Chocolate ganache for a cake with drips. How to make chocolate smudges on a cake
Hello everyone. Today there will be the most burning topic - how to make beautiful smudges on a chocolate cake. This is the most popular request to my direct, everyone who was waiting - catch the article.
Chocolate stains... This is, perhaps, the most common mistake among beginners (unfortunately, not only beginners suffer from this, very often I meet work and more experienced colleagues with ugly streaks). How to find that line so that the smudges do not run down in puddles on the substrate and at the same time do not lie in thick waves on the top? Today I will reveal the secret of my chocolate drips.
I will describe not so much the recipe as the technology itself. Here it is important to understand the very essence of the process in which the drip will sexually drain on the cake, reaching its middle.
There are many recipes on the Internet on how to make chocolate drips for decorating a cake. And you will be surprised, but almost all of them are working!
At one time I tried ganache for drips both in butter and in cream with the addition of butter... And today I will tell you the most elementary recipe drips from chocolate with cream, but not with 33% fat, but with the usual 10%. Yes Yes! Even with this kind of cream, smudges can be made beautiful. There are many myths that chocolate curdles in such cream. No no and one more time no! The fat content of the cream has nothing to do with it, smudges can be done with baked milk 4%. This is a matter of practice.
Today I will prepare drips for a dark chocolate cake, but, as you understand, black, milk, and even white chocolate can be used. The proportions, respectively, will be slightly different. Each chocolate will have its own gramme! I never weigh, I measure everything by eye.
In this article, I will teach you to understand what needs to be done in different situations... And in the future, you yourself will experiment and everyone will find for themselves the most comfortable proportion for themselves.
So, how to make drips for a sponge cake made of chocolate and cream 10% at home recipe with photos step by step.
Ingredients:
- dark chocolate - 50 grams
- cream 10% - 40 grams
Preparation:
First, I'll write about the preparation. The cake should be as cold as possible, which means that in the refrigerator it should stand flat for at least 1-2 hours, and preferably all 4. If you recently covered it with a finishing layer of cream, you can send the cake to freezer for 30 minutes to speed up the process. It is because of the difference in temperature, cold cake- warm chocolate ganache, and you get good smudges.
What kind of cream can you make chocolate smudges on? Yes, almost any! For us, the main condition is an even and chilled surface. I make smudges on creams like -, ganache, Swiss oil meringue(all creams are available on the links). Leaks on these creams fall without problems. Even on mousse cake you can make smudges, as in my version with
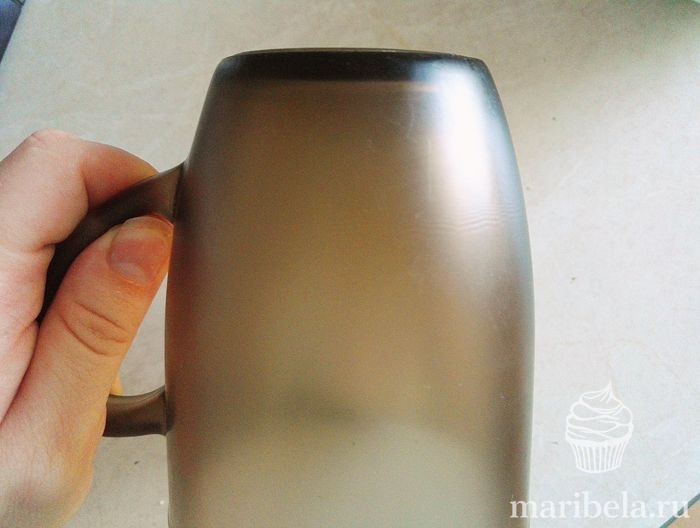
Before you start making ganache, take a clean glass glass and put it in the refrigerator to cool, then you will understand why we need it.
Getting started cooking chocolate coating for the cake.
Break the chocolate into pieces and fill it with cream (I have the cream from the fridge, the temperature is not important here).

Let's send our bowl to the microwave for 30 seconds. We don't have to wait for all the chocolate to melt! This can overheat it. The chocolate should slowly dissipate from the warmth of the cream.
So, they warmed up for 30 seconds. We take out and mix. At first, our mass will clump, we confidently interfere.

The chocolate will slowly dissolve in the cream.

If there are pieces of unmelted chocolate left, then send the bowl to the microwave for 10 seconds, no more! It is possible to heat for a long time only for the first time, then we heat only impulsively for 10-15 seconds, otherwise the chocolate will curdle.
So, warmed up. We take it out and knead it thoroughly again. You should get an emulsion without lumps and bubbles! Ganache should drain from the spoon with a ribbon, if it barely drips from the spoon, then the mass is too thick, you need to add more cream, literally half a teaspoon, do not add a lot at once. We mix everything and wait for the moment until the ganache flows from the spoon.
Is it flowing down? Fine. We take a glass out of the refrigerator and check our drips on it.

If the drip reaches the bottom of the glass, then the mass is liquid, you need to add more chocolate. Literally a slice, added - mixed. If necessary, warmed up in the microwave for 10 seconds.
Let's try again. Has the drip stopped in the middle of the glass? Fine.

We take out the cake. We choose the ugliest side (of course, you should try to make the cakes perfectly even, but anything can happen). In this cake, the top coat is ganache, I experimented with a new recipe, and as you can see, the experiment has not yet been successful. Let's start the first drip, for this I choose a small spoon, you can also drip from a disposable bag. But this is more convenient for me. It is more difficult to control the length of the smudge with a sack, but with a spoon, you can add drop by drop exactly where you want.
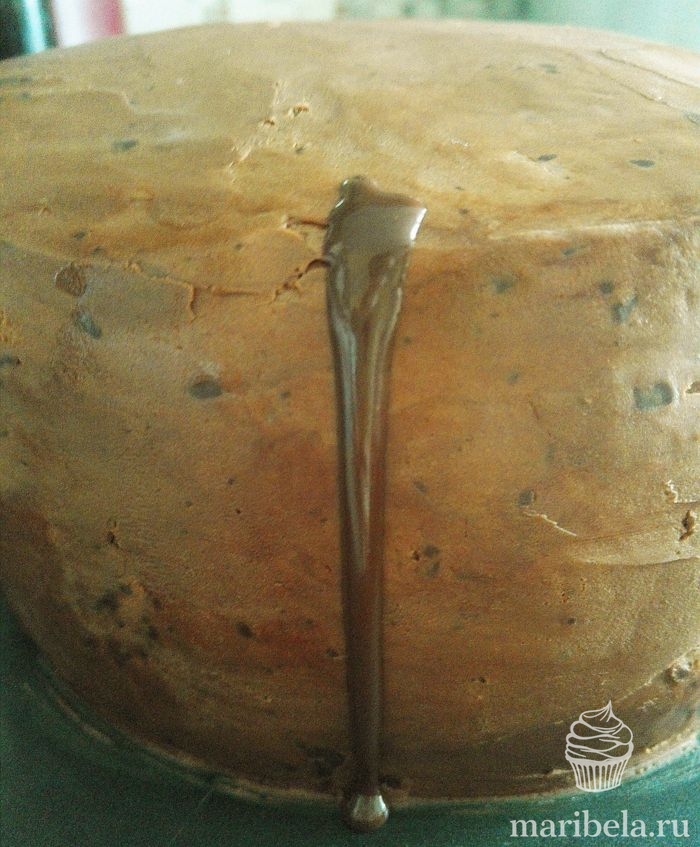
Let's start our smudge and watch. So, if the smudge has reached the substrate, then either the temperature of the ganache itself is high (we try, it should not be hot in the hand), the operating temperature is 27-30 degrees, or the ganache is liquid, then we add a little chocolate again. Melt and mix.

Let's try again.

Is the stream frozen almost at the top? So the glaze is thick - add cream drop by drop, knead.

Let's start flowing again. Reached the middle? Fine! Feel free to water the whole cake. In the picture, I specifically gave an example of 3 smudges. The first one is too long - the ganache is liquid, the second is too "greasy" smudge of thick ganache, and the third is normal.
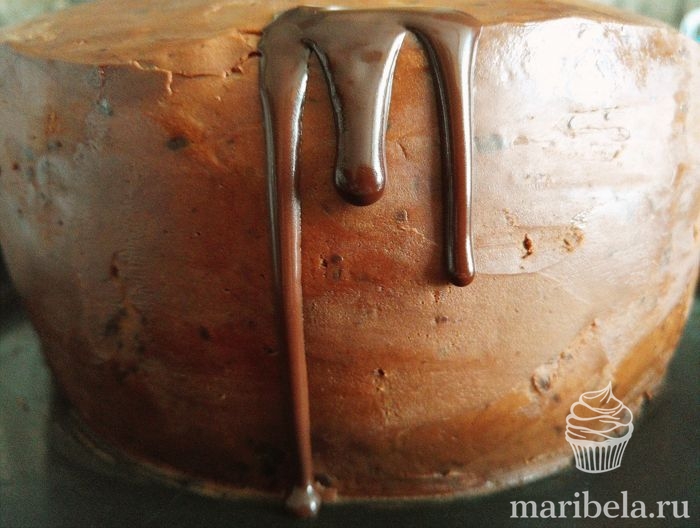
I first make the smudges, go through the entire edge of the cake with a spoon, and then pour over the top if required.

If, as you drip, your glaze thickens, put the bowl in the microwave to warm up, literally for 5-10 seconds and continue.
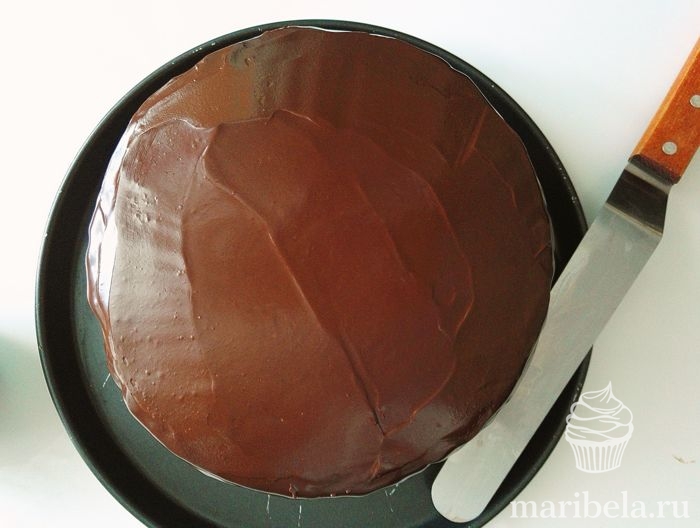
How to evenly pour the top of the cake with chocolate icing? Very simple. Pour the glaze in the center, take the spatula, warm it up under hot water, wipe off the water and level the surface, while turning the turntable (at the moment, I work in the field and there is no table at hand, this is why my cake is not evenly covered with cream)

That's all! The surface of the cake is completely ready to decorate.
From above, the cake can be decorated with whatever you want. From banal sweets to mastic figures, as you know, mastic does not flow on chocolate.
The perfect drips of chocolate on the cake are ready.

I hope you now have a clear understanding of the process. Dripping is not difficult at all! With experience, you will measure everything by eye. Literally one trial lesson and chocolate smudges will obey you.
What I want to add, there is no need to make a palisade of drips, it looks beautiful when drips of different lengths: one is slightly shorter, the other is slightly longer. Their length can be adjusted with a spoon, letting in somewhere a little more chocolate, somewhere on the contrary less. Well, in my opinion, one or two drips from the chocolate flowing down to the substrate is still acceptable, but when half of it flows down in puddles, it does not look very aesthetically pleasing.
I will publish the recipe for the cake itself one of these days - do not miss it.

Enjoy your meal.
Appetizing drips of chocolate and other tasty "materials" are a very popular option for decorating cakes. It looks very unusual and original on the dessert. If you wish, you will be able to make a cake with smudges at home yourself.
You can also make icing for decorating a cake yourself, since purchased options are usually quite expensive. And sometimes they are sold only in specialized stores for confectioners.
Classic chocolate icing
The classic drip frosting recipe requires the selection of very high quality chocolate. It is desirable that it be bitter with a cocoa content above 50%.
Ingredients:
- chocolate - 90-100 g;
- butter fat - 40 g.
- Heat the cream, but do not bring it to the boil. Optimum temperature- 70 degrees. Take off milk product from the stove.
- Add finely crushed chocolate to the cream. Stir until smooth.
- Add pieces of fat.
After the next stirring, you can immediately use the mass to decorate the cake.
White chocolate
This recipe completely repeats the classic one. Only the glaze is made from white chocolate.
Ingredients:
- white chocolate - 90 - 100 g;
- cream (intended for whipping) - 70-80 ml;
- butter fat - 40 g.
- Add to the cream warmed up to 70 degrees small pieces white chocolate.
- Stir the mixture with a spatula until the chocolate chips are completely dissolved.
- Add butter. Mix everything again.
This recipe will allow you to create snow-white smudges on the chocolate cake.
Colored icing for smudges on the cake
The colorful color design of the cake will attract the attention of both adults and little sweet tooth. It is most relevant to serve such desserts for children's holidays.
Ingredients:
- sunflower oil - 20 ml;
- white chocolate - 70 g;
- any food coloring- according to the instructions on the package.
Preparation:
- Melt the chocolate in any way you want. It is convenient to do this both in a water bath and in the microwave. The melting bowl must be dry.
- Pour in refined oil odorless into an already liquid mass.
- Add dye. Navigate in the right amount the instructions on the packaging of this ingredient will help. You can use a dye of one or more colors, after dividing the white mass into parts.
- Mix everything well.
Decorate the cake with colored smudges from the resulting mixture.
Master class on how to pour icing on a cake
Every experienced pastry chef knows how to make chocolate smudges on a cake right. There are several professional secrets for this:
- Before decorating the dessert, be sure to cool it well. But the glaze, on the contrary, is used warm.
- First you need to pour the mass for future smudges on the edges of the cake. Then - fill in the center and, finally, level everything with a special spatula.
- It is very important to strictly follow the chosen recipe so that the glaze gets the right consistency. Otherwise, too thick mass will turn into too "pot-bellied" stripes on the treat, and too liquid will drain onto the plate, forming unappetizing puddles.
- The frosting should not be too hot. It is best to check the temperature directly with a clean finger before applying. The mass should not burn the skin.

Experienced confectioners suggest that it is convenient to check the temperature of the glaze with a cold cup. On its walls, you can experiment with the flow rate of the mass and understand how it will behave on the cake.
Cake with drips and fruits
Such a delicacy is often prepared for a wedding celebration. But it will fit festive table and for any other reason.
Ingredients:
- chocolate biscuit cake- 2 pcs.;
- fruit syrup - 80-100 ml;
- granulated sugar - 130-150 g;
- fat cream - 180-200 ml;
- peaches - 3 pcs.;
- yogurt with fruity taste- 330-350 ml;
- gelatin - 23-35 g;
- butter fat - 60 g;
- nectarine - 1 pc .;
- dark chocolate - 80-100 g;
- raspberries and blackberries - 40 g each

Preparation:
- Pour gelatin with syrup. Let it swell.
- Chop two peaches without peel into small cubes.
- Heat the mixture from the first step until dissolved. Do not boil! Strain.
- Beat the cream with sand until you get it. thick cream.
- Pour yogurt, liquid gelatin into it, add peach pieces. To mix everything.
- Smear the cakes with the resulting mass. Lay on top of each other.
- Smooth the surface with a spatula.
- Melt the chocolate and butter on steam bath... Cool the glaze slightly.
- Pour chocolate mass around the edges. Use a spatula to push it further and further so that large drops flow beautifully on the sides of the cake.
- Then fill and level the middle.
- Send dessert to the refrigerator. Before serving, arrange with slices of peach, nectarine and whole berries.
You can complement the cake decoration with smudges and fruits, and a few fresh mint leaves.
Dessert with sweets
The basis of the dessert according to this recipe can be any. The main thing in it is an unusual appetizing design. 
Ingredients:
- vanilla cakes - 2 pcs.;
- canned pineapples - 250-300 g;
- granulated sugar - 130-150 g;
- cream - half a liter;
- sour cream - a full glass;
- any candy, wafer rolls, biscuits - to decorate the dessert;
- dark glaze for smudges.
Preparation:
- Pour the cream into a deep bowl. Add sour cream, sugar. Whisk the ingredients together until fluffy.
- Drain the syrup from the fruit (leave it to soak). Cut them into small pieces.
- Saturate the cakes with pineapple syrup. Smear with cream.
- Sprinkle small pieces of pineapple between the cakes.
- Send the workpiece to the cold for two hours.
- Pour warm icing on top. "Push" drops on the sides down with a small wooden spatula. In the same way, go around the whole cake.
- Smooth the middle with glaze with a spatula.
- Let the smudges freeze in the cool.
"Ladies' whim" with smudges
To decorate such a cake, you can use icing of any color you like, for example, blue or pink.
Ingredients:
- sugar - a full glass;
- poppy - a full glass;
- eggs - 5 pcs.;
- flour - 1.5-2 tbsp.;
- baking powder - 8-10 g;
- sour cream - 380-400 g;
- cocoa - 3-3.5 tbsp. l .;
- hazelnuts - 180-200 g;
- dried cranberries - 1 full glass;
- condensed milk "boiled" - 1 can;
- butter - 380-400 g;
- glaze for smudges of any color.
Preparation:
- Roast the nuts in a dry frying pan. Peel off. Divide several pieces into halves and set aside for decoration. Turn the rest of the nuts into large crumbs.
- Beat eggs (raw) with sugar until frothy.
- Without stopping the "kitchen assistant", add sour cream, flour, baking powder.
- Divide the dough into three approximately equal parts. Add to them, respectively, cranberries, poppy seeds and cocoa. The result is three different masses.
- Bake three cakes out of them. Cook every 17-20 minutes in the oven at 180 degrees.
- Kill the condensed milk with butter until fluffy. Add chopped hazelnuts.
- Collect the cake, thickly smearing the cakes with cream and stacking on top of each other.
- After the cakes have cooled completely, decorate the upper part with warm glaze of any color, creating neat smudges from it.
Decorate the resulting cake on top with the whole nuts left.
Original cake "Zucotto"
The main uniqueness of such a dessert is its shape. The cake turns out to be round and, as it were, filled with a delicious sweet filling.
Ingredients:
- chocolate cakes (wide) - 3 pcs.;
- almonds - 40 g;
- cream (very fat) - 280-300 ml;
- powdered sugar - 90-100 g;
- cherries (fresh or frozen) - 280-300 g;
- white chocolate icing for smudges.
Preparation:
- Leave one wide round cake intact. From the second, cut a circle about 1/3 less. Place the latter in a tall salad bowl.
- Lay out the cuttings and the remaining cake in such a way that the walls of the container are filled. You should get a "bowl" of biscuit.
- Beat the cream with powder until a thick cream. Add shredded chocolate and chopped nuts.
- Pour in pieces of fresh or defrosted pitted berries.
- Mix everything and put in the resulting "bowl".
- Close the structure with the left round cake.
- Cover the surface of the cake with plastic wrap. Leave in the cold overnight.
- In the morning, turn the workpiece onto a flat plate.
- Pour chocolate on the cake, or rather white icing, forming neat smudges.
Decorate the dessert to your liking, for example with fresh whole cherries or other berries.
If the drip frosting has been prepared correctly, it will not melt when room temperature... Therefore, the cake can be safely served to guests at the table, even in a warm room.
4 RECIPES FOR COLORED GLAZE FOR SMOOTHS ON CAKE 1. Glaze sugar - 100 g glucose syrup - 100 g water - 50 g condensed milk - 70 g gelatin - 8 g white chocolate (milk or dark chocolate with a cocoa content not higher than 56%) - 100 g food coloring Preparation 1. Soak sheet gelatin (8 g) in a bowl with big amount very cold water for 5-10 minutes. Advice. If you use powdered, not sheet gelatin, then 8 g of powdered gelatin should be poured into 48 g of water and left to swell for 40-60 minutes. 2. Place chopped white chocolate (100 g) and condensed milk (70 g) in a bowl or tall plastic measuring cup. Set aside. 3. Pour sugar (100 g) into a small saucepan or saucepan, add glucose syrup (100 g) and pour water (50 g). 4. Bring water with sugar and glucose to a boil and cook to 103 ° C (if there is no thermometer, let the syrup boil for about 2 minutes). Pour hot syrup over chocolate with condensed milk and leave for 2 minutes. 5. Add squeezed sheet (or swollen powder) gelatin to the chocolate. 6. Add food coloring. Advice. You can use powder or gel food coloring to make the glaze. If the dye is gel or powder (fat-soluble), then add it to the glaze before punching it with a blender. Powdered fat-soluble dyes color the glaze in brighter colors (compared to other dyes). If the glaze is water-soluble, add it to the syrup. For glaze white- add white dye(titanium dioxide), because glaze without the addition of dye will have a yellowish milky tint and will not turn out to be pure white. 7. Punch the glaze with a hand blender, being careful not to create bubbles in the glaze. Advice. We punch the icing with a blender, transforming the chocolate with the rest of the ingredients into a homogeneous emulsion, which makes the icing smoother and shinier. But there are subtleties here that need to be taken into account. Fresh, freshly cooked glaze tends to form a large number bubbles that form when the blender is in the wrong position. Therefore, gently immerse the blender in the icing, at an angle of 45 ° C. The blender should be completely immersed in the icing, but not at the bottom of the measuring glass, but close to the surface. It is necessary to try to find such a position of the blender, when, in the process of punching, a pattern in the form of a triangle is formed on the surface of the glaze, it can be called in another way - a kind of small funnel that sucks in the air that enters and the rare air bubbles... Also, listen to the sound that the blender makes - over time, you will learn to navigate by sound if the blender is properly immersed in the icing. Punching the frosting at the slowest speed of the blender is also a prerequisite for a bubble-free frosting. eight. Ready glaze tighten cling film so that the film adheres to the surface. 9. Put in the refrigerator for 12-24 hours to stabilize - during this time it will thicken and when pressing on the surface of the thickened glaze, some resistance should be felt, ie. the glaze should not be liquid, but elastic. Before coating, the glaze must be brought to an operating temperature of 30-35 ° C by heating it in the microwave or in a water bath. We check the temperature with a culinary thermometer. Glaze is applied to a completely frozen product (cake). 2. Milk-based Ingredients: Powdered sugar (no slide) - 4 tbsp. l. Flour (no slide) - 4 tsp. White chocolate - 4 tbsp. l. Milk - 4 tbsp. l. Butter - 50 g Food coloring of the desired color. Preparation: 1) Stir dry ingredients (flour, icing sugar), sift. 2) Put milk and butter on the stove until the butter dissolves, then add chocolate and stir. 3) Gradually add to milk with butter and chocolate flour mixture and mix everything very quickly and intensively so that there are no lumps. 4) At this stage, add the dye and, on a not very high heat, bring to a gloss, remove from heat and stir constantly until it cools, about 28-30 C, then pour over the cold (!) Cake and gently smooth with a spatula until streaks form. 3. Cream-based Ingredients: 40 g cream, 33% fat 70-90 g chocolate, white or milk 40 g butter Preparation: 1) Pour the cream into a saucepan, place on the stove and heat, but do not bring to a boil. Remove from stove. 2) If you want to add colored smudges to the cake, it's time to add gel food coloring to the cream. 3) Add chocolate to hot cream or chocolate icing... Stir with a whisk until the chocolate is completely dissolved. 4) Add butter. Stir with a whisk until smooth. 5) Cool the glaze to 27-35 degrees. In consistency, it will become stringy. Our frosting is ready to be applied to the cake. 6) Apply the icing to the cold cake, pre-lined with cream. The cream can be anything - butter, ganache, cream with mascarpone. 7) Spoon the icing onto the top of the cake. Smooth with a pastry spatula. 4. Perfect glaze for smudges! We will need: - chocolate - cream (20% - 33% fat. Keep in mind that the thickness of the glaze will depend on the fat content of the cream. It is important to find the consistency that suits you best and with which it is most convenient for you to work) Mix chocolate and cream in a 50/50 ratio. Melt in microwave oven or in a water bath. If you melt in the microwave, place the bowl of chocolate and cream in the oven on impulse for 30 seconds, stirring well each time. After melting, you can add food coloring. Apply frosting to the cake, creating drips. Remember! Your cake needs to be very well chilled for the smudges to freeze. 5. On gelatine Beautiful, tasty and easy-to-prepare glaze! Ingredients: 100 g of white chocolate 75 g of condensed milk 30 g of butter a pinch of salt 4 g of gelatin 2 tablespoons of water 30 g of heavy cream Preparation: 1. Soak the gelatin in water. 2. But in a water bath mix chocolate, condensed milk, butter and salt. Mix until the chocolate is completely dissolved. 3. Remove from the bath, add cream and diluted gelatin. 4. To obtain color, add white dye and any color. 5. Cool to room temperature and apply to pre-lined and frozen cake. Ready! Photo by iriska_sweets
Cakes drizzled with chocolate always look very appetizing, and their taste is worthy highest praises... To pour chocolate on the cake correctly, as professional cooks do, it is better to use pastry bag... But if you are missing special devices, you can pour the cake with white or dark chocolate, previously melted in the microwave or in a water bath, using a regular gravy boat.
Chocolate-covered cake recipe (with photo)
For the test: 3 eggs, 3 tablespoons water, 200 g sugar, 1 sachet vanilla sugar, 2 tablespoons flour, 2 tablespoons starch, 1 tablespoon cocoa, 100 g seedless raisins, 1 tablespoon margarine, baking soda and salt on the tip of a knife.
For glaze: 100 g of chocolate, 3 tablespoons of milk, 1 tablespoon of butter.
For decoration: 100 g halved kernels walnuts.
Cooking method:
Rinse and dry the raisins. Separate the yolks from the proteins, mix with salt and vanilla sugar, then gradually adding hot water, beat in strong foam... Add whites, whipped with sugar, sifted flour with starch, cocoa, soda and raisins, knead into a homogeneous dough. Put it in a mold greased with margarine, bake in a preheated oven for 20-25 minutes. To prepare the glaze, melt the chocolate in hot milk, mix well, cool slightly, add softened butter and grind.
Pour the finished chilled cake with chocolate to drain, as shown in the photo, and then decorate it with halves of walnut kernels:
How beautiful to pour the cake with white chocolate

For the test: 150 g butter, 200 g sugar, eggs (5 yolks, 7 whites), 0.5 teaspoon of cinnamon, 1 bag of vanilla sugar, 2 tablespoons of ground wheat rusks, 1 tablespoon of margarine, a pinch of salt.
For the cream: 400 ml cream, 3 tablespoons of powdered sugar, 2 tablespoons of orange juice, 1 tablespoon of gelatin, 100 g of ground walnuts, 1 tablespoon of orange liqueur.
For glaze and decoration: 150 g of white chocolate, 18 halves of walnut kernels, 3 tablespoons of cream, 5 tablespoons of sugar, 3 tablespoons of coconut.
Cooking method:
To prepare sponge cake, poured over with chocolate, whisk the whites with vanilla sugar into a strong foam. Grind the yolks with butter, sugar, cinnamon and salt, add proteins and crackers, mix. Put the resulting dough in a mold greased with margarine, bake the cake in an oven preheated to 180 ° C for 30 minutes, cool, cut lengthwise into 3 parts. Soak gelatin in a little water. Whip the cream with icing sugar, add gelatin, Orange juice and liquor, stir. Grease the cakes with the resulting cream, sprinkle with nuts and lay on top of each other. Melt the chocolate in a water bath, add cream, mix. Pour white chocolate over the cake, sprinkle coconut flakes and decorate it with halved kernels.
How to make a chocolate-covered cake garnished with berries

For the test: 120 g butter, 100 g sugar, 1 bag of vanilla sugar, 3 eggs, 200 g flour, 1 tablespoon of starch, 0.5 bag of baking powder, 1 tablespoon of milk, cinnamon on the tip of a knife.
For the cream: 400 g pitted cherries, canned in own juice, 400 g of cottage cheese, 3 tablespoons of sugar, juice of 1 lemon, 400 ml of cream, 1 tablespoon of gelatin.
For the meringue: 3 proteins, 200 g sugar.
For decoration: 50 g of chocolate.
How to make a chocolate covered cake decorated with berries:
- Beat butter with sugar (50 g), add cinnamon, vanilla sugar and the yolks, beat. Add flour, starch, baking powder and milk.
- Knead a homogeneous dough, put it in a dish lined with baking paper, put in a preheated oven for 20 minutes.
- According to the recipe, the sponge cake base for a cake with berries, drizzled with chocolate, must be removed from the oven, covered with whites, whipped with the remaining sugar, and put back in the oven for 10-12 minutes. Throw the cherries on a sieve, soak the gelatin in a little water.
- Beat cottage cheese with sugar, add lemon juice and gelatin, mix well. Put the prepared mass in the refrigerator for 20 minutes, then add whipped cream and cherries, mix.
- To prepare the meringue, mix the whites with the sugar, beat until firm, and place in small portions on a baking sheet lined with baking paper.
- Bake a cake sponge cake drizzled with chocolate with berries in an oven preheated to 140 ° C until tender.
- Cut the biscuit cake lengthwise into 2 parts, grease them with cream and put on top of each other. Put the meringue on top and pour over the chocolate melted in a water bath.
Chocolate-covered fruit cake recipe

For the test: 6 eggs, 6 tablespoons of sugar, 6 tablespoons of flour, 2 tablespoons of cocoa.
For the cream: 6 tablespoons of flour, 500 ml of milk, 300 g of sugar, 250 g of butter.
For syrup: 200 ml of water, 200 g of sugar.
For glaze and decoration: 100 g chocolate, 6 tablespoons of sugar, 6 tablespoons of water, candied fruit.
Cooking method:
To make a cake with fruits covered with chocolate, according to this recipe, from eggs, sugar, flour and cocoa, you need to knead a homogeneous dough, pour on a baking sheet lined with baking paper. Bake in a preheated oven for 20 minutes. Ready cake chill and cut lengthwise into 2 pieces. To prepare the syrup, bring water to a boil, add sugar and cook over low heat until it is completely dissolved. To prepare the cream, mix flour with milk, bring to a boil over low heat, remove from heat and cool. Add softened butter, whipped with sugar, mix. Put one cake on flat dish soak in syrup. Put half of the cream on it, cover with the second cake layer, put the remaining cream on it and smooth. To prepare the glaze, melt the chocolate in a water bath, add sugar and water and mix well. Pour chocolate over the cake, garnish with candied fruit and refrigerate for 1 hour.
How beautiful it is to pour chocolate on the cake to get smudges (with video)

For biscuit: 5 eggs, 200 g sugar, 1 teaspoon of baking soda, slaked vinegar, 2 tablespoons of cocoa, 200 g flour.
For filling: 200 g of sugar, 200 g of sour cream, 50 g of candied fruits, 50 g of shelled walnuts.
For glaze: 3 tablespoons of milk powder, 2 tablespoons of cocoa, 1 tablespoon of butter, 1 tablespoon of water, 1 teaspoon of vodka.
Cooking method:
Beat eggs with sugar and soda, add cocoa and flour. Knead the dough well, put in a dish lined with baking paper, put in an oven preheated to 200-220 ° C. Bake the cake until tender, cool, carefully cut off the top with a sharp knife and remove the crumb. Beat sour cream with sugar, add chopped crumb, finely chopped candied fruits and nuts, mix. Put the resulting filling in a cake layer, cover with the cut top. Mix powdered milk, cocoa and butter, add water, bring to a boil and remove from heat. Cool slightly, add vodka, stir and coat generously with the resulting frosting, so that it comes out with chocolate smudges.
Here you can watch a video on how to pour chocolate drizzled over a cake:
Brownie chocolate cake

- 70 g flour
- 3 eggs,
- 200 g sugar
- 200 g butter
- 100 g mascarpone or creamy curd mass,
- 100 g dark chocolate
- 30 g cocoa,
- 1 tsp vanilla sugar
- ¼ h. L. salt
For glaze:
- 100 g,
- 35 g butter
- 100 ml heavy cream
- 2 tbsp. l. icing sugar
For the dough, cut the chocolate with a knife and place in a large bowl. Add melted butter, whisk until smooth. Add sugar, vanilla sugar, salt and stir. Add sifted cocoa, mix. Add eggs one at a time, stirring the dough each time. Add mascarpone cheese and mix thoroughly. Then add flour, knead the dough until smooth. Put the dough in the prepared form, bake for 35–40 minutes in the oven preheated to 170–180 ° C. The main thing is not to overdry the cake; it should remain slightly damp. Remove the finished cake from the oven, cool. For the glaze, pour the cream into a saucepan, add the icing sugar, stirring, bring the cream to a boil, but do not boil, and remove from heat. Add chopped chocolate and mix thoroughly for 2-3 minutes. Add butter, stir until smooth. Thick glaze put on a biscuit, smooth with a spoon or spatula. Place the brownie in the refrigerator for 2–4 hours, preferably overnight.
Look at the photo of how to pour chocolate on a cake at home:

Cake "Ladies' whim": a recipe with step by step photos

For the test:
- 4 egg yolks
- 100 g sugar
- 250 g creamy margarine,
- 300 g wheat flour
- 75 g sour cream,
- 4 g baking soda(do not extinguish).
For interlayers:
- 100 g butter, 60 g icing sugar;
- 0.5 cans of boiled condensed milk;
- 2 lemons;
- 4 egg whites, 180 g sugar;
- chocolate glaze: 2 tsp cocoa powder, 100 g sugar, 50 ml milk, 1 tsp. butter.
Grind the yolks with sugar, add sour cream, margarine, flour, soda, knead elastic dough... Roll out 5 cakes, bake in the oven at medium temperature. Prepare a separate layer for each cake. For bottom cake grind butter with powdered sugar, grease the next 0.5 cans of boiled condensed milk, cover the third cake with gruel from lemons passed through a meat grinder, spread the fourth with proteins whipped with sugar into a strong foam, the last, fifth cake, cover with glaze. To prepare the glaze, the cocoa powder must be mixed with sugar and milk and brought to a boil over low heat and boiled for 10 minutes. (until the syrup thickens), then cool slightly and add a teaspoon of oil.
Below are the step by step photos to the cake recipe " Lady's whim»:


How else is it beautiful to pour chocolate on the cake to get smudges? You can draw patterns on the surface of the cake with the same icing, squeezing it out of the cornet.
Zebra cake recipe with step by step photos

- Curd - 1 kg
- Butter - 300-400 g
- Eggs - 3 pcs.
- Sour cream - 200 g
- Cocoa - 50 g
- Chocolate (black and white) - 50 g each
- Sugar - 300 g
Put the curd in a gauze bag and hang for several hours to glass the whey (or put it under a press). Pass the cottage cheese twice through a meat grinder with a fine grid or rub through a sieve, adding butter in parts. Add to curd mass egg yolks pounded with sugar, thick sour cream... Divide the mass into 2 parts - leave one white, add cocoa powder to the other. Place both pieces in the refrigerator to set for 2-3 hours. Spread the mass on a dish alternately in even layers, giving the cake a round (square, oval) shape.
Here you can see step-by-step photos of the Zebra cake recipe:


Sacher cake: a classic recipe with a photo

- 150 g chocolate
- 150 g each sugar
- flour and butter
- 6 eggs
- 2 tbsp. tablespoons of cream
- 4 tbsp. spoons of warm water
- 2-3 st. tablespoons of apricot jam
For fondant:
- 40 g butter
- 200 g icing sugar
- 50 g cocoa powder
- 3 tbsp. spoons of milk
Melt the chocolate with warm water.
Grind the softened butter with sugar.
To the resulting fluffy mass, add melted chocolate (or cocoa) in small portions and 1 egg each, constantly grinding the mixture.
At the end, pour in the cream, add the flour and add the cool whipped egg whites. Mix carefully. Grease the mold well and fill with dough. Bake it for 15-20 minutes.
Let the biscuit stand in the mold for 5-10 minutes.
Then overturn the form, take it out and put it on the wire rack until it cools completely.
Trim the sides of the biscuit and spread (top and sides) with a thin layer of slightly warmed apricot jam.
To prepare the fondant, dilute the cocoa powder with hot milk.
While rubbing, add butter and icing sugar. Heat the mixture and pour over the cake.
The top of the cake can be garnished with whipped cream if desired.
Look at the photo to classic recipe cake "Sacher":


Recipe for "Tsucotto" cake drizzled with chocolate

Ingredients for making the Tsucotto cake:
For biscuit:
- eggs - 5 pcs. (small size)
- wheat flour - 100 g
- sugar - 150 g
- butter - 20 g
For the cream:
- mascarpone (or ricotta) - 300 g
- heavy cream (from 33%) - 250 g
- sugar (or powdered sugar) - 150 g (or according to your taste)
- chocolate - 80 g
- pistachios - 30 g
For impregnation:
- coffee (freshly brewed) - 100 ml
- cognac (rum) - 2 tablespoons (optional)
Additionally for decoration:
icing sugar - 1 tablespoon
cocoa powder - 1 tablespoon
Zucotto cake - step by step recipe with photo:

Chicken eggs, without first dividing into whites and yolks, are sent entirely into a large bowl.
Beat the eggs for 10 minutes at maximum mixer speed until thick and fluffy. Beat the eggs yourself for the first 2-3 minutes, and then gradually add all the sugar. It is very important to beat the eggs thoroughly, since only due to their volume, the biscuit itself will rise. By the way, in order for the eggs to whisk more easily into a strong foam, they should be at room temperature. Therefore, take them out of the refrigerator in advance so that they have time to warm up properly.

We send the butter to the microwave for 30-40 seconds so that it melts, and in the meantime, add the sifted flour to the dough.

Mix the flour into the egg mass very gently with a spatula or a whisk.
Pour melted butter into the resulting dough along the side of the bowl. And also with a spatula or a whisk, gently mix the butter into the dough.

Pour it onto a baking sheet lined with baking paper (by the way, if the paper is not very high quality, then grease it with oil). Using a spatula or pastry spatula, carefully distribute the dough over the entire surface of the baking sheet.
We bake a biscuit for a Zucotto cake for 10-12 minutes at 180 C. We check the readiness of the biscuit with a wooden skewer or light pressure on its surface (if the biscuit is ready, it will "spring").
Separate the finished biscuit from the sides of the baking sheet (for this you need to walk with a knife blade along the sides) and transfer it to the wire rack. Remove the paper from the biscuit and leave to cool completely.

In the meantime, let's prepare the cream for the Zucotto cake. Finely chop pistachios and 30 g of chocolate with a knife or chop in a food processor.
Pour heavy cream into a container with high sides(so the cream does not splatter everything around) and beat until firm peaks.
Combine mascarpone or ricotta with fine granulated sugar or powdered sugar and beat for a few minutes.
V cheese mass add cream in small portions.
And gently mix the cream with a spatula.
Transfer a third of the cream to a separate container and set it aside for now. Add chopped pistachios and chocolate to the rest of the cream. We mix.
Gently melt the remaining 50 g of chocolate in the microwave, let it cool slightly (a couple of minutes will be quite enough) and add to the deferred third of the cream. We mix.
For impregnation we brew strong coffee, let it cool down and after that we pour cognac or rum into it. Optionally, the coffee can be slightly sweetened.

Let's start assembling the Tsucotto cake. The cooled biscuit is first cut lengthwise into 2 parts, and after that we cut each part into triangles
Cut the biscuit. Cover a salad bowl with a volume of about 3 liters with cling film. Pressing tightly together, put the pieces of biscuit in a salad bowl.
Soak the resulting biscuit basket well with a mixture of coffee and cognac.
We fill the biscuit basket with pistachio cream and chocolate chips... Make a small indentation in the center of the cream.

Fill the resulting depression with chocolate cream.
Soak the remaining biscuit slices with a mixture of coffee and alcohol on one side and lay them on top of the cream with the soaked side down.
Cover the top of the Tsucotto cake with a foil and send it to the refrigerator for 5-6 hours or overnight. Before serving, the cake must be cooled well, otherwise it will be very difficult to carefully cut it into portioned pieces.
We take out the chilled Zucotto cake, poured with chocolate, from the refrigerator, transfer it to a dish and remove the foil.
Before serving, sprinkle the cake with icing sugar and cocoa powder.
Recipe for chocolate cake "One, two, three"

Ingredients:
Biscuit:
- Wheat flour - 250 g
- Sugar - 300 g
- Cocoa powder - 55 g
- Salt - 1 tsp
- Soda - 1.5 tsp
- Baking powder - 1.5 tsp
- Chicken egg - 2 pcs.
- Milk - 280 ml
- Butter - 60 g
- Vegetable oil - 60 g
- Vinegar 6% - 1 tbsp
Impregnation:
- Boiled water - 50 ml
- Sugar - 50 g
- Cocoa powder - 10 g
Glaze:
- Sour cream - 1 tablespoon
- Sugar - 1 tablespoon
- Cocoa powder - 1 tablespoon
- Butter - 1 tablespoon
- - 50 g
Cooking process:
The biscuit can be baked in a slow cooker or oven. Any favorite cream is suitable for the interlayer, you can simply pour it over with chocolate icing.
First, add sifted flour, sugar, cocoa, baking soda, salt, baking powder to a deep bowl. Stir dry ingredients. Add eggs, vegetable oil, milk, melted butter and vinegar. Beat thoroughly with a mixer, you should get a smooth shiny dough.
Grease a bowl of a multicooker with butter, put a circle of baking paper on the bottom. Lay out the dough. Bake the future chocolate cake"At one, two, three" on the "bake" mode 60 minutes. Or in the oven at 180 degrees for 50-60 minutes.
After baking, immediately remove the biscuit from the mold. It is advisable, when the biscuit has cooled, wrap it in plastic for a couple of hours.
Prepare impregnation or cream, layer the cakes. Top with glaze. For the glaze, mix all the ingredients, boil until smooth, do not boil. The "One, two, three" chocolate cake prepared according to this recipe is ready.
Here is a selection of photos for recipes for cakes poured with chocolate:


What kind of "beast" is this - "ganache"? Let's figure out with you today what it is, how to cook and, in general, everything connected with it :)
The word came to us, like many "tasty" words, from France, of course. Ganache is an emulsion (if you can call it that) of chocolate, cream and butter. Butter is not always added, and you can make ganache with any chocolate - from white to dark. The scope of its application in the confectionery craft is so wide that it is impossible not to fall in love with it! From it you can make the very (so fashionable now) smudges on cakes, make a wonderful chocolate cream for cakes and cupcakes. It is also very convenient for them to line the cake and make the filling for pasta or profiteroles. In general, it's just incredibly tasty and practical.
But the fact is that the cooking technique and proportions will differ depending on what purpose you will use it for and what kind of chocolate you are going to make.
As for the proportions, I will say for sure: no one forbids you to experiment and choose the most correct ratio of ingredients for yourself. After all, everything is individual, and what one likes does not have to be to the liking of another. Especially when it comes to food, anyone.
In order to prepare ganache, you need to remember the standard ratios. However, I myself do not always adhere to them, since every time I just choose a more suitable option for myself. It all depends on what I'm going to do with the finished ganache.
The ratio is (in the chocolate / cream / butter sequence):
- on dark chocolate- 1/2 / 10-50% of the weight of the chocolate;
- on milk chocolate- 3/2 / 10-50% of the weight of the chocolate;
- on white chocolate - 2/1 / 10-50% of the weight of the chocolate.
Oil is not always added, but if, for example, you are going to make smudges, then you need it. Anyway, it is added to make the mass shine and more pliable to work. Try it and choose for yourself what you like best.
For example, dark chocolate: we take 100 grams of chocolate and 200 grams of cream, and, accordingly, 10-50 grams of butter. Cream must be from 33% fat, and butter - 82.5%. The oil should be very good, of high quality, and not cheap. Otherwise it will spoil you final result both in terms of consistency and in terms of taste.
Here's a basic way to make ganache:
- Bring the cream to a boil over a fire, remove from the stove, add chopped chocolate, stir until smooth. Then (if desired) add finely chopped butter. Mix thoroughly until smooth.
If you rely on my experience, then, for example, in order to align the sides of the cake or to make a layer for it, or a cap on cupcakes, I take a ratio of 1: 2, this consistency is ideal, in my opinion. Of course, the cream must be cold.
Further, if you are going to make a cream for a layer or leveling, you need to let the ganache cool at room temperature and, covered with cling film "in contact" (this means that the film should touch the surface of the ganache), put it in the refrigerator for several hours. Remove from the refrigerator after the specified time and begin to beat with a mixer, as regular cream... In time, everything is the same, do not over-beat. Everything, the cream can be used.
If you are going to make smudges, then just let the ganache cool down at room temperature and get to work.
As for the smudges on the cake, here I sometimes deviate from the generally accepted rules. I often make icing based on the following proportions (but this is mainly for homemade cakes, not to order) - 100 grams of chocolate + 70 grams of butter. I melt the chocolate in short pulses of 15 seconds in the microwave. Each time I stir the chocolate, as outwardly it may seem that it is still strong, as it keeps its shape, but as soon as you start stirring it, it melts. So don't get fooled by appearance, always stir chocolate. It is very easy to overheat it and then it will curl up.
Further, when the chocolate is ready (on average, it takes about 50 seconds, if it is one chocolate bar), add small pieces of butter and mix thoroughly. At first it will seem that nothing is working, but gradually the oil will begin to melt. If the oil is too cold, then you can put the mass in the microwave, but literally for a few seconds! And you continue to interfere.
When the mass becomes completely homogeneous and smooth, shiny, the glaze is ready. We add butter so that the surface of the cake shines beautifully and the chocolate does not harden too much. Since it will be impossible to cut it and no less unpleasant to eat it.
Now another important point- the glaze must be allowed to cool slightly. Here, too, only practice will help you, since only in this way will you learn to determine by eye the desired consistency... All the nuances are important here: how cold is the cake itself, what is the temperature in the working room, what is the consistency of the icing and in what way do you cover the cake.
If you pour the glaze as soon as you cook it, you get the following: since it is still too liquid, the glaze will rapidly flow down the cream, without having time to harden and set. Accordingly, you will get transparent smudges, under which the cream will be visible, and which will collect in a puddle at the base of the cake. There is nothing beautiful about it. Again, if you "miss" the right moment, then it will harden too quickly, and instead of smudges, you will get a dense chocolate hat, which you will simply start to smear. If you see that the consistency is too thick, then just put it in the microwave for a few seconds. But do not overdo it, otherwise the mass will exfoliate and the glaze can be sent to the trash bin, or allowed to harden and eat)))
Someone prefers to pour the icing into the middle of the cake and then, gently moving the icing, makes smudges. But this method is only suitable for those who have already gotten their hands on a little. Because otherwise, you should not expect that the glaze will spill beautifully around the edges, from the fact that you just poured it into the center)) The most easy way for beginners, do the following:
gently scoop a small amount of frosting onto a silicone spatula or tablespoon. In this case, the glaze should not be completely liquid, but it should not cool down enough to thicken too much. It is necessary that it slowly drain off the spatula or spoon. Pour close to the edge of the cake and use a spoon to help the icing flow down the side of the cake. Do this in small areas, otherwise it won't work.
Those with a full hand also use pastry syringes and act a little differently. You've probably seen how pastry chefs do this, moving the syringe along the edge of the cake, and, at the same time, grabbing small areas.
These are so complex and at the same time simple recommendations... Hope I helped you with this detailed article by sharing my observations and skills with you. Good luck to everyone who loves to pamper their pets delicious sweets!) Leave all questions under this article.
Read also ...
- Chicken liver pate
- Delicious zucchini with cheese in sour cream in the oven - a step by step recipe with video Zucchini recipes in the oven with sour cream
- Banana rice and corn flour pancakes (gluten free) with homemade banana sauce Banana pancakes with semolina
- Cabbage casserole with chicken Chicken fillet casserole with cabbage


