New Year's gifts and toys made of salt dough. New works using the material "Salted dough", on the topic "New Year
Master class with step by step photo"New Year's gifts" in the technique of modeling from salt dough.
Author: Galanova Daria, 9 years old student of MBU DO DDiU association " Salty fantasies»MillerovoTeacher: Nazarova Tatiana Nikolaevna, teacher additional education MBU DO DDiU Millerovo

The master class is very simple in complexity, perhaps it will be useful for kindergarten teachers of seniors and preparatory groups... In this case, you can pre-cut the blanks of snowmen and mittens from the dough. Dry them, and in the classroom, invite the children to make the rest of the moldings. The master class will also be interesting
everyone who loves to sculpt from salt dough. Make gifts for friends and loved ones. And also for teachers of additional education, primary school teachers, teachers of extended day groups.
Purpose: New Year gifts.
Target: creating New Year's gifts using the technique of molding from salt dough.
Tasks:
Educational: master the technique of making gifts from salt dough;
Developing: develop accuracy in modeling, artistic thinking;
Educational: encourage the desire to give new Year gifts made with my own hands;

Required material:
Paper napkin, stack, a glass of water, "Extra" salt, flour top grade, cutting for dough "snowman" 10.5 x 6 cm, photo frame, colored paper, floral mesh "snow", "small mitten" 5 x 2.5 cm cocktail tube, ballpoint pen without paste, rolling pin, pencil.
Salty dough recipe:
Combine 1 cup flour and 0.5 cups salt. Stir, make a hole. Gradually pour in 1 glass in a thin stream cold water... Knead tight elastic dough... Store the dough in a plastic bag.
Snow recipe
In a small saucepan, combine 2 tablespoons of water and 1 teaspoon potato starch... Stir and put on low heat. At the same time, stir constantly. As soon as the mixture becomes transparent, remove it from the stove and immediately add 1 cup of Extra salt. First with a spoon, and as soon as the mixture cools down a little, you can stir it with your hands. The snow is ready. Transfer it to a plastic bag and close it securely. It is important that no air enters the package.
Progress:

Roll out the dough 5-7 mm thick. Use a cookie cutter to cut out the "snowman" and transfer to a paper napkin.

Mark the eyes with a pencil, push your mouth with a stack. With a stack, make a mark for yourself where you glue the snowman's hat.

Form a tortilla out of a small lump of dough. Cut it in half. Moisten the snowman's head with water and glue the hat. We glue all the elements of the composition cold water... Roll up a small, thin flagellum and glue it onto the hat. We sculpt a fur hat. Form a ball from a small lump and glue a bell.

Form a very small carrot and glue the spout to the snowman.

Roll up a thin flagellum and glue a scarf to the snowman.

From small, identical lumps, form two lumps similar to beans and glue the legs.

Using a ballpoint pen without paste, push the buttons down the snowman's center.

From a lump the size of large plum form a gift box and glue the snowman on the hand. It turns out that the snowman is holding a gift in his hands. Glue the gift more tightly so that after the craft dries, it does not fall off.
The snowman is ready, we start sculpting mittens.

Roll out the dough 3-4 mm thick. Cut out two small mittens.

Stack the cuffs on the mittens. Make holes with a cocktail tube.

Blind a very small snowman on one of the mittens.

On the second mitten, glue the Christmas tree and toy balls.
So quickly we blinded mittens.
Place the snowman and mittens on a sunny windowsill. In the air, crafts are dried for about 5-7 days. Although the mittens will of course dry out in a couple of days, since they are not as bulky as a snowman.
The crafts are dry. Paint them with paints, cover with glossy varnishes.
We glue the snowman in a frame, decorate with glitter. Spread a layer of PVA glue under the snowman's legs, put "snow". Tighten it lightly. Once the glue is dry, the "snow" will adhere firmly. Such "snow" can be stored for a couple of days in a plastic bag.
The snowman is ready.
Pass the tape through the mittens. Decorate with glitter
Gifts for the New Year are ready.


Happy New Year!
Alexandra Veselova
Master Class"Christmas toys from salted dough"
Veselova Alexandra Vladimirovna
New Year- a magical time for our children. And preparing for this magic is interesting and exciting. All children adore christmas crafts made by hand. Fiddle with dough is also one of the favorite childhood activities. By combining both, you can decorate the tree with wonderful unique toys.

Progress.
For test we need: 2 cups flour, 1 cup fine table salt and a little water.
Mix dry ingredients and gradually add water. The mass should have a pleasant consistency - not stick to your hands, and not be too tight (do not break or crumble).


Finished dough spreads it out on a flat surface and roll it out.

Using molds or a stack, we cut out the shapes of the conceived shape.


We decorate crafts with beads, bugles. On the watch form, lay out the beads in accordance with the location of the numbers on the dial and hands. We decorate the Christmas tree by sprinkling it with beads, and pressing it a little into dough... Lay out any bead pattern on the bell mold.


To the center of the dial we attach a ball of dough flattening it a little.

Christmas tree blanks toys dry at room temperature during the day, periodically turning them over.
Ready-made, already dried salt dough toys we paint with paints.


And you can admire original crafts and homemade Christmas trees toys.

Imagine craft and make children happy!
Related publications:
Making a loaf for children from salt dough. I needed: 4 cups flour, 2 cups coarse salt, 2 glasses of water. We mix the flour.
Master class for young teachers "Modeling from salt dough as a means of developing creativity in preschoolers" Master class for young teachers. Topic: "Modeling from salt dough as a means of developing creativity in preschoolers" Organizers: senior.
In 2016 it is an anniversary year and we decided with the kids to make magnets on the "Space" theme. We needed: 1. Salted dough. There are a lot of recipes.
Materials: 1. Fine salt 2. Flour 3. Water 4. Acrylic paints 5. Twine 6. Thermal gun Salt dough recipe: You will need: 2 glasses.
Dear colleagues, today I offer you a master class made from salted dough "Cat and Fish". For this we need: for making dough :.
Making crafts from salted dough is a very exciting activity that is enjoyed not only by adults, but also by children. Such products can become.
One of the favorite materials used for creative children's work is salty dough... You can make a lot of it funny crafts, for example or. It is very easy to work with such a test, it is somewhat reminiscent of plasticine, so not only adults, but also children can freely use it. In order to make Christmas tree decorations from salted dough, you will need minimal amount ingredients that everyone probably has.
Christmas toys made of salt dough
So, the recipe for making a dough for crafts.
We will need:
- two glasses of flour
- one glass of salt
- 250 grams of water
The most common flour is suitable, without any impurities and additives. The water should be cool. Salt - you can take "Extra".
How to make salty dough
1. In a small cup or saucepan, combine salt and flour, add water to them, and stir to knead the dough. How good the material for making New Year's toys from salt dough turned out can only be understood with the help of hands, if it is dry and crumbles, add a little more water, and if you understand that there is enough water, then you can add a little flour.
2. Some advise adding a little to the dough sunflower oil, no more than two tablespoons. Then the dough will be of the correct consistency and will not quickly crust over during operation.
3. Ready dough roll out with a rolling pin, take cookie cutters and make figurines. Well, the New Year's toys made of salt dough are almost ready. They can be left as they are or decorated to make them more original.
How to decorate a finished dough product
1.
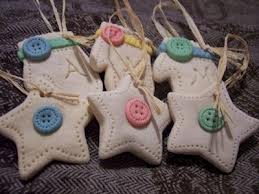
 Use a cocktail tube to make holes in the figurine to make them more airy.
2. The multi-colored buttons will make the toys more homey.
3. You can also decorate toys with shells, distributing them over the surface while the dough is not dry enough.
4. To keep the toys from looking boring, you can paint them in bright colors and decorate them with additional elements made from the same salty text.
You can endlessly list the options, since in fact they exist great amount... Show your imagination and spend time with your children with benefit.
A selection of ideas for Christmas tree decorations from salt dough


Oksana Seifert
Good afternoon, dear colleagues! Winter has come into its own and very soon a merry and joyful holiday will come - New Year! And as always, by tradition, we decorate christmas tree, forest beauty bought toys: colorful balls, icicles, snowmen, snowflakes, tinsel, etc. Well, what if to decorate herringbone toys made by hand. After all, such toys made with love, carry warmth and positive emotions of the one who is their tinker... Today I propose master class on making Christmas tree decorations(balls) from do it yourself salt dough... Such toys can be done with children, since work with dough develops fine motor skills of the fingers of children. For making New Year balls to us will need: 1 cup flour, 1 cup fine salt, a little water, a cap off felt-tip pen, paints gouache, brush, sippy glass, glue "Moment", or glue "Titanium", green, blue, silver sequins, star-shaped sequins, satin ribbons. Stir flour, salt and a little water in a small bowl and knead dough... It must be firm and thick so that it can be sculpted. Dough roll out to a thickness of about 1 cm, and cut out circles with a glass. With the cap from felt-tip pen cut a hole for threading the tape. Then our balls must dry. To do this, you can bake them in the oven, or you can leave them on a sheet of paper for several days. After the balls are dry, you can proceed to the most interesting thing - their design. Here you can show all your imagination. Can be colored toys with gouache paints, draw patterns, glue colorful sequins using any available glue. Pass a satin ribbon through the hole and tie a bow. Our Christmas ball is ready! Can be decorated christmas tree! Thank you for the attention! I wish you all good luck and creative success!


Related publications:
 The New Year will come only in a month, but we are preparing for the holiday now. By tradition, the guys and I senior group decided to do it.
 When the exhibition "Autumn Golden" was announced in the garden, I thought for a long time what we could do with our 3-year-old (almost) daughter. So that she also participates.
Educator: Boeva Irina Yurievna MBDOU kindergarten №34 Objectives: - To promote the development of fine motor skills of hands, imagination, observation.
Master Class. Purpose: to form an idea of \ u200b \ u200bthe type of decorative and applied art-testoplasty. Objectives: Raise the level.
 good evening, dear teachers. Today I want to share again my creativity from salted dough. And I made a half liter out of an ordinary one.
Easter is big and Holy holiday in the life of every Orthodox person. This year a charity event was timed to coincide with this holiday.
 MASTER-CLASS "BRIGHT COLORS OF AUTUMN" (AUTUMN TREES FROM SALT Dough) Autumn forest, playing with colors, Weaves wreaths from the crown of trees, With His Own.
My kids love to watch "fixes". And after watching the series about "Plasticine", they came to the kitchen with the question:
- Mom, can we make plasticine? To do this, you only need one glass of flour, half a glass of salt and half a glass of water. So they said on the fixes.
I could not refuse such a creative business and the process went in full swing. It was before the New Year, so the theme of toys is New Year's.
Christmas, Christmas toys made of salt dough - children's master class:
 1. First of all, the children themselves kneaded the dough. By mixing all the ingredients in a bowl. The proportions were taken exactly as the fixies said:
- 1 cup flour
- 0.5 cups salt
- 0.5 cups of water
 2. Then they rolled the dough into a cake.
 3. While the children were rolling out the dough, I prepared a herringbone paper stencil for them. They very carefully traced this stencil and cut out with the help of stacks.
 4. In the process of making Christmas tree decorations from salted dough, I remembered about cookie cutters. The children really liked this idea, and they quickly made different shapes from the dough: bells, Christmas trees, cones, stars, etc.
It is easy to work with molds and the result is always pleasing, therefore, in this version, this lesson is suitable even for children from 3-4 years old.
 5. We also tried to make a colored salt dough by adding watercolor paint to it. To do this, they simply dripped a little water into the paint, stirred it with a brush and poured the colored water into the dough. This was also mentioned in the cartoon.
 6. All the figures were left to dry near the battery overnight.
 7. And in the morning, the children, not having time to wake up to the end, were already rushing to their New Year's dough toys to decorate them. Painted with simple watercolors. Also in my bins, I found some rhinestones - they are great decorated Christmas tree decorations.
To dry the paint faster, the eldest son turned on the fan and directed the air flow to the painted toys. They were painted on both sides.
 8. When the paint was dry, the children were happy to decorate the tree with their own Christmas toys made of salt dough.

 9. It turned out very nicely. And the manufacturing process was pleasant and joyful. This year, our tree is beautiful in a special way, because almost all the toys on it are handmade.
And I wish you pleasant creativity with the children.
Subtleties in the manufacture of Christmas tree decorations from salt dough:
1. It is better to use finely ground salt for the dough so that there are no salty grains on the finished figurines.
2. Sculpt Christmas toys with children from salt dough, it is better for large table where there will be nothing superfluous. After the figure, it is better to immediately fold it onto a large flat dish or a piece of thick cardboard to make it easier to carry to the drying place. For example, on a window or next to a battery. If you dry in the oven, then the figures should be immediately folded onto the enemy, covered with foil.
3. New Year's toys made of dough can be whole, or from several parts. The parts adhere well to each other if they are slightly moistened with a wet brush.
4. To make holes in toys, you can use macaroons, pen caps, cocktail tubes and any other materials at hand to make holes in toys.
5. You can paint salt dough food coloring, gouache, watercolors, acrylics, glitters (brilliant paints).
7. To dry salted Christmas tree toys, you can:
- just at room temperature (but this may take 2-4 days).
- near the battery (1 night for flat figures)
- in the oven at 50 gr. (several hours)
New Year decoration can be made not only from dough, but also, etc.
Read also ...
- Chicken liver pate
- Delicious zucchini with cheese in sour cream in the oven - a step by step recipe with video Zucchini recipes in the oven with sour cream
- Banana rice and corn flour pancakes (gluten free) with homemade banana sauce Banana pancakes with semolina
- Cabbage casserole with chicken Chicken fillet casserole with cabbage


