Summary of a lesson in modeling from salt dough in the senior group of kindergarten. Summary of the lesson on the topic "valentine from salt dough"
Municipal budgetary institution of additional education "House of Children's Creativity" of the village of Kysyl-Syr of the municipal district "Vilyuysky ulus (district)" of the Republic of Sakha (Yakutia)
Summary of a lesson in artistic modeling from salt dough.
Topic: Candlestick. Kitty"
Compiled by:
additional education teacher
Borisova Yu.V.
kysyl-Syr settlement 2017
Topic: "Candlestick. Kitty"
Purpose: To study the technology of making a decorative candlestick from salt dough. Create conditions for pupils for the development of creative abilities in practical activities.
Tasks:
Educational:
repeat the technique of working with salty dough
master the skills of making the "Candlestick" craft;
improve the skills of modeling from salt dough
Developing:
To develop the artistic and creative abilities of students,
Develop aesthetic taste.
To develop creative initiative and activity, the imagination of children. develop creative imagination.
Educational:
cultivate perseverance, accuracy and hard work.
Equipment:
candlestick sculpting sequence;
pictures of cats
a computer
Materials for the lesson:
a jar for water;
napkins.
candle in a metal sleeve
salty dough;
Lesson plan:
| Lesson stage name | Allotted time |
|
| Organization of the lesson. | ||
| Main part. | ||
| 1. Game - riddles about cats. A story about the importance of cats in the culture of different countries. 2. Learning a new topic. 3.Practical work: repetition of safety rules sequence making a decorative candlestick; physical education; registration. | ||
| Final part. | ||
| Summing up the lesson. Mini-exhibition of works. Cleaning of the workplace. |
Lesson summary.
Organizing time.
Hello guys! I am very glad to meet you and I hope that you are in a great mood. Let's smile at each other.
Introductory conversation.
Today's lesson is unusual. I will ask you questions, and you will answer them, but only all together, in chorus. Let's see what kind of friendly guys you are. Did you agree?
Do you like to play?
Can you guess riddles?
Then guess the riddles:
Shaggy,
Mustached,
Drinks milk
Singing songs
This beast lives only at home.
Everyone is familiar with this beast.
He has a mustache like knitting needles.
He sings a song purring.
Only the mouse is afraid of him ...
Have you guessed? This is a cat)
Well done. It's all about cats.
The cat is a mythical and magical animal. It is no coincidence that the cult of the cat existed in Ancient Egypt. She was revered as a deity and personified with joy. In Russia, for a long time, there was a custom to first let a cat into a new house, and then to enter the owners. It was believed that this is how a cat brings happiness to the house. In Japan, almost every home has a figurine of a cat with a raised paw, which is believed to bring happiness. The Chinese also believe that she helps a person, protects his home from evil spirits.
Cats can heal their owner by taking away their negative energy. In the family where the cat lives, the energetic atmosphere is better.
The topic of our lesson: "Modeling a candlestick-cat".
What is a candlestick?
A candlestick is a candle holder.
Candlesticks are available in copper, silver and bronze. You can not only buy candlesticks in a store, but also make them yourself. Clay and salt dough make beautiful and interesting candlesticks. They can decorate any interior, and candles in candlesticks create a special atmosphere of mystery in the house.
I suggest you make a candlestick out of salted dough.
Let's remember how to work with salty dough.
Salted dough should always be in a bag, as it starts to dry out in the open air.
A piece of dough, from which we are going to sculpt some part, must be rinsed well. To make the part smooth and neat.
The joints of the parts must be moistened with water.
The balls are rolled in the same way as from plasticine in the palms or on the table.
A cylinder or stick is rolled on the table.
And besides the usual movements, clamps are also performed along the entire length of the part. They rolled it, squeezed it with your fingers along the entire length, rolled it again and so on until the part is of the required length and thickness. If you just roll the sausage, it will fall apart. When you make an applique out of paper, you know that you cannot take a lot of glue. Also here, if you take a lot of water, the dough will soften and stick to your hands. Therefore, carefully lubricate with water only the area to which we will glue another part.
Practical work.
Let's remember the safety rules when working with the test:
Salty dough is inedible!
Carry out the modeling on a lining board, oilcloth, do not put the dough on the table, desk.
You should be extremely careful when working with sharp objects,
Wash hands thoroughly after finishing work.
Now let's get to work.
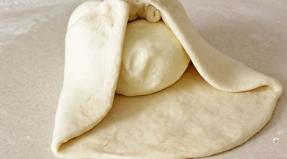
Take a large piece of dough and roll it into a ball, and make a carrot out of the ball. This will be the body of the cat.
Take a candle and gently press it into your torso.
Style the tail (however you like). Attach it to your torso with water.
Take two identical pieces of dough, roll the balls - these are paws, glue them to the body, make cuts (make the claws).
Roll up a ball for the head. Pull back and shape the ears.
Our cat candlestick is ready. We leave it to dry.
Physical education
Guys, let's take a little rest and do a warm-up for the arms. Let's do the exercises:
1. “The bear is climbing the tree” (move your fingers up on the pencil).
2. "Fist-palm" (one hand is clenched into a fist, the other is open and vice versa).
3. “Getting fire” (rub your palm with your palm).
Thank! Well done! We continue our work. Tell guys
What material did we work with today?
How does the dough differ from other modeling materials?
Did you like what you did today?
What new have you learned today? (Answers of children)
Summing up the results of the lesson.
Guys, look at what wonderful candlesticks we have molded from salt dough. We all did the same job, sculpted from the same material, but the cats turned out to be different.
Let's each come up with a little story about their cat.
(Children tell stories about their cat's name and characteristics)
This suggests that we are all different with our characters, habits, characteristics, and each of us puts a piece of our soul into our work. This is what do-it-yourself souvenirs are good for.
All of you have completed the task. I suggest you organize a small exhibition. In the next lesson, we will paint the finished work, so we bring paints, brushes and a good mood.
Cleaning of the workplace.
We clean up our workplace.
All good fellows. Thanks for your work.
Goodbye.
Used Books
Antipova M.A. "Salty dough. Unusual crafts and decorations. Beautiful things with your own hands ”, Rostov-on-Don, publishing house“ Valdis ”, 2008.
Chayanova G.N. “Salty dough for beginners”, M., LLC “Drofa-Plus”, 2005.
Chibrikova O.V. “Gifts for the holidays. We do it ourselves ”, M.,“ Eksmo ”, 2006.
Technology lesson outline" Job with salted dough "
Goals and objectives:
1. To form the concept of working with salt dough, special skills in the manufacture of products from it. History reference.
2. To teach the technological sequence for the manufacture and processing of products from salt dough.
3. Give the main methods of manufacturing products.
4. Teach independent work with instruction cards.
5. To bring up the creativity of the personality, aesthetic taste.
6. Develop creative thinking, motor skills, independence.
Equipment: computer, visuals, tools, samples of finished products, instruction cards, finished dough, etc.
Interdisciplinary connections: history, drawing.
I. Organizational moment.
II. Introductory speech of the teacher.
Any labor activity in technology lessons should be accompanied by the pursuit of beauty and aesthetic pleasure.
Labor, morality and beauty are inseparable. You all have different intellectual capacities, but being able to work with your hands is a great beginning for creative work of the mind. Only in the process of creating things that are valuable from an aesthetic point of view, a student can develop the best qualities of a person, comprehend the laws of beauty, he can develop creative abilities and moral qualities.
Modeling is a favorite and exciting activity. In technology lessons, it became possible to combine modeling and dough. Wall decorations, fun toys, souvenirs - all this can be done by hand.
When working with salt dough, artistic abilities, observation, a sense of line, shape, proportion are developed.
In the process of work, the basic techniques of making composition elements are mastered.
An important role is played by the fact that the necessary materials are available and environmentally friendly. Salt dough crafts are durable and cheap. Hand-made items are highly regarded in the modern world.
History reference.
Salted dough crafts are a very ancient tradition.
In China, since the 17th century, puppets have been made for puppet shows.
In the Himalayas, they were used to make sacrificial cult figures.
In Ecuador, this is one of the artistic crafts (the dough was dyed).
In western Spain, ceremonies in honor of the Mother of God bring bread wreaths to the altar.
In Greece, magnificent bread wreaths decorated with lush ornaments are traditionally baked.
Paintings made of dough are very popular in Poland, Czech Republic, Slovakia.
In Russia, when it became a custom to celebrate the New Year, people gave each other figurines made of salted dough. The skill of making gingerbread has deep roots. Until now, figurines from dough called "kozuli" are baked in the Astrakhan region.
Salted dough has become a very popular creative material in recent years. This occupation was given the name - testoplasty.
II. Main part
I. Materials and tools.
Materials: flour, salt, glue, water, paints, tools.
Salty dough recipe: flour: salt: water \u003d 2: 1: 0.5, that is, 2 glasses of flour, 1 glass of salt, 125 ml of water
Working tools and accessories: stacks, rolling pins, baking sheets, molds, garlic press, strainer, cups and glasses, brushes, pencils, needles, aluminum foil, frames, buttons, cloth, etc. Everything that your own imagination tells you.
II. Technology of making products from salted dough:
1.Kneading
2.Modeling
3. Drying
4. Coloring
5. Varnishing.
1.
Kneading - mix all the ingredients in a suitable bowl, knead the dough thoroughly. It should turn out to be uniform, elastic, cool. If necessary, add flour and salt to the soft dough.
2.
Molding - sculpt or cut out products, the figures need to be immediately on a hard surface (linoleum), a cutting board, then the reverse side of the products will remain flat and will not deform.
3.
Drying and firing - drying methods: in the oven of an electric stove or gas stove, in the air, combine. Dried on white and black baking sheets. Dry the products over low heat until browning, then move the baking sheet from the top shelf to the middle one. We will dry at room temperature on a cutting board. The product is considered dried if the sound is resonant when tapped with a finger.
4.
Coloring - before painting the product, they are usually primed with white oil paint, after drying, they are painted with gouache.
5.
Varnishing - use both liquid and thick transparent varnish. Under a protective layer of varnish, the paints will not crumble, crumble, fade.
III. The sequence of training in the manufacture of parts, products:
Making small ornamental details is an important stage of work before moving on to complex compositions. He teaches you to be accurate and thorough in the manufacture of parts. Almost any product can be decorated with small ornamental details. Cutting and rolling out the dough is better and more convenient on an oilcloth or cutting board. Tools must be dry.
Connect with water.
When decorating, use dough balls, beads, beads.
Practical part:
Manufacturing technology of parts, products:
a) making flowers, berries, fruits, leaves, etc.
b) composing compositions from them.
TB when performing the practical part:
before work - put on an apron, a kerchief; prepare a workplace;
during work - carefully handle sharp-edged objects, paints, water, varnish (only an adult covers the work)
after work - clean the workplace.
Hand over the workplace to the student on duty.
Salt dough sculpting will allow you to realize your creativity, and this lesson will be the initial impetus for this. And then the ancient craft in your hands will turn into an art that will delight others and you.
attachment.
Children's works.
Ulyana Akhmatova
Goals and objectives:
continue to strengthen the skills of working with salted dough on the plane.
roll out the layer, use the template (fish cut from thick cardboard);
work with a stack;
educate accuracy;
develop creativity, imagination.
Materials and equipment:
Salty dough(we prepare in advance) , cardboard covered with foil (we work on it), stacks, rolling pins, oilcloths, product sample, fish patterns (2-3 different ones are possible, children choose at will), henchmen tools: cutting molds (we used small cookie cutters), caps from markers, pastry wheel, etc., cups of water, brushes.
NOTE: IT IS NECESSARY TO WET EACH PART WITH WATER WHEN BONDING (otherwise they may fall off when dry) !
Be sure to repeat the safety instructions.
Educator:
Guys, guess the riddle:
Look, the house is standing - it is flooded to the brim with water.
Without windows, but not gloomy, transparent on four sides.
In this house, the tenants are all skillful swimmers.
Q: - Have you guessed who you are talking about? (children's answers - Pisces).
Well done! Today you and I will sculpt fishbut not simple. And you will decorate it as you want. The teacher draws attention to the board (there are samples of fish on the board, printed pictures must be in color): Look how different and beautiful fish you can do it.
Q.: - To create such a beautiful surface, you can use a wide variety of improvised facilities: stacks, felt-tip pen cap, buttons, molds. A regular cap leaves an imprint in the form of a circle, and a beautiful snowflake on the back. Can be pasted on the body fish small figures, balls, you can mold them yourself, it will also turn out very beautifully.
(The work is carried out sequentially according to flow charts together with a teacher)
1. Take a piece roll the dough into a ball, flatten it and roll out the layer (on foil).
2. We apply the template, carefully cut out with the help of a stack fish(The teacher helps children who find it difficult to complete the task)
3. Smooth the edges with a stack or a damp brush.
4. Make two holes on top for the string with the back of the brush. With the help of a stack, we make a border with a light pressure, between the head and the body.
5. We sculpt eyes by rolling balls from test.
6. Glue balls of smaller diameter onto larger ones.
7. With the back of the brush, press on the balls, making the pupils.
8. Using the cap, we apply the scales on the surface of our relief... If someone wants to decorate their fish, you can make small balls from test and stick them to the body fish; you can cut different figures using molds and decorate fish... Don't forget to wet every detail with water.
9. Roll out a thin sausage from test, glue the mouth fish.
10. We make an impression on the tail, pushing through the lines.
11. The fish are ready! It remains only to dry.
Dry for about a week or more.
Summarizing lessons:
Analysis of works.
V.: - Guys, our occupation... See how wonderful you got fish.
Well done! On the next occupations we will paint the fish with gouache, cover them with varnish and tie strings so that you can hang them on the wall.


Related publications:
Summary of GCD for modeling from salted dough group "Friends for the Bunny" Summary of GCD for modeling from salted dough group Zpr-2 "Sun" "Friends for the Bunny" Topic: "Friends for the Bunny" Purpose: To generate interest.
Modeling from salt dough on the theme of Dymkovo and Filimonov toys Integration of educational areas: artistic and aesthetic development ,.
Purpose: Creation of voluminous crafts from salted dough and their decorative design according to the plan. Objectives: educational: Teach children modular.
Program content: -To teach children to create an image of animals (sculpt from salt dough) -Develop a sense of form, proportions, eye, consistency.
Summary of a lesson in molding from salt dough in the second junior group "Radiant Sun" Summary of lessons on modeling from salt dough in the 2nd junior group on the theme "The sun is radiant" Compiled by: teacher of MADOU No. 1, Kyzyla Kosheleva.
Scientists have proven that the development of logical thinking, coherent speech, memory and attention is closely related to the development of fine motor skills and coordination.
From work experience. Preschool
Korableva O.L.
Creative assignments in modeling classes
Bas-reliefs and high-reliefs
Salt dough modeling is a fun activity
for children and adults
Using salt dough modeling lessons and
the inclusion of elements from salt dough in children's creative works made in mixed media
Salt dough modeling is a fun activity for both adults and children. Babies, older children and their mothers and grandmothers are happy to sculpt from salt dough. The lesson brings a unique tactile sensation from such a kind and soulful plastic material as dough, and besides, it gives a pleasant feeling of simplicity and ease of creation, the creation of your own little "creations", turning the sculpting process into a real creative process. This activity is especially useful for children, as it helps to develop fine motor skills of the hands, relieves excessive emotional stress, which allows you to find another approach to working with children who are overexcited and active, and on the other hand, it activates less active children, including the muscular apparatus. and developing general motor skills. Sculpting, as one of the types of visual activity, is an excellent training for developing motor activity, sensitivity and flexibility of the fingers. If a lesson on training finger movements is carried out systematically, it will serve as a powerful means of increasing the performance of the cerebral cortex. It is known that the correct and timely formation of a child's speech occurs under the influence of impulses coming from the hands. Therefore, we can say that the developmental success of our children is largely "not at their fingertips." And modeling, including modeling from salt dough, is one of the types of creative activity that diversifies the children of younger, senior preschool and preparatory to school ages.
In our classes, in addition to various types of traditional modeling from plasticine, as well as picturesque modeling and volumetric compositional modeling on a plane, we use bas-relief, high-relief and figured modeling from salt dough. Salty dough has some advantage over clay: flour, salt, water are the most affordable materials. Salted dough is plastic, does not stain your hands so much and does not melt like plasticine, moreover, it makes it possible to experiment widely, as with the plastic material itself (it can be pulled, flattened, rolled, rolled into a cake with a rolling pin, glued, rolled, cut with a knife, etc. using confectionery molds to push through a strainer or garlic press, pierce, dry, bake), and with a choice of tools, sculpting devices and objects to create a relief on the surface of parts (rolling pin, strainer, garlic extractor, brush, molds for cutting dough, stacks, toothpicks, combs, embossed buttons, felt-tip pen caps, tailor's wheel, confectionery syringe attachments, disposable forks and serrated knives, sand sculpting molds, etc.). Salted dough is a unique material. It can be combined with natural and decorative materials: cones, pebbles, shells, sand, dried plants and seeds, pieces of lace and shreds, pieces of leather, beads and buttons. Crafts can be painted after drying with gouache and watercolors or left unpainted, preserving the golden color of the bread (after baking) or milky (after air-drying) - this also has its own originality.
There are some simple technological rules for working with this material that must be followed in order to achieve the best work result in an art studio.
Workplace.The humidity and temperature in the room are of some importance, since at high humidity and temperature, the products during sculpting will blur on the desktop and lose their original shape. Therefore, the room should be cool and your hands should also be cool - you can wash them before starting work with cold water, while using this procedure as a hardening element. The optimum room temperature should not exceed 20 degrees. The surface of the table on which the dough is kneaded and rolled out must be smooth and even. For children, plastic boards are used as a work surface. There should be no unnecessary items on the workspace of the table - it is better to give tools and materials necessary in the course of creative work individually as needed. Therefore, it is better to place fixtures, tools and additional materials on a separate table. If the work is not a lot of materials and not a lot of materials will be used, then disposable sectional plastic plates or sector containers can be used for placement. The latter option is convenient because in the course of work the child independently decides on the use of various materials, creating his own artistic image.
Kneading salt dough. It is carried out by the teacher, educator before class or on the eve, in the latter case, the dough is placed in a plastic bag and in the refrigerator, which improves the quality of the mass for modeling. In the circle classes in the preparatory group for school, you can invite the children to knead the dough on their own. Then, to knead the dough individually, children will need: aprons, shallow enameled or metal cups, bowls, glasses (containers) for measuring bulk products and measuring the volume of liquid, a spoon or a stirring stick.
Cooking salt dough. The classic recipe for salty dough: 1 cup of salt (200 g), 2 cups of flour (200 g), 3/4 cups of water (125 ml). Mix salt with flour, dilute the mixture with water, pouring it into the well. Knead the dough like dumplings or noodles so that it doesn't stick to your hands. Knead well until elastic.
Better to use white wheat flourpremium grade with high gluten. In addition to wheat, you can use rye or mixed in a 1: 1 ratio of wheat and rye. Rye flour gives the dough a brown hue, vaguely reminiscent of the color of clay, which can be used in unpainted products. The dough made from one rye flour is less elastic than the dough made from wheat flour, therefore they use additives:potato starch (1 tablespoon), wallpaper glue (1-2 teaspoons), PVA glue, vegetable oil (in small quantities). Thanks to the content salt the dough holds its shape well when molding, and the finished one does not grow moldy. In order for the products to have an even, smooth surface, it is better to use the finest salt - "Extra". Watermust be clean. If you knead the dough in pre-chilled water, it will be more elastic. The dough can be made colored at the kneading or kneading stage, adding powdered food coloring or cocoa powder and coffee to obtain brown tones. When the colored dough dries, it brightens a little, so the dyeing is done at the rate of one dye packet per 100-150 g of dough, red and orange dyes are the most intense, so they can be used to dye 200-300 g of dough. You can prepare a colored dough by adding gouache paints while kneading, but you need to take into account that in the future such a colored dough will stain your hands.
It should be noted that in the process of working with the dough, children diligently knead it and play with the material, which is why the dough quickly becomes soft and sticky, so it should be kneaded more abruptly. It is best to sculpt with dry hands so that the dough does not stick, or dip your fingers in flour during work.
Storing the dough. It is most convenient to store salted dough in the refrigerator by placing it in a plastic bag. Store the colored dough separately. It is advisable not to store the dough for more than 2-3 days, since during long-term storage the dough becomes damp and when baked gives an ugly gray tint, unwanted stains may appear in the finished product.
Modeling. Depending on the task at hand, molding from salt dough can be piecewise or curly.Individual elements, sculpted mainly on the basic shape of the ball (sticks, ribbons, Easter cakes, cakes), are combined into simple shapes (flower, leaves, snowman, sun, etc.), from which the composition is composed. If many separate elements are being performed, the work is not finished or it is necessary to interrupt, then the finished elements and the dough are covered with polyethylene so that the dough does not become crusty and does not crack when drawing the pattern. A common piece of dough is also stored in polyethylene. When sculpting, it is necessary to take into account the size of future figurines: it should not exceed 5 cm. Larger figurines may crack when drying, in addition, cavities may form inside large figurines, which can also lead to deep cracks.
Bonding parts. To connect the individual details of the elements of the composition, you need toothpicks and a brush with water. To connect small parts (eyes, buttons, etc.), it is enough to carefully moisten the contact points with a toothpick, since the brush may be too wet. The larger parts are connected in the same way, but with a wet brush. Large parts, for example, lumps for a snowman, are held together with toothpicks, which serve as a base rod for stringing lump balls moistened at the points of contact. Avoid getting water on the front surface of the product, otherwise dark spots may appear after baking.
Drying. You can dry the product from salted dough naturally and in the oven. Natural drying carried out in a warm place in the air. This type of drying has disadvantages: cracks may appear on the product, because it dries out inside it slower than on the surface. Drafts may be the cause of the cracks. The increased humidity in the room also interferes with drying. In the summer, you can expose the product to the sun. The large thickness of the product during natural drying can lead to the fact that the product inside will sour before it dries. Drying in a gas ovenrequires careful monitoring. To prevent the products from burning, you need to put a container with water under the baking sheet. They put the baking sheet in a well-heated oven and wait for the moment to brown so that the shape is fixed and not deformed, after which the flame is reduced, otherwise the products may swell or crack from the back side. Products painted with food dyes are dried at a temperature of no more than 125 degrees, otherwise the original color may change. A completely dried product can be easily removed from the baking sheet. Tap your finger to make sure the inside is not damp. If the sound is ringing, then it is dried, if muffled, it is not completely dried. When drying, you can open the oven door slightly, which will not damage the product, but will help regulate the temperature inside. Drying in an electric ovenbegins at a low temperature with a gradual increase. So that such drying is not very long and energy-intensive, you can dry the product for 2-3 days in a natural way, and then dry it in the electric stove. To do this, first put the baking sheet for 1-2 hours at a temperature of 50 degrees, then raise the temperature to 75 and keep it for another 2-3 hours. After that, the oven is turned off and the product is left overnight. If after that the reverse side of the products is not dry, then they are turned over and dried until tender.
Browning. Using browning, you can add versatility to monochrome compositions, and monochrome compositions of brown tones from dough dyed with cocoa, coffee or made from rye flour can be supplemented with chocolate shades. Browning is carried out at a temperature of 180-200 degrees, with constant monitoring of the process in order to avoid burning the products. If the baking sheet is at the top of the oven, then the most protruding parts of the products will darken first, and if the baking sheet is at the bottom, the thinnest parts of the work will brown. In addition, differently browning the individual details of the same composition, you can achieve the effect of versatility.
IN microwave oven do not dry the product made of salted dough.
Gluing... If a piece breaks off as a result of drying or transportation of finished products, then it is glued using PVA glue or Moment universal glue. It is advisable to leave the product for a day after gluing. When making a composition from ready-made elements on canvas, cardboard, hardboard, they are also glued to the background using these types of glue.
Storage of products... Store salt dough products in a dry place: moisture can irreparably spoil them.
Examples of salt dough modeling lessons
in different age groups
| Topic and objectives of the lesson | Drawing |
| Junior group "Kolobok" (bas-relief). Two lessons. Lesson 1... Drawing on corrugated cardboard: "Track for a kolobok". Session 2... Acquaintance with the features of the material at an accessible level. Playing with the material: crushing, flattening, squeezing, pinching, stretching, rolling. Modeling of the simplest form. "Yablochko" (curly modeling). Show children a variety of plastic materials (the possibilities of plasticine and dough): plasticity, viscosity, weight, mass integrity. On the basis of the simplest forms, learn to convey expressive images (delicious apple). | |
| Middle group "Bunny in a white fur coat" (curly modeling). Conduct a comparative analysis of materials for modeling: plasticine and dough, determine their similarities and differences. Show the techniques for fastening parts from the dough and techniques for applying a relief pattern. "Still life" (bas-relief). Two lessons. Lesson 1... Modeling. On the basis of simple forms, learn to independently convey familiar images: an apple, a pear, a plum, an orange. Create a composition that is thoughtful in size, shape and color. Lesson 2. Painting the bas-relief with gouache, decorating with braid, lace. | |
| Senior group "Bunnies are dancing in the meadow" (high relief). Working out the techniques of sculpting elements from the dough. Transfer of motion. Acquaintance with methods of joining parts and fastening on a cardboard background. Self-decoration with a relief pattern and carved dough elements. "Herringbone, herringbone, elegant needle" (curly modeling). Prototyping the image in a constructive way on a frame made of cone-shaped shapes with a "fringe" using a stack-knife. Self-decoration of a snowdrift with a relief pattern, spruce branches with sparkles, sequins, beads. "March cats" (bas-relief). Two lessons. Lesson 1. Practicing dough sculpting techniques: giving a ball-shaped lump a shape resembling a sitting kitty (getting a "matryoshka" shape, pulling "ears", "tail" from a common piece, pinching the "ears"); making legs with relief scratching. Self-compilation and gluing of composite elements on a cardboard background, decoration with small dough elements. Lesson 2. Painting composite elements, decorating with additional materials. "Carnation"(High relief). Collective panel. Lesson 1... Making a background for the collective work "Happy Victory Day!" (gouache). Session 2... Securing the technique of cutting "fringe" into strips of dough, making the cloves in a counter movement; assembly of inflorescence; self-execution of the stem and leaves of a carnation. Assembling a festive composition. | |
| Preparatory group for school. "Russian beauty" (mixed media bas-relief). Two lessons. Meeketing the image of a girl in a constructive way on a stick frame. Experimenting with different materials: dough, fabric, lace, ribbons, cardboard, wire. Decorating with additional materials according to the idea: cereals, sequins, beads, beads, buttons and natural materials. "Doll" (curly modeling). Fantasy work of white salt dough and colored cocoa powder, coffee. Acquaintance with element-wise curly modeling, methods of fastening parts with a wet brush and fragments of toothpicks, with a method of making hair using a garlic press. Decorating doll clothes with embossed patterns, prints. |
Lesson on testoplasty in the older age group.
A painting for the wall:
"Bunnies are dancing in the meadow" (high relief)
Tasks
Teach children to create expressive images of salt dough and convey movement. Work out the techniques of sculpting elements from the dough. To acquaint with the methods of connecting the details of the picture. Self-decoration with a relief pattern and carved dough elements.
Materials, tools, equipment
Salted dough, plastic boards, a tray of flour (for drying fingertips), a glass of water (for gluing elements), a brush, toothpicks, PVA glue, composite background cardboard, cord or soutache for fasteners; for making decorative carved and counter-relief prints - stacks, embossed buttons, felt-tip pen caps, nozzles for a pastry syringe, a disposable fork and a serrated knife.
The teacher reads or hums a poem by G. Lagdyn, offers to imagine and show how a bunny is dancing:
Bunny, bunny, dance!
Make us laugh, make us laugh!
Stomp, stomp with your paws,
Gray slippers!
Like this! Like this!
The zainka hopak is dancing!
Then the teacher distributes material for modeling in order to make friends - hares, dancing in a snow-covered meadow. Invites children to independently determine the order of work: what needs to be blinded first, what then? (First we sculpt snowdrifts, then bunnies.)
Correctly. And you need to start by preparing the background for the picture: fasten the braid by tying it to a knot or a strong bow. If we do this at the end of the work, we will damage the image.
We will immediately transfer the sculpted elements to the compositional background of the picture, fixing the large elements with PVA glue, and connecting the small elements with each other with a wet brush.
We will make the snowdrifts in the form of a bas-relief to give volume to our picture. On the ready-made "snowdrifts" we will place volumetric figures of dancing hares (high relief). We will collect and glue the "rabbits" immediately on the background-cardboard to avoid damage when transferring the figures from place to place.
To decorate the finished composition, you can use snowflake stars cut out from a thin layer of dough. Decorate the snowdrifts with a counter-relief pattern, prints.
The teacher invites children to consider a toy bunny or drawing and determine the shape of future modeling elements (ovoids, a ball), their size, number.
Children begin to sculpt elements of the composition and place them on a cardboard background: background of snowdrifts, foreground, bunnies (body-ovoid, head-ball or ovoid, ears, paws). Finish the work by decorating by design.
After class
Children look at ready-made compositions, talk about the characters of their characters, their mood.
After drying, the work done is used to decorate doll corners or natural corners.
It is possible to hold a general exhibition of volumetric paintings made of salted dough and organize a game "Guide".
From the history of testoplasty
In the Russian North, in hospitable and friendly Pomor houses, in prominent places there have always been man-made wonders in the form of small figures of people and animals. These are mukosolki - crafts made from flour and salt. In the old days, such toys served as amulets. At Christmas, the pomors made such figures and handed them out to relatives and friends, saying: "Let bread and salt be common with you, never translated."
"Sun" and "salt" are cognate words. The sky is empty and gloomy without the sun, and food is ugly and tasteless without salt. The ancient Slavic custom - to greet a dear guest with bread and salt - has come to us from time immemorial. Bread meant earth, salt meant sun. They took out the earth and the sun to our dear guest! Hospitable people have long been called hospitable people by the people.
The history of salt dough goes back to the times when people worshiped the gods of the natural elements, and figurines made of salt dough were used in sacrificial rituals. Even baking the famous loaf was an honorable and responsible duty; not everyone could bake the sacred loaf. The solemn ceremony lasted for several days with the participation of the court "caravachats". There were ritual millstones for making flour. They composed songs asking for help in kneading the dough, in which people asked God to descend from heaven and take part in the preparation of a loaf. Of particular importance were wedding loaves, with which they still meet newlyweds on the doorstep of the house ... Interestingly, in Ukrainian folklore, God is also personified in a loaf, which was called divin, a marvelous loaf. In Belarus, the loaf was compared with the luminaries - the sun and the moon. According to legend, the loaf, before returning to earth, visited the sky, where it met the dawn and saw the stars. In the old days, the loaf was necessarily decorated with sculpted symbolic figures of animals and birds.
For the Slavs in antiquity, the year began in March. By inviting spring, they baked figurines of larks, with which children climbed onto the roofs of sheds and trees, so that spring would "see" them. And adults in the fields and hills sang songs "Vesnyanka", calling on storks and cranes to bring the long-awaited warmth on their wings as soon as possible, led round dances, lit fires. The holiday ended with the burning of the effigy of winter Mary, the symbol of death, in a fire.
On the day of the March solstice, another holiday associated with bread was celebrated - Shrovetide. They baked pancakes and treated everyone, went to visit, arranged festivities.
In Russia, in many regions, the tradition has been preserved to bake figurines from "goat" dough (in the Arkhangelsk province) and "cows" (in Siberia and in the central regions of Russia), which used to symbolize an increase in livestock numbers and a fruitful year. They were baked for the ancient ritual holiday "koleda". Sheep and cows made of dough meant a whole flock for the peasant, a pigeon meant a rich harvest.
Other countries also have holidays associated with the test. In France on February 2, the Presentation of the Lord is celebrated. On this day, pancakes are baked and even arrange a kind of competition, who will throw a pancake higher from a frying pan. Also in France there is a holiday, the tradition of which originated in the 4th century. It is dedicated to the arrival of the Magi. On this day, they bake the "King's Pie", in which a bean is placed. The pie is cut into the number of guests, and those who are lucky to find it can count on good luck and happiness for a whole year.
A long time ago they came up with the idea of \u200b\u200bbaking unusual curly bread. Italian masters were simply virtuosos in baking such breads.
And in our country, curly gingerbread cookies are very fond of, which were presented for birthday, presented to the bride at a wedding, given as a sign of respect and as gratitude. Printed gingerbread cookies were made using printed wooden forms: flat boards with a counter-embossed pattern. A little later (in the 18th century), gingerbread cookies with genre scenes appeared, and they began to be decorated with tinted sugar, glaze and even special gilding. "Miracle lace" was woven from sugar syrup. Arkhangelsk gingerbread cookies were baked not only in the form of figurines of birds and animals, but even in the form of fantastic animals and Santa Claus, the Snow Maiden. The famous Tula gingerbread cookies became famous throughout Russia and far abroad.
Many primordial Russian traditions are preserved or are returning again. And it's great that many of them are associated with breads, pies, gingerbread and pancakes. And the most famous fairytale "long-liver" from our childhood and the childhood of our grandparents is Kolobok!
Lykova I.A. Artistic work in kindergarten. Ecoplastics: ornaments and sculptures from natural materials. Section 6. Testoplasty. - M .: publishing house "Karapuz", 2009.
Khananova I.N. Salty dough. - M .: AST - Press book. - (Golden Library of Hobbies), 2008.
Antipova M.A. Salty dough. Unusual crafts and decorations. Do-it-yourself beautiful things. - Rostov n \\ D: publishing house "Vladis"; - M .: publishing house "RIPPL Classic", 2007.
Block width px
Copy this code and paste it on your website
Theme: Salty dough fantasies
The purpose of the lesson: teach children how to make a snowflake pattern and sculpt from salt dough
this template is a New Year's gift. Fix the techniques of sculpting an oval, a ball,
pinching, connecting the parts of the craft with each other.
Lesson Objectives:
Educational:
Make a simple snowflake pattern from
Teach children to cut a contour pattern
snowflakes.
Form skills and habits of working with salty
Decorate a salt dough snowflake with various
materials.
Educational: Educate students:
love of nature;
desire to observe objects of nature;
accuracy and diligence;
the desire to complete what has been started;
creativity in the child's activities.
Developing: Develop in students:
mental cognitive processes
(perception, attention, memory, visual-figurative
and logical thinking, speech);
artistic taste and creativity;
emotional and sensual sphere of the child.
Lesson type: communication of new material, combined with the use of ICT-
technologies.
Methods: visual, verbal, problematic, method of independent work.
Materials and equipment
For the teacher: Sample product. Photos of souvenirs from salt dough. Illustrations
works of decorative and applied creativity from salt dough. Projector.
A computer. Power Point presentation.
For students: salt dough, stacks, jars of water, brushes, watercolors,
beads, beads, wooden toothpicks, felt-tip pen caps, wet wipes,
paper, scissors, pencils, rectangular triangles, rolling rollers
dough, cellophane bags for the test.
Interdisciplinary connections: literature, the world around, fine arts,
technology.
Lesson plan:
I. Organizational part.
II. The mood for motivation.
The teacher's message: “From the history of products from
salty dough in different nations ”.
Crossword solution.
Solving the riddle.
III. Fun physical education.
IV. Practical work:
Repetition of safety precautions when
Making a snowflake template from paper.
Modeling snowflakes from salt dough.
V. Reflection.
Vi. Completion. Children's team rallying ceremony
During the classes
The board is decorated with photographs of folk crafts made from salted dough. On desktops
–Kits for working with salted dough, oilcloth. Dress code - school suit and
work apron.
I. Organizational part.
Checking readiness for the lesson.
II. Motivation Mindset:
1. The teacher's message: "From the history of products made from salt dough among different nations."
By the design of the board, you guys guessed that today we will be doing some
souvenir made from salted dough. Once upon a time, in the hoary antiquity, people began to sculpt
bread cakes made of flour and water and burn them on hot stones. From dough
baked not only bread, but also decorative products. Making dough from flour, salt and
water was an old custom, and was used to make figurines in
religious purposes. Even the ancient Egyptians, Greeks and Romans used figurines from
salt dough in ceremonies of worship of their deities. In Germany and
Scandinavia has long been customary to make Easter and Christmas
souvenirs from salt dough. Various medallions, wreaths, rings and horseshoes
hung out in window openings or attached to doors. It was believed that these decorations
bring good luck and prosperity to the owners of the house (Slide 2). In Greece and Spain during
celebrations in honor of the Mother of God, magnificent bread wreaths are placed on the altar, decorated
lush ornaments (Slide 3). In Eastern Europe, Poland, Czech Republic
large pictures of dough are popular. Such paintings are not painted and have
the usual color for baking, which is considered especially attractive (Slide 4). When
the main symbol of Christmas was the tree, poor people made from bread dough
christmas decorations, bagels, gingerbread "goats" with which they presented their
friends and relatives as a sign of love and respect. To keep jewelry from being eaten
large amounts of salt were added to the dough by mice and insects. This is how it came about
salty dough. Our great-grandmothers sculpted figurines of various birds and animals from it,
the so-called "larks" with whom they greeted the spring. In Russia, products made of flour and
salts (mukosolki or hospitality) came from the north of the country. “I give you mukosol so that
there was bread and salt, so that there was abundance in the house ", - so they said on holidays in Russians
villages (Slide 5). Although dough crafts are a very ancient tradition, in modern
the world highly appreciates everything that is done with your own hands. Salty dough in recent years
has become a very popular material for creativity: it is very elastic, it is easy
process. It is an environmentally friendly material, pleasant to the hands, practically not
leaves dirt. Working with salted dough is a pleasure and joy.
2. Solution of the crossword puzzle:
Today we will do salt dough sculpting, but here's what we will sculpt and why, we
we will find out by solving the following crossword: (Slide 6.7)
Crossword
1.In a new wall, in a round window, in the afternoon glass
broken, and inserted overnight.
2.What kind of a master he applied both leaves and
herbs and thickets of roses?
3.Winter glass flowed in the spring.
4.Starts a calendar month named ...
5.Winter is the beginning, the year is over.
6. From the sky - star, in the palm of your hand - water.
7.The man is not easy: he appears in the winter, and in the spring
disappears because it melts quickly.
Having solved the crossword puzzle, we found out that we will sculpt gifts for the New Year from salted dough.
year, but what exactly? Let's solve a riddle for this.
3. Solving the riddle.
What kind of stars are carved
On a coat and a scarf?
All through, cut-out,
And take it - water in your hand.
Of course, we will sculpt snowflakes. Look guys at the pictures. These are snowflakes
under the microscope. What amazing, beautiful patterns and none of the kind. (Slide 8)
III. Fun physical education.
And now, before work, we will warm up our hands with finger gymnastics. We read together in unison
(Slide 9) a poem and squeeze our fingers to the beat:
“We kneaded the dough, we kneaded the dough.
We were asked to mix everything thoroughly.
But no matter how much we knead and no matter how much we knead,
We get the lumps again and again ”.
IV. Practical work:
1. Repetition of safety rules during work.
Before we start working, let's remember the safety rules when working with
scissors (Slide 10)
Keep the scissors in the specified location, in
certain position.
Place on the table so that they do not hang on
edge of the table.
Do not hold the scissors with the sharp ends up.
Do not leave them open.
Don't cut on the go.
Pass the scissors closed, holding the work
part, rings away from yourself.
And safety rules when working with salt dough:
When handling salt dough, avoid contact with
crumbs in the eyes.
Be careful when handling sharp
cutting tools.
Feet should be firmly supported by the entire sole of the
Keep the body straight or slightly
tilt forward.
2. Making a snowflake template from paper.
First, let's prepare a paper template, according to which we will make our gift -
snowflake. Bend a sheet of paper in half, and then again in half. Apply to the fold
an acute angle of a right-angled triangle and draw a line with a pencil, carefully
see how it is shown in the presentation (Slide 11). Bend the paper along this line and
one more time, as shown in the presentation (Slide12). Draw a simple pencil
the pattern according to which we will cut the snowflake. Expand the paper, we have a template
snowflakes, each has its own, unique (Slide13).
3. Modeling snowflakes from salt dough.
For work, we need tools and devices (Slide14) that you have on
tables, and salty dough, which you prepared in advance at home according to the following recipe: 2
glasses of flour, 1 glass of "Extra" salt, 1 glass of water (Slide 15).
Let's remember how to sculpt from salt dough. Dough is molded in almost the same way as from
plasticine or clay. The balls are rolled in the palms or on the table. If the ball is not
it turns out, you need to mash the dough again and roll it again. To attach
one piece of dough to another, water is used. You need to take some water to
the dough did not soften and did not stick to your hands. Gently dip the brush into water and lubricate
only the area to which we glue another part. Dough surface on
air dries very quickly, so on the worktable the dough should be in
tightly closed plastic bags. Take as much test as you need each time
it is necessary, and the surplus immediately fold back.
Step 1. Roll the ball in your palms or on the table.
Step 2. Roll out the dough ball into a cake until
thickness of about 5 mm.
Step 3: After attaching the template to the dough, carefully
cut out the contour with a stack of a snowflake. Lead the stack
slowly and smoothly so that the edges of the cut do not
cracks formed (Slide16).
Step 4. Decorate the snowflake by extruding with a pen
patterns and "imprinting" beads, bugles into the dough,
buttons (Slide17). This should be done immediately after
modeling, otherwise the dough will be covered with a crust and instead
prints will result in ugly breaks.
Usually, salt dough items are good
stick to each other. But sometimes (for example,
when one of the elements has already dried up) place
connections must first be moistened with water
using a soft brush. It's necessary
do also if you want to add
any details for an already dried product.
By the way, in the same way you can fix
broken products.
Step 5. We make a hole from the handle with a rod for
fastening snowflakes to a ribbon.
Step 6. With watercolors, you can slightly
paint the snowflake (Slide 18).
Step 7. Let the snowflake dry in natural
conditions until the next lesson.
V. Reflection.
What knowledge you previously acquired did you use in class today?