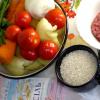
Homemade pita recipe in the oven. Pita (arabic flatbread)
- 3 tbsp. flour
- 1 tsp salt
- 1 tsp Sahara
- 2 tsp dry yeast
- 1.5 tbsp. warm water
- 0.5 tsp vegetable oil (for greasing the dough)
For filling:
- 0.5 kg of sausages (any, preferably small)
- 350-400 g fresh cabbage
- Dill, parsley and green onions to taste
- Mayonnaise, ketchup to taste
- Salt to taste
Pita - delicious homemade bread!
Almost everyone saw pita on store shelves, but almost no one knows what it is called. To have an idea of \u200b\u200bwhat we are talking about, remember a thin pita bread and a round volumetric loaf with a crust raised due to internal bubbles. On the label he also most often says - lavash. This round flat bread with a convex crust is pita. It can be purchased at the store and prepared at home.
The crust raised by the bubble is specially provided. If you tear it a little, you get a pocket in which you put chopped meat, spices and herbs. The classic shawarma is a pita with cold cuts.
Georgian lush lavash is also a kind of pita.
By the way, the first mention of this high-grade flour bread can be found in the Old Testament. Pat of bread - this is how the ancient Jews called this cake. This phrase was translated into Russian, like a loaf.
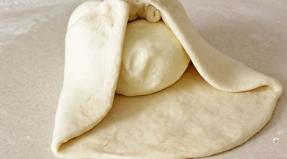
Making a sandwich pocket
To bake this homemade bread, you need to take care of the ingredients. The following components are required at hand:
- 3 cups flour;
- 1 glass of water;
- 1.5 spoons of tea yeast;
- 1.5 tablespoons of sugar and sunflower oil;
- 1 teaspoon of salt.
Having once tried to cook pita at home, in the future you can customize the recipe for yourself.
- The classic dough is kneaded - warm water, sugar and yeast. As soon as the yeast begins to foam, add vegetable oil;
- In a volumetric bowl, combine flour with salt;
- Pour the yeast oil mixture into flour, and knead the dough - dense so that it does not stick to your hands;
- The kneaded dough is left to rise in a warm place;
- As soon as it doubles, a long sausage is made of it, more like a loaf, which is divided into 8 parts.
Someone makes 6 parts, but the problem is being solved, how to bake pita at home, which means - in an ordinary oven. Several cakes with a diameter of more than 15 cm will hardly fit on the wire rack. And since you will have to bake only 4 times.
As you can already understand, a cake is rolled out from each portion of the dough. They are not baked on a sheet - on a wire rack!
The oven must first be preheated to 260 ° C.
It is advisable to have an oven with a window for baking pita at home. It will show how the cake is inflated. Usually, in 10 minutes, it acquires the maximum volume.
Take out one batch - spread the next.
You can see that making pita recipes at home is easy enough.
After mastering the process of how to cook pita at home, you will probably want to use it not as a pocket for an ordinary sandwich - butter-cheese-sausage - but to put something equally tasty, mysterious, oriental into it. For example, shawarma.
The simplest homemade shawarma in pita is chicken.
The easiest shawarma sauce. You should start making the dish with him, since in order to imbue the tastes of all the components, he needs to brew a little.
All ingredients are taken in packages, seasonings are added to taste.
Mix in a glass of sour cream, fermented baked milk and mayonnaise until completely homogeneous. Add a tablespoon of salt and sugar, lemon juice - it is enough to squeeze a quarter of a medium lemon.
All other ingredients: pepper, crushed garlic and suneli hops are added, trying. In order not to get too bland or, on the contrary, spicy.
The sauce must be allowed to brew, so it is removed to a cool place and the shawarma is started.
Chicken breasts are fried in sunflower oil, adding - when it's already stewed a little - garlic, salt, pepper. Garlic should be laid out so that it does not have time to burn. All this is brought to readiness.
Separately, finely chop vegetables - tomatoes and cucumbers. Peel the crust from the cucumbers, remove the skin from the tomato, having previously doused them with boiling water.
Finely chop greens - parsley or cilantro, add to vegetables.
At the pita, they raise the crust, put the meat with vegetables in the pocket, pour a couple of tablespoons of the sauce.
The homemade dish is ready.
Shawarma is usually made from beef or lamb, but chicken cooks faster. Lamb must first be pickled in vinegar, herbs and garlic - it is advisable to do this in the evening.
Then the meat is fried until a beautiful golden brown on the outside and half cooked on the inside.
Then the meat is brought to full readiness in the oven, wrapped in foil so that it does not burn - checking the readiness by piercing it with a match. As soon as the juice that flows out becomes colorless, the meat is ready.
It is finely chopped, mixed with fresh tomatoes and pickles, put in a pocket and sauce is added.
Shawarma turns out to be more similar to the version from the kiosk, but it takes longer to cook.
Fantasy and old recipes will tell you how to make an original pita at home.
Tortilla ... Cut the lush bread into two separate layers to make 2 circles - plates. Each of the plates is greased with some kind of sauce: self-prepared or purchased. Mayonnaise, tomato, mustard, even regular butter are suitable.
Fried eggs ... Homemade bread is opened and broken chicken eggs are placed in the pocket, slightly salted. Pita is placed in a hot skillet and waited for the proteins to harden. The yolks should remain semi-liquid.
Before serving, chopped herbs are poured into the pocket to taste.
2-3 pits can be used to make a pie. To do this, the bread is spread out, filling is laid out in each plate, for example, fried mushrooms and olives, fried meat and olives, bacon and mushrooms. Sprinkle each layer with herbs and cheese.
Place the plates on top of each other and place in the oven.
Once the cheese has melted, the pie is ready.
You can simply use the pita as a pocket for hot sandwiches. In addition to any filling according to your own taste, cheese must be added to it - in order to securely seal the pocket. You can reheat such a snack in a toaster, microwave or conventional oven.
Pita will taste better if you just grate it with garlic before serving, add sauce and herbs to the pocket, roll in caraway seeds. You can experiment endlessly! Enjoy your meal!
Lean pita bread - a recipe for cooking in a pan at home
Pita is a yeast-free Arabic lean bread. Moreover, it is ancient, as it is mentioned in the Old Testament. Its analogues are called: chapatis - in India, lafa - in Iraq, snaps - in Kazakhstan. Oh, delicious-oooh!
It has an interesting feature. This "pocket" is formed from air bubbles that swell during baking. And in this pocket you can put any filling: vegetable salad, meat, cottage cheese ... and so on, because this is the same bread. And so the children are delighted with him, took a burrito and run to play.
And it is also healthy and tasty, especially since recently there are so many different additives in store bread that it is simply scary to eat it.
Pita cooking recipe
This is a completely lean recipe, you don't even need oil for frying. We will bake in a dry frying pan. It is advisable to take with a thick bottom or cast iron, so that it warms up better.
- Warm water - half a glass (125mg)
- Flour - 2 cups
- Salt - half a teaspoon
- Vegetable oil 2 tablespoons
- If the "pocket" is not fundamentally important for you. Then, if you wish, you can add your favorite spices, herbs, sesame seeds to the dough. Sesame will give the cakes a unique taste, you can first dry it slightly in a pan.
We knead the dough, as for flour, you can mix wheat flour with any other. For example, add half a cup of rye or whole grain, it retains moisture better. But here, too, the pocket most likely will not work! The amount of water also varies, since it depends on the flour, it absorbs moisture in different ways. It is better to sift flour through a sieve.
Cover the dough with a towel and leave for 20 minutes.
After that, again knead the dough with our hands for about 5 minutes. Divide it into equal pieces, assuming that the cake will be the size of a small saucer and always round. Otherwise, the pita will not rise completely and we will not get a pocket. We make balls from pieces not with palms, but with fingers (shown in detail in the video recipe).
And roll out perfectly round cakes with a rolling pin, otherwise there will be no "pocket". The thickness of the cake is no more than 3 millimeters. There is no way to roll out a perfect circle, cover the cake with a saucer and cut off the uneven edges. And now you can sprinkle sesame seeds on the pita and walk with a rolling pin so that the sesame seeds stick into the dough and do not fall out during baking.
Thus, we roll out all the other balls and cover with a towel so that the moisture does not evaporate from them. Moreover, you do not need to pour flour on the table, since the dough is not sticky.
Next, heat the pan to the highest temperature, reduce the heat a little and put the future cake in a dry pan. (If you want to add oil to the skillet, you can do so, but then the taste of pita will be different for you.)
Put the future pita on a hot skillet - don't miss the moment. After about 1 minute, you will see a lot of bubbles on the surface. This means it's time to turn over!
And now the pita will begin to rise and become like an inflated pouch within 1 minute! Of course, if you did everything right.
After you remove the cake from the pan, it will begin to deflate. And if you see fit, you can grease it with oil or just cover it with a towel so that the moisture does not evaporate. And when all the pits are ready. You can cut the pita in diameter, or cut the edge and put absolutely any filling there.
This is a detailed video tutorial of Pete's recipe, including how to make balls by hand.
What to do if the pita does not work with the pocket.
- Make circles with a smaller diameter.
- If this does not help, and you just desperately need a pocket, then you can do this:
- Add yeast or baking sourdough. Better, of course, leaven, it is much healthier.
- Or make a not entirely lean option - add hot kefir instead of water.
That is, leave all the ingredients as they are. But add the same amount of hot kefir instead of water. Kefir needs to be heated on the stove to a boil, do not worry, but this procedure will curdle it.
Pita is a type of bread, flat and round tortilla baked from wallpaper or wheat flour.
This type of bread includes lafa in Iraq, chapatis in India. Pita is an Arabian bread that features a pocket created by steam during baking. Once cut, the pocket can be filled with anything from vegetables to cuts of meat, from salads to thick sauces. So it turns out a pita with a filling - either bread, or a whole lunch.
Pita is baked in two ways - in the oven or in a pan.
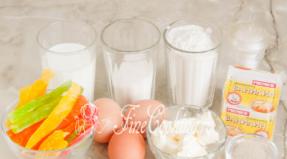
Ingredients
To make 8 pita cakes, you will need:
- flour - 500 grams
- fresh yeast - 28 grams
- warm water - 250 ml
- salt - 2 tsp (for slightly salty)
- vegetable oil - 1 tbsp. spoon + for greasing the bowl
Preparation
Pour warm water into a bowl, add yeast and salt. Dissolve yeast.

Add vegetable oil and stir.

Add the sifted flour.

Knead the dough, which will be crumbly at first.

Place it out of a bowl on a floured work surface. Knead an elastic, homogeneous, soft dough. Knead for at least 10 minutes.

Grease a bowl with vegetable oil and place the bun in it.

Cover with plastic wrap and leave in a warm place for an hour. During this time, the dough should rise by half.

Divide it into 8 koloboks. Roll each into a flat cake up to 7 mm thick.

Fold on a baking sheet and bake in an oven preheated to 220 degrees. When baked, the tortillas inflate, becoming like a ball. As soon as the cake has turned into almost a ball, then the pita is ready. This will take 5-8 minutes from the start of baking.

Remove the baking sheet from the oven and cover with a towel while the bread cakes cool.

How to cook pita in a pan. Preheat a heavy-bottomed skillet (good if it is cast iron). Drop in oil. Put in the tortilla.

As soon as bubbles appear, flip over. Bake for a couple of minutes, turn over again and bake for a couple more minutes.


Place on a plate and cover with a towel.

Actually, the pita is ready. You can try it with any dish. Or you can immediately make it in Arabic with a pocket - you get a pita, a recipe with a filling. It will look like this:

How to make pita at home? How to make homemade pita from yeast-free dough? It turns out it's much easier than it sounds.
What is pita? This is a yeast-free round cake, hollow inside, so beloved in all countries of the Mediterranean. You can put any filling in pita, like in a purse - vegetables, cheese, beans.
And how convenient it is to take it with you to work, as a healthy snack. Let's cook it at home.
To prepare pita at home, you do not need special equipment, a regular frying pan will do. The ingredients are the simplest - flour, water, vegetable oil and salt. Cooking takes no more than 40 minutes.
Ingredients:
(for 8 pieces)

200 ml boiling water
- 360 g flour
- 20 ml of vegetable oil
- 2 g salt
Pita recipe
Pita dough is prepared in a special way - choux. First you need to dissolve the salt in boiling water. 
Pour salted boiling water and butter into flour. 
Stir the flour mixture with a spoon until the water is cold. Then knead the dough, which is very pleasant to the touch, with your hands - it is easy to press and takes the desired shape. Collect it into a ball. 
For 15 minutes. leave the dough to rest in the bag. 
Roll up a small sausage, divide it into 8 pieces. 
Roll all the pieces into balls. 
Cover them with plastic wrap. 
To roll out the dough, prepare a little oil - you will need to lubricate the rolling pin and the table with a few drops. 
Constantly turning the dough, roll it out in the shape of a circle. The diameter of the pitta is about 15 cm. It is important that the cake is round, with smooth edges. 
In a well-heated skillet, without adding oil, fry one side of the pita for 20 seconds. At first, small bubbles will appear on the cake, and then it will begin to swell from the inside. 
Flip the pita over to the other side. At this point, it will deflate a little, but after 20 seconds, the cake must be turned over again, after which it will swell again. 
Remove from the pan. Prepared pitas should be kept under a towel. 
Important points to remember when preparing pita:
1. When rolling out the dough, you do not need to sprinkle flour either on the table or on the text itself.
2. The pan should warm up evenly and well.
3. Turn the pita in the pan several times.
It is convenient to cut the finished cakes diagonally with scissors. Put all the tasty things in the refrigerator inside. For a snack at work - just right. And you can eat pita without anything, as yeast-free bread.
Pita is one of the simplest types of bread, along with a variety of pita bread, focaccia, tortilla. This representative of the cuisine of the Arab peoples is very easy to cook at home, and there are so many recipes with it that it is difficult to count.
Pita is ideal for picnics and takeaways. The thing is that its distinctive feature is that this cake is hollow inside. Most often it is cut and put inside meat, herbs, vegetables, cheese.
However, you can stuff pita with absolutely any ingredients that you like. So, you can cook with it not only the usual sandwich, but also a dessert with fruits and sweet sauce, as well as bake already stuffed pita in the oven. In a word, this bread will give a truly wide scope for any lover to cook.
You should not cook a lot of pitas at once, because they turn out to be very thin and tender, and therefore dry out quite quickly. Because of this, they are stored in a film or tightly tied bag so that air access is minimal.
And even a slightly dried pita can be reanimated by holding it in a colander over boiling water in a saucepan for several minutes. After this procedure, it will be as if freshly baked!
Ingredients for 8-10 pits
- 250 grams of wheat flour
- 150 grams of room temperature water
- 1.5 tbsp. tablespoons of vegetable oil
- 4 grams dry yeast
- 4 grams of salt
How to cook pita
Pita dough can be kneaded either by hand or with a food processor or bread maker. To make the dough, combine flour, salt and yeast.

Then add oil and water to the dry ingredients.

Knead the dough for 5-10 minutes. It should be slightly lumpy and rather tight. If you are using a bread maker, knead the dough using the Pizza Dough setting (Binatone BM-2068) or the equivalent setting on your model, which requires a short, one-time fermentation batch.

After kneading, let the dough rise for an hour. It will become smooth and very lush.

Divide the finished dough into 8-10 pieces.

Roll the dough pieces into small balls and let them stand for 10 minutes.

Then roll each piece into a cake with a diameter of 15-20 cm and a thickness of 3-4 mm, lay on a sheet of parchment and leave for another 15 minutes, covered with a clean towel.

Heat the oven to 220 degrees with a baking sheet. Gently transfer the sheet with pita bread to a hot baking sheet and bake for 8-10 minutes without opening the oven door.
During baking, the pits are inflated, and a cavity is formed inside.
Wrap the finished pitas while still hot in a damp towel and let them cool as they are, then transfer them to a bag. And how to stuff this wonderful bread, you can easily come up with yourself - there is no doubt about it!

Pita is a fluffy and delicious white tortilla or bread that is used in recipes for various appetizers. The main distinguishing feature of Mediterranean pita is the natural "pocket" inside, formed by the steam accumulated in a small bubble in the core of the bread. A variety of fillings are placed in such a pocket - vegetable, meat or fruit.
It turns out a very tasty and nutritious dish, somewhat similar to the shawarma we are used to, but much safer for the human body. Today I will present to your court recipes for cooking with a photo of pita and fillings for it, which can be easily implemented at home.
Basic pita recipe
Kitchen tools: several large bowls; cutlery (spoons, knives); the baking sheet is spacious; the pan is roomy; kitchen potholders; wooden spatula; a piece of parchment paper; Kitchen Scales; sieve.
Ingredients
How to choose the right ingredients
- Try to choose only the best ingredients for your pita. This is especially true of flour: it must be of the highest grade and fairly finely ground. Also, do not forget that various debris should not be visible in the bag with flour: blackened grains, remnants of polyethylene or husks from grains. Remember that only fresh and high quality flour will allow you to make a truly delicious pita.
- If yeast baked goods aren't your thing, make a yeast-free pita - This recipe allows the use of a teaspoon of baking soda, quenched with table vinegar.
- Olive oilRecommended for use in the recipe is an integral part of Greek cuisine; without it, the pita will not turn out the way you expect it to be. Sunflower oil, which is often used in the absence of olive oil, makes the cake less fluffy and tender, and the dough itself can give off a bitter taste.
- Pour 70-75 g of dry yeast into a small bowl, add about 250 ml of water to it. Stir the mass thoroughly with a spatula so that the yeast is completely dissolved. Leave the mixture for a few minutes in a warm place. Mix the remaining water with 20-25 g of table salt and 7-10 g of granulated sugar, trying to dissolve all the grains.
- Sift 750 g of wheat flour through a sieve, make a small depression in it.

- Pour the infused yeast into the niche, as well as water with salt and granulated sugar. Then add 80-100 ml of olive oil and mix thoroughly.

- As soon as the dough has become too tough, transfer it to the kitchen table, sprinkled with flour, and knead by hand for about ten minutes.

- Then we leave the dough in a warm place for an hour, during which time it should swell well. We knead the dough that has come up and divide it into twenty identical pieces.

- We form a ball from each piece, then leave the products to infuse for about half an hour. To prevent the blanks from getting covered with a dry crust, cover them with a towel.

- Roll each ball into a cake with a diameter of about 12 centimeters.

- We again leave the pieces in a warm place for proofing, this time it will take about ten minutes. We line the baking sheet with baking paper and transfer the prepared cakes to it. In total, we need to bake 10 cakes in the oven.

- We bake the products for about 10 minutes at 200 degrees in the oven. We bake the remaining ten blanks on both sides in a dry frying pan heated over medium heat. In this case, in no case cover the pan with a lid.

Basic pita recipe video
The video shown for viewing shows the complete process of preparing and baking delicious pita in the oven and in a pan.
Shawarma pita recipe at home
Time for preparing: 35-40 minutes.
Servings:4-5.
Calories per 100 grams: 180-265 kcal.
Kitchen tools:several large bowls; cutlery (spoons, knives); Grill pan; kitchen potholders; wooden spatula; a piece of parchment paper; Kitchen Scales.
Ingredients
| Eggplant | 1 PC. |
| Red onion | 1 PC. |
| Suluguni Umalat | 150 g |
| Pita ready | 3 pcs. |
| Ham | 100 g |
| Fresh cucumber | 1 PC. |
| Cachoricotta | 20-30 g |
| Fresh radish | 2 pcs. |
| Avocado | 1 PC. |
| Lemon juice | taste |
| Kachokovallo | 50 g |
| Salad mix | taste |
Step by step cooking process

Video of a shawarma recipe in pita at home
This video provides a detailed step-by-step process for preparing delicious pita snacks.
- To prevent the pita from burning, try to monitor the intensity of the stove fire when baking in the pan. Do not make the fire too strong, as this will simply burn your cake on the outside and remain moist on the inside. In addition, in the oven, it is best to bake a raw cake at 200 degrees, constantly observing the level of rise of the dough: if the product has swollen too much, immediately open the device door to prevent the appearance of tears on the delicate surface of the pita.
- To prepare pita shawarma, you can also use a wide variety of fillings, for example, meat. For example, you need to twist the chicken through a meat grinder, add finely chopped onion and salt. Then stew the meat in a skillet for about seven minutes, stirring constantly, and then place the resulting filling in the pita.
- In addition, this product can be made sweet by filling it with jam, jam or canned fruit slices.
- Prepared stuffed pita bread can dry out quickly if left outdoors for a long time. To avoid this, you can wrap the snack in plastic wrap and leave it at room temperature.

How and with what to serve the product
- Pita is a versatile snack that works great for a hearty breakfast, nutritious lunch or early evening meal. If you are watching your figure, I do not advise eating the product late in the evening, since the calorie content of the snack is quite high.
- Be sure to serve suitable drinks with your drink. In my opinion, milk, kefir or yogurt are best suited for a product without filling. As for pita shawarma, vegetable juices, tea or unsweetened coffee are perfect for such an appetizer.
- Many gourmets believe that filled pita bread tastes much better when sprinkled with a suitable sauce. The most popular sauces for this appetizer are ketchup, mayonnaise or sour cream. It is also worth noting that pita with sweet and sour Chinese sauce comes out incredibly tasty.
- It is customary to eat peeta with your hands, without using cutlery. However, if children are going to eat your snacks, use a sharp knife to cut the product into small pieces and serve on a spacious plate with a fork.

Helpful information
Now that you know how to make pita, I recommend paying attention to other, equally reliable and quick recipes for delicious snacks that can be easily prepared at home.
- Try to tackle a very mouth-watering homemade one, famous for its amazing taste and incomparable, memorable aroma.
- Also, do not forget about the delicious, which is rightfully considered one of the most attractive snacks. Even the most notorious fastidious people are not able to refuse such a delicacy.
- Alternatively, try a low-calorie one. This light and hearty dish will attract the attention of those gourmets who would not want to gain extra pounds.
- Surprisingly delicate - the most worthy decoration of the festive table. This nutritious and aromatic dish will impress even those who do not like fish-based products.
- If you want to experiment, check out the great recipes with different fillings. Maybe it is among them that you will find the best one, perfect for your family.
Thank you all for your attention to the recipes! I look forward to your comments on the recipes just described. In addition, share your own findings and experience in making pita and filling for it. Are you using different ingredients or are you preparing the dough in a different way? Tell us about it, let's work out the perfect recipes together! Bon appetit and more exciting culinary discoveries!