A step-by-step recipe for making a biscuit. The classic recipe for biscuit in the oven
As a child, we all loved my mother's cakes so much. There was certainly a recipe that was prepared exclusively on holidays. Now we have matured and it is in our power to bake any delicacy for all family members.
The variety of culinary masterpieces is so great that it won't be long to get lost in it. To decide on what to actually opt for - think about what you want?
1. To make it tasty
, no, not just tasty, but so that a piece of delicacy melts in your mouth.
2. So that you can don't worry too much about calories
.
3. To be the ability, when using almost the same ingredients, to receive a new treat each time
.
4. To there were no difficulties with cooking
so that the dish is not capricious.
The French are refined connoisseurs of sweet pastries, and we express our gratitude to them for the fact that the world knows the recipe for such a delicacy as biscuit.
Is it possible! The French are refined connoisseurs of sweet pastries, and we express our gratitude to them for the fact that the world knows the recipe for such a delicacy as biscuit. This treat is perfect for all of the above requirements.... You may argue that you have to tinker with his baking, that biscuit can only be prepared by an experienced hostess.
With our tips, you will delight your loved ones, guests and yourself with the culinary skills.
Homemade biscuit recipe (simple): proven options
We offer for your consideration several proven options.
Biscuit "Classic". What do you need to make this dessert?
Ingredients:
1. Six pieces eggs;
2. Wheat flour 150 grams;
3. Granulated sugar 200 grams;
4. Baking powder 10 grams;
5. Vanilla -10 grams;
6. Pinch salt.
Let's start the cooking process.
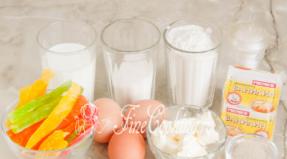
 Ingredients for the cake.
 We take eggs, break them into a clean container and with the help of available tools beat until foam appears ... Then in the portions indicated in the recipe add salt, granulated sugar and vanilla to the bowl... After repeat the whipping procedure for about three to four minutes ... In a special container mix flour and baking powder... Slow combine the contents of two bowls by adding the mixture to the eggs.
And again beat for about twenty five minutes... As a result of the performed manipulations, you should get out dough of medium consistency ... If the process of whipping becomes tiring with its monotony, then you can cheer yourself up with the thought that the longer you beat the ingredients, the thicker the biscuit will be..
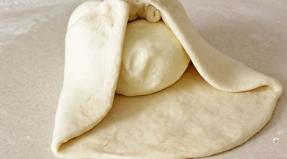
Next, take a tall form, cover it with special parchment paper and carefully pour the finished dough on it. Now it's turn put the future biscuit in the oven... The homemade biscuit recipe is so simple that you will not have time to look back how in twenty-five minutes you will have cakes ready for him .
 Next, take a tall form, cover it with special parchment paper and carefully pour the finished dough on it.
 The temperature in the oven should not exceed one hundred and eighty degrees.
When you are convinced that the cakes are already browned and look appetizing enough, do not rush. IN turn off the oven, but do not take out the form, let the biscuit stay there for another ten minutes. After the specified time spread a clean towel on a hard surface and turn the cakes over to it.
The cakes are now ready to create the most delicious cakes and cakes. Biscuit, in addition to its other advantages, is also good because it contributes to the development of imagination. And the secret is in the cream. The cakes themselves come out quite dry, so they must be soaked in syrup, fruit juice or cream.
You will need two glasses of cow's milk, one glass of sugar, and four chicken yolks.
 Since childhood, custard remains a favorite for many connoisseurs of the sweet life.
 The yolks are ground with sugar , Meanwhile the milk on the stove is brought to a boil ... And then the fire is reduced, and yolks are introduced into the milk in small portionswhile stirring thoroughly. The cream is on the stove until it thickens.
Then it remains only to wait for the resulting mass to cool down in order to apply it to the finished cakes.
Homemade biscuit recipe is so simple and delicious that it is very often used in preparation for children's holidays... Boys and girls like this not fatty and moderately sweet treat. But if you are trying to please older gourmets, then you can refer to the biscuit recipe called "Elizabeth" .
Biscuit "Elizabeth" in its preparation includes the following stages:
The cream is prepared here from the following products: two packs of fresh butter, one can of condensed milk, two yolks, a bag of vanilla. Add to all of the above half a glass of water.
Eggs are mixed with water and condensed milk and gradually heated over low heat. At the same time, the butter is ground with vanilla.
Later combine both masses and beat until an airy consistency... The cream is ready. When it cools down you can apply it to the cakes on both sides by adding chopped nuts . From above, the masterpiece is decorated with grated chocolate, berries or marshmallows.
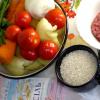
Another exquisite delicacy is biscuit with cottage cheese. You need to bake the cake, divide it into 2 parts and soak it with syrup.
Then go for the stuffing. Take half a glass of juice. Better if it is grape or apple, and dissolve one packet of gelatin in it... Then mix five hundred grams of cottage cheese with half a glass of sugar, beat everything and add juice with gelatin there. Now you again need the form in which the biscuit cakes were baked.
 From above, the masterpiece is decorated with grated chocolate, berries or marshmallows.
 Now you have seen how simple the recipe for making a biscuit at home is. Then lay out in turn on each other the cake, then the filling, again the biscuit, the rest of the filling. Place the treat in the cold for three hours .
When the specified time is up, you can start decorating. Give complete freedom of imagination here, you can use everything that you love and everything in the refrigerator:fruits, berries, marmalade, chocolate, caramel, ice cream.
The main thing is that the appearance of the dessert is as great as its taste. If you want the cakes to be more saturated, then they can be cut not into 2, but into 3 components. During the cooking process, it happens that the cake does not want to keep its shape, breaks, do not put it in the trash can.
If it is crushed, then such a marriage can be used for decoration. And if you break the cake into several small pieces and soak it with cream then you get a slightly different dish, but also not a bit worse than a biscuit.
 To decorate the cake, use everything you love and everything in the refrigerator: fruits, berries, marmalade, chocolate, caramel, ice cream.
 Another trick for those with little time. If the guests come unexpectedly, and there are no conditions for baking the cakes, then you can buy them at the nearest store, and grease with cream and decorate yourself.
To enjoy a simple recipe for making a biscuit at home, check out our recommendations.
1. Both the appearance and taste of the dish depend on high-quality flour., especially for such a finicky biscuit. Flour must be high in gluten , and to enrich it with oxygen, first pass it through a sieve. Let the flour breathe.
2. If you are impatient, then this point is for you. After the biscuit is placed in the oven, it must not be opened. If you look into the baking cabinet in the first fifteen to twenty minutes, the dough will fall and you will have to forget about the splendor.
3. The eggs also need attention. Beat them without being lazy. If you save time on this process, then when baking, the biscuit will rise, but as soon as you get it out of the oven, it will immediately fall and turn out to be flat.
4. Sugar should be chosen only white , brown in this case will not be able to replace it.
5. The proverb says that you cannot spoil porridge with butter, this also applies to biscuit. It is preferable that the oil had a high fat content, then the baked goods will differ in taste and splendor.
 The appearance and taste of the dish depend on high-quality flour, especially for such a finicky biscuit.
 6. If you decide to pamper your loved ones with a delicacy, then approximately
Sponge cake is a versatile pastry for confectioners. Almost no cake can do without a biscuit, cakes and rolls are made from biscuit, used as a basis for any confectionery.
Lush, like a cloud, and quite dense, with butter and cream, with nuts and with carrots - they are very different, but they are united by the cooking technology. Whatever the biscuit dough, for it you just need to beat the eggs (or separately the whites and yolks) and add the rest of the ingredients as carefully as possible. It is due to the air added during whipping that your biscuit will rise in the oven.
When baking a biscuit, two processes take place at the same time. Firstly, the air in the dough heats up and, accordingly, expands, it makes the dough rise in the oven, that is, increase in volume. Secondly, if there is enough heat (at a baking temperature of 180-200C), the walls of the growing pores are baked. Thus, to get the correct biscuit, you need to beat the eggs well, add as much air as possible, stir the dough, being careful not to lose the added air, and then bake it correctly at a sufficiently high temperature.
Before carefully studying the technology of Irina Chadeeva, we suggest watching the video recipe of the professional pastry chef Oleg Ilyin!
What are we baking from?
FLOUR
Biscuits are baked due to the starch gelatinization process - when heated in a wet dough, it changes its structure, becoming thicker and more viscous. Therefore, it is the presence of starch that is important for a biscuit, and, accordingly, it can be baked from almost any flour - rice, wheat, corn, buckwheat (any flour contains starch). If you replace part of the wheat flour with starch, the biscuit will be more durable and crumbly. You can bake a biscuit without flour at all, only on starch. But in nut flour (ground nuts) there is no starch, and therefore biscuits with nut flour are less durable and easily settle. Nevertheless, pastry chefs often make biscuits with nuts - it turns out very tasty!
EGGS
Without which, in principle, a biscuit cannot be baked - it is without eggs. It is the eggs that give it both splendor (when whipping) and strength (when baking). A well-beaten egg mass is the key to success when working with a biscuit.
SUGAR
For a biscuit, use regular sugar, preferably with small crystals. They dissolve faster, respectively, and eggs beat better with them.
Basic biscuit recipe
There are many options for biscuit, but it's worth starting with the simplest recipe, which, however, is no worse than the most complex ones. Remember the proportion:
4 eggs
120 g sugar
120 g flour
and no baking powder!
How to make a biscuit:
1. First, measure out all the ingredients. Sift flour (as well as starch, if you use) - it is saturated with air and then mixes better in the dough. Divide the eggs into whites and yolks (remember that cold eggs are best separated into whites and yolks), using a large bowl for the whites and medium in size for the yolks.
Please note that the forms and trays for biscuits must be prepared in advance, and the oven should also be preheated in advance. When the biscuit dough is ready, it must be immediately transferred to a mold (on a baking sheet) and baked without wasting time. The biscuit dough settles quickly, and the finished products from the settled dough are low and dull.
2. Pour half of the sugar into the yolks and beat with a mixer at maximum speed until they are thick, almost white.
3. Wash and dry the whisk and beat the whites at full speed until the mixture is white and thick. Mixer attachments should leave a clear, non-spreading mark. Only now add the remaining sugar and beat on until the mass becomes snow-white and shiny.
 publishing house "Mann, Ivanov and Ferber"
4. Add the yolks to the whites and stir very gently with a spoon until the mixture becomes homogeneous, light yellow in color.
How to mix correctly? Take a spoon and dip the side into the middle of the bowl. Pass the convex part of the spoon along the bottom (towards you), then up the side of the bowl, continue moving over the dough and again lower the spoon in the middle. The spoon will describe a circle. Repeat this movement while turning the bowl with your other hand. Thus, all types of biscuit (and other whipped) dough are quickly and accurately mixed. This method is called the “folding method”.
5. Add flour and other dry ingredients. Stir again by folding. Do not stir for too long, as the dough may become too thick.
 publishing house "Mann, Ivanov and Ferber"
As soon as the lumps of flour have disappeared, stop. Transfer the dough to a mold, flatten the surface and place in the oven.
 publishing house "Mann, Ivanov and Ferber"
What to add?
Butter is often added to the biscuit. To do this, melt it, cool it and pour it in as carefully as possible. Even a small amount of butter makes the crumb more tasty and moist, biscuits with butter do not stale longer.
How to prepare a form?
There are several ways to prepare the molds and bake the biscuit. Each has its own advantages and disadvantages. Sometimes it doesn't matter in what form you bake, and sometimes it matters.
Method number 1
Lubricate the inside of the mold with softened butter (the melted butter will drip off and you won't get an even coating). Pour in a spoonful of flour and, shaking the mold, distribute the flour first along the sides of the mold, and then along the bottom. Tap the mold well to sprinkle out excess flour.
With this method, the biscuit does not stick to the bottom and walls of the mold at all. After baking for 5–10 minutes, the biscuit cools down and shrinks slightly, while a small gap appears between the wall of the form and the biscuit, and a small slide remains on the biscuit. Turn the biscuit over onto the wire rack, it can be easily removed, while the slide will be at the bottom, and the top will be completely flat.
DISADVANTAGE: when using this method, the biscuit is slightly lower.
Method number 2
Do not grease the baking dish, but cover the bottom with baking paper.
When baking, the biscuit will stick to the walls, but when you take out the mold, it will also settle. Since the walls cannot settle (they are stuck), the "pea" will settle, thus, when cooling, the surface of the biscuit will become even. The biscuit is taken out of the mold only when it has completely cooled down. To do this, you need to very carefully run the knife along the walls, separating the biscuit, and remove the form. Remove the baking paper before using the biscuit.
DISADVANTAGE: in order to separate the biscuit from the walls, skill and accuracy are needed; silicone molds cannot be used.
Method number 3
Do not grease the dish or place baking paper on the bottom.
 publishing house "Mann, Ivanov and Ferber"
This method is suitable for the lightest and most delicate biscuits, which settle under their own weight when they cool. These are biscuits with a small amount of flour and starch, as well as protein biscuits. Usually they are recommended to be cooled upside down - for this, immediately after baking, the mold is turned over and placed on bowls so that the biscuit does not touch them. In this position, the bottom and sides of the biscuit are glued to the mold, it does not fall out, but it also does not settle under its own weight. Please note that in this case it is important to choose the correct size of the form so that the biscuit does not turn out above the edges and can be turned over.
DISADVANTAGE: sometimes it is difficult to separate the biscuit from the mold; silicone molds are not suitable for such baking.
Bakery products
Always preheat the oven to 180-200 ° C in advance. It is advisable to bake biscuits on the middle level of the oven; convection can be used. Try not to open the oven for the first 15 minutes of baking to keep the air cool. You can check the readiness of the biscuit 25-30 minutes after the start of cooking. Ready biscuit - always with a uniform slide, golden brown in color. Pierce it in several places (closer to the middle) with a toothpick, there should be no dough stuck on it. You can also press with your palm, the finished biscuit is elastic and durable.
IMPORTANT!
To prevent the biscuit from getting soaked during impregnation, to be strong and elastic, it is advisable to let it lie down for several hours. For cakes, I usually bake a sponge cake in the evening and leave it in the kitchen overnight. Please note that the biscuit should not dry out - for this, if the air in the kitchen is dry, you can put the biscuit in a bag after it has cooled completely.
 publishing house "Mann, Ivanov and Ferber"
How to cut a biscuit?
One four-egg sponge cake baked in a 20 cm diameter pan can usually be cut into three cakes. Use a few simple tricks to keep your cuts straight and the cakes consistent in thickness.
Lay the sponge cake upside down - it is very flat and your cake will be flat on top too. It is convenient to use a sheet of baking paper, a flat plate or wire rack as a substrate, the main thing is that you can easily rotate the cake along with the base. Prepare a knife - it is highly desirable that it is sharp, with a blade that is longer than the diameter of the biscuit. A bread knife with a wavy blade works very well.
Use a knife to mark the cut lines about 1 cm deep around the circumference of the biscuit.
Insert the knife into the cut and cut, carefully turning the biscuit and pressing the knife against the bottom cake, it should go exactly along the marked line.
Problems?
- Too thin dough - whites or yolks are not beaten well, the dough has been stirring for too long;
- The biscuit does not rise well - the dough was stirred for a long time, the eggs were not beaten well, the oven was too cold;
- The biscuit sagged heavily after baking - the dough was poorly baked, there is little flour or starch;
- Biscuit donkey in the oven - oven too hot;
- The biscuit crumbles heavily - too much starch.
Prepare the ingredients for the biscuit.
Lightly grease a baking dish and cover with parchment (or grease, sprinkle with flour and shake off excess flour).
Sift flour 1-2 times.
Separate the whites from the yolks.
The whites must be separated from the yolks very carefully so that not a drop of the yolk gets into the whites, otherwise the whites will not beat. Also, the bowl in which the whites will be whipped must be clean, without traces of fat. Better to wipe it down with a paper towel dipped in vinegar or lemon juice.
Put the yolks in a bowl, add half the sugar and vanilla sugar.

Grind the yolks well with sugar until they increase in volume and whiten the mass.
The yolks can be ground with a fork, whisk, mixer, or rod grinder.

Place the egg whites in a clean bowl or mixer bowl.

Beat the whites on a medium mixer speed until a light, fluffy foam forms (until soft peaks).

Without stopping whipping, add sugar in a thin stream.
When all the sugar has been added, continue whisking until the egg is tilted (or turned over) and the egg spills out of the bowl (be careful not to interrupt the egg white).

Add a third of the whipped whites to the yolks.

And gently, from top to bottom, mix with a silicone spatula.

Add sifted flour to the yolk mass.

And mix well.

Then add the remaining whipped egg whites.

And very carefully, with movements from top to bottom, as if lifting layer by layer, mix the dough.
Advice 1. The dough does not need to be stirred for a long time so as not to destroy the air bubbles, due to which the biscuit rises.
Tip 2. You can add grated lemon or orange zest, sifted cocoa, chopped nuts to the biscuit dough. These ingredients are pre-mixed with flour. If cocoa or nuts are added to the dough, you should take less flour by the same amount. Also, some of the flour can be replaced with starch.
Tip 3. The form is filled with dough no more than 2/3 of the height, since during baking the biscuit increases in volume by about 1.5 times.

Place the dough in a mold and smooth the surface.

Bake the biscuit in an oven preheated to 180 ° C for about 30-35 minutes.
Carefully remove the sponge cake from the mold, place on a wire rack and let cool.
Advice 1. During baking, it is advisable not to open the oven door for the first 20-25 minutes, otherwise the biscuit may fall off. But, if not necessary, it is better not to open the door during the entire baking time of the biscuit.
Tip 2. The biscuit is ready if it has shrunk a little, the edges move away from the walls of the form and when you lightly press on it with your fingers, the biscuit springs, and the fossa is quickly restored.
If the form is not covered with parchment paper, you need to use a knife to walk along the edge of the form and separate the biscuit from the walls of the form. Cover the cooled biscuit with a napkin or paper towel and let it rest at room temperature for 8-12 hours (then, when soaked with syrup, the biscuit will not soak and crumble when cutting ).
Good appetite!
There are many recipes for a fluffy biscuit for a cake in the oven, but I wanted to start with a simple, not too complicated recipe, since the biscuit dough should be high and fluffy, but the desired result is not always obtained. This recipe is suitable for both bakery masters and novice pastry chefs, because it is easy to prepare and 90% is obtained by everyone.
INGREDIENTS (per serving):
- 4 eggs;
- 120 g Sahara;
- 120 g flour;
Nothing else needs to be added, neither soda nor baking powder. You will get one fluffy crust, for a cake it is advisable to bake 2-3.
COOKING:

For baking the cake, it is advisable to take a 20 cm mold.For the cream, you can use sour cream whipped with sugar and custard.
But it is worth noting one important fact! If you want your biscuit not to get soaked during soaking and to be strong, then after baking, leave it to “rest” for 3-4 hours. But at the same time it should not dry out, you can pack it in a bag or cover with a towel.
Everything, the biscuit is ready!
Incredibly delicious and fluffy sponge cake for a cake in a slow cooker
If you do not know how to properly make a fluffy sponge cake for a cake in a slow cooker, then this recipe can reveal all the secrets of cooking to you. All my readers have probably noticed that we offer you simple recipes, with minimal use of products, but despite this, you get a delicious cake, and if you apply a little imagination, you can get a dessert worthy of any holiday. Let's start the cooking process for us.

INGREDIENTS:
- 8 pcs. large eggs;
- 240 gr. Sahara;
- 250 g flour;
- 1 p. Vanillin;
COOKING:

This step-by-step recipe will help you bake a delicious and light cake, so you don't have to watch a video of a simple and fluffy biscuit for a cake, everything is already quite accessible and understandable. You can use any creams for the cake, as the biscuit goes well with everyone. A handmade cake is a symbol of home comfort and warmth.
Chocolate sponge cake for the cake. What's the secret to a fluffy sponge cake?
Cooking a delicious cake for your beloved family is not at all difficult, the main thing is to correctly bake a simple and fluffy chocolate biscuit for the cake. To your attention, my dear readers, I want to present a recipe for a chocolate sponge cake that will not leave indifferent either you or your family.

INGREDIENTS:
- 6 pcs. eggs;
- 0.5 tsp salt;
- 6 tbsp. l. Sahara;
- 6 tbsp. l. flour;
- 1 p. Vanillin;
- 3 tbsp. l. cocoa;
- 1 tsp baking powder (if the eggs are not beaten well);
- 10 gr. butter;
COOKING:

In this recipe, we have revealed all the secrets of how to properly bake a fluffy sponge cake for a chocolate-flavored cake. This cake, simple to prepare, but very tasty, will undoubtedly delight your family with an unusual, rich taste. I just warmly advise you to try this biscuit, especially if you are madly in love with chocolate.
Enjoy your tea!
Good day, my dear users. Today I want to share with you an unusual biscuit recipe, since it differs from the classic one in its recipe. A lush and simple sponge cake for the cake was created by French pastry chefs and craftsmen hundreds of years ago, but at the same time its composition has not changed much. Sponge cake has always been the leader among all confectionery baked goods, especially if you get it airy, fluffy and light.

In this recipe, I want to tell you how you can bake a cake with kefir.
INGREDIENTS:
- 4 tbsp. flour;
- 6 eggs;
- 2 tbsp. Sahara;
- 1 tbsp. l. vanilla sugar;
- 1 tbsp. l. baking powder;
- 1 tbsp. kefir (you can take any fat content);
- a pinch of salt;
COOKING:

When the cake is ready, you should not take it out of the mold right away, it is better to wait until it cools down.

I often use such a biscuit as a base for a cake. The cake turns out to be high and soft, so that it can be freely divided into 3-4 parts. The variety of options for such baking creates a large field for the manifestation of culinary imagination. Any cream can be used.
Insanely delicious and fluffy sponge cake for a cake on eggs
Many beginner pastry chefs simply do not know how to properly prepare a fluffy and tall sponge cake for a cake. That is why, a website was created where you can find many options for biscuits. Today I will tell you a step-by-step recipe for making a classic biscuit on eggs.

INGREDIENTS:
- 5 eggs (eggs should be chilled, it is best to keep them from the refrigerator, then the whites will whisk well);
- 1 tbsp. flour;
- 1 tbsp. Sahara;
- vanilla sugar;
- 10 g butter to grease the mold;
COOKING:

Such a biscuit can be eaten in this form, or divided into several parts and soaked in cream. For decoration, you can use melted chocolate, powdered sugar, or fresh fruit. In general, you can connect all your imagination and then you will get an incredibly delicious cake.
Biscuit dough is the classic and most common version of cake layers and other desserts that we are used to using. In fact, there is nothing difficult in making a biscuit, and any culinary specialist will be able to make it on his own at home with a minimum of effort.
Classic biscuit dough
This biscuit dough is suitable for almost all types of cakes.
What you need:
- chicken eggs - 4 pcs.;
- sugar - 150 g;
- flour - 100 g;
- vanilla sugar - 1 tsp.
First of all, we prepare all the necessary ingredients. We take a form of small size and a diameter of 20 centimeters, grease it with oil and cover the bottom with parchment paper. The flour must be sieved a couple of times so that there are no unnecessary impurities in it. The whites are separated from the yolks. Be very careful when doing this.
Mix the yolks in a separate bowl with 75 g of sugar and vanilla. We rub them with a whisk until they increase noticeably in volume. Beat the whites with a mixer at low speed until a peak is formed. After that, we begin to gradually fill in the remaining sugar there, while the mixer does not turn off.
Add 1/3 of the whipped protein to the yolks, mix gently with a spoon and add flour there. Mix well again, add the remaining proteins and knead the dough. Do not overdo it on time, otherwise air bubbles will disappear and the biscuit will not rise. Pour the dough into a mold, level and bake for half an hour. Temperature 180 gr.
In a multicooker
And again, owners of multicooker can rejoice, because they are able to make biscuit dough using a miracle of technical thought. Multi-glasses are indicated in the ingredient list as a measure of weight.


What you need:
- flour - 1 glass;
- chicken eggs - 4 pcs.;
- drain. oil - 20 g;
- sugar - 1 glass;
- vanilla sugar - 1 tsp.
Separate the yolks and beat the latter until peaks form. Add the yolks, both sugars one by one, and at the same time continue to beat with a mixer. Gently pour flour into the mixture, mix with a spoon or spatula.
After that, grease the multicooker bowl with a piece of butter and carefully pour the dough into it, leveling the surface. The biscuit cakes are cooked in the "Bake" mode for about an hour. The result is a lush base that can be used to create any dessert.
Sponge cake for 4 eggs in the oven

To make a 4-egg sponge cake dough, you will need the following ingredients:
- flour - 1 glass;
- sugar - 1 glass;
- rast. oil - 1 tbsp. the spoon;
- chicken eggs - 4 pcs.
All eggs are broken into a bowl at once, and sugar spills out. An important point: the surface of the dishes and any objects in contact with the dough must be dry. Even a drop of moisture is not acceptable in the biscuit, otherwise it will not rise.
Beat the mixture until the sugar is completely dissolved, and in parallel, add a little flour there. Gently knead the dough. We cover the parchment in a greased baking dish, pour the dough into it and put in the oven for 40 minutes.
On sour cream for the cake


What you need:
- flour - 2 cups;
- sour cream - 1 glass;
- chicken eggs - 5 pcs.;
- sugar - 1 glass;
- drain. oil - 20 g;
- soda - ½ tsp.
The yolks are separated from the proteins and mixed with the sugar. After that, sour cream is added to them. The mixture is thoroughly mixed. Pour flour into the resulting mass. Beat the whites separately until they reach stable peaks and combine them back with the yolk component.
In a greased form, bake a biscuit for about 45 minutes at a given temperature of 180 grams. The finished dessert can be divided into several identical cakes and used to make a cake with any filling.
Custard on boiling water
Choux pastry on boiling water is one of the non-standard options for making biscuits. Be sure to give it a try with the following step-by-step recipe!

What you need:
- chicken eggs - 4 pcs.;
- sugar - 1 glass;
- flour - 1 glass;
- baking powder - 1 tsp;
- rast. oil - 3 tbsp. spoons;
- boiling water.
First of all, we set the oven to warm up to 180 grams, since the preparation of the dough will not take much time. The form is covered with parchment. Flour is mixed with baking powder. Eggs are beaten with sugar until white foam appears.
Flour and baking powder are sifted through a fine sieve into an egg-sugar mass. Beat the dough, pour in vegetable oil and 3 tablespoons of boiling water. Beat again, then put the dough into a mold. We wrap it in a circle with a cold towel, and on top with foil. This is necessary so that the biscuit rises evenly in all places. Cook for 40 minutes, periodically checking the cake with a toothpick.
Whipped biscuit cakes in 5 minutes
Even a kitchen amateur will make a biscuit in 5 minutes. This recipe is so simple that it is almost impossible to spoil it.


What you need:
- chicken eggs - 3 pcs.;
- drain. oil - 50 g;
- sugar - ½ cup;
- flour - ¾ glass;
- baking powder - 1 tsp;
- cocoa - 2 tbsp. spoons;
- vanilla sugar - 2 tsp.
Eggs are beaten with sugar. At the same time, you need to melt a piece of butter in the microwave or on the stove. Add vanillin, cocoa powder, melted butter and baking powder to the mixture. At the end, sifted flour is placed.
We take a special glass that can be used in the microwave and put it right in the middle of a bowl of biscuit dough, after having filled it with water. This will help the biscuit bake evenly.
We put the microwave oven on the most powerful mode and send the workpiece there for 5 minutes, after which we keep it on heating for a couple of minutes. The finished biscuit can be greased with honey or chocolate.
How to make with kefir?
Kefir sponge cake is a simple and delicious homemade baked product that can be served with a festive table or regular tea drinking.

What you need:
- chicken eggs - 3 pcs.;
- drain. oil - 100 g;
- flour - 2 cups;
- kefir - 1 glass;
- sugar - 1 glass;
- vanilla sugar - 1 tsp;
- salt - 1 pinch.
Beat eggs, melted butter and sugar in a bowl until smooth. This is followed by flour mixed with baking powder, a pinch of salt and vanilla sugar. Beat the mixture again with a mixer at medium speed. Pour kefir last, mix with a wooden spatula. The result should be a dough with a consistency similar to that used to make pancakes.
Do not forget to preheat the oven to 200 degrees. The mold is oiled, covered with parchment paper and the dough is poured into it. We make sure that it is evenly distributed over the surface. We bake for 40 minutes and at the same time constantly check readiness with a skewer or a toothpick.
No added eggs
Need to make biscuit cakes urgently, but there are no eggs at home? Do not despair! After all, you can use a recipe where you can not add them.


What you need:
- flour - 200 g;
- sugar - 200 g;
- baking powder - 1 tsp;
- rast. oil - 100 ml;
- lim. juice - 2 tbsp. spoons.
First of all, we heat up to 180 gr. oven, and cover the bottom of the form with parchment paper. Mix flour, sugar and baking powder in one bowl, butter, lemon juice and 200 milliliters of warm boiled water in another.
Gently pour the liquid component into the dry one and mix thoroughly.
As soon as the mass becomes homogeneous, immediately pour it into a mold and set it to bake for half an hour.
A delicious sponge cake without eggs is ready!
Chocolate sponge cake dough

What you need:
- chicken eggs - 6 pcs.;
- flour - 100 g;
- sugar - 100 g;
- baking powder - 1 tsp;
- cocoa - 2 tbsp. spoons;
- vanilla sugar - 1 tsp;
- drain. oil - 20 g.
Separate the yolks and beat them together with sugar. Please note that the fresher the eggs, the tastier the biscuit will be... When the mixture turns white, add flour and vanilla sugar to a bowl. Mix gently with a spoon or spatula.


What you need:
- chicken eggs - 2 pcs.;
- drain. oil - 50 g;
- flour - 1 glass;
- honey - 2 tbsp. spoons;
- sugar - 5 tbsp. spoons;
- baking powder - 1 tsp;
- salt - 1 pinch;
- fat sour cream - 0.5 kg;
- boiled condensed milk - 1 can;
- milk chocolate - 50 g;
- walnuts.
We mix melted butter, a tablespoon of sugar, honey and eggs in a bowl, after which we send them to boil in a water bath, stirring constantly. When the mixture visually increases in volume, the dishes are removed from the stove. Add flour and start kneading the dough. When the mass becomes plastic, we divide it into 6 equal parts.
To prepare the cream at medium speed, beat the sour cream and the remaining sugar. We heat the oven to 180 gr. and alternately bake the cakes for 10 minutes. They must be very thin, therefore, when rolling out the dough, we visually control the size. Each new cake is smeared with cream, and the third and sixth in a row with additional boiled condensed milk. The sides of the cake are smeared with leftovers. Decorate the resulting dessert with grated chocolate and walnuts on top.
Cream for biscuit cakes: options
As a rule, a cake without cream is no longer a cake. In this matter, only your imagination and taste preferences can limit you.

With the help of creams, you can not only make an interlayer for the cakes, but also decorate the dessert itself.
Below you can see a list of the most popular supplements.
- Butter cream. Its preparation will not be difficult. You will need heavy cream (33, 35%) and a mixer. Beat the product at the highest speed, then fill it into a pastry syringe.
- Protein cream. It is also very easy to prepare. You need a couple of egg whites and sugar. With a mixer at medium speed, the eggs are beaten until peaks form and after that they can be used directly for the layer of the cake.
- Custard. If you are afraid to take raw proteins, then you can try this option. In addition to sugar, a teaspoon of lemon juice and a little water are added. The mixture is cooked over medium heat. Determine the degree of readiness by pouring the cream into a teaspoon. The thicker the jet, the better.
- Sour cream. This cream is tastier than creamy and not so high in calories. However, for its preparation, it is necessary to use sour cream, where the fat content is at least 30%. The recipe is outrageously simple - just whisk the product on a high mixer speed. Experienced pastry chefs advise using the cream immediately after preparation.
- Butter cream. This option is used more for decoration than for use. Just take fatty butter, a couple of eggs, milk or condensed milk and powdered sugar, beat the resulting mixture with a mixer until a thick, homogeneous mass is obtained.