Cake with kiwi "green turtle". Kiwi cakes
Active cooking time: 40 minutes
Difficulty level: middle
To make a cake, I needed:
Cake:
400 g shortbread cookies
- 2 pack. store-bought kiwi-flavored jelly
- 2 kiwi
- 25 g gelatin
II jelly:
- 750 g sour cream
- 500 ml of milk
- 35 g gelatin
- 200 g sugar
1. I turned the cookies into crumbs using a blender. 
2. Melt the butter, cool and add to the liver. I kneaded the dough. It turned out to be quite crumbly, but wet.
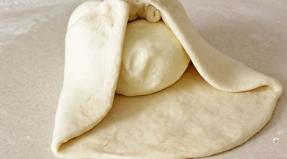
3. Cover the baking dish with cling film. She laid out the dough on the bottom and spread it over the entire surface, pressing well. Then I put it in the refrigerator.
4. I spread the packaged jelly according to the instructions, poured it into a bowl, which in shape resembled a baking dish, but at the same time it was lower and smaller in volume. I put it in the refrigerator to freeze.
5. After a while, added sliced \u200b\u200bkiwi. This is what became my mistake. It turns out that kiwi and pineapple cannot be added fresh in jelly, as they neutralize the effect of gelatin.
6. During the night it did not freeze, but I did not despair, I melted it over low heat. In the meantime, the extra gelatin was diluted in hot water and added to the kiwi syrup. I put it back in the refrigerator.
7. This move worked and after 4 hours the jelly was ready.
8. I kept the bowl in hot water a little and the jelly came off the bowl easily. She covered the top with a cake mold and turned it over, that's how it turned out to be in the middle.
9. Then the milk was brought almost to a boil and gelatin was poured over it. Stir well until completely dissolved and let it cool.
10. Beat the sour cream with sugar with a mixer until the sugar is completely dissolved. I added vanilla in the process. While cooking, try the cream; it should be sweet, since fresh milk will be added later.
11. Without switching off the mixer, added milk with gelatin in a thin stream. This is done so that lumps do not appear and the gelatin does not immediately grab from the cold sour cream.
12. This mixture was carefully poured into an empty spot in the mold and refrigerated for another hour.
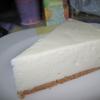
13. This time was enough to grab. She carefully removed the sides and cling film. The weight of the finished cake is approximately 2 ½ - 3 kg.
To be honest, when the kiwi jelly didn't work out, I wanted to quit this venture, but I'm glad I finished the recipe. My guests at home and who came in in the evening were shocked at first by the unusual type of cake, and then by the taste. It turned out to be very delicate and airy, with a sweet and sour taste. When you finish eating a piece, you really understand that another one won't fit into you.
I tried milk and sour cream jelly. I didn't like such options, so I risked combining these products and made the right decision. In tandem, they worked 100%. This part of the cake was similar to a soufflé, only denser in consistency.
Enjoy your meal!
To receive the best articles, subscribe to Alimero's pages.
Kiwi cakes - the best recipesIf you are a fan of such delicious exotic fruit as kiwi, then these recipes are for you. "Chinese gooseberry" - this is how this amazing fruit is often called among the people. 3 recipes for the most delicious cakes in which kiwi is one of the main ingredients. Such beautiful and tasty dishes can be prepared for one of the family dinners, or you can surprise guests with them for any occasion.
Cold Kiwi Cake
You will need the following products:
- 6 pcs. kiwi
- biscuit crisps - 175 gr.
- 150 g soft, melted butter
- heavy cream - 500 ml.
- 150 g crushed almond nuts
- vanilla sugar - 1 pack
- 1 tea lies. powdered sugar
- for glaze - 125 gr. Sahara
- fresh yolks - 3 pcs.
- some toasted almonds
Cooking process:
1. Fold the biscuits into a bag and crush them into crumbs using a rolling pin. Then take a round nonstick deep baking sheet and spread about half of the biscuit crumbs over the bottom.
2. Mash the butter thoroughly in a separate bowl, then add the icing sugar, 250 ml cream, yolks, vanilla sugar and finely ground almonds. Stir everything well.
3. Take 3 kiwis, peel them and cut into small cubes. Mix the kiwi with the cooked almond butter.
4. Now pour all this kiwi mixture into your pan on top of a layer of crushed biscuit. Sprinkle everything on top with the remaining biscuit crumbs. Place the lid on the nonstick dish and refrigerate for 6 hours.
5. After the allotted time, take out the form and transfer the resulting cake to a plate. Remaining 3 pcs. Cut the kiwi into circles and decorate the entire surface of the cake with them.
6. Whisk the remaining heavy cream (250 ml) together with powdered sugar so that you get a thick cream. Use a pastry syringe to decorate your cake. Sprinkle the sides of the creamy sponge cake with fried almonds.
Kiwi and mousse cake
You will need the following ingredients:
- 6 kiwi
- cottage cheese - 0.5 kg
- 1 egg
- heavy cream - 750 ml
- 3 fresh yolks
- wheat flour - 125 gr.
- 175 g powdered sugar
- a pinch of table salt
- 750 gr. butter
- gelatin - 4 tsp. spoons
- 1 tea a spoonful of lemon zest
- juice of two lemons
- orange or any other liqueur - 80 gr.
Cooking process:
Stage 1. Preparing the cake dough
Sift flour onto a dish and make a depression in the center. Pour lemon zest and salt into this depression, pour in a raw egg. Chop the butter into small pieces and add to the flour. Knead a smooth dough out of all this and put it in the refrigerator for half an hour.
After the allotted time, remove the dough and place on a round baking sheet with a non-stick coating with a diameter of about 24-26 cm. Place the form in an oven preheated to 200C and bake for 17-20 minutes.
Stage 2. Preparing the filling
First, you need to soak the gelatin for 10 minutes in cold water. For 4 tea. tablespoons of gelatin need about 2 teaspoons. spoons of water.
Mash cottage cheese with the remaining 150 gr. powdered sugar. Then add juice squeezed from lemons and fresh yolks to this mass.
Without stopping stirring, heat the gelatin so that absolutely all the lumps disperse and pour it into your curd-lemon mass. Let cool, then pour whipped cream and liquor into it.
Stage 3. Finish making the cake
We take the cake out of the oven baked during this time and put it on a wide dish. Spread the prepared filling on top of the cake in an even layer. To prevent it from spreading, it is advisable to take a bowl with high edges. Refrigerate the cake for 6 hours.
When you take the cake out of the fridge, decorate the entire surface with kiwi slices.
Sponge cake with kiwi
To make this cake you will need:
- kiwi - 3 pcs.
- 5 egg yolks and whites (individually)
- honey - 200 gr.
- 200 gr. wheat flour
- Baking powder - 2 tsp. spoons
- 750 ml heavy cream
- vanilla sugar - 1 sachet
- 2 tea. tablespoons of powdered sugar
- Cream softened butter - 1 table. lies.
- crushed pistachios
Cooking process:
Stage 1. Cooking a biscuit
Beat the egg yolks with honey with a mixer into a creamy mass. In a separate bowl, beat the egg whites until they form a thick, dense foam.
Add flour and baking powder to the yolks with honey, beat everything until smooth, and then gradually add the whipped egg whites and stir everything. Last of all, add melted butter to the dough and stir everything until uniform.
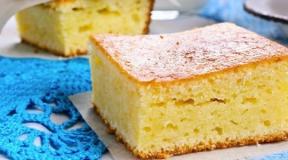
Place oiled paper on the bottom of a deep, round baking dish and place the resulting dough on top of it. Bake the cake in an oven preheated to 180C for 25-30 minutes. As soon as the cake is ready, immediately remove it from the mold, let it cool, and then cut the resulting biscuit into three equal layers.
Stage 2. Preparing the filling
Pour heavy cream into a deep bowl and beat with a mixer for 30 seconds, then add vanilla sugar and powdered sugar to them. Beat everything until the mixture becomes very thick and dense. Cut the kiwi into slices about 3 mm thick.
Stage 3. "Assembling" the cake
Take the first layer of sponge cake, place it on a platter and place 4 tablespoons of the freshly cooked buttercream on top of it. Place a few kiwi slices on top of the cream. Cover it all with a second layer of biscuit and do the same again. Gently place the third layer of biscuit on top and pour the remaining butter over the entire cake.
Use a pastry syringe to make cake decorations. To top it off, sprinkle with chopped pistachios and garnish with the remaining kiwi slices.
The sponge cake is ready!
Let's get some rest and have a tea party! And as a dessert, we will prepare a kiwi cake. Pleasant light acidity of fruit goes well with cream and walnuts. Kiwi has many beneficial properties. It tastes slightly like strawberries, gooseberries or melons and contains a lot of vitamins and minerals that are beneficial for the health and elasticity of the skin, strong immunity, a good figure and excellent mood.
It is eaten raw, dried, dried, added to pizza and sauces for meat and fish dishes. And we will try today a delicate and fragrant cake.
Cake ingredients
Let's take the usual biscuit dough as a basis. Just add some walnuts to it. Ours is uncomplicated. Cooking takes very little time. We take:
250 g sugar;
150 g flour;
Baking powder bag;
Vanillin;
Walnuts - 100 g;
Salt on the tip of a knife.
Cooking the right biscuit
We add walnuts to the cake with kiwi, more precisely, to the dough. To do this, clean them, lightly fry them in a pan, grind them in a blender until they become flour. Separately mix the sugar, salt and vanillin, add the eggs and beat with a mixer for about 4-5 minutes until fluffy, but not strong foam. Sift the flour through a sieve, mix with baking powder, chopped nuts and gradually add to the eggs, continuing to beat. The dough should not be very liquid, but like thick sour cream.
Grease the form with vegetable oil and fill it two-thirds. Leave it on your workbench for a few minutes before baking. The dough will evenly cover the mold, and a light crust will form on its surface. Now you can bake. For many, it is more convenient to use a split form - then it is easier to remove it from it. In the oven, select a temperature of 180 degrees and bake for about half an hour.

During the baking process, you do not need to open the oven - the biscuit will not rise and will not bake well. It is easy to check the readiness by puncturing it in several places with a fork or a toothpick - they should remain clean, without dough residues.
Do not immediately remove the biscuit from the mold. Let it cool down. This will take about 5-6 hours. A good biscuit should stand upside down. Then its surface will be flat, without a slide. You can set 3-4 wide cups on the table and turn the pie over them. And so that it does not dry out, you can cover it with a dry towel.
Impregnation for cake layers
In order to make the kiwi sponge cake more juicy and tender, we will prepare a special impregnation. It is used before greasing the cakes with cream. We need:
Water - 1 tbsp.;
Coffee - 3 tbsp. l .;
Sugar - 3 tbsp. l.
In a small saucepan, dissolve the sugar in water and, while stirring, heat to a boil. Cool it down.

We brew coffee, filter it, add it to the sugar syrup. Mix well. Well, the coffee impregnation is ready.
Layer for cake layers
Our kiwi cake goes well with buttercream. For him we need:
Cream 30% fat - 450 g;
Powdered sugar - 200 g.
As you know, cream whips well when chilled. Therefore, before preparing the cream, we will send them to the refrigerator for a couple of hours. Then beat with a mixer, gradually introducing the icing sugar, for 5 minutes, until soft peaks form. It is better not to use sugar - often it does not have time to melt.
Collecting a kiwi cake
Divide the finished and cooled biscuit into 2 cakes and saturate each with coffee syrup. It is good to use a silicone pastry brush. It allows you to evenly apply the liquid over the entire surface. We lubricate not the inner porous part of the cake, but the outer one, on which a crust has formed, and turn it inward. This will make the cake soaked well from all sides.

Peel the kiwi and cut into cubes. We spread the bottom cake on a dish, grease it well with cream, put the kiwi slices and fill it with cream on top. Cover with the second crust, level the edges and grease the finished cake with butter on top and on the sides.
Dressing up the turtle
Before decorating the kiwi cake, send it to the refrigerator for a couple of hours. So it is better saturated, the upper layers of the cream harden and it is easier to decorate. In the meantime, let's prepare the fruit. Our cake will be in the shape of a green turtle.

Carefully remove the skin from the kiwi and cut into slices. We leave one whole: we cut out the head, four legs and tail of the turtle from it. We decorate the cake with circles over the entire surface. Finally, add the head, tail and legs. Well, everything is ready! You can drink tea.
- Cake:
- Shortbread cookies - 400 g.
- Butter - 150 g.
- I jelly:
- Kiwi Flavored Jelly - 2 Packs
- Kiwi - 2 pcs.
- Gelatin - 25 g.
- II jelly:
- Sour cream 25% - 750 g.
- Milk - 500 ml.
- Gelatin - 35 g.
- Sugar - 200 g.
Cooking method
- Step 1 Crumble the cookies with a blender.
- Step 2 Melt the butter, cool and add to the liver. Knead the dough. It turns out to be quite crumbly, but wet.
- Step 3 Cover the baking dish with cling film. Put the dough on the bottom and spread it over the entire surface, pressing well. Put in the refrigerator.
- Step 4 Dilute the packaged jelly according to the instructions, add gelatin (20 g) additionally diluted in a small amount and pour into a bowl that resembles a baking dish in shape, but at the same time was lower and smaller in volume than the main form. Put in the refrigerator to freeze.
- Step 5 After a while, add the sliced \u200b\u200bkiwi. Leave to freeze in the refrigerator overnight. Then remove the kiwi jelly from the mold. To do this, hold the bowl in hot water a little and the jelly easily leaves the bowl. Cover with the cake pan and turn it over.
- Step 6 Next, bring the milk to almost a boil and pour gelatin over it. Stir well until completely dissolved and let cool.
- Step 7 Beat sour cream with sugar with a mixer until the sugar is completely dissolved. Add vanilla in the process. While cooking, try the cream, it should be sweet, since fresh milk will be added later. Without turning off the mixer, add milk with gelatin in a thin stream. This is done so that lumps do not appear and the gelatin does not immediately grab from the cold sour cream.
- Step 8 Pour this mixture carefully into an empty place in the mold and refrigerate for another hour.
- Step 9 Then carefully remove the sides of the form and cling film. Decorate the cake with grated chocolate. The cake turns out to be very delicate and airy, sweet and sour in taste.
1. I turned the cookies into crumbs using a blender.
2. Melt the butter, cool and add to the liver. I kneaded the dough. It turned out to be quite crumbly, but wet.
3. Cover the baking dish with cling film. I put the dough on the bottom and spread it over the entire surface, pressing well. Then I put it in the refrigerator.
4. I spread the packaged jelly according to the instructions, poured it into a bowl that resembled a baking dish in shape, but at the same time was lower and smaller in volume. I put it in the refrigerator to freeze.
5. After a while, added sliced \u200b\u200bkiwi. This is what became my mistake. It turns out that kiwi and pineapple cannot be added fresh in jelly, as they neutralize the effect of gelatin.
6. During the night it did not freeze, but I did not despair, I melted it over low heat. In the meantime, the extra gelatin was diluted in hot water and added to the kiwi syrup. I put it back in the refrigerator. 
7. This move worked and after 4 hours the jelly was ready.
8. I kept the bowl in hot water a little and the jelly came off the bowl easily. She covered the top with a cake mold and turned it over, that's how it turned out to be in the middle.
9. Then the milk was brought almost to a boil and gelatin was poured over it. Stir well until completely dissolved and let it cool.
10. Beat the sour cream with sugar with a mixer until the sugar is completely dissolved. I added vanilla in the process. While cooking, try the cream; it should be sweet, since fresh milk will be added later.
11. Without switching off the mixer, added milk with gelatin in a thin stream. This is done so that lumps do not appear and the gelatin does not immediately grab from the cold sour cream.
12. This mixture was carefully poured into an empty spot in the mold and refrigerated for another hour.
13. This time was enough to grab. She carefully removed the sides and cling film. The weight of the finished cake is approximately 2 ½ - 3 kg.
To be honest, when the kiwi jelly didn't work out, I wanted to quit this venture, but I'm glad I finished the recipe. My guests at home and who came in in the evening were shocked at first by the unusual type of cake, and then by the taste. It turned out to be very tender and airy, with a sweet and sour taste. When you finish eating a piece, you really understand that another one will not fit into you. 
I tried milk and sour cream jelly. I didn’t like such options, so I took a chance to combine these products and made the right decision. In tandem, they worked 100%. This part of the cake was similar to a soufflé, only denser in consistency.