Sourdough bread is the main secret of delicious country baked goods. Time-tested and new recipes for sourdough bread
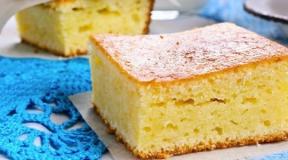
White, delicious, real bread... Thin, crispy crust, amazing crumb!
Sourdough recipe (see recipe) I have the simplest one. Sourdough for a little more than a month, already an adult 🙂 She has recently changed the structure, has stopped growing in the refrigerator, but everything is stably kept in bubbles. I feed her every two or three days. If I don't bake, then I add fresh flour and, if necessary, some water, so that it is like thick pancakes in consistency. If I bake, then I take 2 tbsp. spoons on a loaf, add 1 tbsp. a spoonful of flour and again water. * Simple flour - Sokolnicheskaya, water - from a bottle (I drank 1.5 liters of leaven in a month).
Well, we continue to bake with sourdough! Today the loaf is on long kneading with a mixer! + double folding. Myakish turned out to be just a fairy tale! Does not crumble, a thin crispy crust even when cold, the crumb structure will delight you, I promise 🙂
So, the recipe for homemade sourdough bread without yeast!
Recipe:
- Sourdough - 2 tbsp. spoons
- Water - 285 ml. * May be needed for 5-10 gr. less depends on the moisture content of the starter. I have a decently thick one now.
- Flour - 400 g.* I have, as always, flour with 13% protein content. Wheat premium
- Sugar - 1 tsp
- Salt - 1.5 tsp
- Vegetable oil - 3 tbsp. spoons
* How much to hang in grams - read who does not have measuring dishes and who measures everything with cups
Preparation:
- Since the eveningmix the starter culture with 85 ml of water and 3 tbsp. tablespoons with a heap of flour. (100 gr.) * My dough turned out to be not very liquid, because the leaven was thicker than usual. I didn’t add water, I left everything as it happened.
- We remove it under the film and leave it at room temperature until morning. * You can put the starter culture in the warmth for 1.5 hours in the morning, if you forgot or did not have time in the evening
- Pour sugar, salt, butter and flour into the dough and begin to knead with a mixer, adding water. * We start mixing.

- In 2 minutes.

- After 10 minutes.

- After 15 minutes.

- Grease the bowl with vegetable oil, grease the dough with vegetable oil, cover with a film and put it in a warm place. * The dough is soft, but not runny! Gets well with oiled hands and does not float much
 The dough is like soft rubber.
  We form a bun
- Fold up 2 times. First time in an hour

- Second time in 40 minutes

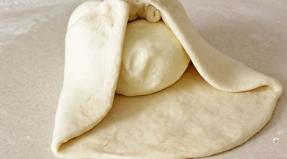
- Take a bowl, cover it with a cloth / towel, sprinkle generously with flour and shift our dough with the “seam” down. Sprinkle a little flour on top * It is more convenient to form a loaf on a table dusty with flour


- We are waiting for full proofing in warmth, covering the dough on top with the edges of the fabric * It can rise in 40 minutes, it can take an hour. Depends on temperature

Loaf forming

Bakery products:

Enjoy your meal! 
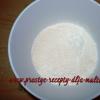
1. The recipe for making sourdough bread without yeast is actually quite simple. However, there are several important nuances that must be taken into account. First you need to take 4 tablespoons of flour and sift. Pour 4 tablespoons of warm water into a small jar. The water should be purified, and its temperature should be about 40 degrees. That is, the water should be slightly warmer than body temperature. Gradually add flour to the water, stirring constantly. When all the flour is in the jar, mix the mass thoroughly to get rid of the lumps. Then you should cover the jar with a sterile bandage or gauze and tighten with an elastic band. Send the leaven to a warm place where it will ripen.

2. It should be noted that at first the leaven will not change either in volume or in texture. This is not a cause for panic. You need to wait 2 days for bubbles to form on the surface.

3. After 48 hours, you can start the second cooking step. Add 2 more tablespoons of sifted flour and 2 more tablespoons of water to the sourdough. The water, like the first time, should be about 40 degrees. Mix the mass thoroughly, removing lumps. Cover the jar with gauze again, tie and send to the former warm place.

4. The leaven should stand for another day. Then it can be used. For one serving of bread, you will need 2 tablespoons of sourdough. You need to add salt, water and sugar to it and you can knead the dough.

5. Sourdough for bread without yeast at home, although it is prepared from rye flour, you can bake any bread from it. In addition, it can be perfectly stored for up to 10 days in the refrigerator under a tightly closed lid. However, before direct use, the starter must be placed in a warm place for about 1-1.5 hours.
Delicious, soft, aromatic, fluffy - this is how sourdough bread turns out if you cook it at home. Recently, the quality and taste of purchased bread is getting worse and worse, and there are a number of objective reasons for this. Firstly, there is no proper quality control, secondly, the manufacturer is trying to save money on everything, and thirdly, the ingredients that are put in the bread make it completely different from what it should be. Therefore, many begin to think about how to make natural, tasty, healthy bread without yeast at home. And the first thing to start cooking with is the leaven.
Sourdough for bread has dozens of different cooking variations. You can prepare a starter culture using honey, kefir, hops, malt, various types of flour, etc. In this article I will tell you how to cook yeast-free bread starterbased on personal experience and knowledge.
I took the basic tips for cooking on the Internet, but in practice it turned out that not everything is so simple and if you do not know some of the features, then sourdough for bread it may not work out and baked goods will not delight you with their taste and aroma either.
Eternal leaven for yeast-free bread
Already from the name of this starter it becomes clear that it can be used more than once. And with the right approach, it will really become "eternal" and will be able to delight you until the desire to bake bread disappears.
There are many variations of this sourdough for bread on the net. Someone takes as a basis rye flour, someone wheat, someone mixes different types of flour, thus trying to improve the quality of the sourdough at the exit. But, as personal experience shows, and the experience of other bakers, there is no difference what you choose as the basis, and there is no difference from which leaven to bake bread. If it is cooked correctly, then the bread will turn out great.
The whole process of making sourdough for yeast-free bread can be divided into several days.
The first day
I took about 150 grams of flour and added water to the consistency of thick sour cream. Pour the flour into a container (the sourdough will ferment in it for all five days) and carefully add some water, stirring in the dough. The main thing at the first stage is not to make a too liquid or thick starter. Watch the consistency so that it looks like homemade thick sour cream.
Next, we put the base in a warm place without drafts. Some people advise covering the starter with a damp towel to avoid insects and other unwanted things getting into it. Leave the starter for 24 hours.
Second day
On the second day will already begin to revive a little. The first small bubbles and a slightly sour smell should appear on the surface. If all this is not there, then it's not scary, because once at a time it is not necessary. It happens that the leaven begins to live actively after the first 24 hours, and maybe a little later. In any case, we continue cooking.
After you feel the characteristic sour smell and see small bubbles on the surface, then it's time to feed the starter culture, stimulating the growth and reproduction of bacteria. To do this, add flour, about 100 grams, and add water to return the leaven to its original consistency of thick sour cream.
Day three
As a rule, on the third day, your bread leaven will already actively grow and increase in size. On some sites, it is advised to feed her again, adding again 100 grams of flour and water, as on the second day. On the third day, my starter culture was still not very active, just a lot of bubbles appeared on the surface and a good sour smell.
Some bakers say the leaven can give off a rather unpleasant odor that is the result of fermentation. Personally, my leaven smelled very nice, some kind of fermented milk products. I even tried it, and it tasted sweet and sour. Therefore, if there is no unpleasant smell, then do not sound the alarm that something is going wrong.
Day four
On the fourth day already clearly said: “I am growing. I'm ready to become delicious bread. " A "foam" appeared on the surface, which could increase 3 times in 10-12 hours. I decided to feed the starter one more time so that I could be 100% sure of its future effectiveness. I did everything in the same way as in the first days - I added 100 grams of flour and water to return the previous consistency.
Day five
Now my yeast-free sourdough was completely ready. The smell was with a slight alcoholic note, the leaven was bubbling, and the taste was sour-bitter.
Now part of the leaven must be put into bread, kneading the dough on it, and part of it must be poured into a jar and refrigerated until next cooking.

Reading the bread sourdough recipes, everything seemed quite simple and understandable, but starting the preparation, I encountered some peculiarities that I want to tell you about.
- The sourdough must be kept warm.
The ideal temperature for preparing the starter culture is over 25 degrees. This means that it should not be cold in an apartment or house, because otherwise the optimal temperature for the development and reproduction of bacteria will not be reached, the leaven will not grow, and the dough mixed with it will not rise.
- Stir the starter regularly during the preparation process.
Flour is heavier than water, therefore, even after mixing the leaven, the flour will settle to the bottom of the dish. I advise you to stir your starter 2-3 times a day to speed up the fermentation and growth process.
- Cooking time 3-5 days.
There are recipes that say that the sourdough will be ready in 3 days, someone prepares 4. After the first unsuccessful experience, I decided to play it safe and prepared the sourdough for almost 5 days. But he clearly saw the process of growth and development, which indicated that the dough would rise and the bread would turn out to be excellent.
How to restore the leaven
As you already understood, we send part of the leaven into the dough, and part of it is poured into a jar and put in the refrigerator. The next time you want to bake your bread, take out the leaven, add a little flour to it (I do it by eye) and give it time to "feed". It is best to get the sourdough in the evening and leave it to "eat" overnight. In the morning, we send part of it to the dough again, and part to the refrigerator until the next baking. Thus, it is not necessary to wait 5 days each time to prepare a new starter for yeast-free dough, but 8-12 hours is enough to make a finished product from the starter.
Thus, we get an eternal leaven for bread, which can be used as long as there is a desire to cook.
P.S - on the Internet there are more complex recipes for sourdoughs, more sophisticated with a large number of ingredients. But I think this particular option is optimal, because the bread is tasty, fluffy, soft, aromatic, and the process of making the sourdough itself does not take much time.
The familiar and beloved yeast bread is considered not particularly useful due to the presence of thermophilic yeast. And many people who follow a healthy diet prefer to consume yeast-free baked goods. But many recipes cannot do without fermentation - a bun or baguette with a lush crumb will definitely not grow. Therefore, we offer you several recipes for sourdoughs that housewives used long before the discovery of modern yeast.
Features of the preparation of sourdough for bread without yeast
Sourdough for bread is made on the basis of a mixture of flour and water. This is due to the presence of bacteria in the air and under the shell of grain crops. But the cooking process takes a certain amount of time and has the following technological features:
- The duration of the sourdough preparation ranges from 3 to 7 days.
- The starter culture should be “fed” on a daily basis and its growth controlled.
- In the first two to three days, the leaven thinns the sharp sour aroma, then it is replaced by a more pleasant one.
- Only part of the prepared sourdough is used to knead the dough. The rest of the product can be stored in the refrigerator for a long time.
How to make a classic yeast-free bread starter
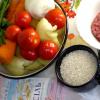
Traditionally, this sourdough is made on the basis of rye flour and rice. It makes excellent buns, breads and pancakes. It takes 6 days to prepare it.
Grocery list:
- Rice ―200 g.
- Sugar - 4 tbsp. l.
- Rye flour - 16 tbsp. l.
- Water - 500 ml.
How to cook:
- Fill the rice with half warm water (250 ml), add 2 tbsp. l. sugar and leave in a cool place for three days.
- On the third day, add ½ flour (8 tablespoons).
- Pour in the rest of the water the next day.
- On the fifth day, strain the mixture through cheesecloth, add the remaining flour and sugar.
- After 24 hours you can use the starter culture.


How to make yeast-free quick sourdough bread
If you are short of time and do not want to bake large-pored bread, such as a ciabatta, you can use the Express Coarse Sourdough Starter. This recipe is especially convenient if you use a bread maker.
List of components:
- Water - ½ tbsp.
- Coarse flour - ½ tbsp. l.
- Sugar - ½ tsp.
How to cook:
- Combine all ingredients and knead for 5 minutes, until the mass becomes sticky.
- Cover the starter container with a towel and let sit for 6-7 hours.
- When the leaven is bubbling, you can start making a dough based on it.


How to make yeast-free hop sourdough bread
At first glance, the sourdough from hop cones may seem unusual, but the bread baked with its participation turns out to be especially soft and tasty.
Products:
- Hop cones (fresh) - 225 g.
- Flour - 100 g.
- Sugar - 20 g.
- Water - 0.45 liters.
Fermentation method:
- Put cones in a saucepan and cover with water. Bring the mixture to a boil, and cook until it is halved.
- Cover the saucepan and let the mixture brew for 10 hours.
- Strain the hop broth. You should have about 200 ml.
- Mix the broth with sugar and flour, cover and leave for three days.


How to make yeast-free rye bread starter
Rye flour is difficult to rise and is very finicky in baking. Whole-grain sourdough will help this dough rise.
You will need:
- Rye ―1.5 tbsp.
- Honey - 1.5 tsp.
- Water - 300 ml.
How to cook:
- Fill the grains with water, wrap the container well with a warm cloth and let them stay warm for 24 hours.
- The next day grind the grains in a food processor, add honey to them and leave warm for a day.
- After a day, the leaven will grow up and can be used for the test.

Having tasted soft and delicious homemade bread with these sourdoughs, you will forget about store-bought yeast bread for a long time.
When I became interested in how to bake bread without yeast, using self-grown sourdough, I began to read that they write about it on the Internet, and for a long time I could not dare to try, because I had read a lot of positive things like "you can certainly try to bake bread according to my recipe, but it is unlikely that you will succeed right away, since it is very difficult and not everyone is given "or" a lot of products went into the trash before I succeeded "or" baked my hundredth bread and only now it began to remotely resemble something edible "or" take a 75.21% moisture leaven refreshed at dawn after the full moon. I'm exaggerating, of course, but I think many will understand me)))
Having met even in one in a dozen recipes, such moods frighten most beginners and people either think that baking bread is something incomprehensible and do not dare, or they take a long time to get together, like me. And then I thought that humanity began to produce industrial yeast quite recently, and before that bread was baked with sourdough, and it is difficult to imagine that in some village, a simple woman with a bunch of children and a household, sat and calculated the percentage of sourdough moisture or something else. something like that. I realized that the process of baking bread is a natural and generally simple procedure, which is available to any housewife.
Armed with this understanding, I overcame my fear, began to boldly try recipes that contained less ingenuity and intimidation, the bread immediately began to turn out delicious (yes, sometimes a little better, sometimes a little worse, but always tasty) and gradually I formed some of the simplest and most popular recipes, which I always get well, if the main conditions are met: a lively and healthy leaven, sufficient heat to rise, aged for the right time, a good batch and a desire to feed your loved ones with tasty and healthy bread.
At some stage, I got tired of telling my friends and others every time how and what to do, and I made a file in which I collected and systematized everything that I understood for myself about baking bread. Here I am sharing this information with you, I hope it will be useful to someone.
LEAVEN
Sourdough is a substitute for industrial yeast. It needs to be grown, and then it can be stored for years, becoming stronger and stronger, you just need to feed it on time.
How to grow a rye starter starter
It will take a few days to grow the starter:
| 1 day | Mix 50 g of rye flour + 50 g of lukewarm water in a liter jar, cover with a lid or foil (do not close tightly) and put in a cabinet for a day. |
| 2nd day | After standing for a day, the leaven should ferment, increase in volume. Add 50 grams of rye flour and 50 grams of lukewarm water, mix, cover and again in the cabinet for a day. |
| Day 3 | The leaven continues to ferment. We do the same as on the second day: 50 g flour + 50 g water |
| 4th day | Everything is the same as the third day. |
| Day 5 | The leaven is ready. It should be alive, bubbling, voluminous. In total, about 400 grams of sourdough was obtained. From this amount, you need to select 100 grams, put it in a jar, tightly close the lid and refrigerate. This will be the starter itself, from which each of your bread will be fermented later. The rest of the leaven can already be used (see the advice in recipe # 1). |
How to handle the starter starter?
The starter starter is quietly in the refrigerator. When you bake bread, take as much from the can as needed according to the recipe. And immediately add flour and water to the jar (I add 25-50 grams of flour and 25-50 grams of water (25 or 50 depends on how much sourdough you took for bread)), mix and put it back in the refrigerator - that's how you fed the sourdough. If you bake bread regularly, you won't have to do anything else with the leaven. If you rarely bake, then the sourdough must be fed once a week in any case. After the leaven has been fed, after a while it will bubble up and rise, then it will calm down. It is necessary that the size of the can be such that there will be room for the rise.
For any operation with the leaven, maximum accuracy is important: the cleanest dishes, hands, towels. It is necessary to ensure that nothing but flour and water gets into the leaven.
She should look normal, in the active period - with large bubbles, in the calm - with small ones. It should not be so that the flour is exfoliated separately, water separately. Make sure there is no mold !!! If the leaven is strongly stratified or moldy, throw it away and make a new one. But if the leaven is kept in order and is fed on time, such troubles should not arise.
WHEAT RYE BREAD RECIPES
Comments on all recipes
- You need to bake bread only in a good mood and with good thoughts!
- Flour is different, so the amount of flour and water indicated in recipes can vary according to the situation. How? - you need to feel it, it comes with experience, for a start you can do it strictly according to the recipe, and then analyze it and gradually it becomes clear whether changes are needed or not.
- In all recipes, you need to take a little lukewarm water, just above room temperature, too warm or hot water can destroy the leaven.
- Dough is a preliminary fermentation of a portion of the flour. The dough is already the actual dough that will be baked.
- If the dough has stood as long as it should, but for some reason you cannot immediately knead the dough, it's not scary - just put the dough in the refrigerator, knead the dough later.
- If according to the recipe it turns out that the dough itself needs a little less ready-made dough than it turned out, then the rest of the dough can simply be put in a jar in which the leaven is stored.
- The dough must be kneaded well. Knead with your hands for at least 15-20 minutes. Since in all the above recipes the dough is sticky and not at all steep, you need to knead in a bowl, and not on the table.
- The dough, kneaded and laid out in molds, should rise twice. The rise time of the dough depends on the strength of the leaven and the temperature in the room. In the cold season, in order to better rise, it is better to put it either near the radiator, or on the table near the stove, when something is being prepared.
- All recipes below are for baked goods in tins. The most convenient form is a brick.
- If the bread fell off during baking, then the dough has stood or was too runny, adjust over time and this will not happen.
- If the baked dough is too porous, it is most likely that the dough was too runny or not well kneaded.
- Additive options: coriander or caraway seeds (which contribute to better digestion of bread, they need to be added a little, 1-2 teaspoons), pumpkin or sunflower seeds, flax seeds, sesame seeds, poppy seeds, raisins, bran (hanging), chopped nuts, oatmeal ... Add all additives at the end of the dough.
- Before putting the bread in the oven, brush it with water with a baking brush and sprinkle it with sprinkles (cumin, sesame, poppy seeds) right away, until the water is dry.
- It is necessary to put the bread in the oven carefully, without knocking, so as not to fall off. The oven must be preheated well in advance, oven at 200 0 for 40-50 minutes. But ovens are different, so you have to adapt to your own, this is important! The finished bread is brown, if you check it with a splinter - it should be dry.
- Ready bread must be removed from the mold immediately, otherwise it will soak. Allow the bread to cool before cutting. If you start cutting hot, the dough will reach for the knife and it will seem that the bread is damp. In general, rye bread tastes better when it has stood.
From the specified amount, 1 large brick is obtained, weighing 700-750 grams.
| Opara | Rye flour - 150 gr Water - 150 gr |
|
| Dough | Dough - 300 gr White flour - 200 gr Rye flour - 130 gr Salt - 10 gr Vegetable oil - 1 tablespoon Honey (or sugar) - 1 tablespoon Water - 200-230 gr |
Advice:
When the sourdough was first made, after taking out the right amount for storage in the refrigerator, 300 grams remained. Here they can be used in this recipe as a dough (ie, take this leaven and start making bread from the "Dough" stage). True, the sourdough is not yet very mature, so you need to add yeast for the first time, or be prepared in advance for the bread to rise for a long time or it may not turn out very well. It's not scary. When the leaven is ripe, it will work well.
Recipe variation # 1 - with rye malt
| Opara | Rye flour - 150 gr Water - 150 gr Starter starter - 2 tablespoons |
Mix everything with a bowl, cover with a towel and leave at room temperature for 16 hours. |
| Malt | Rye malt - 25 gr Water - 50 gr |
|
| Dough | Dough - 300 gr Steamed malt (see above) White flour - 200 gr Rye flour - 105 gr Salt - 10 gr Vegetable oil - 1 tablespoon Honey (or sugar) - 1 tablespoon Water - 150-180 gr |
Mix everything, knead thoroughly. At the end of the batch, add a handful of additives (seeds, etc.) Grease the mold with butter and put the dough in it. Smooth out with a wet hand, as the dough sticks. Cover with a towel and put in a warm place to come up for 2-3 hours (until it rises 2 times). When it comes - sprinkle with whatever you want and bake. |
Recipe number 2
Compared to the first recipe, this bread is more rye (rye flour is 2 times more than wheat). From the specified amount, it turns out 2
large bricks, each weighing 850-900 grams.
| Opara | Rye flour - 300 gr Water - 500 ml Starter starter - 80 gr |
|
| Dough | Dough - 800 gr White flour - 400 gr Rye flour - 300 gr Salt - 1 tablespoon with top Vegetable oil - 1 tablespoon Honey (or sugar) - 1 tablespoon Water - 300-320 gr |
Grease the mold with butter and put the dough in it. Smooth out with a wet hand, as the dough sticks. Cover with a towel and put in a warm place to come up for 2-3 hours (until it rises 2 times). When it comes - sprinkle with whatever you want and bake. |
Recipe variation # 2 - with rye malt
It turns out delicious dark bread like "Borodinsky"
| Opara | Rye flour - 300 gr Water - 500 ml Starter starter - 80 gr |
Mix everything with a bowl, cover with a towel and leave at room temperature for 10-12 hours. |
| Malt | Rye malt - 50 gr Water - 100 gr |
Boil water 30 minutes before kneading the dough, pour the malt with this boiling water and let it brew for 30 minutes |
| Dough | Dough - 800 gr Steamed malt (see above) White flour - 400 gr Rye flour - 250 gr Salt - 1 tablespoon with top Vegetable oil - 1 tablespoon Honey (or sugar) - 1 tablespoon Water - 200-220 gr |
Mix everything, knead thoroughly. At the end of the batch, add 2 handfuls of additives (seeds, etc.) Grease the mold with butter and put the dough in it. Smooth out with a wet hand, as the dough sticks. Cover with a towel and put in a warm place to come up for 2-3 hours (until it rises 2 times). When it comes - sprinkle with whatever you want and bake. |
Recipe number 3
Unlike the first two recipes, this bread contains more wheat flour than rye. From the specified amount, 1 large brick is obtained, weighing 800-850 grams.
| Opara | Starter starter - 2 tablespoons White flour - 2 cups Water - 2 glasses |
|
| Dough | All dough (see above) White flour - 1-1.5 cups Rye flour - 1 glass Salt - 2 tsp Honey (or sugar) - 2 tsp Vegetable oil - 1 tablespoon |
Mix everything, knead thoroughly. At the end of the batch, add 1 handful of additives (seeds, etc.) Grease the mold with butter and put the dough in it. Smooth out with a wet hand, as the dough sticks. When it comes - sprinkle with whatever you want and bake. |
Recipe number 4
Pure white bread, although the sourdough is rye, it will be lost there, and it will be white. From the specified amount, 1 large brick is obtained, weighing 800-850 grams.
| Opara | Starter starter - 2 tablespoons White flour - 2 cups Water - 2 glasses |
Mix everything with a bowl, cover with a towel and leave at room temperature for 12-14 hours. |
| Dough | All dough (see above) White flour - 2-2.5 cups Salt - 2 tsp Honey (or sugar) - 2 tsp Vegetable oil - 1 tablespoon |
Mix everything, knead thoroughly. Grease the mold with butter and put the dough in it. Smooth out with a wet hand, as the dough sticks. Cover with a towel and put in a warm place to come up for 2-4 hours (until it rises 2 times). When it comes - sprinkle with whatever you want and bake. |