Cake with curd cream and a little. Sponge cake with curd cream
Very often there are cakes in which there is a very small layer of biscuit, but a rather thick coating of sour cream and curd cream. These cakes are good for those who do not want to gain a lot of weight, without denying themselves sweets and desserts. The biscuit-curd cake helps in this situation, since the bulk of the calories is in the biscuit itself, and not in the curd cream. Especially if you take low-fat cottage cheese for such a layer, which does not add extra pounds.
Of course, one cannot say that a cake with cottage cheese and fruit will not add extra centimeters, but it is much more useful than huge butter-soaked biscuit cakes. In addition to cottage cheese with sour cream made from healthy products, there will also be fruits in the torus, which will add vitamins, since they cannot be heat treated.
Cakes are different not only in the composition of the fruit, but also in the method of preparation and assembly. Currently, the most fashionable are cakes in which one thin layer of biscuit cake and a very high layer of sour cream and curd cream. The second option is several very thin cakes, between which there are thick layers of cream.
Both options will look good even on a festive table. But any of the cakes must be tried in advance so that at a crucial moment you do not lose your face and do not rush to the supermarket for festive pastries. Although, as practice shows, making a cake with fruits and sour cream-curd cream is no more difficult than any other biscuit. Just remember that the biscuit cakes are somewhat dry, so before you cover them with cream, you need to soak them well with any liquid impregnation.
It is worth considering several types of pastries based on sponge cake, covered with cottage cheese and flavored with fruits, since even cottage cheese cream each housewife makes her own, having some secrets of making. Also, cakes can differ in terms of finding fruits. The bulk is baked goods in which the fruit layer is located between the biscuit and cream. There are also cakes in which the cream is made with pieces of fruit, and the cake itself is soaked in jam or berry syrup very abundantly. These desserts are more like three-layer desserts - where a biscuit, a layer of jam or jam covers it all - curd cream with fruit. If you choose the right colors and flavors of various fruits, then the cake will be delicious and very beautiful when cut.
Two layers and impregnation
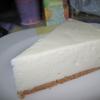
This biscuit dessert contains two layers, as well as a beautiful decoration of different fruits and berries.
What layers do we use - biscuit, cottage cheese cream and fruit decoration.
The cake will turn out to be very tall in a standard shape, so I prefer to bake it in a large shape, and preferably a rectangular one right on a baking sheet with high sides. In this case, more pieces are obtained for the children who are invited to the child's birthday. It is good to take such a dessert to school or kindergarten, since in this case no one will be deprived. It is also easy to divide a rectangular cake into equal parts.
Also, one of the options for such a dessert can be several layers of biscuit, with layers of cottage cheese cream. The ingredients for both desserts are the same, the only difference is in the assembly of the pastries. What is needed for cooking:
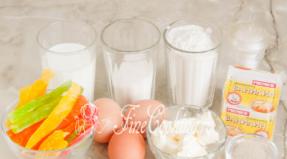
Sponge layer:
- Chicken eggs - 5 pcs.;
- Wheat flour - 1 glass;
- Sugar sand - 1 glass.
Cream layer:
- Cottage cheese - 2 packs of 200 gr .;
- Sugar - 0.5 cups;
- Butter - 50 gr.;
- Bananas - 2 pcs.;
- Sour cream - 3 tbsp. spoons.
Fudge:
- Sour cream - 2 tbsp. spoons;
- Sugar - 3 tbsp. spoons;
- Cocoa - 3 tbsp. spoons;
- Butter - 1 tsp.
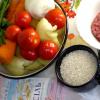
Decoration:
- Kiwi - 3 pcs.;
- Bananas - 2 pcs.;
- Victoria berries - 1 cup
A small addition before starting the step by step recipe. If you will be making one layer of biscuit, then no fondant is needed.
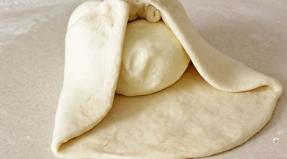
How to prepare a biscuit layer correctly has been described in many articles on our website, but repeating it never interferes. We separate the eggs into their constituents, namely, the whites and yolks. The utensils for whipping whites should be not only clean but also dry. Even the slightest drop of water can ruin the whipping process.
Beat the proteins at low mixer speeds until soft peaks, after which we begin to introduce a quarter of the sugar into the protein mass, which is necessary according to the recipe for making a biscuit. Next, beat the yolks with the remains of granulated sugar and add flour, sifted in advance, to them. The whole yolk mass must be mixed well and only after that start putting the whipped proteins into it.
At this stage, you can put the oven to heat up to 180 degrees, and cover the baking sheet with baking paper. Do not grease the edges of the baking sheet, as the dough climbs up along the dry edges. And if they are oiled, then the cake may not rise from the edges, but form a hill in the middle.
Now add the whites to the yolk mixture and stir with a spatula from bottom to top. You should not use a mixer, since during the whipping process we will lose all the air layer in the proteins. Pour the resulting mass onto a baking sheet and level it with a spatula so that the cake turns out to be the same height.
While the cake is baking, and it takes about 35-40 minutes, you can make a cream from cottage cheese.
To do this, it is better to grind the cottage cheese through a fine sieve, or beat well in a blender, breaking all the lumps. Next, combine the cottage cheese with sour cream, sugar and softened butter, beat just as thoroughly, but with a mixer. Cut two bananas into small cubes and add to the prepared cream.
When the biscuit is cooked, we determine the readiness with a toothpick, then we leave it in the oven for 10 minutes, but the door should be slightly open. This will allow the biscuit to cool down a little, not losing temperature too quickly. If you take out the cake immediately and put it to cool at room temperature, then the biscuit can fall off, and the cake will turn out to be very thin. After 10 minutes, remove the baking sheet from the oven and cool it for another 30 minutes without removing it from the mold.
At this point, you can think about decoration.
We clean and cut the kiwi with thin plastics, peel the victoria berries from the stalks, wash them gently and dry them on a fabric surface. Cut the bananas into thin plastics, slightly beveling the cut.
After all these preparatory work, we take out the biscuit from the mold and begin to collect.
We coat the cake with cream very abundantly, then carefully lay out the prepared fruits, creating a unique pattern on the white surface of the cream.
Put the finished sponge cake in the refrigerator for an hour, after which you can serve it to the table. For the beauty of the decoration, you can sprinkle the fruit with powdered sugar or grated chocolate.
Now let's consider the option when the cake is prepared with a layer of curd cream between two layers. We act according to the initial scenario, only pour the dough not into a large baking sheet, but into a baking dish. Be sure to cover the bottom with baking paper, and leave the edges open and do not grease them with oil. It will be easier if there is a detachable form on the farm, since it is easier to cover it with parchment, you do not need to specially cut a circle or adjust the edges. All you need is to remove the sides, cover the bottom with parchment, and then put the side part in place, pressing the paper.
After the cake is baked and cooled, it must be cut into 2 equal parts, smeared with cream not only between the cakes, but also to arrange the sides of the baking. Next, we prepare the fondant, which should lie on the top layer. To prepare it, mix all the ingredients except the oil. Namely, add sugar and cocoa to sour cream and mix well until smooth. Now we put the workpiece on low heat, and when the fondant starts to heat up, add oil and bring to a boil. To make the fudge a homogeneous consistency, it must be constantly stirred. As soon as the mixture boils, remove it from the heat and pour it on top of the cake. It must be done carefully, trying to fill the entire surface of the cake with an even layer of fondant.
Cut the fruit and put it on a slightly cooled fondant. Let the cake settle in the refrigerator for about an hour and serve. If the cake needs to be moved or stored for a long time before being served, it is best to cut and stack the fruit right before serving.
Varieties of fruit cake
You can change the recipe a little only when assembling the cake itself. In this case, a little less fruit will be required, since they must be cut into small cubes and placed on the first layer of the cake. Then we saturate the cake with cream and put the next layer. We generously coat the whole cake with cream, not forgetting about the side surface. You can decorate with grated chocolate or nuts.
If you decide to make a well-soaked three-layer cake, use a jar of jam. Cover the sponge cake abundantly with jam, let it soak a little and lay out a thick layer of curd cream. Decorate the top with fruits and berries.
If you want to get a beautiful cut, contrasting colors will look good. You can take any fruit, or rather, those that are very fond of in your family. One has only to remember that slices of orange and tangerine must be peeled not only from the thick peel, but also thin films must be removed from each slice.
When using berries and fruits with seeds, the latter must be removed. This applies to nectarines, peaches, apricots. Peel off pears and apples, as it will not go well with the delicate texture of the cake itself.
Bananas on top of a cake should only be used if the culinary product does not have to stand for a long time before serving. Since they quickly darken and can ruin not only the appearance of the dessert, but also, softening, float between other fruits.
When using jam, it is necessary to check the combination of the taste of the jam and the taste of the fruit that will decorate the cake. It is better to take jam from a fruit that matches one of those presented in the decoration. For example, apricot jam and apricot halves on top of baked goods.
This type of dessert does not limit your imagination regarding the selected fruits. You can use any, the main thing is that they go well with each other.
Cottage cheese cream for a biscuit cake has rightfully received its approval from both ordinary chefs and professional pastry chefs. Ease of preparation and excellent taste made this cream a great option for creating cakes, pastries and other sweet desserts. Choose the recipe that suits you and you can feel like a real creator of culinary masterpieces.
Classic curd cream for sponge cake
You don't need to be a professional pastry chef to make butter-curd cake cream. The recipe for a cottage cheese layer for a biscuit is simple and will require a minimum of effort and time from you.
Ingredients:
- 75 g butter (butter);
- 315 g semi-fat cottage cheese (9%);
- 425 g of sweet powder;
- 5 g vanilla extract.
Cooking method:
- In a container, combine the butter, curd product and vanilla extract, turn on the mixer and shake the ingredients until a homogeneous fluffy consistency is obtained.
- Now put the mixer aside, take a spoon and start adding sweet powder in portions, stir everything gently.
- Turn on the appliance again and beat the mass for about three minutes.
- That's it, 20 minutes of your time and the result is a delicious delicate cream.
Cream of curd cheese for cake
Curd cheese is an original product that can be combined with both salty and sweet additives. Therefore, this ingredient is used not only for the layer of cakes, but also for various snacks. In this case, curd cheese cream can be used both as an impregnation for a biscuit and for its decoration.

Ingredients:
- 285 g of curd cheese;
- half a pack of oil;
- 85 g of sweet powder;
- gram of vanilla.
Cooking method:
- To get the right cream, it is important to use an 80% oil. We cut it into pieces and leave it for a while so that it becomes soft.
- After we foam it with a mixer, then pour in sweet powder and vanilla, turn on the device and do not stop stirring until the mass becomes lush.
- Now we put the curd cheese, work with the mixer for a couple of minutes and the cream is ready. Instead of vanilla, you can use other flavors, and add colors as you like.
Creamy curd cream
Cottage cheese cream is cream and cottage cheese with any percentage of fat content. It all depends on the purpose for which you are preparing the cream. It should be borne in mind that the high fat content of the curd product and a large amount of cream make the cream more liquid.

Ingredients:
- 325 g of cottage cheese;
- 265 ml cream;
- 145 g of sweet sand;
- 1.5 teaspoons of flavored sugar.
Cooking method:
- First of all, we will beat the curd product until a delicate consistency.
- Pour sweet and flavored sand into a separate bowl, and also pour in the cream, beat with a mixer until a cool foam. To make the cream tender, and sugar does not grind on your teeth, it should be crushed to powder.
- Now we combine the creamy and curd mass and stir everything with a mixer again. If desired, you can pour cocoa into the cream, pour in a spoonful of syrup or a few drops of citrus juice. Also, for the manufacture of sweet products, gelatin is often used, which allows the cream to keep its shape well.
With sour cream
Curd sour cream is a good choice for making a very special homemade dessert. Such a cream does not need to be boiled or insisted for a long time, all you need is to prepare the ingredients and beat them well.

Ingredients:
- two packs of homemade cottage cheese;
- three tbsp. spoons of sweetener;
- 215 ml sour cream;
- vanilla (if desired).
Cooking method:
- The curd product should be of a uniform consistency, so if you have granular curd, then you should first pass it through a sieve or grind it with a blender.
- Now sugar, it should also be crushed into powder so that it can completely dissolve and spread over the cream.
- The next ingredient is sour cream, we choose the most fatty product, but before making a cream from it, the sour cream must be dried. To do this, cover the bottom of the sieve with gauze, make several layers. Pour out the sour cream and wait until all the whey comes out, and only the thickened mass remains in the colander, thanks to which the cream can keep its shape.
- Now combine all the prepared ingredients in a blender bowl and stir until a homogeneous fluffy mass is obtained. Before soaking the cake with it, it must cool slightly.
We have told you a basic version that you can adjust to your liking, for example, add spices, fresh, canned or dried fruits and berries, orange or lemon zest, poppy seeds.
Curd-yoghurt layer
Making the most delicious cake means choosing the best cream. After all, it is the impregnation that makes any dessert delicious and special in taste. We invite you to try the curd-yoghurt cream for the cake, which will allow you to prepare a delicious treat that is unique in taste.

Ingredients:
- half a kilo of homemade cottage cheese;
- 425 g natural yogurt (no additives);
- 65 g of sweet powder;
- vanilla to taste;
- optional mint liqueur.
Cooking method:
- Grind the curd product with a sieve and put it in any dish.
- We put natural yogurt, vanilla to it and stir everything well.
- Now add the powder, if desired, pour in the mint liqueur and stir the mass with a mixer until a delicate texture is obtained.
With condensed milk
Cream based on cottage cheese and condensed milk is one of the best options for impregnating biscuit and shortbread cakes. Also, many pastry chefs use it for tiramisu, as a filling for cakes, rolls and profiteroles.

Ingredients:
- 325 g of curd product (9%);
- 215 g of condensed milk.
Cooking method:
- To make the cream a delicate texture, it is better to grind the curd product through a sieve.
- Then we combine it with concentrated milk and mix with a mixer until smooth.
- You can change the color of the cream with cocoa powder or beetroot juice. For the best taste and aroma, you can put orange or lemon zest, rum or vanilla extract in curd cream with condensed milk.
Strawberry with gelatin
If you put strawberries in the curd cream, then your dessert will be filled with an amazing aroma and summer freshness. The berry not only changes the taste of the cream, but also makes its color more appetizing in appearance. Also in this recipe, gelatin is used, thanks to which the cream becomes light, but at the same time stable and easy to use.

Ingredients:
- 285 g of cottage cheese (fat-free);
- 65 g of sweet powder;
- 165 g strawberries;
- 17 g of gelatin.
Cooking method:
- First of all, we will soak the gelatin in water and set it aside to swell.
- For the cream, we take a low-fat curd product so that the layer is light and airy. Grind it with a blender until you get a creamy texture.
- First, grind the berries with a mixer, and then grind through a sieve.
- Pour strawberry puree into the curd mass, add sweet powder and whisk until the sweet crystals are completely dissolved.
- We send the swollen gelatin to the fire, warm it up until it is completely dissolved, then pour it into the total mass and stir it quickly. We use the ready-made strawberry-curd cream with gelatin immediately so that it does not turn into a soufflé.
It is quite simple to make curd cream, but there is one mistake that many housewives make - they buy packaged curd in the store. You won't be able to get a real tasty cream from such a product, so it is better to use farm products with a fat percentage of 7 to 9%.
A cream based on cottage cheese is prepared quickly, does not require heat treatment, but it turns out to be light and fluffy. Cottage cheese must be taken with a fat content of 5% or more (preferably homemade). In order for the cottage cheese cream for the biscuit cake to be the most airy, the dairy products that are used in the recipe must be whipped in a blender in advance.
Traditional curd cream requires only available products and only 15 minutes of time. It is only important to strictly follow the technology of its preparation.
It is necessary:
- 300 g of cottage cheese 9% fat;
- 440 g icing sugar;
- 2 g vanillin;
- 70 g butter.
Cooking method.
- The oil is allowed to melt a little under natural conditions and combined with curd and vanilla.
- Beat the ingredients with a mixer on medium speed until fluffy.
- Next, the composition is mixed with a spoon, adding powder in parts. First, it is better to sift it through a fine sieve.
- All components are beaten again with a mixer on a minimum setting for 3 minutes. You should get a light, airy cream.
Helpful advice: if the curd cream is too thick, the biscuit cakes need to be additionally moistened with impregnation (for example, fruit, alcoholic, coffee).
Cooking recipe with gelatin
Gelatin cream is ideal for multi-layered colored cakes: in the context of such a dessert looks very impressive.


Required products:
- 480 g of cottage cheese with a fat content of 5–8%;
- 80 g sugar;
- 100 g icing sugar;
- 20 g of granulated gelatin;
- 120 ml of boiled chilled water.
Cooking technology.
- Gelatin granules are poured with water and left under room conditions for 40 minutes to thicken (the way gelatin swells may vary from manufacturer to manufacturer, so you need to read the information on the package).
- The solidified gelatin is heated in a water bath and then cooled.
- Combine cottage cheese, powder, sugar, gelatin. Stir with a whisk.
- Before use, the curd cream with gelatin is placed in the refrigerator for 20 minutes.
Curd sour cream
To prepare this cream, only 3 components are required, but it is very important to follow the technology here. If you beat the food for longer than necessary, the air mass will turn into a liquid.

The cream will be fuller if the sweetened sour cream is cooled beforehand.
Ingredients:
- 250 g of cottage cheese with a fat content of 8%;
- 400 g sour cream fatter;
- 160 g granulated sugar.
Cooking method.
- Take a homogeneous cottage cheese or rub it through a sieve so that not a single grain remains.
- Sugar is dissolved in sour cream.
- Combine sweet sour cream and cottage cheese and beat until lightness with a mixer on a slow mode for strictly 8 minutes.
- Sour cream-curd cream is cooled for 40 minutes before use.
Helpful hint: the cream can be supplemented with seasonings to taste: cardamom, cinnamon, natural vanilla, as well as candied fruits, dried fruits and toasted nuts.
How to cook in a multicooker?
With the help of a multicooker, in 15 minutes it will be possible to make a custard, which can be used not only for spreading the cakes, but also for decorating the dessert.


Ingredients:
- 250 g of cottage cheese;
- 0.5 l of milk;
- 200 g granulated sugar;
- 3 eggs;
- 50 g wheat flour;
- 100 g butter.
Cooking steps.
- They take out the oil in advance to make it softer.
- Beaten eggs, sifted flour, melted butter and sugar are mixed. Beat the cottage cheese separately and combine with the total mass.
- Milk is poured into the multicooker bowl and the "Heating" mode is turned on. Warm until warm.
- Milk is poured into the main composition in a thin stream. Mix well.
- The resulting mixture is poured into a slow cooker and put on the "Stew" mode for 5 minutes (if you need a thick cream - for 8 minutes).
- The finished cream is cooled first on the table, then in the refrigerator.
Chocolate curd cream
This cream attracts with an exquisite and memorable taste: with sourness from cottage cheese, with a slight bitterness from chocolate.

Required components:
- 600 g of fatty (better homemade) cottage cheese;
- 100 g milk or dark chocolate;
- 400 ml whipping cream;
- 100 ml of fat milk;
- 20 g of instant gelatin;
- 1 g vanilla;
- 50 ml of strong brewed coffee;
- 60 g granulated sugar.
Recipe.
- The cream is cooled in advance and then whipped with half of the cooked sugar to form a strong foam.
- Gelatin is soaked in water and heated in a water bath.
- Cottage cheese is ground with the rest of sugar and vanilla. Filter the coffee and pour it into the curd mass, mix well.
- The chocolate is broken into slices, poured over with milk and melted in the microwave or in a water bath.
- Combine all ingredients in a large bowl and mix gently.
Condensed milk
Thanks to the addition of condensed milk, the cream acquires a pleasant creamy taste. To prevent the layer from being overly sweet, the components are diluted with fresh lemon juice.
Required products:
- 350 g of cottage cheese;
- 100 g of condensed milk (uncooked);
- 50 g icing sugar;
- 1 g vanilla;
- 180 g butter.
Recipe.
- In a capacious cup, beat the pieces of butter with powdered sugar with an immersion blender or mixer.
- Continuing to beat on a slow mode, condensed milk is introduced in portions (a spoonful at a time).
- Cottage cheese is ground through a fine sieve and added to the first mass. Continue to beat with a mixer at low speed.
- The resulting cream is placed in the refrigerator for 30 minutes before sandwiching the cake.
Curd yoghurt cream
The product is very light, has a delicate taste and low calorie content. It is preferable to take plain yoghurt and supplement it with natural juices.

For cooking you will need:
- 500 g non-grained cottage cheese 5% fat;
- 400 g of natural yogurt;
- 20 g bagged gelatin;
- 80 g granulated sugar;
- 120 ml of water;
- 40 ml of concentrated juice of your choice.
Cooking technology.
- Gelatin is poured with cold water for 40 minutes.
- Beat the cottage cheese with a mixer, add yogurt and continue to beat. In the process, sugar is poured.
- The swollen gelatin is heated in a water bath until the granules disperse.
- Continuing to beat the curd-yoghurt mass, add gelatin and juice.
- After thorough mixing, the cream is placed in the refrigerator for 30 minutes to fix.
Curd-banana cake layer
Banana is able to improve the consistency of the cream, so if the composition is not thick enough due to the low fat content of the curd, you should add this fruit.

You will need:
- 0.5 kg of cottage cheese;
- 3 medium ripe bananas;
- 2 raw yolks;
- 50 g butter;
- 200 g sour cream;
- 100 ml of milk;
- 70 g sugar;
- 10 g vanilla sugar.
Cooking method.
- Beat the yolks first separately, then with sugar. Grind thoroughly until the sand dissolves.
- Heat the milk, put sweet yolks in it and, bringing it to a boil, turn off the stove. The mixture is cooled at ambient temperature.
- Separately combine cottage cheese, sour cream, slightly melted butter, vanilla sugar. All are whipped in a blender.
- Milk-yolk mixture is introduced, mixed.
- The finished cream is placed in the refrigerator for half an hour.
Cottage cheese creams are ideal for all biscuits. They go well with light, chocolate cakes, both simple and with various fillings.
I advise you to take high-quality ingredients: butter 82.5%, natural cottage cheese, condensed milk according to GOST without vegetable fats. I didn't need the cream cheese that I made for the photo, the curd cream was enough and the cream cheese, for which I bought it, did not have to be done. I'll tell you about the decor separately, if you want to do something like that.
In advance, I baked two types of sponge cake: one that can be prepared in the standard way in the oven, and also from which I cooked. By the way, I also successfully baked a spinach biscuit in a slow cooker (it was hot and did not want to turn on the oven). The finished cakes, wrapped in cling film, lay in the freezer for several days, this does not affect the quality of the biscuit, so you can cook the cake in stages! I cooked two cakes, so I distributed a little load :)
The cream made a curd, which I recently used in, it is quite stable and suitable for finishing the cake.
For impregnating the light biscuit I used peach syrup, the spinach biscuit does not need to be impregnated, it is quite "juicy".
For the layer of cakes, in addition to the cream, canned peaches (a small jar was enough) and fresh strawberries, which can be replaced with fresh or frozen raspberries, blueberries, are perfect.
So my cakes are from a multicooker, their diameter is small, 20 cm, and due to this, the cake came out high, just following today's fashion trends in confectionery art :)
So, when the cakes are ready, it remains to prepare the cream, collect the cake and decorate, which is what we will do!
Carefully beat the cottage cheese with condensed milk with a blender until a smooth homogeneous mass without grains.

Beat butter at room temperature with a mixer with powdered sugar and vanilla sugar until fluffy light mass.

Add cottage cheese to the butter mixture in parts, continuing to beat. We get a fluffy cream. In the cold, it hardens well and quickly! But on the cake you need to apply cream at room temperature.

Cut each cake into 3 pieces. In the spinach biscuit, I cut off the baked part a little so that the green color was visible (the trims came in handy later). Collect the cakes alternately, adjusting to size, then turn the stack over, so it is easier to start assembling from the bottom cake, which has become the top. I started with green.
To soak a light biscuit, drain the syrup from the peaches, I got 200 ml. If there is no syrup, you can dissolve 3 tbsp in 200 ml of hot water. l. sugar, cool and soak the cakes.

We put the first cake on the dish, I have spinach, I don't soak it. Lubricate it abundantly with cream (190-200 g), so that the cream goes slightly over the edges. Place chopped peaches and strawberries on top. Apart from the last one, I had 2 large strawberries and half a peach for each cake, I cut it into thin slices.
Cover with the next cake, light, soak it with 1/3 of the syrup (4-5 tbsp. L.), Grease with cream, lay out the fruits. I immediately covered the sides with cream as the cake "grew". We continue this way with all the remaining cakes, do not forget about the impregnation.

Saturate the last light cake, cover with cream without fruit. We cover the sides. We leave about 200 g of cream for the final finishing (if it's hot, you can remove it for a while in the cold). The collected cake needs to be cooled in the refrigerator, the cream will quickly stabilize, all the crumbs from the cake will solidify in the cream and you can finish the finishing. The remaining cream should be brought back to room temperature if you put it away in the cold, and the sides and top of the cake should be cleaned.

I have grooves on the sides, I have a spatula for cream with teeth, you can make them with a fork if you want. It seemed to me more interesting :) And it is not always possible to perfectly align the sides if there is no rotating pan and wide spatula, like the professionals! Put the cake in the refrigerator for a couple of hours or overnight.

The most interesting thing is the decor :) For my daughter, she wanted something light, airy, delicate, so strawberries in white chocolate came to mind, on a stick and without, which I had baked in advance, mashmalo, mint and white chocolate icing, tinted with dye. Well, and the promised little mermaid (previously washed with soap, although it was new from the box)!

With strawberries, everything is simple: I melted 50 g of white chocolate in a water bath (the water does not touch the bowl of chocolate), dipped the strawberries, laid them on parchment, sprinkled them with decorative sprinkles, cooled them down.
All the decor needs to be prepared in advance, as the icing on the cake hardens quickly!

This time, I needed the icing that was pouring enough, since the cake was tall so that it could drain well and cover the sides, so I prepared it like this: melt the white chocolate. It melts at a lower temperature than dark, therefore, if you melt in a water bath, just bring the water to a boil, if in the microwave - in pulses, stirring each time. Stir the chocolate, add vegetable oil (it is not felt at all in the finished glaze), mix until smooth. Add color if necessary. The glaze comes out pouring. Let it stand for a while and thicken a little. If you missed the moment and the glaze became too thick, you need to warm it up a little and it will become pouring again!

Only apply icing on a well chilled cake !!! First, let's make smudges: slowly pour a little from a spoon onto the edge of the cake, retreating 0.5-1 cm, the glaze begins to drain and harden.

Then, cover small areas (5-7 centimeters) with glaze from a spoon, quickly spread it and immediately apply our decor so that it freezes in the glaze and does not fall off. You can decorate the entire top of the cake, you can use a ring, leaving the middle. If the glaze froze, and you did not have time to attach some decorative element, dip it a little in a bowl of liquid glaze and attach it to the right place!

I decorated the whole cake with drips, and pasted the sweets in a semicircle, since I decorated part of the cake and sat the doll on the ottoman, which I blinded from scraps of spinach cake and cream.

Since the diameter of the cake is not large, I still have the icing and decor, and I decided to decorate its base as well: I poured some icing on the dish at the bottom of the cake and glued the sweets! Store the finished cake in the refrigerator before serving, add the mint just before serving, as it can wilt.

And here is another exactly the same cake, only the decor is a little simpler. I made this cake for my family. I tinted the glaze yellow, the decor is the same: strawberry, meringue, mashmalo, mint.

In the context, I demonstrate a homemade cake. Here's a funny striped cut :)

Well, the children's version attracted and pleased everyone: both the birthday girl (the little mermaid first asked to give it to her), and the guests of the holiday! And the holiday was gathered by about 20 children, as they celebrated right in the courtyard of our friendly house and treated all the guys: both those who went to our holiday, and those who just went out for a walk :))

Cooking a delicious dessert is not always a difficult process, available only to professional pastry chefs. Sponge cake with curd cream is the best choice for those who have no special culinary skills. Ingredients for making a treat can be found in every home. As an impregnation for the biscuit base, choose any cream: whipped cream, cottage cheese or sour cream.
Classic sponge cake with cottage cheese
It only takes 15 minutes to prepare the curd filling. The necessary products will be found in the kitchen of any housewife.
Ingredients:
Curd cream:
- cottage cheese with a fat content of 5%;
- powdered sugar 500g;
- vanillin 10 g;
- butter - 100g
Preparation:
We turn to the preparation of the cakes. For a biscuit you will need:
- Eggs - 5 pieces;
- baking powder or soda - 1 tsp;
- icing sugar 150g;
- flour -150 g;
- salt - 0.5 tsp;
- milk - 50 ml;
- vegetable oil - 50 ml
- vinegar -1 tsp
Cooking steps:
- Separate the whites and yolks.
- Beat whites until white foam appears, add vinegar, mix.

- Add salt, sugar and vanillin. Beat the mixture until hard peaks appear.
- Add the yolks, slowly add the flour and mix thoroughly.

- Add liquid ingredients (butter and milk).

- Preheat the oven to 200 ° C, pour the dough into a mold (silicone is the most convenient) and bake for half an hour. Take it out, check the dough with a toothpick. If necessary, bake until cooked.

- The biscuit is ready. Now leave it for half an hour, covered with a napkin.
- Cut the cooled biscuit into several cakes.

- It's time to make the cake. Thoroughly spread each layer with cream and fold together. Smear each cake on the outside. After a few hours, the biscuit will become soft and juicy.

- The biscuit-curd cake can be varied by adding various berries to the cream. The layer for the biscuit cake can contain cherries, strawberries or raspberries.

In addition to the classic shape, you can also make a roll cake. You can add some condensed milk to the curd cream. Biscuit roll cake with creamy curd cream become juicy and soaked properly, for this leave it for several hours without putting it in the refrigerator.