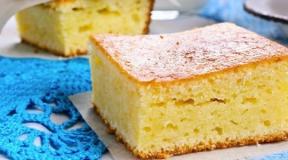
Original color of eggs. Easter egg coloring
A universal choice of gift ideas for any occasion and occasion. Surprise your friends and loved ones! ;)
Hello dear friends! As I wrote in a recent article - Easter is coming inexorably. Every year it shifts quite significantly, but it is still not worth missing it anyway.
How to prepare for this holiday? You can make, bake delicious themed dishes and invite family and friends to visit.
But how to surprise them? Of course, the main symbol of Easter is colored eggs. But how do you color the eggs? And what?
I decided to delve into the Internet on this topic, see what different sources offer. I was surprised to find that there are quite a lot of painting methods, but often, as they say, the authors of articles "pour from empty to empty" - the same method is sprayed several times to get the required volume. At the same time, attention is paid mainly to the classic color options (which we will definitely take a look at).
But I want something new, fresh, unusual! So, I present to you thirty workshops and ideas for coloring and decorating eggs in a variety of ways, from the classic to the most extravagant.
How to dry eggs?
Before starting master classes, you need to decide where and how you will store the unfinished results of creativity? After all, it is very easy to lubricate a drawing if you just put the testicle on a flat surface. There are several options:
- Use containers for storing eggs. In them, the pattern is less smeared.
- Take some foam rubber and toothpicks. Stick toothpicks into the foam at a distance so that you can place your creation inside.
- Purchase special stands. You can build them yourself. For example, make a cardboard ring in which you will place the egg after coloring.
I myself am just getting ready for the total Easter coloring. While I have tried a couple of methods, I will share my research further.
Natural ways
In the meantime, keep a very valuable plate, which shows most of the simplest options for decorating eggs with the most natural dyes at home. All of them need vinegar - add one tablespoon to a saucepan of water.

Here are:
- Coffee... You can also use tea, since it is much more affordable and you don't have to grind anything. It turns out to be a beautiful brown shade.
- Beet... My favorite color is pink or raspberry, it all depends on the time of soaking. It is recommended to soak for 8 hours.
- Carrot... A bright festive color will give you carrots, from which you will need to squeeze out the juice, and then boil the eggs in the resulting solution.
- Spinach... A somewhat unexpected way for our latitudes, isn't it?) You will need spinach if you want to get a delicate green color.
- Cabbage... To get the blue color of the eggs, take a couple of red cabbage heads, chop finely and stir with 500 ml of water. Leave the eggs here for 8 hours, covered with plastic wrap.
- Turmeric... But she will give a sunny yellow. Pre-grind the turmeric (you should get 2-3 tablespoons) and cook until boiling, then cool and place the eggs there.
All the main nuances are presented in this wonderful hand-drawn instruction, which I have already stored in my hamster bins a long time ago. A very useful thing during Easter
They completely forgot about the onion peel! But she is the most classic dye. There is nowhere more classic. For her, take onion peel in the desired volume (for the brightest shade, a peel from four onions in one glass of water is recommended). Boil the water for about half an hour, and then dip the eggs in there for a few minutes.
Advice: for a beautiful flower-grass pattern, put eggs in nylon "bags" with grass, flowers, etc. The output will be an interesting drawing.

It is not necessary to make exactly plant-like tracks. You can wrap eggs with threads, glue paper patterns.
Food colorings
In general, when buying any food coloring, there should be instructions on it that allow you to correctly turn the staining procedure. If this did not happen suddenly, then:
- Add vinegar to the water, bring to a boil. Leave it on for half an hour.
- Then the eggs can be boiled in this solution (for a short time) or they can be lowered into the already cooled solution.
However, there are some tricks that will allow you to stand out from others. For example, if you stick round stickers in the form of a polka dot pattern before painting, you will end up with an unusual and very stylish egg.

Or maybe you want a wealth of colors? Then feel free to take gold leaf (it's not that expensive, by the way, if you know the right places;)). Color first, then wrap the egg with a piece of gold foil and rub lightly with a brush. This creates an interesting marble effect.
Wondering where you can get inexpensive gold leaf? There you are reference on a comprehensive Aliexpress (verified seller and one of the most advantageous offers). Here you will buy a lot of precious leaves for a small amount).

Advice... If you want to achieve a beautiful marble effect, then you can do this: paint the egg a light color, and then dip it in water with a dark color, in which vegetable oil will be present (in small drops, about two teaspoons per 500 milliliters).
Minions
Loved by children and adults, they are very easy to build with yellow and blue dyes, as well as many small toy eyes and a felt-tip pen. To do this, the egg needs to be dipped in the dye only halfway, dried. Glue the eyes on the yellow part and draw funny faces. The child is happy

Draw with a permanent marker
One of the fastest ideas. All you need is a permanent marker (one or more) and your imagination. Specks, lines, numbers, mysterious patterns - you get minimalistic, but very stylish eggs. True, it seems to me, you shouldn't leave them for a long time so that you can eat them. Still, a marker ...

Metallic markers are also on sale now - a suitable accessory for Easter. The drawing is more delicate than using regular colors.

Simplicity and sweetness
Have you ever had white chicken eggs like a funny Hello Kitty? Try to do the same as in the photo. Little girls will be especially delighted - they will like the cute design. For extra decoration, use small flowers, bows, buttons and whatever is at hand.

We use paints
How without them? You can use watercolor or acrylic paints. In the second case, you can not be afraid of moisture getting to the surface - acrylic dyes are not scary. They do not have a strong smell, they do not penetrate deeply.

Reluctant to mess with long-term painting? Then take the bubble wrap and paint over it properly. It remains only to roll the egg over the surface of the film and you will get a speckled egg

Moving on to less traditional painting methods.
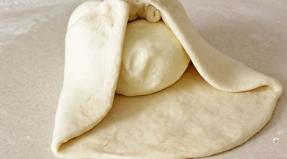
With cloth
For me, these methods have become a kind of discovery. For example, there was an option of what to do with old ties. For this, however, they must be made of real silk.
The method is as follows: take a tie, wrap it tightly with a cloth and over it with threads (you can use a cotton cloth). Take a little more vinegar than before (about three tablespoons). Boil the eggs for 10 minutes after boiling, cool and very carefully separate the fabric. The incredible beauty comes out

Here is the version with a silk handkerchief and cloth. In general, do not throw away the silk rags - they can come in handy in the most unexpected situations.

On the theme of fabric and onion decoration: take lace and wrap the eggs tightly with it. The recipe remains the same, but the patterns are great!

Thread decor
You can wrap your creations with threads not only to form beautiful patterns, but also use them as a full-fledged decorative element. To do this, take PVA and coat the surface as the thread advances, which is laid out in a spiral.

Groats in the course
Why is it necessary to paint an egg? After all, you can simply paste over it with grains! Take whatever you want - rice, peas, buckwheat, sesame seeds and more. You can completely roll the product in one kind of grains, or you can pour it in strips, as in the photo.

Confectionery dressing
Again, you need to properly coat the surface with glue (you can take PVA) and sprinkle sprinkles on top of it. Balls, stars, and just long stripes of sweet material will come in handy.

Dragon eggs
Yes, not the easiest idea, but it also has a place to be. For these, you will need round sequins and glue. You can go the other way - take an artificial foam egg and a lot of buttons. It remains only to stick them in circles to get the effect of scales.
I recommend using options with rhinestones, "scales" and other things either for empty shells or for artificial fake eggs, since it will be a pity to scrape off all these decorations later.
Advice... How to blow an egg out of the shell? There are two ways:
- Pierce the egg from both sides with an awl. Take a saucer and simply blow out the contents of the egg. Blow gently to avoid damaging the shell.
- Pierce the egg on one side. Take the syringe and use it to extract the contents.

Pieces of glass and rhinestones
To decorate eggs, both artificial and natural, square pieces of glass or rhinestones will help you. It looks very impressive and festive

Compromise option
A great idea for those who do not want to mess around for a long time, but still want to decorate. And not artificial eggs, but the most natural ones. For each piece, you will need several small rhinestones, which you can glue in any order. PVA is useful for gluing.

Quilling
It seems to me that this method is also suitable for an ordinary Easter egg, it will only be a pity to spoil it, Or you can take an artificial form, as in a master class.

And now, perhaps the most exotic way of all - painting ... with nail polish.
Painting eggshells with nail polish
My friends, just a shell without contents, if you do not want to be poisoned. I decided to experiment on the eggs with the contents and realized that even after a short lay, they are soaked with the smell of varnish so much that only the yolk remains edible at best.
However, if you just want a beautiful shell or surface, then take note. An incredibly easy way.
Prepare nail polish (preferably several colors), a container of water (not used for cooking) and the shell itself. Spread the varnish over the surface of the water, painting the patterns that you want to see later. Take only fresh, undiluted varnishes that have not expired, otherwise you will not get a thin beautiful layer, but thick lines and cakes.
The coverage area should be approximately equal to the surface area of \u200b\u200bthe egg in order to obtain a beautiful effect again.

Gently dip the egg into the pot, submerging it completely in the water. It will immediately be covered with an interesting pattern.

This is what I "drew" for the second egg. First I dripped with pink varnish, and then green. As a result, green "dispersed" pink.

I took the eggs not white, but brown, so the result was not very bright.

I also painted a plastic honey jar. I did not take into account some of the features, so here and there there were cakes of varnish: _D In general, this method of painting is suitable not only for the shell - here you can also use small decorative jars and dip your nails (though you will have to wipe off your fingers later, but the result is worth it :) )

But what others get by diluting more varnishes and using the white color of the egg as a basis. As soon as people do not fantasize!
 other methods
Suddenly I remembered that I had not told about all the options I knew. What else can be used to color eggs for Easter:
- Zelenka... It is better to use it like this: wrap eggs with gauze, in which put rice, leaves, pieces of paper and so on. Tie tight. Now place them in a pot of cold water and cook until boiling, then a few more minutes.
- Paper decorations... These are all kinds of hare ears, eyes, man-made coasters. The decoration options are almost endless.
- Sequins... Spread the surface with PVA glue or paste, and then sprinkle it generously with glitter, shaking off the excess.
- Thermal Stickers... Before Easter, they are sold in almost all stores. All you need is to pull the sticker over the already boiled egg and quickly lower it into boiling water. I must say, it turns out not always successfully - you have to experiment with stickers from different manufacturers.
- Pencils + watercolor... Use a pencil to draw an image on the surface. Dissolve the watercolor in water (the thicker the better) and dip the product into it. Didn't like the effect? Rinse off the paint and try again.
Finally, I have prepared for you an interesting video with a very simple way to decorate, in which it is very easy to get the effect of "space" coloring:
Well, how do you like the painting methods? But I probably forgot something. Can you tell me in the comments? I would be very grateful, as well as other readers who dropped by the blog. In the future, I will definitely share with you my painting results, do not miss
Do not forget to subscribe to updates so as not to miss new interesting articles! And I say goodbye to you.
Best regards, Anastasia Skoreeva
One of the brightest and kindest holidays is Easter. Orthodox Christians and Catholics prepare for it in advance. The main attribute of the holiday is the Easter egg. There are many ways to color eggs. We offer many interesting and original ways to decorate Easter eggs. You can create by yourself, or you can work with your children. So, we look at the options and choose the best ones.
We paint eggs for Easter beautifully with food colors or watercolors
If you love everything delicate, sensual, then this method of painting eggs is for you. You don't have to be a professional artist to do this. You just need to follow our instructions. And if you show creativity, then it's just wonderful, you will get a masterpiece.
 Easter eggs painted with food colors in a watercolor style
 For work we need:
- liquid food coloring or watercolors;
- brush;
- black marker;
- small disposable cups.
 Pour 25 drops of food coloring into a small disposable cup. Add some water to make the paint thinner.
 In our work we will use red, yellow, blue and green paint. Do not dilute a lot of dyes, 5 ml will be enough.
 We paint eggs in a watercolor style. To do this, put a dot on the egg with a brush with food coloring or watercolor. Then we smear it. Then we do the same again on the painted surface, but do not touch the edges. This is how we create an imitation of flower petals.
 We are waiting for the paint to dry and in the center we draw the core of the flower with yellow paint. Remove excess dye with a dry napkin. Thus, we draw three flowers of different colors: red (as in the photo), yellow and blue. Then draw green leaves.
 Draw the contours of the flowers with a marker. Draw pistils and stamens in the middle of the flower.
 After the paints have completely dried, we carry out the final stage - drawing small details and contours of flowers with a marker. And do not worry if you once again go beyond the contour or draw an uneven line, on the contrary, it will be even more interesting. Because it doesn't have to be perfect. There is only creativity.
 Floral watercolor drawing is the answer to the question: How to paint eggs in an original way for Easter?
 So we got beautiful picturesque eggs for Easter in watercolor style.
Bright and unusual eggs. We paint with food coloring
This is an interesting way to paint eggs for Easter, thanks to which festive eggs will turn out to be bright, colorful. Children will really like the process of painting. And what, you will understand yourself when you watch it to the end.
 Bright eggs for Easter in batik style
 To paint eggs, we need:
- hard boiled eggs;
- liquid food coloring;
- vinegar;
- water;
- paper towels;
- rubber bands, gloves, sprayer, glass baking dish.
 Pour water and vinegar into the sprayer in a ratio of 50 to 50%.
 Place three paper towels in a glass baking dish. Sprinkle the top with diluted vinegar and water in equal proportions.  Wrap the egg in the top paper towel. We fix it with an elastic band. Put food coloring on a damp towel. The dye spreads over the paper surface, enters all the folds. Feel free to add other colors. Next, sprinkle the dyed towel with vinegar and water again. Then we take the egg in our hands and squeeze it, so that the paint fills all the voids and the whole egg is colored.
Now we are patient and leave the eggs in paper towels for 1 hour. The more eggs lie, the brighter the color will be. 
We remove the finished egg from the napkin. If there are white spots on it, then simply rub the egg with the rest of the paper towel. Here we have such a textured batik egg.
Beautiful starry sky on Easter eggs
A very deep and rich color that resembles a starry sky and we are not even afraid of this word - GALAXY. Plastic eggs were used for the work. You can, of course, use real eggs, but the work on the transformation is long and painstaking. And it will be a pity for her to "destroy" so quickly at the festive table.
 How unusual it is to paint eggs for Easter. Deep saturated pattern on Easter eggs
 We will briefly describe and show how to make eggs for Easter with your own hands with a photo. For more detailed instructions, see.
To work you will need:
- plastic eggs;
- acrylic paints of different colors;
- hard brush, sponge.
 Photo collage "How to paint eggs for Easter"
 We paint the eggs with acrylic paints in black, apply 2 layers, it will take about 15 minutes. The palette shows the paints that we will use. We paint the eggs with blue, blue paint. We tried to make our own unique pattern on each egg. You can make swirls with a brush, apply paint in different directions, do not brush too much, otherwise the pattern will turn out muddy. 
Now a regular sponge will be used. Soak it in the darkest color - dark blue and leave marks on the egg. We are waiting for the painted places to dry out and do the same with lighter paint, grab the unpainted places. Move on to pink paint, then gold. Then we dip the brush in black paint and, with light movements, not strokes, put specks. Small black islands turn out. The last step remains - working with white paint. Apply the paint by spraying (dip the brush into the paint, then spray on the egg. You can use an old toothbrush and a fine-toothed comb. Dip the brush into the paint and run it over the comb, and fine splashes from drops cover the egg).
 Galactic eggs for Easter
 Decorating eggs for Easter with pastry beads
Children like these eggs very much. And even more they like to decorate them. After all, the decoration is based on confectionery powder. The colors can be different, yellow prevails here.
 Easter eggs decorated with pastry beads
 For work, we take boiled eggs, PVA glue, confectionery powder. All stages are visible in the photo below. The only thing that needs to be explained to the children is that you cannot eat the shell, and what is left after decorating the eggs, because it came into contact with the glue. 
Easter eggs and decorative tape
This method of decorating Easter eggs does not require food coloring. You can call it clean, but not fast. It takes imagination to work.
 Easter eggs decorated with decorative tape
 For work, we take pre-cooked eggs, decorative tape, scissors. Cut out various shapes from scotch tape and glue them to the egg. 
Golden Easter eggs and golden marble effect
Very spectacular and chic eggs are obtained. The method, of course, is not easy, long, but the result is worth it.
 Golden eggs for Easter
 Very beautiful and unusual eggs for Easter. The work is long, painstaking, but as a result we will get a gorgeous result and rave reviews from friends.
 Easter eggs with golden marble effect.
 For work, take polystyrene, matches, boiled eggs, food colors, vinegar, gold leaf, glue.

We will need polystyrene and matches in order to dry the painted eggs. 
Be sure to add two tablespoons of vinegar to the food coloring water to fix the food coloring. 
After the eggs are completely dry, we proceed to painstaking work. Tear the gold leaf into small pieces, because the egg only needs to be partially covered for the marbled effect. We spread the egg with glue, but not the entire surface. 
Glue the pieces of gold leaf to the egg and smooth them carefully. We are waiting for complete drying. That's all, beautiful and spectacular eggs are ready.
 Easter eggs in gilding. original article and photo.
 Marble eggs for Easter
The decoration is based on ordinary nail polish. Everything is very simple, but at the same time beautiful.
 Marble nail polish eggs on eggs
 The process of dyeing eggs is very simple. We take a plastic cup, which is not a pity to get dirty. Pour water at room temperature. We add a few drops of varnish to the water, it will not sink or mix with water, but will lie on it with a thin film. Mix the varnish with a stick, make swirls, patterns and dip the egg.

In work, you can use one varnish or several. You can take a wide variety of colors and shades. We spied on the idea with blue marble eggs
Easter eggs with geometric patterns
A very simple and not painstaking way to decorate Easter eggs. You can use colored eggs, or you can use ordinary eggs with dark shells. For work, we take a white marker, or you can also use a corrector pencil, with which we draw various patterns. 
To create a festive mood for children, all you need to do is paint the raw eggs and put them back in the tray in the refrigerator. Children will be happy to open the refrigerator and look for new painted eggs there.
We paint eggs with children with acrylic paints
This is the simplest idea you can think of. Suitable for babies! it the perfect way to dye Easter eggs for toddlers, even from 9 months. Fast, simple, and most importantly purely.No stains on clothes and carpet, and most importantly, a happy baby and mom.

Everything is very simple. Put a pre-cooked egg and a teaspoon of acrylic paint (one or two colors) in a plastic bag. We seal the package and give it to the baby.

No dirty hands, no cups, spoons, water puddles. Only clean hands and a lot of positive emotions.
And also crushing the package, the child develops fine motor skills, tactile sensations. Develops observation and color perception.

When the whole egg is covered in paint, take it out and leave to dry.

If desired, curly stickers can be glued to the eggs before coloring. And when the paint is dry, just take them off. 
How to dye eggs in baking soda?
The next way dyeing eggs for Easterchildren will love it. Indeed, coloring is based on chemical reactions, safe and interesting.

So, how to paint eggs, and even in baking soda? It's very simple!
For this we need:
- Baking soda
- Vinegar
- Dry food paints
- Container for coloring
- Hard-boiled eggs.
Pour baking soda into the container. You can take several containers at once. Next, add dry food paint, about 1 tablespoon per container. The more paint, the richer the color will be. Stir the soda and paint until uniform in color.
Ask your child to carefully place the egg in the container. Then pour the vinegar into a glass and have it slowly pour over the egg. The child will be amazed when he sees what happens. Vinegar and baking soda will chemically react, creating a sea of \u200b\u200bbubbles and a slight hiss. We are waiting for the bubbles to go away, we take out the colored egg and put it to dry.
After complete drying, specks will remain on the egg, which will give the Easter egg an interesting texture.
How to paint eggs with wax crayons?
It turns out to be very easy and simple to paint eggs with ordinary wax crayons. The method is simple and at the same time Easter eggs are bright and original. 
Cook the eggs, take them out, put them in the tray and start coloring. The egg should be dry and hot. The wax crayon melts on the egg, leaving beautiful, rich colors. Then we put the eggs in the refrigerator for 2 hours. Then we clean the egg from small pieces of wax. That's all.
You can complicate this process a little and get this picture.

To do this, it is enough to dip the eggs in liquid food coloring. Mini master class on coloring Easter eggs in the photo below. 
Here is another interesting option for coloring eggs for Easter.  Draw on a hot hard-boiled egg with white chalk. Then we put the eggs in the refrigerator for 15 minutes. Then we moisten the egg in vinegar and until it is dry we pour it with liquid food coloring. This is how you get beautiful eggs with a white unpainted trace.
Here are some interesting ideas for coloring Easter eggs. The main thing is a good mood and your imagination. Be healthy and be happy!
food coloring
For everything to go well, you should use the instructions that are usually available with special dyes for eggs.
1. Before dyeing, eggs should be boiled until tender, dried with a towel and cooled.
2. Fill several deep containers with water, add a little vinegar to each.
3. Dilute the dye in each container. Use 1 sachet per glass of liquid. But the proportions can be adjusted independently depending on how rich the color you want to get as a result.
4. Hold each egg in the solution for several minutes until the desired color is obtained, and then remove and put on a napkin. It is convenient to perform this procedure with a perforated spoon.
onion peel
Before you start creating original compositions of flowers, leaves, stripes or specks on Easter eggs, you should learn how to use ordinary onion peels for coloring.
1. Remove the husk from a couple of kilograms of vegetables.
2. Fill it with water. Cook over medium heat for an hour.
3. Strain the resulting broth and cool.
4. Boil the required amount of eggs in the onion peel broth.
Ideas using onion peels
If you want to make colored eggs more elegant and interesting, you can decorate them with a variety of drawings and patterns. Find out in more detail how to paint eggs in onion skins with patterns and patterns, here we will give a couple of ideas.
Striped
In order for an unusual pattern in the form of stripes to flaunt on the surface of the shell, it is necessary to tie a chicken egg before dyeing with threads or ribbons of various widths. Rubber bands, which are often used to hold money together, are also suitable. The strips can be arranged in a chaotic manner. After that, it remains only to boil the eggs until cooked in a decoction of onion peels.

With leaves and flowers
The technology for creating these patterns is almost the same as in the case of stripes. Only instead of threads it is necessary to use greenery, grass or flowers. They should be applied to the surface of the shell, after which each egg should be tied with a piece of nylon. These blanks can only be boiled in a decoction of onion peels until cooked.
Remove tapes or nylon with leaves and flowers only after the eggs have cooled completely. Otherwise, the pattern will be smeared.
Food Coloring Ideas
Two-color staining
If you want the eggs to be bright and unusual, then you can use two dyes of different colors when staining at once. It is better if these shades are contrasting. Hard-boiled eggs should be dipped on one side in the first food coloring, placed on a napkin and allowed to dry. After that, dip the unpainted side in a dye of a different color. Also dry the eggs on a napkin. If, when staining with the second color, the tip of the egg is lowered a little lower into the liquid with the dye, then at the junction the colors will mix and the egg will be painted not in two, but three colors! It is not necessary to keep the egg straight when staining. If you tilt it at a slight angle each time, the result will be much more interesting.
Eggs in the form of Minions
Eggs should be painted in the same way as in the previous method. In order to make Minions, you should use yellow and blue dyes. For accuracy, you should dip the eggs in the dye vertically and strictly to half. It is best to paint it blue first. After the blue color dries, you need to paint the opposite end. Dry again. Minions' faces and hair can be painted with watercolors or a regular felt-tip pen.

Speckled eggs
Each boiled egg should be moistened with water and rolled in rice grits. After that, wrap it tightly with gauze, paint with a dye of any color. Dry on a napkin.
How to decorate eggs with a felt-tip pen
You can easily draw any ornament with felt-tip pens. To do this, you should use eggs already boiled and painted with any dye. It is also not prohibited to use regular white eggs.
In this simple way, you can depict any flowers, butterflies, or just patterns of dots, stripes and monograms.
How to decorate eggs with watercolors
Watercolor paints are safe for health, so they can be safely used to create beautiful and bright compositions on chicken eggs. Drawings in the style of Gzhel, Khokhloma or Zhostovo painting look especially advantageous. If you have experience in drawing, then you can safely apply it to create beautiful eggs for Easter. 
Boiled eggs should be used when drawing. Both dyed and unpigmented eggs are suitable.
How to decorate eggs with beads, sparkles, decorative sprinkles
To create an original decoration for Easter, you need to prepare hard-boiled eggs, PVA glue and various sprinkles. You can use small beads, sequins, sequins, as well as pastry balls or stars. To begin with, boiled eggs must be completely covered with glue, and then rolled well in a loose material prepared in advance.
How to create 3D patterns using flour and salt
To get three-dimensional patterns on the surface of the shell, you need to follow just a few simple steps. Initially, you need to paint the egg in any bright color. Then boil a viscous paste from flour and a small amount of flour. Using a thin brush, this composition should be used to make any patterns on the egg. Sprinkle with coarse salt while still wet. The finished decorated egg should be dried on a stand.
Painted eggs or Easter eggs are an essential attribute of Easter. They symbolize spring and the rebirth of new life, and special attention should be paid to the process of their creation.
Traditionally, eggs are painted on Maundy Thursday, on the eve of Easter. However, you need to decide on ideas for their design earlier. LifeStyle 24 offers 10 original ideas for painting, as well as recipes for unusual Easter eggs in the form of dessert and ice cream.
Ideas for coloring eggs for Easter 2019
Space eggs
materials:
- acrylic paints
- brush or old toothbrush
- water
How to paint:
Paint the eggs with black acrylic paint. To evenly coat the egg with paint, use egg coasters.
Separately apply space colors to the cardboard. For example purple, blue, cyan, gold, white, etc., pick one color and spray it on the egg. This can be done either with a brush or even an old toothbrush. However, only apply a different color after the previous coat has dried.

Easter eggs: tips for coloring
Advice: so that the paint lays down evenly - wash all the eggs well with a brush and soap. You should also wipe all eggs with an alcohol solution.
Tie-Dye Eggs
Materials:
- Food coloring (3-4 colors)
- Paper towel
How to paint:
Wrap the washed and boiled eggs in a paper towel. Apply a drop of food coloring of different colors around the perimeter of the egg.

DIY Easter egg: how to paint eggs in different colors
Leave the egg to dry and then unwrap.

Pastel colors
Materials:
- Whipped cream
- Food coloring (multiple colors)
How to paint:
Whisk in the cream. It is better to take chilled and with the highest percentage of fat. Apply several colors of food coloring to the surface of the paste. Use a toothpick to make random patterns on the surface.

How to paint eggs for Easter with cream
Dip the boiled eggs completely into the bowl of cream and turn them over several times. Leave the eggs in the mixture for 30-40 minutes. Then remove and let dry well.

Advice: before dyeing eggs for Easter, they must be removed from the refrigerator so that they are at room temperature. If you throw an egg from the refrigerator into hot water right away, the shell may crack.
Mosaic
Materials:
- Paint for eggs
- Boiled unpainted eggs
How to paint:
Boil the eggs and paint them the desired color. Boil a few eggs and do not paint them. Grind the shell of unpainted eggs.

Two in one - mosaic and Easter egg
And stick these pieces on the painted eggs in random order.

Important! Use food grade adhesive.
Quilling eggs
Materials:
- Quilling paper
- Glue
How to do:
Roll up small quilling paper circles. The narrower the paper, the neater the egg will look. Stick the paper elements onto the boiled egg.

Decorating Easter eggs: quilling is what you need
The egg can be pre-painted in the desired color.

Sweet eggs with sprinkles
Materials:
- Easter topping
- Glue
How to do:
Sprinkling can be useful not only for decorating the pasque. Cover the egg with special glue and roll in the sprinkle.

Easter decoupage
Materials:
- Protein
- Napkin for decoupage
How to paint:
Cut out the pattern you want from the napkin. Whisk the protein. Wrap a dry boiled egg in a napkin and blot with beaten egg white.

Decoupage Easter eggs: original ideas
Leave to dry well.

Decoupage Easter eggs: how to do it?
Advice : Add half a teaspoon of salt to the water to avoid cracking the shell.
"Golden" eggs
Materials:
- Gold colored foil
- Glue
How to do:
Apply glue to the egg, but not over the entire surface, but only partially. Stick on the foil. Use a coarse-bristled brush to remove excess foil.

Before applying the foil - the egg can be painted in the desired color.

Marble technique
Materials:
- Nail polish
- Water
How to paint:
Put a few drops of nail polish in a bowl of water. Use a toothpick to create a random pattern on the surface of the water.

Decorating Easter eggs: nail polish comes in handy
Place the egg in the water so that the varnish film completely covers the egg. Leave on for 10-15 minutes, then remove and leave to dry.

Instead of varnish, you can use oil (art) paint.
Advice: so that after painting the eggs shine - rub them with vegetable oil.
Ombre technique
Materials:
- Food coloring
- Water and spoon / ladle
How to paint:
Dilute the paint in water and pour it into a glass. Using a spoon or ladle, lower the egg halfway into the glass of paint. Do this for 3 minutes. Then lift the egg so that the water covers half of it for another 5 minutes. Raise and lower the egg in the same way.

DIY Easter ideas: ombre technique
For the last ten minutes, paint over only the bottom of the egg using the same principle.

Decorating Easter eggs: ombre technique
Advice: for children, it is worth painting eggs only with natural dyes - beet juice, spinach, onion husks, and the like.
And not just boiled eggs
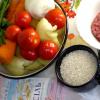
Boiled chicken eggs - it is quite difficult to surprise someone on Easter. But ice cream or a full-fledged dessert in the form of an egg is quite possible. We offer you simple cooking recipes that you can easily repeat at home.
Ice cream egg
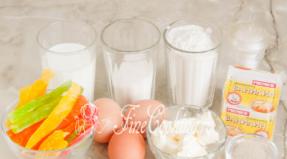
Ingredients:
- Water 500 ml
- Fruit juice with pulp 250 ml
- Sugar 200 g
- Fresh lemon juice 1 tbsp
- A bag of gelatin

Preparation:
1. Soak gelatin in water for 5 minutes and then add sugar. Heat the liquid over low heat until completely dissolved.
2. Introduce fruit juice slowly. Keep it on fire for another minute and remove from the stove. Strain through a sieve, let cool and add lemon juice.
3. For the mold, you can use plastic eggs that are sold in children's stores. Make a small hole through which you will pour the finished mixture.

4. After that - place the eggs and popsicles in the freezer for at least 2 hours.
Chocolate dessert
Ingredients:
- Chocolate eggs without toys
- Cream cheese 150 g
- Heavy cream 130 g
- Powdered sugar 30 g
- Lemon juice 0.5 tsp
- Vanilla extract 0.5 tsp
- Butter 20 g
- Fresh orange juice 2 g
- Apricot jam 1 tbsp

Chocolate Easter eggs: delicious and delicate
Preparation:
1. Carefully cut off the top of the chocolate egg. If the edges are uneven - even better, it will seem as if the "shell" has broken off. Leave the eggs in the fridge while cooking the filling.
2. Combine cream cheese, powder, lemon juice and vanilla extract. Whisk the mixture until smooth. Whisk the chilled cream separately and add gently to the mixture.
3. Remove the eggs from the refrigerator and gently spoon into the filling with a spoon. Leave them in the refrigerator for 30-40 minutes for the filling to harden well. Until then, cook the yolk.

4. For the yolk, combine butter, orange juice and jam. Heat the mixture over low heat and stir constantly. When the mass becomes homogeneous, remove from heat.
5. In the finished filled eggs, make a small indentation and place the "yolk" there.
Today it is difficult to imagine Easter without Easter cake, Easter and, of course, painted eggs.
It is better to choose the same shape and size so that they look beautiful on the festive table. But the choice between white and brown eggs is a matter of taste and, of course, the method of coloring and color. For example, light, transparent colors are almost invisible on brown eggs, but rich dark colors take on a deeper hue. White eggs are like a blank canvas, the paint usually lays down on them evenly, and the shades are clean.
When cooking eggs, remember that the longer eggs are boiled, the longer and harder they are digested by the body. Soft-boiled eggs are easier to digest than hard-boiled or raw eggs. But hard-boiled eggs are suitable for dyeing, because, firstly, the shelf life of such eggs is much longer than that of the rest, and secondly, they are not too fragile and do not deform even with hot dyeing.
There are many ways to color and decorate Easter eggs. You can paint the eggs with traditional onion skins, or you can still paint them hot with watercolors. You can boil eggs wrapped in colorful shreds of fabric or wrapped in dye threads, you can, like a stencil, attach small leaves of indoor plants, various stickers, stickers to each egg, tightly wrapping it with a cloth, you can roll a wet egg in rice, wrap it tightly in a stocking and cook in beetroot, spinach or onion broth. Or you can paint the eggs with dyes bought in the store.
!!!
Be careful with chemicals - nail polish, glue, artificial colors. They can be used only on the undamaged surface of eggs and carefully making sure that they do not enter the body, especially for children.
TOP 5 original ideas for Easter eggs
1. Marble eggs
Creative and unusual decoration of the Easter table. You've probably already seen how to make such eggs in the video. It is enough just to boil the eggs hard-boiled, beat them to make patterns from the cracks and send them to the food coloring solution for several hours. It is better, of course, to use natural dyes in cooking - onion peel or beet juice.
But there is another way to marble Easter eggs.
To achieve a marbled effect when dyeing eggs, it is important to follow some rules. The dyeing technique is extremely simple: for this you need boiled eggs, food coloring of different colors, vinegar, vegetable oil, paper napkins, one deep and one shallow bowl.
Primary staining
In a deep bowl, combine 3 cups of water, 2 tablespoons of vinegar, and a few drops of food coloring. Dip the egg in the solution and wait for it to take on the desired shade.

Application of marble streaks
In a second bowl using the same recipe, prepare another solution of a different color.
For the formation of streaks on the surface of the shell, add 1 tablespoon of vegetable oil to the mixture. Beat the surface lightly with a fork.
To obtain the marbling effect, it is important that the depth of the mortar is no more than 2 cm and does not hide the egg.

Dip the primary colored egg into the solution and twist slightly so that its shell collects oil spirals on the surface of the mixture. You can experiment with colors for unique combinations of soft hues and vibrant contrasts.

Drying eggs
Remove the egg from the solution and dry it gently with a paper towel.

Leave the eggs on a paper towel to dry and cool completely. For a more complex design and color combination, repeat the second step a few more times with paints of different colors.

2. Puppet theater
Perhaps this is one of the most original solutions for decorating Easter eggs, which will especially appeal to children. After all, with such funny testicles, you can first play out some interesting scene or fairy tale, and then proceed to the traditional fun - whose testicle is stronger.
It will take quite a bit - acrylic paints + a thin brush or felt-tip pens, multi-colored dyes and, of course, boiled eggs.
First you need to paint them in a different color using artificial dyes. Use bright colors - pink, green, blue, yellow, etc.
Let the eggs dry.

Paint funny faces on the eggs with acrylic paint (or a felt-tip pen).
Now it remains to organize a place for the stage on the festive table and conduct the first rehearsal!
3. Dinosaur eggs
If dinosaur eggs appear on your table, guests are guaranteed an experience.
It's easy enough to "make" them. It is necessary to very tightly wrap dry eggs with pieces of gauze, securing its ends with an elastic band, and dipped into a solution of some paint.
It is better if it is a natural color: brown, noble gray or dark green.

The white streaks that will remain from the gauze will contrast well with such colors and resemble the skin of long-extinct animals.
4. Wax streaks
The waxing technique is also quite simple and original. The only thing that is required of you is increased caution, since you will have to work with fire.
Melt the wax, it is better to do this in a water bath. Put 2/3 of the eggs in a container with melted wax.
On soft, warm wax, squeeze out any number of veins with a thread around the entire circumference of the egg.
Let the wax harden and dip the eggs in warm water and paint.

Only those places that are free of wax will be painted, so think in advance how you would like to see the final result.
If wax does not lag behind dried eggs well, put them in the refrigerator for a while - the wax will easily come off.
5. Multicolored symmetry
We dilute several dyes in different containers. These can be shades of the same color (like ours), or completely different.
Cover the egg with glue paper (or tape) on the side that will not be dipped in the paint.
Dip it carefully into the water, be careful not to get paint on the sealed part.
Wait about an hour (if you want an intense color) or less.
Remove the egg, peel off the paper, let it dry and glue over the part that has already been painted over.
Dip the egg again in a different color solution.

How you glue the paper depends on how the drawing will turn out. It can generally be abstraction, straight or oblique lines. So that the dye is not dull, rub it with vegetable oil and polish it.
It is extremely simple to prepare Easter eggs using the presented methods, but the result is always very effective and unusual!