How to quickly peel a herring for a fur coat. Effective Ways to Quickly Peel Pitted Herring
Herring has been the most popular fish on our tables for many decades, both on holidays and on weekdays. It can be served in any form: fillet cut into pieces with onion and butter, or in salads, for example, in the traditional “herring under a fur coat”. True, not everyone likes to cut herring; it is believed that this is a difficult and painstaking exercise. We will tell you about several effective and easy ways to cut herring, and this task will not scare you anymore.
Preparation for cutting
- The color of the gills should be dark red. A darker color indicates that the herring is already stale and unsuitable for food. Another sign of freshness is that the gills are resilient and do not fall apart.
- The fish's eyes should not be cloudy and falling out of their orbits.
Also pay attention to the smell. There should be no foreign impurities in it (for example, bitterness or putrefaction). To avoid mistakes, buy only fresh or slightly salted herring. The spicier the ambassador, the more likely it is that the manufacturer hid unpleasant odors with it.
There should be no spots, cuts or holes on the covers of high-quality fresh or slightly salted herring. After breaking the integrity of the skin, oxidative processes occur inside the carcass, which are invisible from the outside, and the fish begins to deteriorate quickly.
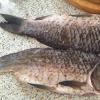
It is better to buy whole carcasses of herring to control its quality
So, the herring has been bought, and you need to start cutting. To do this, you will need:
- cutting board;
- sharp knife;
- tweezers or forceps to remove small bones;
- cellophane bags for waste.
It will be better if you have a separate board for cutting fresh or slightly salted herring. The fact is that this fish has a persistent and corrosive smell that is difficult to wash out of a wooden surface. You can put a sheet of cardboard, paper, or a thick napkin on the board (this is even more convenient to clean up waste). But don't post the newspaper under any circumstances! Printing ink will definitely enter your stomach along with the herring, and this is harmful to the body.
It is also advisable to have a separate knife. It is good if you have a set of knives, among which there is a special carving knife for fish.
If you have long nails, you can easily remove the small bones from the carcass. If not, arm yourself with tweezers or eyebrow tweezers.
Traditional way
- Place the fish on a cutting board lined with paper or napkin. Use a sharp knife to cut off the head.
Cut off herring head
- Then cut off the tail.
After, separate the tail
- Take the herring by the top fin. Cut it off carefully.
Cut off the dorsal fin
- Place the herring back to you. Run the knife into the belly, and starting from the tail, carefully cut.
Cut the belly
- Now you can easily remove the insides by helping yourself with a knife. There may be milk or caviar inside the carcass. Many people love these products: they can be eaten simply with bread or you can cook some original dish, for example, pate. In any case, thoroughly clean the intestines from the milk and caviar.
Remove entrails while helping yourself with a knife
- Be sure to remove the lower fins from the belly of the herring. To do this, lay the fish on its side and cut strips half a centimeter wide along the entire length of the abdomen. Cut from the inside, from both sides.
Remove the bottom fins
- Peel the inside of the carcass from the black film. Rinse thoroughly under running cold water (not warm or hot!).
Rinse the herring with cold running water
- Place the herring on a plate or board with the back facing you. Make a depression with your left thumb where the fin was cut. Move with slight effort to the top of the carcass, severing the skin, and then to the bottom, to the edge, strictly in the middle. The back will be divided into two neat halves.
Divide the back into two halves
- Place the herring back with the back facing you. Pick up the edge of the skin from the side of the tail and gently pull it towards you so that it does not break, but comes off completely.
Peel off one side
- Repeat on the other side of the fish.
Repeat on the other side
Done! The herring is peeled and you can serve it to the table.
Note! If you cut fresh rather than salted herring in this way, make sure that it is completely thawed. So it is much easier to move away from the bones and "shed" the skin. But in frozen herring it is easier to cut off the head and tail.
Removing bones from carcasses in different ways
You can simply cut the peeled herring into pieces, arrange on a plate and serve as it is. But it's better to take a little time and remove all bones from the carcass. There are some simple methods that will make this quick and easy.
On fillet
- Take the prepared carcass and begin to separate the ridge. Separate some meat near the tail for a comfortable grip. Grasp it, and, holding the rest of the carcass on the plate with your free hand, gently pull upward in a forward motion. The bones will gradually come out of the herring meat. The fresher the fish, the easier the bones will come off.
- Flip the carcass over to the other side, with the ridge up. With the same movements, pull the backbone along with the bones.
- Starting at the top, select the remaining bones and black films from the inside of the fillet, and so on to the tail.
This way you can prepare herring fillets for salads, especially for. All you have to do is cut the meat into suitable pieces.
Raw herring can be peeled in the same way. True, this will be a little more difficult: the ambassador slightly softens the meat and allows it to come off the bone more easily.
Cleaning in one stroke
For this method, prepare the carcass first: remove the fins, skin and entrails.
Grasp the tail of the herring with both hands. Her side will be directed at you. Tear the tail slightly with your hands, spreading them slightly. Hold the herring very tightly, otherwise it will slip out of your fingers.
Holding the carcass in front of you with both hands, "roll it over" towards you so that the herring makes a circle around its own tail.
Now cut the fish in one motion, quickly spreading your arms to the sides. If everything is done correctly, in one hand there will be a back with a ridge, and in the other - two belly stripes. Now it remains to separate the back from the bones.
Herring fillet can be used for salads, for example, Herring under a fur coat
It is better not to do this trick with fresh raw herring. It is unlikely that it will be possible to remove the meat from the bones without damaging the fillet. But if you want to prepare fillets for "herring under a fur coat" or other similar fish dishes in this way, then the method is quite suitable; all the same, the meat will need to be cut into small pieces.
Punching method
This method does not completely remove the bones from the fillets, but it is also quite simple.
- Gut the fish, cut off the fins, and remove the skin. Rinse thoroughly under running water. Then make a cut on the back of the carcass. Take it in your hands so that the fingers of the palm are inside the abdomen, and the thumb is in the dorsal incision.
- Squeeze your fingers and separate part of the fillet from the ridge with a pushing motion. Continue doing this until half of the fillet is completely separated. If you follow the process carefully and carefully, most of the bones will remain on the ridge.
- Do the same with the second half, but now hold the ridge with one hand, and make a pushing motion with the other.
This method is also perfectly applied on fresh, well-defrosted herring.
Another easy way
Place your thumb at the dorsal fin 2–3 cm deep. Move it carefully towards the tail, dividing the carcass of fresh or slightly salted herring in half.
Take the loose fillet on the tail and pull towards the head. When you separate one half, move on to the other. Slide your finger under the ridge and separate the tail of the fillet. Pull the ridge away from the fish. Now you just have to remove the bones from the fillets.
Video: quick cutting herring
We have told you about just a few ways to remove bones from herring. Surely you have your own tried and tested method that you constantly use. Please tell us about it in the comments. Bon appetit and comfort to your home!
New Year's herring under a fur coat is the central dish of almost every table. And here, too, there are nuances: the salad must necessarily contain fish without bones.
You can always buy ready-made fillets in the store, but store fillets are usually generously filled with marinade with harmful additives. Still, it's better to learn how to pickle it yourself. 
WILL NEED
herring
cutting board
sharp knife
gloves for those who do not like the specific smell of fish on their hands
First of all, thoroughly wash the herring under running water.  Then, with a sharp knife, detach the head from the carcass and cut the belly of the fish from head to tail. Get rid of the insides. If you are lucky and have caviar in your belly, you can use it for sandwiches. It turns out very tasty.
  Rinse the gutted herring again with running water. Now you have to remove the skin from the carcass. To do this, first make a deep cut along the ridge, going from head to tail.
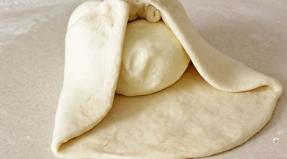
  Remove the dorsal fin immediately. And then, carefully picking up the edge of the skin with the tip of a knife, remove it from top to bottom.
  Now the most important thing! Divide the tail in two. Hold the herring firmly by the tail with both hands, in one hand - one part of the tail, in the other - the other. Holding the fish in this way, wrap the herring around the tail, while a small tear will already appear near the tail.
  Carefully, slowly, slowly continue to separate the herring, while all, even very small, bones will remain on the part where the back is. It remains to cut off the tail and separate the spine along with most of the bones from the back. Check the finished fillet parts. Remove all remaining bones from them. An ordinary table fork will help you with this.
  Under the remaining side bones of the herring, insert the fork teeth, pull them towards you and remove. If you do this carefully, there will be no bones left.
  Once the bones have been removed, the fillets can be cut into portions or used for salad dressing.
Having decided to treat home or guests to salted herring, the hostess asks how to clean it. Herring is not served unpeeled. You can make delicious cold snacks from salted fish: salad under a fur coat, forshmak, rolls, or just eat it with boiled potatoes, cut into pieces and sprinkle with sunflower oil. Before preparing any dish from the herring, you have to remove the bones, and often remove the skin.
Training
For cleaning salted fish, it is better to have a separate cutting board, but you can wrap regular cling film and work on it. You cannot clean the fish on the newspaper, as the paint sticks to the product, and therefore to the stomach. Medical gloves will help protect your hands from unpleasant odors.
For work you will need:
- sharpened knife;
- tweezers;
- plastic bag.
Cleaning methods
There are several ways to clean salted herring.
For novice housewives
The fish is freed only of the bones, leaving the skin. This is how a herring is prepared for serving as a cold snack, cutting it into pieces and sprinkling it with chopped fresh or pickled onions or herbs.
- The fish is gutted, washed, and the head and tail fin are trimmed.
- The thumb is placed next to the dorsal fin and buried 2-3 cm into the back.
- The finger is moved to the tail and the carcass is divided into halves.
- The ridge is removed with the hands.
- Small bones are pulled out with tweezers.
In one motion
This is how herring is cut in the Far East when a lot of fish needs to be processed. First, the carcass is gutted and the head is removed. Then:
- The fish is gripped by the tail fin with both hands.
- Wave their hands so that the carcass makes one turn.
- Hands are spread apart.
- In one hand there will be two halves of a clean fillet, in the other - a back with all the bones.
- From the back, the ridge is removed by hand along with large bones.
As a result, three pieces of clean pulp are obtained: a back and two fillets.
Herring is a versatile fish, with which you can prepare an appetizer, a delicious everyday dish or an original festive one. The main difficulty is to prepare it for serving. There are several ways to peel a herring, choose the most convenient one and please your family and friends with culinary experiments with salted fish.
What you need to clean
 Since peeling herring is not the cleanest process, you need to prepare in advance everything you need for it.
- Cutting board. Better to use a separate board specifically for fish. Choose products made of plastic or glass: they are easier to clean and do not absorb odors.
- A sharp knife. The sharpest knife is needed for high-quality cleaning of herring. If you need to sharpen the tool, do it just before cutting the fish.
- Tweezers... With its help, it is easy to clean the herring from the bones that “hide” in the fillet - they are thin and easily break off.
- Bags for tripe and bones... Place the leftovers in a bag right away, so you can shorten the cleaning time after cleaning.
- Container for cleaned fish... A regular plate will do.
Two cleaning options
If you have never cut fish before and are just learning how to properly peel a herring, your first attempt may not be very successful. Don't be discouraged, it's just a matter of time. Take your time, and after a few tries you will master this simple art.
The classic way

Let's start simple. Prepare everything you need and get started.
- Cut off the head and tail of the herring, remove them.
- Pick up the fish by the top fin and cut it off with a knife.
- Slice the belly of the herring from head to tail. Remove the insides. You can leave caviar or milk: many people like to eat them with bread.
- Place the herring on a cutting board and trim the edges of the belly to remove small bones, fins, and hard parts.
- Thoroughly peel off dark films - they give off bitterness. Rinse the fish under running water.
- Run the knife along the back of the herring, making a thin incision. Pick up the skin from the side of the head and pull it off.
- When the skin is removed, hold the fish in your hands. Place your thumb on the dorsal incision, and place the other four inside the carcass. Begin to separate the fish from the ridge, moving slowly from head to tail.
- First remove one half of the fish, then the other. As a result, only the ridge should remain.
- Check the fillets for bones. Remove them with tweezers. Cut the fish into slices and serve as planned.
Professional way
 This method requires a little more dexterity than the traditional method, but it gets through cleaning faster. Traditionally, we start by preparing the ingredients.
- Cut off the herring head. Leave the tail, it will still come in handy.
- Cut off the top fin.
- Slit the belly, remove the entrails, peel off the films, rinse the fish.
- Make a cut in the back from head to tail.
- Peel off the skin gently. Pry it close to your head and pull.
- When the skin is removed, the fun begins. Take the fish by the tail, dividing it in half.
- Holding the herring firmly by the tail, roll it back and forth.
- Now, while continuing to hold the herring, pull the halves of the tail in different directions. Do this slowly so as not to break the bones of the spine. At the end of the procedure, you will have a clean half without bones in one hand, and a half with a ridge in the other.
- Put the boneless fillet in a plate, carefully separate the other half from the ridge.
- Check the peeled fish for small bones, remove them with tweezers.
- Cut the fillets and continue cooking.

- Do not buy fish in a spicy brine: sellers often use spices to mask the stale product. A good fish should have clear eyes and firm crimson gills.
- To prevent the smell of fish from permeating other foods in the refrigerator, store leftover pieces in a sealed glass jar. Add some vegetable oil and a couple of onion rings for a delicious snack.
- Do not use newspapers while cleaning so that ink does not come into contact with the product. Better to wrap the cutting board with cling film. Leftover fish can be immediately wrapped in plastic and discarded without staining the board.
- Lemon juice will help remove fish odors from the cutting board and hands: wipe the tools with a lemon wedge, then wash with a regular product.
This is not to say that it is correct to peel the herring only in the first or second way. Just understand how convenient it is for you, and each next fish will be given easier than the previous one.
Herring dishes are a traditional cold appetizer on the festive table. Served pickled with a side dish, used as an ingredient in salads, combined with seafood, vegetables and herbs. One of the most delicious appetizers is spicy salted herring. The difficulty in serving is to independently clean the fish fillet from scales and ridge.
Small bones and other waste products can take a long time to process. Let's use a simple but effective method for quickly cleaning a herring. The process begins with fish in the store. The speed and ease of cleaning scales and bones depends on its quality.
Choosing quality fish
The quality can be determined according to the criteria presented in the table.
| What to look for | What should be |
|---|---|
| Date of manufacture and expiry date | When choosing canned herring in the store, pay attention to the date of the catch and the plant where you put the product in the jar. Evaluate the appearance of the package - there should be no dents or traces of rust. |
| Fish scales | The scales are light-silvery without spots and third-party inclusions. |
| Gills | The gills are dark red. If, by clicking on them, a blood stain is formed, you should not buy fish, the discharge is an indicator of violation of the rules of salting. |
| Abdomen | Lovers of herring caviar or milk should pay attention to the appearance of the fish belly. Press lightly on it to determine the quality of the content "showing" outward. |
| Carcass density | The carcass is dense and elastic, without traces of damage. |
| Smell | The quality indicator is a fresh, pleasant fishy smell. An extraneous "smell" indicates the spoilage of the product. Permitted aroma - subtle notes of seasonings used for brine blanks. |
Herring dishes are best served as a hand-cooked fillet. Buying whole salted fish is more profitable than buying a semi-finished product.
Video Tips
Effective Ways to Quickly Peel Pitted Herring
Prepare carefully for the process of peeling herring. Take care of the necessary devices and additional funds in advance.
| Tool | Appointment |
|---|---|
| Well-sharpened fish knife | Sharpen your cutlery before cooking. Depends on the sharpness of the blade: the efficiency and speed of peeling herring, cutting fillets into even parts. |
| Rubber gloves | Gloves will protect your hands from sharp blade cuts, bone pricks and the smell of herring. |
| Cutting board | Protect your countertop with a fish cutting board. Give preference to plastic utensils, which are more practical and more convenient than wood. The latter will absorb fish oil, ichor, intestines and retain the smells of food for a long time. |
| Cling film | For easy cleaning of fish waste, protection from odor and grease, wrap the cutting board with cling film, and when finished, roll up and discard. |
| Additional funds | Tweezers are required to safely remove small bones from fish and "splinters" from the palms if the bones "dug" into the skin of the hands. After peeling the herring, rinse the cutting board with a special product. And for freshness and elimination of unpleasant odors - wipe the work surface of the table and your palms with lemon juice. |
The effectiveness of peeling herring depends on skill. So, the movements of a translational nature, produced by the thumb in the direction of the ridge, will help to clean the fish much faster and better. With the characteristic movement of the knife, the skin practically moves away from the sirloin. Applying the technique requires hands-on experience. But for amateur cooks, there are ways to quickly clean herring at home:
Method number 1 - classic
- Prepare the herring for cleaning by rinsing the fish with cold water and removing excess salt and mucus.
- Use a sharp knife to separate the head.
- Remove the tail - the unclaimed part of the fish. Rinse the herring again under running water to avoid small bones getting caught in the fillets.
- Cut the bottom of the herring in a straight line, moving from head to tail. Make an incision at the ridge up to 1 cm in size. Through it, remove the "filling", including the caviar. After removing the entrails, rinse the carcass, wipe with a napkin. Blot the inside as well, removing the veins and intestines, so that the fillet comes out without any bitterness.
- Scrape the dark films off the carcass with a knife.
- The skin of the herring is easily "pulled together" if you grab it by the edge on each side of the fish.
- Fillet is removed by the "capture" method, starting from the head and moving towards the tail. Herring contains so small bones that it is not always possible to remove them. Feel free to cut off a little sirloin along with the smallest bones.
- After the manipulations, you will get two pieces of fish fillet, cleaned of bones and scales. Remove the remaining bones with tweezers.
Method number 2 - painstaking
- Prepare the fish for cleaning: wash, cut off the head, split the body in two and remove the entrails as described above.
- Removing the tail is done differently: firmly grab both tail parts of the herring with both hands, making several circular movements with the carcass in different directions.
- After "returning the fish to its original position", using force, tear the carcass in half with a pulling motion, holding the two tails.
- In one hand will be the tail of a herring, in the other - fillet, from which it will remain to remove the bones.
The critical stage is the removal of the ridge and large bones:
- Take the herring in both hands, turning the belly towards you.
- Use your thumbs to feel for the location of the ridge from the inside of the fish.
- Divide the carcass into two halves so that the "felt" bones remain on one herring fillet.
- Gently press down the ridge on the inside, and on the outside, sort the bones with your fingers, removing them from the herring.
- Do the same with the other half of the fish.
There is another way to remove bones from herring without a knife - using scissors.
Video description
Method number 3 - cleaning with kitchen scissors
Slice the fish away from the ridge by removing the skin. Using sharp kitchen scissors, cut the carcass from the tail to the head. They are convenient to remove herring fins and internal contents from the belly. The advantage of using scissors is to simplify the process by removing unnecessary parts in one motion.
Take advantage of this and other technologies for cleansing herring from bones. Observing safety rules, you will be able to "cut" the herring in a short time, having received a clean fillet, which will only have to be arranged for serving on the table.