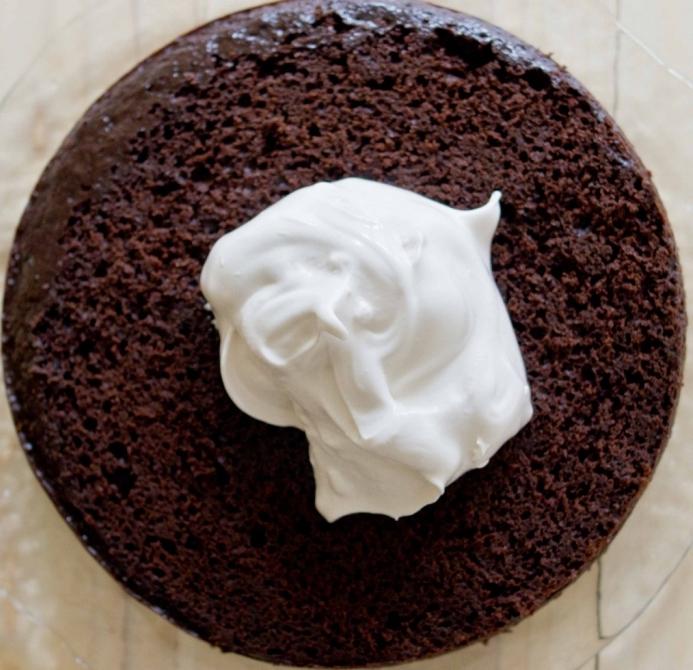
How to color eggs in onion peel. Original ways to paint eggs in onion peel
Hello dear readers. Soon Easter is coming, and today we will talk about how to paint eggs in onion husks. It is one of the most widely used natural dyes. After all, with the help of the husk, you can achieve not only different shades, but also paint with beautiful patterns. And for this you do not need to buy anything, just collect the husk from the onion and pick up different leaves that you like. You can still make eggs with cereals, such as rice, or use improvised means.
 In my memory, our parents only once painted eggs with food colors. The color of course was bright, but the hands were the same. And after cleaning, the eggs were also dyed. Maybe the eggs, after cleaning, look original, but eating them is not very pleasant. Although dye and food, but chemistry is chemistry. Therefore, we paint eggs with natural dyes. And today I will tell you how to paint eggs for Easter with onion husks.
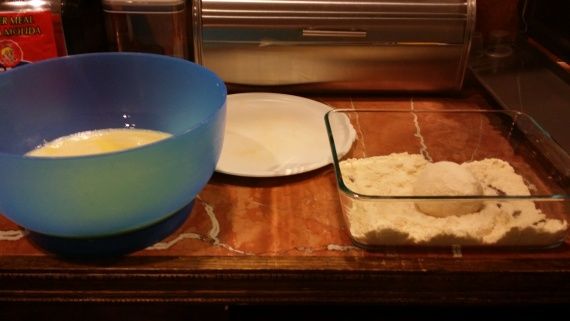
For starters, take onion peel. In order for the paint on the eggs to get saturated, you must first boil the onion husk. You can do this in the evening, or on the same day as painting.
If previously, then it is enough to boil over a quiet fire for 15 minutes and leave our solution to infuse until the next day.
If you need to stain today, then boil for 30 to 40 minutes, and then immerse the eggs for staining. Cook for about 10 minutes.

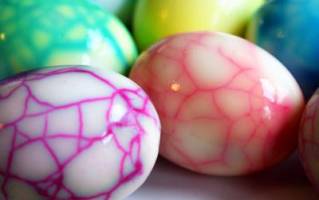
If you want the eggs to be solid, it is best to wash them first. So the paint will evenly lay down. Another tip, strain the onion peel, cook eggs only in broth. Take a look at the photo below.

The two rightmost rows are painted with husk. The far right with strained husk, and the second - along with the husk. As can be seen in the photo, the eggs are not the same color. Although this may be even better for you, there will be some semblance of a picture.
But you do not control the process of applying the drawing, and do not know what it will turn out. This can be done by slicing the onion peel and placing it in a stocking, the technology is written a little lower.
And if you are interested in other colors of eggs with a photo, then these are also natural dyes. What we painted them with can be found in the article on our blog “.”
Our mother loves to paint eggs in a stocking, with the addition of the first leaves. Most often these were currant leaves or parsley. They just were just the right size, and then looked very nice on the finished egg.
Mom always sent us to collect green leaves while she cooked everything else. I asked to take only beautiful leaves. It always turned out beautiful eggs painted in onion husks with a pattern.
 The leaf should not be large, otherwise it will be difficult to uniformly press it to the egg, and then a blurry pattern will turn out.
To apply the pattern, we need leaves or grass, old dimensionless nylon tights, and a tie.
Mom usually moistened the leaves with water, glued to the egg, and gently lowered into the pantyhose. She straightened the leaves, pulled on tights and tied up. She didn’t even cut tights, and she had garlands of up to 10 eggs. For convenience, we cut them into pieces so that only one egg is enough.
 We have parsley leaves and rice. Instead of leaves, you can use ordinary rice, millet or pearl barley. Just wet the raw rice with an egg and stick around it with a cloth (nylon tights). Rice is better to take polished, you can even cut rice. Cook as in the first case, 10 minutes.
You can stain eggs with patterns and other methods. For example, take an ordinary bicycle camera and cut into thin elastic bands. Dress on the egg and paint with them. You can use stationery gum, but they are often torn by boiling.
You already come up with patterns yourself, and depend on your imagination and the number of elastic bands.

Or even use an elastic bandage to apply the pattern. It turns out also an interesting picture.
You can use a variety of lace fabrics. The pattern will turn out like on a fabric.
 Or even just scribble a drawing on the shell with a needle. Unless of course you have time for this.
Tips for coloring onion peel with and without a pattern

Precautions for coloring onion peel
Onion peeling is completely safe. But there are still points to consider.
For example, dishes in which onion husks will be cooked. The husk paints not only the shell, but also the pan.
Our mother used an old pot for these purposes. Because then it was difficult to wash it later. Although many cleaners have already been invented, we also use only one pot, not enameled, for painting.
And of course we don’t forget that we work with fire and hot water.
We hope that we have helped you with the question of how to paint eggs in onion husks. And if you have not yet decided on the choice of Easter cakes, then we can help with this. We have a great selection of proven Easter cake recipes. You can get acquainted. Or see our favorite recipe.
Coloring eggs for Easter with onion husks is a simple and affordable way to prepare for the holiday. How to make krashenki unusual? We learn some original step-by-step recipes with photos - how to paint eggs in onion husks, and how - with a picture, and we will beautifully make Easter eggs with our own hands.
Ingredients needed:
- chicken eggs - 8-10 pcs.,
- onion peel - 1 l,
- water - 2 l
- salt,
- vegetable oil
Instruction:
- Pour onion peel with water, bring to a boil and boil for 40 minutes. There should be enough water to fully cover the number of eggs you need. Two liters of water will need about a liter of tightly packed husk.
- If there is no time to cool the broth - put the eggs directly in boiling water. Before this, the eggs need to be slightly warmed up. This can be done by holding them for 10-15 minutes in slightly warm water.
- Boil the eggs for 10 minutes. Then you can drain the boiling water and pour the eggs with cold water - so they will be better cleaned. You can leave the eggs in the broth for some time to achieve a more saturated color.
Easter eggs with drawings
- raw chicken eggs - 8-10 pcs.,
- onion peel - 1 l,
- rice (groats),
- green
- old nylon stockings or tights,
- elastic bandage,
- gauze,
- paper,
- scissors,
- leaves and flowers of plants
- threads
- gum
- lace
- needle.

Rice
- Cut the stocking into pieces so that one egg fits in one piece and there are edges that can be tightly tied.
- Tie one edge of the stocking to form a pouch.
- Put the egg in the bag and cover the rice. Tie the bag so that the capron fits snugly around the shell.
- Using your fingers, spread the rice inside the bag so that the grains evenly cover the entire egg.
- Cook eggs in husks according to the instructions above.
- When the eggs are cooked and cooled, cut the bag and rinse the eggs with cold water to wash off the rice. It will turn into speckled eggs. Why is rice used? Another grits quickly boils and turns into porridge, without leaving clear prints on the shell.

Leaves and flowers
- A popular way to color eggs with a pattern is to use parsley leaves.
- Choose beautiful neat leaflets.
- Wet the leaf with water and attach to the shell, then fix the leaf with a nylon bag.
- Instead of parsley, you can use dill, cilantro, currant leaves, chamomile flowers and any other plants.
- The shell area, covered with plant material, will remain unpainted. The eggs will have a clear pattern with natural contours.

Paper
- Cut the writing paper into small pieces of any shape.
- To make the fragments neat, first draw the outline with a simple pencil, and then cut it out. It can be abstract ornaments or thematic drawings.
- Moisten a piece of paper with water so that it sticks to the shell and secure with a capron. If you are worried that the fragments will move and the pattern will turn out blurry, use self-adhesive paper or electrical tape.

Thread or elastic
To dye eggs with a pattern, you can do without a stocking, and take, for example, threads or elastic bands.
- Just wrap each egg with threads in random order - you will get striped eggs.
- Instead of threads, you can use stationery gum. Choose gum thicker so that they do not burst in boiling water.
- Do not tighten the eggs too tight - the shell may crack.

Lace
Another option is to wrap the eggs with lace. As a result, the shell will be decorated with luxurious openwork ornaments. The finer the lace, the more elegant the resulting pattern. Simple but sweet shell-shaped rhombuses are obtained by placing the egg in a large net.

Zelenka
With the help of onion husks they make amazing drawings on eggs (see the photo below) - with marbles. You will also need an additional solution of brilliant green and gauze.
- Grind the husk with scissors, in a blender or in a coffee grinder.
- Moisten raw eggs with water and roll in chopped husk.
- Fix the husk fragments with gauze or a nylon stocking. Tie the edges of the makeshift pouch tightly.
- Boil the water and add the green stuff there - from a few drops to a whole bubble. The brightness of the hue depends on the amount of green.
- Boil the eggs for 10 minutes and cool.
- Drain and gently cut the cheesecloth. Rinse the husk from the shell with running water. It is recommended to wear gloves during this work.
For stains to be even more diverse, use husks of different varieties of onions. Shredded writing paper can be added to shredded husks. Note - if there is a lot of paper, the eggs will turn pale.

Needle
You can even apply a drawing after you have painted them with onion husks. Any ornament is simply scratched on the shell with a needle. Colored eggs can be complemented with factory Easter-themed stickers or bandaged with ribbons.

Gauze or bandage
You can connect your imagination and use any other materials by coloring eggs according to this principle. Instead of stocking, gauze or a wide elastic bandage is also suitable.
- The water in which you will boil the eggs, you need plenty of salt. If the shell bursts, the egg will not leak.
- To make the color more intense, use vinegar. You can rub the egg with vinegar before staining, after staining, or add vinegar to the water.
- To keep the hue even, wash the eggs before staining using a soft sponge. You can also rub the shell with alcohol.
- Do not cook eggs for too long - they will become unpleasant in taste. If you want a darker saturated color, hold the eggs after staining in a cold broth of onion husks for several hours.
- To make the eggs shine, rub the shell with vegetable oil.
That's all the tricks of creating beautiful and original Easter eggs. Onion peel is a natural dye, so all procedures are completely safe.
Painting eggs with onion husks for Easter is not only beautiful, but also useful. Indeed, industrial dyes, which are often used for coloring eggs for Easter, paint not only the shell, but also the protein.
There are many natural dyes with which you can make eggs not only festive, but also safe on. But the undisputed leader among natural ingredients is onion peel.
Painting eggs with peeled onions is very simple, but you need to know a few secrets so that the color is saturated and uniform.
How to prepare eggs for coloring for Easter 2018:
- so that the eggs do not burst during cooking - remove them from the refrigerator at least half an hour before cooking. Or you can hold them in cold water for 15 minutes
- Wash the eggs and soap well before painting. It is better to use an old toothbrush for washing;
Onion colored eggs for Easter 2018
- after you color the eggs - rub each of them with a napkin soaked in vegetable oil. This will give a glossy shine;
- optionally dyed with natural dyes, the eggs must be plain. You can wrap each gauze with rice grains, ribbons or threads and only then dip into the dye. So interesting patterns will appear on the surface.
How to color eggs with onion husks for Easter 2018
Ingredients:
- eggs;
- a few handfuls of onion husks;
- parsley leaves (optional);
- dry rice (optional);
- oil.

How to color eggs with onion husks for Easter - ingredients
Remove the eggs from the refrigerator at least half an hour before cooking. Wash them well with soap. For a marble effect, it is better to take white eggs, and a more saturated color you will get from eggs with a dark shell.

Cook the husks for at least an hour
Pour onion peel with water, bring to a boil and cook for about 1 hour. In an onion husk broth that has cooled to room temperature, lay the eggs and boil for another 15 minutes. Then let the eggs cool.

Put the eggs in the onion peel and boil for another 15 minutes
How to decorate eggs with specks for Easter? Take a wet egg, roll it in dry rice and tightly wrap gauze, securing the ends (by the way, many housewives successfully use women's tights).

Eggs painted onion husks and rice for Easter 2018
The eggs will be "marbled" with an interesting pattern, if you place them directly in the onion peel, then wrap them in gauze and wrap them tightly on top.

Eggs painted onion husks for Easter 2018
You can also attach leaves of parsley (or other small grass) to the egg and also wrap tightly with gauze. So you get the desired pattern.

Eggs painted onion husk with parsley for Easter 2018
Happy Easter!
Do you know why eggs are painted on Easter? And why do they traditionally prefer a bright and rich dark red color to everyone else?
HISTORICAL REPLICA ON PAINS
It is said that after the resurrection of Jesus Christ, his disciples dispersed all over the world, bringing with them scandalously revolutionary news about the immortality of the soul. With the same thought, Maria Magdalena went to the Roman emperor - she went so that life would triumph over death, so that truth grows and expands, so that light grains sprout and sprout. Given the status of Comrade Tiberius, it was not comme il faut to go without gifts in those days, so Maria took what was available to her - a simple chicken egg, in which she wanted to put a special meaning: there, under the shell, under the shell, there is life. The analogy, I think, is clear.
Tiberius, as I understand it, did not differ in patience and calm disposition, and therefore, having heard what Mary Magdalena tried to convey to him about the miracle of the resurrection of the Son of God, was angry in a terrible way and exclaimed in anger: “This is impossible! It’s impossible, like, for example, for a white egg brought by you to turn red! ”
And at that moment, as you yourself understand, it still became a bloody red-brown color. Since then, the tradition has begun to paint eggs on Easter - as a tribute to memory, as a symbol of faith, as a sign of love.
However, in fairness it should be noted that this is not the only version of where the legs grew from the habit of doing such manipulations with chicken eggs. Not the only, but beautiful one, huh? In general, I won’t remember about others - it’s not for this that we gathered here to talk about historical conversations, let's get down to business. Hands itch something to grind!
Nowadays, with the advent of all kinds of food colors, special colors for Easter eggs and even various stickers, few people think about the origins and traditions, but in vain. To paint eggs with natural substances is not only more beautiful, more pleasant and more natural, but also more useful - I think this is not worth talking about.

Onion peeling egg dyeing technology
The first stage is common to all methods: preparing a decoction. Onion peel (don’t ask me how much - the more, the better; I just fill the ladle in which I boil the eggs to the top, and even lightly tamp them), put them in a pan and fill them with water. Leave for half an hour, then put on fire, bring to a boil and boil for 10-20 minutes. We are waiting for complete cooling - the broth is ready. You can omit this step and immediately lay the eggs in a bowl of water and husk, however, the color intensity of the painted eggs in this case will not be so saturated and deep. In addition, if you need a fundamentally even, perfect color, you need to strain the broth - and boil the eggs already in a "clean" liquid without onion husks.
And now we will proceed directly to the “laying out” - more precisely, to the methods of decorating eggs painted with onion husks.
Dressing eggs stained with onion husks
1. A thread once, a thread two - the strip turned out!
A bright egg, smooth and so ... real. Imagine - you are holding it in your hands, you are examining the deep color that the husk has given him, and you simply “swim away” with your thoughts behind every path drawn by threads on a glossy surface.
What to do. To get a striped pattern on the eggs, it is necessary to wrap each egg tightly with thick threads before boiling.
Draw patterns - some of the eggs can be made with strictly horizontal stripes, some with vertical, give chaotic drawings to a few more, and symbolic crosses to others. It will be great!

2. Lace draws a fairy tale, magic, love and affection.
An amazing miracle is an egg with bizarre patterns, delicate curls, incredible loops and ponytails. You hold in your hands - and literally with your hands you feel its entire depth, some kind of sacred knowledge hiding inside. Very mysterious puppies turn out!
Creating delightful lace patterns is not difficult. Believe me, it’s even much easier than it might seem. The most important thing is to choose a suitable lace, the pattern of which will be small enough and at the same time suitably large in order to look nice on the surface of the egg.
What to do. Tightly wrap the eggs in one layer of lace, fix (with threads or a knot) and cook. We remove the lace and admire.
By the way, in addition to lace fabrics, you can take something simpler. The main thing is textured. Well, for example, eggs that are wrapped before cooking in a plastic net in which they sell fruit look great.
3. Birch leaf, parsley leaf. And on the eggs are curls.
Incredibly delicate drawings! However, it is not surprising - Nature herself creates them ... Creates by investing her love and care, imagination and skill.
Getting prints of leaflets on the eggs is easy.
What to do. A drop of water will help you temporarily “glue” the necessary parts of the plants onto the egg, after which it remains only to tightly wrap the entire composition with a piece of nylon tights (gauze as an option), fix the fabric (with a knot, threads) and weld everything together.
After you remove everything superfluous from the egg, the outline of the plants will remain amazingly beautiful on the shell - perhaps even with a slight greenish tint (birch, for example, stains the eggs well).

4. Draw at home, flowers, snowflakes - give the egg pictures.
Fancy squiggles. Surrealistic lines. Cubism and geometry, symbolism and classical forms - sometimes it seems to me that the paints can be considered endlessly, immersed in their philosophy and finding more and more new dimensions of life.
What to do. We cut out everything that is fashionable to cut from electrical tape: droplets, hearts, etc., sculpt on an egg and cook it like that, then gently peel it off.
Of course, it is difficult to imagine that an adult puffed over sticky tape, trying to cut out hearts, squares and droplets from a rather inconvenient material, however, who said that adults need to puff? Attract free child labor - believe me, the little one will also be grateful to you for the opportunity to shred my father’s electrical tape, decorate the eggs of your choice, and then give your grandmother Easter paint of your own making.
In fairness, I must say that a couple of times we came across an electrical tape, which, after boiling with onion peel from an egg, we peeled along with the shell, but there were still more positive experiments. And beautiful experiences, mind you!
5. Tsap-scratch, yes Tsap-scratch - everyone is happy about Easter eggs!
It seems that on an endless brown-red surface of an egg, the frost draws its patterns with the finest brush, displays bizarre squiggles, creates incredible compositions. Magically!
What to do. Nothing special. Just draw with a needle.
Of course, complex drawings and incredible ornaments can be left to the artists, and at this time you will arm yourself with finished paint and a needle and write to everyone: “Christ is Risen!” Well, or “You sing from Luda for a long memory!” It's not difficult and very exciting.


6. Marble hinges, marble covered. Marble eggs washed by Easter!
An absolutely incredible feeling is to hold in your hands an ordinary chicken egg and drive away thoughts of its stone strength. An absolutely special pleasure is to look at the "marble" folds on the egg and try not to "get lost" in their labyrinths. By the way, getting such a pattern is easy.
What to do. It is enough to crumple onion peel slightly, wrap raw eggs with it, tightly wrap with gauze and cook.
Having removed the "clothes", you will find wonderful "marble" paint.
7. Point, point, comma - steep krashenka came out!
Meditative egg: you look at it, you look, you are looking for something ... And it’s like - bingo! But no, it’s not ... And again you surrender to the game “find that, I don’t know what” ...
Want to meditate?
What to do. Dip the egg in water, and then immediately into a bowl of dry rice - roll as it should. Grains stick, you immediately wrap all this joy with gauze (or capron) and cook in onion broth.
When you remove the fabric and remove the rice, you will find cute speckles.
If the soul requires experimentation, the same way you can get a pattern with peas - you get large dots. By the way, a very interesting pattern is given by olives, cut into rings - I recommend to try.

8. Flowers grow on an egg - on Easter, miracles are simple!
Tenderness. Touching. Translucency…
On krashenki flowers look especially beautiful.
Like everything else, simple and affordable.
What to do. Raw eggs, we press small flowers to them (moreover, not only “flat” violets or lilacs, but also voluminous shaggy chrysanthemums, chamomiles), we wrap them in several layers of nylon, tightly bind. Cook.
We remove the "fur coat", admire the fruit of our efforts.
9. Dark, light, dark, light ... The eggs for Easter are stripped!
Looking at these puppies, it is difficult to contain an exclamation of delight: they are unusual, strict, solemn.
The process of their creation, of course, is somewhat more complicated than all of the above, but the result is more interesting, agree.
What to do. The most important thing is to choose the dishes in which you can steadily put the right number of eggs on the “ass”. Selected and delivered? Fill with onion broth about a third and set to cook. 5 minutes after boiling, add another third of the broth and cook again - 3 minutes. Fill "with the head", boil for a couple of minutes and drain the broth.
You will get wonderful stripes - from dark to light. (In the photo - experiments with other paints).

10. Girls painted, painted thoughts with wax ...
There is something ancient, mysterious and mystical in the art of painting krashenka with wax. And the egg touched by the scribe with wax is special: incredibly warm, sincere, right.
Perhaps this method is the most time-consuming of all described, but the eggs that are obtained as a result of a little witchcraft are worth the effort.
What to do. On a raw cold egg, dyed with onion peel in a barely noticeable beige color, draw patterns with hot wax and write wishes, after which we lay the eggs in a very concentrated broth and leave them there for several hours. After the eggs turn a deep brown color, we intensively remove the wax with a napkin.
Some tips for those who want to learn how to paint Easter eggs as a true master of their craft:
- onion peel is a pretty stable thing, however, some housewives, after cooking, additionally soak the eggs in vinegar precisely for greater paint resistance;
- eggs for cooking must certainly be at room temperature: of course, this does not exclude the possible cracking of the shell during cooking, however, it will significantly reduce the likelihood of such troubles;
- so that the eggs glisten dazzlingly and look festive and solemn on the plate, grease the prepared beauties with a thin, thinnest layer of any vegetable oil - you won’t tear your eyes off !;
- sometimes you can fool around a bit - boil a couple dozen quail eggs in onion husk: you can’t even imagine how small and sweet specks look in a cute speck in red-brown color!
Staining with other natural dyes
In addition to onion peel, you can use other natural dyes for coloring eggs for Easter. There are many of them, the main thing is to choose “your own” and approach this with a soul.
1. Blueberries give a very intense saturated blue color - just boil the eggs in a saturated blueberry broth.
2. Contrary to popular advice on the Web, I can say from my own experience that neither beet juice nor cherry juice stains eggs. However, if a light slurred shade of gray-beige color is considered a color, then it is painted. But not pretty.
3. Brown color is easy to obtain using natural coffee - you need to boil the eggs for about 10 minutes in very strong coffee, then fix the result with vinegar.
4. By the same principle, you can color the eggs with black tea - there will be a different shade of brown.
5. But hibiscus, alas, gives a completely uninteresting shade of gray.
6. Thanks to turmeric, you can get a rich yellow color (3 tbsp. Quality turmeric in 0.5 l of water will give a good golden hue).
7. Curcuma's closest friend is curry powder.
8. Birch leaves give the eggs a delicate yellow tint.
9. Juice of red cabbage in the company of vinegar will color the eggs blue.
10. When boiling, the pomegranate peel gives the eggs brown color.
Happy Easter to you and bright krashenok!

The simplest and, perhaps, the ancient method of preparing dyes in Russia is the option of painting eggs with “clothes” of bulbs. But how to paint eggs in onion husks so that they look original and bright? Modern technologies offer many alternative options for decorating eggs for Easter - from chemical food colors to colorful stickers. But the use of onion husks for this purpose is the most environmentally friendly method. In addition, he captivates with the ease of the process and the realization that it was in this way that our ancestors prepared colored eggs for Bright Sunday.
Over the years, craftsmen have come up with many curious options on how to give originality even to simple egg designs. We have collected the most unusual and interesting ways of coloring eggs for Easter with onion husks. Using them, you can create truly original paints that will become a decoration of the festive table or a unique gift for your family and friends. All you need to create them is a large number of onion peels proper, which it is recommended to start collecting no later than Shrovetide.
The classic version of how to dye eggs with husks from onions suggests that the hostess should get dye with a uniformly painted surface. To do this, you will need a very small set of ingredients:
- eggs - white or dark (at your discretion);
- husk from onions - as much as possible;
- salt - 2 tsp;
- sunflower oil - 2 tbsp. l .;
- water.
The first thing to do is remove the chicken eggs from the refrigerator and let them warm to room temperature. This is because when stained with onion peels, the eggs are immediately boiled in a coloring broth. And so that the shell does not burst during cooking, it is important that there is no sharp temperature drop. If you do not let the eggs warm, then there is a great risk that they will burst and in the place where the shell is broken, the protein will acquire an ugly yellow hue. Also, before putting eggs in a pan, it is recommended to thoroughly wash them and wipe them with a soft cloth.
While they will warm up (it will take at least an hour), you should start cooking a decoction. You can cook eggs at the same time as onion peel, but in this case, the color will probably be uneven. Put in advance the husks from the onions in a wide pot and pour clean water. Let it infuse for at least half an hour, after which you can put the pan on the stove.
When the water boils, turn down the heat and let it boil for about twenty minutes. After that, remove the pan from the stove and leave to cool. Then strain the broth, completely removing the onion peel from it, so that the color lies exactly on the egg shell. In addition, this method allows to achieve a more saturated color.
In general, the key factor for getting a dark color of dye depends on how much onion peel you manage to collect before Easter. To achieve the fullest tone, during the preparation of the coloring broth, it is necessary that the amount of husk be so large that it will even have to be tamped in a pan. If such an amount is not collected, then you can paint not white, but dark eggs.
Next step: put the broth back on the stove and add salt to it. Stir thoroughly to completely dissolve the salt, and lay the eggs in the pan. Cook until eggs are fully cooked. As a rule, this takes about 12 minutes. During cooking, periodically turn the eggs with a spoon so that they are qualitatively and evenly dyed from all sides.

Make sure that the water completely covers the entire surface of the shell, otherwise it will not work to achieve an even color.
When the eggs are boiled, fill them with cold water and let cool completely. Then wipe with a cotton towel and, in fact, everything is ready. Further, if desired, they can be greased with sunflower oil. With this simple method, you add an egg surface to a glossy sheen. Also, with its help, the color will become more saturated. But if you prefer a matte finish, then you can remove the vegetable oil from the list of ingredients for this recipe.
We get various natural shades
If you show a little creativity, then you can get different nuances of brown color, using only husk from onions. The whole secret is how long it takes to cook eggs in a coloring liquid. Thus, if you keep different parties in a boiling broth for different times, you will be able to collect an Easter collection, which will make an interesting composition from one dominant color, but in different shades.
So, if you want to get beige color with golden tint, then just boil them in the broth for no more than one minute. In this case, you have to put almost ready-made eggs into the decoction. To successfully turn into a dark orange color, it is enough to boil them in a decoction of onion peels for two to three minutes, no longer. But to get a more saturated brown color with a red tint, you need to wait five to seven minutes before removing the eggs from the pan with a natural dye.

If you managed to get the Yalta onion, which has a bright purple husk, then at the exit you will have dyes of a purple spectrum.
Use the above time intervals to paint eggs in different shades of purple. By the way, if you did not have time to prepare the required amount of onion peels, and you do not want to paint the eggs in another way, do not despair. Just go “hunting” to the nearest supermarkets. There, pick the ingredient you need for painting from the bottom of the boxes with onions.
Easter ombre and simple geometry
There is an opinion that it is not interesting to paint eggs with onion husks, since all the paints will be the same brown color. For creative natures who are not satisfied with getting different shades of the same color, this may seem boring. But there are many curious and simple methods that allow you to paint eggs with husk and achieve original designs.
For example, you can paint Easter eggs in the ombre style - with the transition of tones from light to dark. The only difficulty with this method is that you will need to lay the eggs vertically on the bottom of the pan. Fit them tightly so that they support each other.
Then pour the onion broth into the pan - just enough so that the water covers one third of the height of each egg. Put on the fire, wait until the water boils, reduce the heat and let the broth boil for five minutes. Then add another decoction - so that now water covers two-thirds of the height of the eggs. Let it boil again and boil for three minutes. Finally, fill in the remaining amount of dye from the onion peel so that it completely covers all the eggs. Keep a couple of minutes and pull out the puppies. If you did everything right, then you should get Easter eggs in the amber style - the color will cover the shell, losing its intensity closer to the sharp end of the eggs.
Another simple method will allow you to make Easter eggs with drawings at home. To prepare them, you will need the following ingredients:
- white chicken eggs - the amount depends on the volume of the pan;
- threads or thin rubber bands;
- salt - 2 tbsp. l .;
- peel of onion - at your discretion.
Put onion clothes on the bottom of the pan and pour boiling water so that the water completely covers it. Allow this substance to brew for two to three hours. After, take the eggs warmed to room temperature, and wrap them with knitting threads or thin elastic bands. You can do this in a chaotic manner, or winding threads in the shape of a cross, or, for example, a star. Then dip the prepared eggs in a pan with husk, add salt to the water and bring to a boil. Reduce heat and simmer for ten minutes.
Pull out the finished eggs with a spoon on a plate and allow to cool completely. After you can remove the threads or elastic bands. Unfilled stripes will remain under them, which will form a geometric pattern. If you wish, then you can combine the two methods described to get completely unique Easter eggs that are simultaneously painted in ombre style and with geometric patterns.
Another variation of these methods will take a little longer. First you need to paint the eggs with a not very intense color. To do this, dip them in a coloring broth for only minutes, a maximum of two. Cool them and wrap with threads, trying to create an interesting pattern. Then boil the eggs for about ten minutes to get a rich brown or dark red color.
After you remove the threads, not a white pattern will open under them, but a less contrasting beige with a golden hue. Such a tandem will look beautiful and unusual.
Inshell plant motifs
The traditional themes of Easter Easter eggs are floral designs. They are quite simple to make if you use real plant petals, buds and small flowers. It is advisable to select textured leaves. For example, the leaves of parsley, dill, dandelion and clover, inflorescences of field chamomile, lilac or any other available small flower heads will look beautiful. Paints with flowers look especially cool, since when painting the shell it is possible to convey the image of each petal.
You will also need nylon. Unnecessary disposable tights that should be cut into squares can handle this task. The size of the flaps should be such that you can freely lay eggs in their center, wrap them in a nylon bag and tie it.
Rinse each egg thoroughly under running water and wipe with a dry cloth before cooking. Then, each leaf or inflorescence with which you want to decorate the shell, moisten and attach to the egg in random order. Gently wrap it in a nylon bag and tie it tightly. This will securely fix the leaves. After that, as usual, cook the eggs in onion husks for about 10-12 minutes. Then cool the puppies and pull them out of the bag. Under the leaves and inflorescences there will be an unpainted part of the shell repeating the contours of the plant.
If you do not want to take kapron tights, then for this purpose you can use bandages. But keep in mind that you will have to work hard to reliably wind their eggs, without moving leaves and inflorescences from their places. And you can do without leaflets and wrap the eggs with beautiful openwork lace and fix them with threads or thin elastic bands.
In this case, their beautiful pattern will be imprinted on the surface of the shell. For this purpose, even the most primitive gauze can be used. Just wrap it in eggs and paint as usual. With its help, it will be possible to achieve an unusual effect of a checkered surface, as if scaly. This design is compared with dragon eggs.
In addition, you can ease your task and instead of natural plants, use small stickers in the form of flowers, stars, Easter bunnies, butterflies, capital letters XB (Christ has risen!) And so on. According to the stencil principle, after painting, light contours will remain under them.
Various natural materials can be used as natural stencils to paint Easter eggs. For example, even rice is useful to you.
A very interesting pattern is obtained if wet eggs are properly rolled in rice before painting and then wrapped with a bandage or put in a nylon bag. After you get it, cool the eggs and brush away the pictures from them, an unusual pattern will open before you, slightly resembling a frosty pattern on glass. It will be created by numerous specks left on the shell from the rice grains. You can dream up and use another small cereal instead of rice. For example, it can be buckwheat, millet, and so on. The staining process is similar.
Marble color and picturesque patterns
You can create multi-colored krashenki that will look like stones with their appearance. It is pretty simple. After all, for this you need a small amount of ingredients. The advantage of this method is that it can be resorted to if you could not collect a large amount of onion husks to paint eggs.
How to achieve a marble effect
But before you start painting eggs, you need to cut the husk into squares the size of one centimeter. Ideally, if you can collect husks of different colors - not only golden, but also purple. After you chop onion “clothes”, wet each egg with water and carefully roll in these scraps. Then tightly wrap it in gauze, folded in two layers, or capron and tie.
In the water in which the krashenka will be boiled, it is necessary to pour the green. Also add salt to the solution to strengthen the shell. Next, cook hard-boiled eggs, as usual. After they weld, fill them with cold water and cool. Take them out of the pan with gloved hands so that your fingers do not turn green from the dyed gauze. Peel the shell and an unusual surface will appear in front of you, similar to natural marble. If you wish, you can rub them with vegetable oil to give shine.
There are also fairly simple ways to create whole pictures on the eggshell. Depending on your artistic abilities, you can draw plot pictures or images of animals in a naive style, which will also look very appropriate. Or you can limit yourself to the inscription “Christ is risen!” Or the image of the Orthodox cross. All that is needed for this is to keep the eggs in the onion broth, as is done with the classical method of painting.
Take a needle in your hand and carefully scratch fancy patterns or inscriptions on the shell.
Natural paint will easily recede, revealing white lines. Of course, this method will require considerable time, but your krashenki will be uniquely unique. In addition, you can attract children to such an activity, turning the process into a pleasant family pastime.
You can also adopt the option of creating patterns on the eggshell with wax. First, paint the eggs in a light beige shade, for which they need to be held in the onion dye for no longer than 30 seconds. Cool them and then use hot wax to draw patterns on the surface or write good wishes.
The easiest way to draw is to melt the top of a thin church candle over the fire and draw with it. When the wax has hardened, lay the eggs in a concentrated onion broth and let them lie in it for two to three hours to get enough color. After that, remove the wax layer, under which there will remain patches of light shell.
Tips for successfully staining eggs with onion husks
In order not to be upset due to damaged dishes, it is necessary to take into account the fact that during the process of coloring Easter eggs, not only the shell is painted, but also the inside of the pan walls. And it doesn’t matter that we use natural dyes, which are onion peel. Therefore, before proceeding with the process, carefully select a pot. This should be either an old container, which you do not mind spoiling, or one in which the walls are well washed.
If you want to get a dye of a very saturated color, then it is important to observe the time frame. When you bring water with onion husks to a boil, be sure to reduce the heat to a minimum and let the broth boil quietly. In this mode, the onion husks should boil for at least half an hour, and preferably forty minutes. The more time you devote to this stage, the stronger the natural paint. Then strain the liquid and carefully lift them even the smallest particles of husk. This will guarantee uniform staining of the egg surface.
Eggs themselves should also be examined carefully for cracks or shell irregularities. If you notice such a marriage, it is better to postpone such copies to use them for cooking salads or other dishes. But they are not suitable for the festive Easter eggs. Another useful tip: before painting, wash the eggs, then degrease their shell with vinegar. This simple method will improve the ability of the shell to absorb paint, which will lie in a uniform layer.
When the dye is ready, you can put the selected eggs into the pan. Be sure to salt the water, but do not add fire - it is better that the process goes at a small but constant temperature. If necessary, regularly turn the eggs over so that they are qualitatively colored.
In the event that you plan to create patterned options using stencils, do not forget about preliminary measures.
- Make sure that the capron you want to use does not fade when boiled. Therefore, it is better to boil a small piece of this matter in advance to check its quality. Otherwise, poor-quality material can greatly affect the staining process and spoil the final result, making the color of the shell “dirty”.
- But if you plan to use small stickers as stencils, do not hope that they stick firmly to the egg surface. All the same, do not take the time and securely wrap everything with gauze or capron to avoid possible troubles during painting.
Coloring the main Easter symbols using the old grandfather method can be not only environmentally friendly, but also an exciting process. The main advantage of the method of coloring eggs with onion husks is its accessibility, because there is no need to spend money on the purchase of dyes. And the supply of husks from onions will probably always be found in the kitchen of any home.