How to color eggs in onion peel. Original ways to paint eggs in onion peel
Onion peel, it is desirable to collect it in advance - the more eggs there are, the more onions are needed. For a dozen eggs, a liter with compacted husk is enough, but for a more saturated and dark color, you can take more. Also, the resulting color will be from the onion variety: for example, onions will give the shell a pleasant purple hue.
If you mix different varieties, you can get interesting shades.
To prepare the broth, you need to put the husk in the pan - it is advisable to choose one that is not a pity to spoil, since the paint may remain on the walls. Pour hot water on top so that it does not reach the edge. Put on fire, bring to a boil and reduce temperature. Onion peel is simmered for 20 to 50 minutes: the more, the darker the paint.
While preparing the broth, you need to remove the eggs from the refrigerator so that they have time to warm to room temperature. They will have to be boiled in boiling liquid, and due to a sharp change in temperature, they can burst. Rinse them thoroughly and leave for half an hour while the husks are brewing.
Painting eggs with onion husks
It is advisable to strain the finished broth: otherwise, the stains will remain on the shell, the color will be uneven, although some prefer the option. Add salt to the water so that the shell becomes harder and the paint does not fall under it and does not stain the protein. Gently lower the eggs, bring to a boil and cook for 8-10 minutes. The longer you cook, the more saturated the shell will get, but, with, the eggs will be less tasty: from a long thermal exposure, the protein acquires the texture of rubber, becomes denser. It is advisable to turn the eggs during cooking for uniform coloring. Make sure that the decoction completely covers them.
To diversify the coloring, it is possible to wrap part of the eggs with thread, and part to roll in dry rice and wrap in gauze. After cooking, some will produce beautiful stains, while others will have a small speck.
If you take out the eggs after three minutes and pierce the shell with a needle in several places, and then boil it by adding cinnamon and cloves, then they will stain inside.
Hold the finished eggs in cold water for several minutes, so that then the shell easily leaves the protein. To give a matte surface a shine, they are wiped dry and lubricated with sunflower
The simplest and, perhaps, the ancient method of preparing dyes in Russia is the option of painting eggs with “clothes” of bulbs. But how to paint eggs in onion husks so that they look original and bright? Modern technologies offer many alternative options for decorating eggs for Easter - from chemical food colors to colorful stickers. But the use of onion husks for this purpose is the most environmentally friendly method. In addition, he captivates with the ease of the process and the realization that it was in this way that our ancestors prepared colored eggs for Bright Sunday.
Over the years, craftsmen have come up with many curious options on how to give originality even to simple egg designs. We have collected the most unusual and interesting ways of coloring eggs for Easter with onion husks. Using them, you can create truly original paints that will become a decoration of the festive table or a unique gift for your family and friends. All you need to create them is a large number of onion peels proper, which it is recommended to start collecting no later than Shrovetide.
The classic version of how to dye eggs with husks from onions suggests that the hostess should get dye with a uniformly painted surface. To do this, you will need a very small set of ingredients:
- eggs - white or dark (at your discretion);
- husk from onions - as much as possible;
- salt - 2 tsp;
- sunflower oil - 2 tbsp. l .;
- water.
The first thing to do is remove the chicken eggs from the refrigerator and let them warm to room temperature. This is because when stained with onion peels, the eggs are immediately boiled in a coloring broth. And so that the shell does not burst during cooking, it is important that there is no sharp temperature drop. If you do not let the eggs get warm, then there is a great risk that they will burst and in the place where the shell is broken, the protein will get an ugly yellow hue. Also, before putting eggs in a pan, it is recommended to thoroughly wash them and wipe them with a soft cloth.
While they will warm up (it will take at least an hour), you should start cooking a decoction. You can cook eggs at the same time as onion peel, but in this case, the color will probably be uneven. Put in advance the husks from the onions in a wide pot and pour clean water. Let it infuse for at least half an hour, after which you can put the pan on the stove.
When the water boils, turn down the heat and let it boil for about twenty minutes. After that, remove the pan from the stove and leave to cool. Then strain the broth, completely removing the onion peel from it, so that the color lies exactly on the egg shell. In addition, this method allows to achieve a more saturated color.
In general, the key factor for getting a dark color of dye depends on how much onion peel you manage to collect before Easter. To achieve the most dense tone, during the preparation of the coloring broth, it is necessary that the amount of husk be so large that it will even have to be tamped in a pan. If such an amount is not collected, then you can paint not white, but dark eggs.
Next step: put the broth back on the stove and add salt to it. Stir thoroughly to completely dissolve the salt, and lay the eggs in the pan. Cook until eggs are fully cooked. As a rule, this takes about 12 minutes. During cooking, periodically turn the eggs with a spoon so that they are qualitatively and evenly dyed from all sides.

Make sure that the water completely covers the entire surface of the shell, otherwise it will not work to achieve an even color.
When the eggs are boiled, fill them with cold water and let cool completely. Then wipe with a cotton towel and, in fact, everything is ready. Further, if desired, they can be greased with sunflower oil. With this simple method, you add an egg surface to a glossy sheen. Also, with its help, the color will become more saturated. But if you prefer a matte finish, then you can remove the vegetable oil from the list of ingredients for this recipe.
We get various natural shades
If you show a little creativity, then you can get different nuances of brown color, using only husk from onions. The whole secret is how long it takes to cook eggs in a coloring liquid. Thus, if you keep different parties in a boiling broth for different times, you will be able to collect an Easter collection, which will make an interesting composition from one dominant color, but in different shades.
So, if you want to get beige color with golden tint, then just boil them in the broth for no more than one minute. In this case, you have to put almost ready-made eggs into the decoction. To successfully turn into a dark orange color, it is enough to boil them in a decoction of onion peels for two to three minutes, no longer. But to get a more saturated brown color with a red tint, you need to wait five to seven minutes before removing the eggs from the pan with a natural dye.

If you managed to get the Yalta onion, which has a bright purple husk, then at the exit you will have dyes of a purple spectrum.
Use the above time intervals to paint eggs in different shades of purple. By the way, if you did not have time to prepare the required amount of onion peels, and you do not want to paint the eggs in another way, do not despair. Just go “hunting” to the nearest supermarkets. There, pick the ingredient you need for painting from the bottom of the boxes with onions.
Easter ombre and simple geometry
There is an opinion that it is not interesting to paint eggs with onion husks, since all the paints will be the same brown color. For creative natures who are not satisfied with getting different shades of the same color, this may seem boring. But there are many curious and simple methods that allow you to paint eggs with husk and achieve original designs.
For example, you can paint Easter eggs in the ombre style - with the transition of tones from light to dark. The only difficulty with this method is that you will need to lay the eggs vertically on the bottom of the pan. Fit them tightly so that they support each other.
Then pour the onion broth into the pan - just enough so that the water covers one third of the height of each egg. Put on the fire, wait until the water boils, reduce the heat and let the broth boil for five minutes. Then add another decoction - so that now water covers two-thirds of the height of the eggs. Let it boil again and boil for three minutes. Finally, fill in the remaining amount of dye from the onion peel so that it completely covers all the eggs. Keep a couple of minutes and pull out the puppies. If you did everything right, then you should get Easter eggs in the amber style - the color will cover the shell, losing its intensity closer to the sharp end of the eggs.
Another simple method will allow you to make Easter eggs with drawings at home. To prepare them, you will need the following ingredients:
- white chicken eggs - the amount depends on the volume of the pan;
- threads or thin rubber bands;
- salt - 2 tbsp. l .;
- peel of onion - at your discretion.
Put onion clothes on the bottom of the pan and pour boiling water so that the water completely covers it. Allow this substance to brew for two to three hours. After, take the eggs warmed to room temperature, and wrap them with knitting threads or thin elastic bands. You can do this in a chaotic manner, or winding threads in the shape of a cross, or, for example, a star. Then dip the prepared eggs in a pan with husk, add salt to the water and bring to a boil. Reduce heat and simmer for ten minutes.
Pull out the finished eggs with a spoon on a plate and allow to cool completely. After you can remove the threads or elastic bands. Unfilled stripes will remain under them, which will form a geometric pattern. If you wish, then you can combine the two methods described to get completely unique Easter eggs that are simultaneously painted in ombre style and with geometric patterns.
Another variation of these methods will take a little longer. First you need to paint the eggs with a not very intense color. To do this, dip them in a coloring broth for only minutes, a maximum of two. Cool them and wrap with threads, trying to create an interesting pattern. Then boil the eggs for about ten minutes to get a rich brown or dark red color.
After you remove the threads, not a white pattern will open under them, but a less contrasting beige with a golden hue. Such a tandem will look beautiful and unusual.
Inshell plant motifs
The traditional themes of Easter Easter eggs are floral designs. They are quite simple to make if you use real plant petals, buds and small flowers. It is advisable to select textured leaves. For example, the leaves of parsley, dill, dandelion and clover, inflorescences of field chamomile, lilac or any other available small flower heads will look beautiful. Paints with flowers look especially cool, since when painting the shell it is possible to convey the image of each petal.
You will also need nylon. Unnecessary disposable tights that should be cut into squares can handle this task. The size of the flaps should be such that you can freely lay eggs in their center, wrap them in a nylon bag and tie it.
Rinse each egg thoroughly under running water and wipe with a dry cloth before cooking. Then, each leaf or inflorescence with which you want to decorate the shell, moisten and attach to the egg in random order. Gently wrap it in a nylon bag and tie it tightly. This will securely fix the leaves. After that, as usual, cook the eggs in onion husks for about 10-12 minutes. Then cool the puppies and pull them out of the bag. Under the leaves and inflorescences there will be an unpainted part of the shell repeating the contours of the plant.
If you do not want to take kapron tights, then for this purpose you can use bandages. But keep in mind that you will have to work hard to reliably wind their eggs, without moving leaves and inflorescences from their places. And you can do without leaflets and wrap the eggs with beautiful openwork lace and fix them with threads or thin elastic bands.
In this case, their beautiful pattern will be imprinted on the surface of the shell. For this purpose, even the most primitive gauze can be used. Just wrap it in eggs and paint as usual. With its help, it will be possible to achieve an unusual effect of a checkered surface, as if scaly. This design is compared with dragon eggs.
In addition, you can ease your task and instead of natural plants, use small stickers in the form of flowers, stars, Easter rabbits, butterflies, capital letters XB (Christ has risen!) And so on. According to the stencil principle, after painting, light contours will remain under them.
Various natural materials can be used as natural stencils to paint Easter eggs. For example, even rice is useful to you.
A very interesting pattern is obtained if wet eggs are properly rolled in rice before painting and then wrapped with a bandage or put in a nylon bag. After you get it, cool the eggs and brush away the pictures from them, an unusual pattern will open before you, slightly resembling a frosty pattern on glass. It will be created by numerous specks left on the shell from the rice grains. You can dream up and use another small cereal instead of rice. For example, it can be buckwheat, millet, and so on. The staining process is similar.
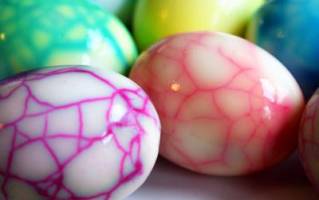
Marble color and picturesque patterns
You can create multi-colored krashenki that will look like stones with their appearance. It is pretty simple. After all, for this you need a small amount of ingredients. The advantage of this method is that it can be resorted to if you could not collect a large amount of onion husks to paint eggs.
How to achieve a marble effect
But before you start painting eggs, you need to cut the husk into squares the size of one centimeter. Ideally, if you can collect husks of different colors - not only golden, but also purple. After you chop onion “clothes”, wet each egg with water and carefully roll in these scraps. Then tightly wrap it in gauze, folded in two layers, or capron and tie.
In the water in which the krashenka will be boiled, it is necessary to pour the green. Also add salt to the solution to strengthen the shell. Next, cook hard-boiled eggs, as usual. After they weld, fill them with cold water and cool. Take them out of the pan with gloved hands so that your fingers do not turn green from the dyed gauze. Peel the shell and an unusual surface will appear in front of you, similar to natural marble. If you wish, you can rub them with vegetable oil to give shine.
There are also fairly simple ways to create whole pictures on the eggshell. Depending on your artistic abilities, you can draw plot pictures or images of animals in a naive style, which will also look very appropriate. Or you can limit yourself to the inscription “Christ is risen!” Or the image of the Orthodox cross. All that is needed for this is to keep the eggs in the onion broth, as is done with the classical method of painting.
Take a needle in your hand and carefully scratch fancy patterns or inscriptions on the shell.
Natural paint will easily recede, revealing white lines. Of course, this method will require considerable time, but your krashenki will be uniquely unique. In addition, you can attract children to such an activity, turning the process into a pleasant family pastime.
You can also adopt the option of creating patterns on the eggshell with wax. First, paint the eggs in a light beige shade, for which they need to be held in the onion dye for no longer than 30 seconds. Cool them and then use hot wax to draw patterns on the surface or write good wishes.
The easiest way to draw is to melt the top of a thin church candle over the fire and draw with it. When the wax has hardened, lay the eggs in a concentrated onion broth and let them lie in it for two to three hours to saturate with color. After that, remove the wax layer, under which there will remain patches of light shell.
Tips for successfully staining eggs with onion husks
In order not to be upset due to damaged dishes, it is necessary to take into account the fact that during the process of coloring Easter eggs, not only the shell is painted, but also the inside of the pan walls. And it doesn’t matter that we use natural dyes, which are onion peel. Therefore, before proceeding with the process, carefully select a pot. This should be either an old container, which you do not mind spoiling, or one in which the walls are well washed.
If you want to get a dye of a very saturated color, then it is important to observe the time frame. When you bring water with onion husks to a boil, be sure to reduce the heat to a minimum and let the broth boil quietly. In this mode, the onion husks should boil for at least half an hour, and preferably forty minutes. The more time you devote to this stage, the stronger the natural paint. Then strain the liquid and carefully lift them even the smallest particles of husk. This will guarantee uniform staining of the egg surface.
Eggs themselves should also be examined carefully for cracks or shell irregularities. If you notice such a marriage, it is better to postpone such copies to use them for cooking salads or other dishes. But they are not suitable for the festive Easter eggs. Another useful tip: before painting, wash the eggs, then degrease their shell with vinegar. This simple method will improve the ability of the shell to absorb paint, which will lie in a uniform layer.
When the dye is ready, you can put the selected eggs into the pan. Be sure to salt the water, but do not add fire - it is better that the process goes at a small but constant temperature. If necessary, regularly turn the eggs over so that they are qualitatively colored.
In the event that you plan to create patterned options using stencils, do not forget about preliminary measures.
- Make sure that the capron you want to use does not fade when boiled. Therefore, it is better to boil a small piece of this matter in advance to check its quality. Otherwise, poor-quality material can greatly affect the staining process and spoil the final result, making the color of the shell “dirty”.
- But if you plan to use small stickers as stencils, do not hope that they stick firmly to the egg surface. All the same, do not take the time and securely wrap everything with gauze or capron to avoid possible troubles during painting.
Coloring the main Easter symbols using the old grandfather method can be not only environmentally friendly, but also an exciting process. The main advantage of the method of coloring eggs with onion husks is its accessibility, because there is no need to spend money on the purchase of dyes. And the supply of husks from onions will probably always be found in the kitchen of any home.
Before Holy Sunday, everyone begins to think: what is the best way to paint eggs. Of course, there are many dyes and other devices that will help to make a bright Easter egg. However, I do not really trust chemicals. Today I will tell you about the grandmother's method: now I always paint eggs with onion husks, maybe you will like it. In this article I will describe 12 technologies of the Easter recipe for painting and decorating eggs. So, let's look at products that are useful to us, and each of the methods of coloring.
Ingredients:
- eggs (quantity as needed);
- rice groats - 1 bowl;
- buckwheat - 1 plate;
- millet - 1 plate;
- onion peel - 50 grams;
- water - 1.5 liters;
- olives - a few pieces;
- leaves of dill, parsley, various flowers.
What kind of eggs should be painted for Easter
In order for the pysanka to turn out not only bright, but also tasty, it is necessary to select and prepare chicken eggs correctly. So here are some guidelines.
- Eggs are best taken from the refrigerator in advance: about an hour before cooking: in this way they will acquire room temperature.
- Next, proceed to washing the eggs. To do this, use a tap with running water, soap and a brush: this is necessary to remove grease and dirt from the surface of the product: as a result, the Easter egg will turn out to be more saturated in color.
We paint eggs with onion husks. Step by step recipe
In order to create a wide variety of colored eggs in onion peel, the following blanks should be performed.
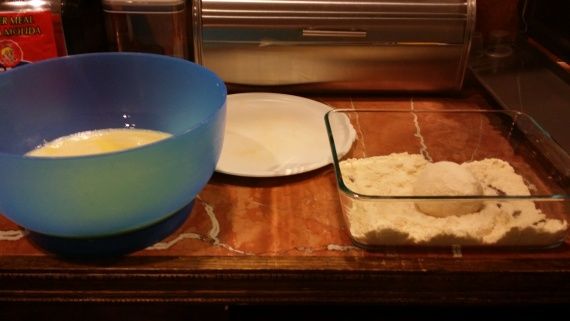
- For the first method, we need rice groats. We take an egg, soak it in water and envelop in rice. After, neatly, wrap in a mesh so as not to knock down the grains. When I paint the eggs, I take the usual nylon tights and cut them into medium squares so that I can completely capture the Easter egg. The ends of the stocking are knitted with a strong thread.
- Method number 2. Buckwheat is used for this method. Technology coincides with the previous option. We wet the egg, envelop in buckwheat and wrap it in a stocking. Thus, the pattern is more massive.
- Method number 3. We are doing the same thing, only with millet.
- For the following options, we need fresh leaves. So, first we take a small sprig of parsley and soak in water. Next, apply to the surface of the egg and smooth all the edges. The leaf should ideally lie on the shell. We wrap a stocking so that it does not get lost in boiling water.
- For the next option, you need to take a sprig of dill. Dip the krashenka in water and glue the leaf. We cover with a capron and tie.
- The krashenka looks very beautiful if you attach a sprig of coniferous tree. Attach it follows the above method.
- You can specially cut the stencil from waterproof material and, just like that, stick to the egg.
- To give an original white pattern, use a regular stationery elastic: it is usually used to connect banknotes. To do this, wrap the egg several times so that the gum is placed throughout the volume. It will turn out for Easter quite an interesting egg.
- A very beautiful Easter egg is obtained if you use lace. Wrap them in an egg, then wrap nylon material on top and secure the ends with thread.
- The next way to decorate Easter eggs for Easter is to use chopped olives. Paste the egg around the perimeter, and wrap it with a stocking - fasten on top.
- Small flowers look very beautiful. The pasting is done according to the above technology.
So, we examined the options for creating patterns. The next step is to paint the eggs with onion husks.
Onion peeling eggs
Decoction for coloring eggs, I prepare as follows.
- I collect 1.5 liters of water in a pot. This amount will require 50 grams of onion husks.
- Fill the husk with water and leave it overnight.
- We put the pan on a small fire, bring the water to a boil. Stir the liquid for about 10 minutes.
- Remove from heat and leave the broth to cool.
- Next, immerse the eggs in a pan: they must be completely covered with liquid, so that the color turns out to be uniform.
- We put on the fire, bring to a boil. After we set the average temperature and boil the butter for 5 minutes. Next, remove them. Let them stand for several minutes and dip in cold water until cool.
In order for the dye to shine brightly, you should take a napkin and wipe the surface of the eggs with vegetable oil. For a beautiful and original supply of Easter eggs, you can create a bird's nest of chips on a pallet. Place painted eggs on top. You can find photos of ornaments and finished painted dogs on our website. I like to cook.
An Easter table is not only Easter cakes and curd Easter, sausage and boiled pork. Traditionally, on Easter we still paint eggs - this is a very old custom, with its interesting history. Some - literally in all colors of the rainbow, others - just stick bright stickers. You can call me conservative, but I want to show you how to paint eggs in onion husks. This method is closest to me, as my grandmother used it. It turns out that we use the natural dye that everyone has in the house. The eggs are obtained a beautiful brownish color, like velvet (the density of the color depends on the amount of husk, more on that later).
The process of coloring Easter eggs with onion husks is very simple, but still it has its own nuances so that they do not burst. I will gladly share with you everything that I know about him.
Ingredients:
- 1 large handful of onion peel (in a free state it occupies a volume of 1.5 l);
- 7 chicken eggs;
- 1 liter of water.

How to color eggs with onion husks:
If you want to paint eggs with peels for Easter, you will need to worry about the source material in advance. I begin to collect the husk about a month before the Holy Sunday of Christ - during this period I just get the right amount. Peeling the onion, remove the dry husk and carefully sort it out. If there are areas with a damaged inner layer, we discard them. Carefully put the selected dry husk in a plastic bag, and on the eve of Easter we get everything that we have collected and ... we begin to worship. 

Onion peel is very light, so the poet will not immediately drown. Slightly “heat” it with your hand or with the help of a spoon so that it is covered with water. 
We put the pan on fire, bring to a boil and cook on low heat for 12-15 minutes. After 5-6 minutes after the start of boiling, the broth will acquire a beautiful brown color. (But so that the color is stable, we don’t stop cooking.) 
Then we filter the broth through a colander into another pan (in which we will boil the eggs). And set aside to cool - if you immediately begin to paint the eggs and dip them in hot water, they may burst. 
While the broth of the onion husks (this is, in fact, the paint) cools down, we prepare the eggs.
Wash the eggs thoroughly. Wash off dirt, adhering particles. Carefully remove the colored markings with a brush (from eggs bought in the store). 
In a cooled broth of onion peel, carefully lower the eggs. We make sure that the eggs do not hit each other - otherwise, during cooking, they may burst in this place.
The eggs must be completely covered with liquid so that the color occurs evenly. If suddenly some of the eggs protrude from the liquid, add a little cold water or transfer the eggs to another pan, where there would be less empty space between them, they would densely adjoin each other - then less liquid would be required to completely cover them. 
We paint eggs in onion husks with a gentle boil for 10 minutes. By the way, look how you can.
Then we take out the eggs, transfer to a bowl or pan and fill with cold water. Hold for 2 minutes under running water, and then just stand for 8-10 minutes in cold water. Then we remove the eggs from the water, put it on a plate and let stand until it cools completely. 
A decoction of onion husks can be used again for coloring eggs. Eggs painted in such a decoction will be the same color as the first batch. So for coloring a large number of eggs it is not necessary to collect a lot of onion husks. It will just be necessary to color the eggs in batches. 
We wipe the cooled eggs dry (the part that, when cooling, touched the plate will be wet) and put it on a festive dish or in special supports. Now you know how to color eggs on Easter with peeling onions. It’s not difficult at all, right?

It is advisable to use eggs of domestic chickens for coloring - they have beautiful, bright yellow yolks, they are tastier.
Eggs must always be fresh - in order to avoid unpleasant moments at the table.
The surface of the painted eggs can be greased with a cotton swab dipped in vegetable oil. In this case, the eggs will gain luster, but lose their velvety. So choose what you like best.
We store the painted eggs in the refrigerator. At temperatures from +2 to +4 degrees, eggs can be stored for up to 20 days (but is it worth it to store eggs for so long? It is better to paint so much to eat them in 3-4 days).

But without a refrigerator, boiled eggs can be stored for long, about 12 hours. At the same time, the eggs manage to maintain taste and nutritional properties.
Therefore, when coloring eggs, it is desirable to take into account both the appetite of eaters and the shelf life of boiled eggs.
If you see that your painted eggs remain out of work, then make some salad out of them, for example,
Probably every housewife has her own secrets for coloring Easter eggs: this artistic process gives considerable scope for creativity. There are many original ways of decorating them: markers, watercolor paints, threads, fabrics, cereals, etc. are used. We already wrote about all this.
Nevertheless, the classic way of coloring eggs is to cook them in onion husks. This is not only the oldest, but also the simplest, safest and most environmentally friendly technique. In addition, painted husk eggs can also be made quite original.
Coloring eggs with onion husks is a simple process, but takes a little longer than just boiling them. To paint Easter eggs with onion husks you need to cook:
- wide pan with a capacity of 1-1.5 liters;
- onion peel (the more the better, start collecting it in advance);
- 3-4 teaspoons of salt;
- raw eggs (in the quantity you need);
- vegetable oil (a couple of tablespoons).
If you want to decorate the eggs with original patterns, add to this list parsley leaves, cilantro or any other plants with small curly leaves or a simple pencil and an office knife. We will definitely tell you what to do with all this.
Basic rules for coloring eggs
To make everything work out perfectly, we offer several rules that will help you to color your eggs beautifully and evenly for Easter with onion husks:
- eggs should not be cold, so they must be removed from the refrigerator in advance;
- before staining, wash the eggs thoroughly and dry;
- so that no fat remains on the shell and the paint evenly lays on its surface, you can wipe it with a cotton swab moistened with vodka or alcohol;
- do not use eggs with cracks;
- so that the shell does not crack during cooking, you need to add a couple of teaspoons of salt to the water;
- to get a richer color, you can add vinegar to the broth, about 1-2 tablespoons per 1 liter of solution;
- to give shine, painted eggs should be greased with a small amount of vegetable oil.
Staining technology
Fold the husk in a saucepan and pour boiling water. Hold the broth for 2-3 hours, and then lightly salt and lay eggs in it. Bring the contents to a boil and then simmer for at least 10 minutes. Allow to cool and remove the eggs, then dry them with a towel. To make the dyes shine, they are slightly greased with vegetable oil.
Leaf patterns

In addition, small leaves of greenery or houseplants can be used to decorate Easter eggs. To do this, you first need to wet the egg and tightly attach small leaves of parsley, cilantro or any house plants with carved leaves to it and wrap it in gauze, carefully bandaging it. Then put the cooked parcel in a pan with salted water and husk and boil for 15-20 minutes.
A very delicate and beautiful ornament with fancy curls is obtained if lace with a fine pattern is used instead of leaves.
Drapery Technique

For decoration, you can use the technique of draping. This is where the pencil and stationery knife come in handy.
Dry the pre-boiled eggs and let them cool. Then, on the shell, carefully draw flowers, leaflets or any shapes that you like with a simple pencil, after which you need to scratch the drawing along the lines with a stationery knife or other sharp object. At the end, you can rub the egg with vegetable oil to give a shine.
You can find some more ideas for coloring Easter eggs in this video.