Black consul cake recipe. Original recipes for tomato preparations for experienced housewives
Marinades fall into two categories. Some are poured hot, others chilled. The need to sterilize cans before seaming depends on this. The use of a cooled marinade dictates the seaming after preliminary sterilization of not only the can itself, but also its contents. Tomatoes are a product that gives their own acid, so 4.5% vinegar is used for canning this product. 1 tablespoon of acetic acid will replace 150 ml of such vinegar or 75 ml of 9 percent.
When pickling tomatoes, take into account that their own acid will increase the acidity of the finished product. Therefore, having determined the taste that the marinade is not sour enough, there is no need to rush to add vinegar.
Cooking in a jar: a step-by-step recipe for canned tomatoes
In order for all tomatoes to be soaked in the marinade equally, it is necessary to select fruits of approximately the same size for stacking in one jar. The same requirements for canned vegetables of all types are required by GOST. Also, you should not mix in one jar tomatoes of different varieties - black with yellow and red, "rocket" with round Krasnodar. The ripeness of the fruit must also match.
The main spices are:
- stems with dill seeds;
- garlic;
- black and allspice peas;
- cloves;
- black currant leaves, horseradish, cherry;
- parsley, celery.

If you replace traditional herbs with lovage, then this must be done very carefully. One small piece of leaf from this plant is enough to replace a bunch of celery, parsley, basil and tarragon combined. Its aroma is very strong, so you can also refuse the clove.
Pouring with hot marinade will be done using this technology three times, so there is no need to pre-sterilize the container. Place all the spices selected for the marinade on the bottom of a clean jar. The greens can be chopped with a knife or laid with whole branches.
Added:
- a few cloves of garlic;
- 3-4 half rings of onions;
- 2 carnations;
- 3-4 peas of allspice, 5-8 black;
- 2 bay leaves.

Recipe:
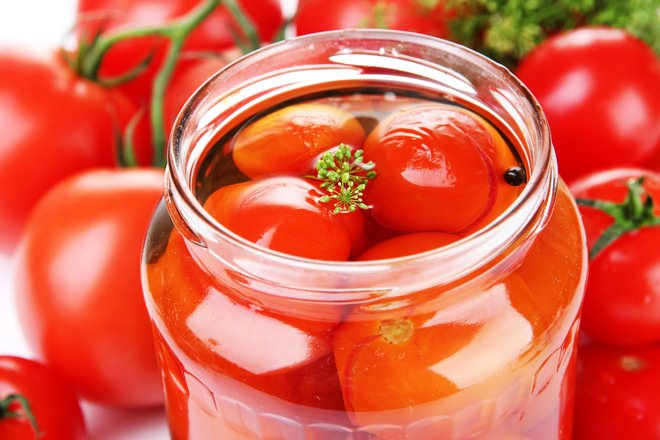
- Punctured tomatoes are stacked in dense layers up to the shoulders of the jar. It is better to make punctures with a wooden toothpick on one side of the fruit in 3-4 places. This is necessary so that the fruits do not burst when pouring boiling water, otherwise the peel floating in the marinade will spoil the appearance of the workpiece.
- To fill a 3-liter jar, you will need 1.5 liters of water, 75 g of fine salt, 100 g of granulated sugar, half a glass of 9% vinegar. If there is no measuring cup, then salt and sugar can be dispensed with tablespoons. It turns out 3 tablespoons of granulated sugar and 2 tablespoons of salt.
- Boil water with sand and salt. After they are completely dissolved, the boiling brine is poured into a jar. After covering the jar with a lid, you need to wait about 10 minutes.
- The marinade is again drained into a saucepan and brought to a boil. The procedure is repeated once more, but now you need to add vinegar and a teaspoon of mustard powder to the brine.
- Marinade is poured to the very edge of the jar. As it cools, the marinade level will naturally decrease. In order for the marinade to fill all the cavities between the densely packed fruits, it is necessary to roll the jar by the neck, placing it on the side of the bottom. Before seaming, you need to fill the jar with marinade to the edge.
- No matter how carefully the can is moved to remove air, there is always the possibility that it went unnoticed somewhere in the middle. Therefore, the jar must be turned over 3-4 times, placing it alternately for 5 minutes on the lid, and then on the bottom.
- The jar is left upside down until it cools completely.
If tomatoes with thick skin were used for harvesting, it is better to cover the jars with a cotton blanket. The longer the workpiece remains warm, the faster the tomatoes are saturated with marinade.
Pickled Canned Cherry Tomato Recipe
Small tomatoes - what can better decorate a festive table? Maybe Cherry with gherkins. Taking into account that the pickle for cucumbers and tomatoes is prepared identically, you can roll up for the winter not only cucumbers and tomatoes separately, but also together. The taste from this will turn out to be more pleasant, rich.
When rolling pickled tomatoes with cucumbers, add a couple of black currant leaves to add flavor. Harvesting only tomatoes will have a unique taste if you use cherry leaves.
Tomatoes are washed, pierced, stacked on top of spices and herbs. As a rule, half-liter cans are used for rolling this type of tomato. Greens laid with whole branches is not the wisest decision, it is better to chop it.
The calculation of the products for the marinade is quite simple:
- litere of water;
- dill umbrella;
- a tablespoon of granulated sugar;
- 2 tablespoons of coarse salt;
- 1 teaspoon 9% vinegar
- bay leaf (added 2 minutes before removing the marinade from heat).

Conservation process:
- The filling is done 1 time, so the jar must not only be thoroughly washed, but also sterilized. If there is no special device, it doesn't matter. A colander is placed on a pot of boiling water, a can is placed in it (bottom up) for 15-20 minutes. Steam treatment is noticeable without any tweaks. The steam, settling on the walls of the can, flows back into the pan. In principle, such a treatment can be carried out by putting a jar on the spout of a kettle filled with boiling water to the limit. But during the boiling process, the water evaporates, which can provoke the kettle to overturn. This means that you need to put the kettle on the back burner, resting the jar against the stove lid.
- The second danger of this method is that spices and tomatoes must be placed in a still hot jar. It is better that the end of the stacking of the ingredients coincides with the moment of the brine boiling.
- Pouring tomatoes with boiling water up to the upper edge of the neck of the can.
- Next, you need to cover the jar with a lid, but do not tighten. After 5-10 minutes, the liquid will settle, filling the gaps between the tomatoes. Its amount must be replenished. After that, you can roll up.
- After seaming, the cans are placed on the lid so that the air does not remain in the middle of the can. In addition, if the can is rolled up leaky, then moisture will appear over the sealing rubber of the lid. If this happened, at this stage everything is fixable, only the cover will be lost forever. The marinade is poured into a saucepan, if necessary, you can add water, the liquid is brought to a boil, the tomatoes are rolled up again.
For Cherry, double steaming with boiling water is not desirable. Most often, this leads to flaking of the skin.
Urban pickle for chopped tomatoes: recipe for liter jars
Making preparations in the country is a pleasure: greens, horseradish root, leaves of fruit trees and shrubs are always at hand. And where can a city dweller get the same dill inflorescence? In principle, it can be replaced with dried seeds of caraway, coriander and other spices. Grocery stores offer a wide range of products. The main thing is not to overdo it, choose one of the most impressive types of seasoning.
The peculiarity of this recipe is that not whole, but cut fruits are used for seaming. The size of the slices depends on the variety of tomatoes selected. It is enough to cut medium-sized fruits into 4 pieces.
Garlic and onion are required ingredients. For this "salad" it is preferable to take watery tomatoes. "Black prince", "bull heart", "rocket", "ladies' fingers" are best used in other recipes. And yellow varieties are suitable for this recipe no worse than Krasnodar tomatoes or tomatoes growing in bunches.
The marinade is prepared for rolling porcini mushrooms and aspen mushrooms:
- 5 liters of water;
- 5 tablespoons of salt;
- 150 ml granulated sugar (9 tablespoons).

Preparation:
- A couple of bay leaves are added to the boiled sugar-salt syrup.
- Before removing from heat, 150 ml of 9% vinegar and the same amount of vegetable oil are added to the pan. This amount of marinade is enough for seaming 12-13 liter cans.
- The marinade is cooled so that the skin does not separate from the tomatoes during pouring. The marinade is poured warm.
- To prevent cans from exploding, they must be sterilized along with the contents. For this, a towel is placed on the bottom of a large wide tank, on which cans with blanks are placed close to each other. Hot water is poured up to the hangers of the cans, the gas is turned on. After boiling water, the jars should be inside the tank for about 15 minutes. It is better to cover them with lids prepared for seaming.
- Banks are rolled up hot.
Canned tomatoes are sweeter
The following original recipe will appeal to even the most experienced cooks. The main highlight of this recipe is the addition of honey. It is not only tasty, but also a healthy product.
Ingredients:
- dense tomatoes - 3.5 kg;
- natural honey - 350 g;
- cloves - 4-5 pcs.;
- vinegar - 45 ml;
- fine salt - 45 g;
- heads of garlic - 2 pcs.;
- horseradish - 100 g;
- allspice - 10-15 pcs.;
- currant foliage - 7 pcs.;
- dill umbrellas - 8 pcs.;
- purified water - about 7 liters.
Cooking steps:
- Tomato fruits are well washed.
- We sterilize the jars together with the lids.
- Peel the garlic and horseradish.
- At the bottom of the jar we put foliage from currants, garlic teeth, allspice, horseradish and dill umbrellas.
- Lay tomatoes on top.
- Pour water into a saucepan, add vinegar, cloves, salt and honey.
- We put on the stove, boil for five minutes and pour the marinade into the jar.
- Leave for 30 minutes and pour into a saucepan.
- We put the marinade on the stove again and boil for 1 minute.
- We pour it into a jar and roll it up.
- We turn each can upside down.
Small canned tomatoes
Small canned tomatoes can become a highlight of your holiday table. These micro fruits will appeal to children and inspire adults. And the presence of onions and celery will give the vegetables a special unique taste.
Ingredients:
- small tomato - 2.3 kg;
- small onions - 600 g;
- dill umbrellas - 9 pcs.;
- small heads of garlic - 2-3 pcs.;
- celery - 450 g;
- fine salt - 55 g;
- fine sugar - 85 g;
- purified water - 2.3 l;
- mustard seeds - 25 g;
- vinegar - 20 ml;
- laurel leaf - 6 pcs.
Cooking steps:
- We wash the cans in water with soda, rinse thoroughly and rinse with steam.
- All greens and tomatoes are well washed.
- Put 3 celery leaves and 5 g of mustard in a jar.
- Peel and wash the garlic and onion with water.
- Cut the onions into rings and put on top of the celery.
- Then add the garlic and put all the tomatoes.
- We put a laurel leaf on the sides.
- Put dill umbrellas on top.
- We put a container filled with water on the stove.
- We fill the water with sugar and salt.
- After boiling, fill the jars and set them to sterilize.
- After a quarter of an hour, pour vinegar into the jars, roll up and turn over.
Black canned tomatoes
Tomatoes "Black Prince" will add some exoticism to your table, they are very aromatic and pleasant to the taste. If you want to decorate your winter preparations a little, to make them more varied, try corking black tomatoes.
Ingredients:
- Tomato fruits "Black Prince" - 900 g-1.2 kg;
- dried horseradish leaves - 3 pcs.;
- dried greens - 50 g;
- head of garlic - 20 g;
- vinegar - 10 ml;
- bell peppers - 4-5 pcs.;
- sugar and salt - at your discretion.

Cooking steps:
- We wash all vegetables thoroughly in running cool water.
- Remove the step from the tomatoes.
- Pepper and cut into 4 pieces.
- We sterilize the jars well, pour them over with steam or boiling water, you can fry them in the oven.
- We fill the jar: first with dry herbs, then with garlic, horseradish, tomatoes and cover with pepper on top.
- In a deep container, mix water with salt and add sugar.
- We put on the stove and after boiling, fill the cans to the top.
- Pour again into a container, boil.
- Pour brine into jars, add 10 ml of vinegar and roll up.
- If the cans are rolled up with ordinary lids, then the cans must be turned over.
A simple and favorite recipe for canned tomatoes
Sometimes I really want to remember my childhood and try those same canned tomatoes the old way. To prepare this canning, you do not need to be sophisticated with ingredients and look for some kind of innovation. Grandma's recipe will always be relevant and will never be forgotten.
Ingredients:
- medium tomato fruits - 2.2 kg;
- salt, sugar - at the discretion of each;
- vinegar - about 15 ml;
- laurel leaf - 3-4 pcs.;
- dill umbrellas - 2-3 pcs.;
- foliage from cherries and currants - at your discretion;
- bulgarian pepper - 3 pcs.;
- garlic teeth - 5-6 pcs.;
- sweet peas - 4-7 pcs.
Cooking steps:
- Wash tomatoes and peppers in clean water.
- Fry clean glass jars in the oven or sterilize over steam.
- Boil the lids in clean water and let them dry.
- Add salt to the water, along with sugar and wait for this brine to boil.
- Put garlic cloves, peas, laurel leaves, dill umbrellas, cherry and currant foliage in a glass container.
- Put medium, whole tomatoes on all the spices.
- We put chopped bell pepper on the sides.
- Pour in the brine for a quarter of an hour and pour it into a container.
- After the brine boils again, fill the jars with it, add the vinegar essence and roll it up.
- We turn over the glass containers.
Delicious pickled tomatoes for the winter (video)
The many tips in this article will help you get delicious, clear marinade and juicy canned fruits.
Soft, slightly moist cake "Black Prince" will delight you with a chocolate aroma, juiciness of berries and a delicate, unobtrusive cream. Dessert consists of three dark cakes soaked in cherry juice and smeared with a versatile mixture of sour cream and cream. The design is very simple and not laborious - the confection is covered with biscuit crumbs on all sides. An excellent homemade cake that is suitable for a holiday and for tea drinking on weekdays!
There are different versions of the Black Prince dessert, in which the methods of making cream and cakes are significantly different. The dough is kneaded with sour cream and milk, the cream is made with butter, custard, and sour cream. Today we give preference to the basic recipe for the Black Prince cake on kefir, and for a more interesting taste we diversify the filling with refreshing cherries. Berries are not present in every version of the dessert, but in this case, their presence is very desirable. Bright, sour cherry taste harmoniously combines with chocolate notes and is appropriate among the abundance of sweetness.
Ingredients: 
For the test:
- kefir - 250 ml;
- eggs - 2 pcs.;
- cocoa powder - 40 g;
- flour - 300 g;
- sugar - 200 g;
- vanilla sugar - 1 tsp;
- soda - 1 tsp;
- butter - 80 g.
For the cream:
- sour cream 20% - 500 g;
- cream 33-35% - 200 g;
- vanilla sugar - 1 tsp;
- icing sugar - 80 g.
For filling:
- frozen cherries - 250 g.
Cake "Black Prince" on kefir recipe with photo
- Cooking chocolate dough with kefir. Sift cocoa powder, flour and soda (quicklime) into a working bowl through a sieve. Stir to evenly distribute dry components. Do not neglect the sifting step, otherwise large cocoa lumps may not dissolve in the dough. The same goes for soda, and the undissolved alkali in the finished baked goods gives bitterness.

- We break eggs into another dish. Add regular and flavored (vanilla) sugar. Beat with a mixer for about 5-6 minutes. We achieve almost complete dissolution of sugar grains and a strong increase in the volume of the mass.

- Add kefir to the lush egg mixture, as well as melted and cooled butter, stir. A fermented milk product is suitable with any percentage of fat, not only the first freshness, but also fairly standing in the refrigerator.

- Add a dry mixture of cocoa, flour and soda to the liquid kefir mass. Stir thoroughly. The composition should thicken, become homogeneous and brown in color.

- Fill a baking dish with a viscous dough, level the layer. You can first lay the bottom with a sheet of parchment paper. The recipe gives the proportions for a container with a diameter of 20 cm.

- We put the form in an oven heated to 180 degrees. We bake a chocolate sponge cake on kefir for about an hour. We check the readiness by piercing the center with a long wooden skewer - no raw dough should remain on it.

- After waiting for it to cool completely, we release the chocolate baked goods from the mold. Cut off the tubercle of the top and set it aside for sprinkling the future cake. Cut the rest of it horizontally into three identical cakes.

Cream for cake "Black Prince" recipe
- Whip cold cream with powdered sugar and vanilla sugar. We bring the mixture to thickening.

- Add sour cream. Mix the ingredients with a spoon or hand whisk, do not whisk. On this, a simple creamy sour cream is ready!

- We completely defrost the cherries - you can speed up the process by heating the berries in the microwave. Put one chocolate crust on a plate, slightly moisten it with cherry juice released during defrosting.

- Lubricate with about a third of the cream. Distribute half of the cherries on top, after squeezing the berries. Next, lay out and soak the second cake with juice. Lubricate with cream again.

- We cover the cherry layer with the last cake (do not forget to moisten it with impregnation). Spread the rest of the cream over the top and sides of the cake.

- Grind the cut "head" of the biscuit in a blender bowl. Sprinkle the cake, press the crumbs on the sides with your palm. We put the dessert in the refrigerator for at least 4 hours to thoroughly soak and harden the cream.

- After a while, the cake can be cut into portions and start drinking tea!

Cake "Black Prince" on kefir with cherry filling and creamy sour cream is ready! Enjoy your meal!
All Soviet cakes were made from simple products from a nearby grocery store. How else? Sugar, egg, kefir, baking powder and flour, everything that the hostess has at hand.
Remove everything in advance and let it warm to room temperature for at least an hour.
Do not forget to preheat the oven to 180 degrees before starting work.
Previously, everyone whipped with a fork or whisk, now our assistant is a powerful blender with a whisk attachment. Or a powerful mixer. Check out the progress in the cooking process!
Break the egg into a beating bowl. Add granulated sugar in portions and beat until fluffy. You should get a lush mass. 
Mix kefir with baking powder for a chemical reaction. Previously, this technique was not used. They extinguished the soda with vinegar. Baking powder in small bags has long replaced soda in biscuits. And the best thing in this recipe is to add it to kefir. Earlier, we would say that this is magic. Now we understand that this is a milder chemical reaction process than that of soda with vinegar essence. 
Add bubbling kefir to the egg and sugar mixture, and sift through a sieve to the mixture of cocoa powder. We have done this before, and it should be done now. To prevent possible cocoa lumps from getting into the dough and disturbing the ideal dough texture. 
Add a third of the flour and stir. Add flour in two more parts.
Knead the dough until smooth. It will be fairly fluid, but pleasantly porous and glossy. As in childhood, you will want to spoon it and eat it raw. 
Transfer the mass to the shape. In which? You decide. Now there are a great many! If you want some practical advice, then such a soft dough in which there is no oil, it is best to bake in a mold that you are sure of non-stick properties. It is best to bake in silicone. If a new form is used, then it is imperative to grease it with vegetable oil! 
Gently drag the silicone mold onto the cutting board, and then onto the wire rack in the oven. Bake at 180 degrees for 30 minutes.
Willingness to determine with a toothpick or wooden skewer.
Remove the slightly cooled cake from the mold and cool completely on the wire rack. A properly prepared biscuit will not fall off. 
Prepare the cream. Previously, you had to beat the softened butter with a fork for a long, long time. Now the same stationary mixer with the right attachments perfectly copes with this task! Beat the softened butter. Add sugar. 
The sugar crunching on the teeth in the cream upsets both the hostess and the guests. You can look for fine sugar in the store. And you can do it easier. Grind the sugar metered for the recipe in a coffee grinder! It will look like a powder and will dissolve in the cream almost instantly.
Add sour cream to the mixer bowl and beat the cream until smooth. 
Using a knife or toothpicks and thread, cut the cake in two. 
Collect the cake. Put the bottom of the cake on a dish. Lubricate it with currant jelly. In summer, you can use puree with sugar from fresh sour berries. 
Put half of the cream on top of the jelly and spread so that there is little space around the edges. With further assembly, this will save you from ugly streaks of bright jelly and the secret of the filling will remain inside. 
Cover with the second part of the crust on top. Place the remaining cream on top and spread evenly over the cake surface and sides. Smooth out nicely with a spatula or a thin long knife. 
You can decorate your work as you wish. Previously, it was either cocoa, or grated chocolate, or nuts. Now, depending on the case, you can pick up any filling! For example, if you have a heart-shaped shape and Valentine's Day or a wedding anniversary is ahead, then you can decorate with cute hearts. It will turn out to be both elegant and touching. 
The finished cake must be chilled in the refrigerator for a couple of hours. So that the cakes and cream "make friends". 
This time is more than enough to set the table for tea drinking and remember a couple of touching stories from childhood! 
Enjoy your tea and an excursion into a carefree childhood!
Hello dear gardeners! Do you like tomatoes of an unusual, unusual color? Do you like the most exotic of them - black-fruited? They are very popular and their fan base is growing. Those who prefer everything extraordinary are attracted by their original look. Many have heard about the special healing properties of dark-colored vegetables. Gourmets like the specific taste of these tomatoes. And someone just loves variety.
Despite the appearance in recent years of breeding novelties in this area, the Black Prince tomato remains the most popular and demanded, bypassing competitors in many ways.
This is evidenced by reviews of vegetable growers and numerous amateur photos on the Internet.
Grow this variety - and you will be conquered by its merits! If annually the tomatoes are from their best bushes, the quality will be guaranteed.
Varietal features
The history of the Black Prince goes back decades and has overgrown with many legends (China, Ukraine, Holland, Russia are called the birthplace of the variety). In amateur gardens, there are various modifications of this variety; its characteristics are slightly different for agricultural firms packing seeds for retail sales. And yet there are a number of stable signs of the Black Prince, which allow us to give him a specific description.
A striking feature of the Black Prince variety is a combination of four properties: it is tall, large-fruited, black-fruited, and has a special pleasant taste.
Sometimes it is confused with the Black Moor, which is characterized by medium-sized plum-like fruits (up to 50 grams). The Black Prince has larger tomatoes - at least 100 grams, not uncommon - 150-170, sometimes even 300-500 grams. Fruits are round-flat, ribbed.
The color of ripe tomatoes, of course, is not black, but very dark - rich chocolate with a purple tone. The skin is rather thin. The pulp with an average number of seeds, not very dense, moderately fleshy, while juicy. It has an interesting greenish-brown color with orange and burgundy tints.

Black Prince - medium term (ripening 115 days after germination), from a group programmed for long-term growth. The height of the bush can reach two meters or more. Average leafiness. Fruit clusters begin to form over 7-9 leaves, then every two or three leaves. It is really possible to remove from two to five kilograms of fruit from one bush (variations depend on climate and agricultural technology).
Agrotechnics
The cultivation of the Black Prince tomato is carried out with obligatory pinching and a strong garter. The bush is formed into two or three trunks, firmly fixing heavy brushes so that the stalks do not break and the whole plant does not break off.
The variety can be cultivated both in the greenhouse and in the open air, tying it to high stakes or strong trellises. Indoors, it is necessary to establish end-to-end daytime ventilation, especially in the heat, otherwise the fruits will not tie well.

Like many other large-fruited and fruitful tomatoes, the Black Prince needs sufficient and improved nutrition (pre-planting fillings of holes with ash and humus, regular root and foliar feeding, for example, feeding with fermented grass infusion are needed).
Strong bushes are better at resisting disease. There is a good resistance to phytophthora - the leaves may get a little sick, but the infection rarely spreads to the fruits.
Blackened ripe tomatoes are easy to mistake for sick ones, so one should not forget about such plantings. At first, the ovaries are dark green, with an even darker spot in the upper part. Having increased to their maximum size, they gradually begin to darken. Ripe vegetables are shiny, glossy. They are not suitable for long storage, they are of the salad type.
Useful fruits
Tomato fruits accumulate worse on acidic soils; instead of dark-colored tomatoes, pale, watery-tasting, with signs can grow. Such lands require preliminary, autumn deoxidation (dolomite flour, chalk).
In the spring, wood ash is introduced into the planting holes. You can carry out foliar feeding (spraying) of the bushes during the period of filling the fruits with a solution of such a fertilizer as calcium nitrate. Improve the taste of tomatoes by fertilizing with magnesium and.
Choke tomatoes have a very rich, slightly spicy taste; many gourmets prefer them over the usual ones. Taste features are associated with the original balance of acids and sugars.
Black tomatoes are unusually healthy food due to the large amount of lycopene and anthocyanins. These vitamin-like substances (by the way, preserved after heat treatment) improve the functioning of the organs of vision, contribute to the elimination of inflammatory processes, stimulate the human immune system, slow down the aging process of tissues, and prevent oncology.
And the fruits of the Black Prince also contain a large amount of vitamin C. Science has proven that this is the food that (in reasonable doses) is a medicine if there is no food allergy.
Culinary exotic
Fresh black tomato salads are useful and original, and the Black Prince variety is one of the most delicious. Its fruits are not very suitable for whole-fruit canning, but they are suitable for other preparations for the winter. There are many interesting recipes.
Tomatoes of the Black Prince variety give a large yield of juice with a sweetish-spicy taste. They can be put in ketchups and lecho. Multilayer salad blanks from tomatoes of different colors are obtained beautiful.
The latest medical research proves the need to include various plant foods containing anthocyanins in the human diet. There are many of them in the berries of dark grapes, chokeberry, cherries, raspberries, etc.
The champions among vegetables are some varieties with lilac and purple colors: black tomatoes, red cabbage, blue kohlrabi, lilac peppers, purple asparagus beans and onions. What purple vegetables do you like, what do you plant in your garden to support the health of your family?
Good harvest and see you soon!
Respectfully, Andrei
Enter your e-mail and receive new articles by mail:

Homemade cake made with love is always a small celebration for the family. You don't have to look for an excuse to pamper your loved ones: I suggest starting a new week with a Black Prince cake recipe. Fragrant and juicy chocolate cakes, delicate sour cream, rich cherry filling and a lot of grated chocolate ... You can't imagine anything tastier!
As a basis for the Black Prince cake, I took the recipe for chocolate kefir cakes, which were also used in Paul Robson's cake. You can bake them both in the oven and in a multicooker (on the Baking mode for about 45-60 minutes - focus on the power and volume of your assistant's bowl). The amount of sugar for the dough can be changed to your liking (according to this recipe, the cake is moderately sweet).
The cream for the chocolate cake is made with sour cream - it should be greasy. I have sour cream with a fat content of 26%, but you can buy it even higher. How sweet the cream will be is entirely up to you. Optionally add natural vanilla, vanilla essence, vanilla sugar or vanillin for aroma.
We take cherries for the filling according to the season: in summer - fresh, in winter - frozen. It is clear that it is pitted. You can substitute potato starch or wheat flour for thickening cornstarch for berry juice, but add only 1 teaspoon. Chocolate sprinkling for decorating the Black Prince cake can be either dark chocolate (my version) or milk chocolate (who likes sweeter and more delicate ones).
Ingredients:
Chocolate biscuit:
(300 grams) (250 milliliters) (200 grams) (2 pieces ) (80 grams) (40 grams) (1 teaspoon)
Sour cream:
Cherry filling:
Sprinkling:
Cooking a dish step by step with a photo:


Let's start by making a chocolate sponge cake. We immediately turn on the oven to warm up to 180 degrees. I have an ordinary Hephaestus gas stove, the heating is lower. All products for the chocolate crust must be at room temperature, so take them out of the refrigerator in a couple of hours. In a separate bowl we sift 300 grams of wheat flour (premium), add 40 grams of high-quality cocoa powder (this time I cooked with a new one and the result was impressive) and 1 teaspoon (no slide) of baking soda.

Mix well with a spoon or fork so that the dry ingredients are evenly dispersed throughout the mixture. Do not forget to sift through a fine sieve, since the soda is most often knocked down in lumps, which will give bitterness in the finished cake.


Beat everything with a mixer at high speed for about 5-7 minutes until the sugar crystals are completely dissolved. Eggs with sugar should greatly increase in volume, and the mass itself should become airy and fluffy. Add 250 milliliters of kefir (any fat content), actively mix everything or beat with a mixer for just a few seconds. Advice: it is best to use kefir not of the first freshness, that is, so that it is sour - then the baking will turn out higher and more magnificent.

Next (or you can even up to kefir - it doesn't matter) pour 80 grams of melted and already cooled butter. Mix again or beat with a mixer at low speed for a few seconds.

Finally, it is the turn of the dry ingredients for the future chocolate crust. Pour the flour mixture with cocoa and soda, which we simply manually stir in with a whisk or spatula. Alternatively, you can mix everything with a mixer at the lowest speed for a very short time.

As soon as there are no dry lumps of flour with cocoa, stop stirring. In terms of thickness, the dough for a chocolate biscuit on kefir is obtained as a dough for pancakes - it is not very thick, but not liquid either. In other words, the dough does not flow, but crawls lazily if you tilt the dishes.

I use a detachable baking dish with a diameter of 18 centimeters (you can take a larger size, then the cake will turn out lower), it is not necessary to grease it with oil, but this is optional. As a rule, I lay out metal forms with parchment paper. To do this, the inner surface is lubricated with a thin layer of refined vegetable oil - it helps the paper stick and hold well. A piece of paper is placed on the bottom, the diameter of which is measured in advance. Well, the walls are just a cut (a couple of centimeters above the sides) of baking paper, which is folded up and inserted into the mold. We press the paper to the walls - thanks to the oil they stick and do not deform. We shift the chocolate biscuit dough into a mold, level it with a spoon or spatula and put it in a preheated oven on the middle level. Let me remind you that I have a gas stove and heats only from below.

We bake the biscuit at 180 degrees for about 1 hour (the time depends on the characteristics of each oven). This time my cake was ready after 1 hour and 10 minutes. We must check the finished baked goods for a dry torch - we pierce it with a wooden skewer or a toothpick in the highest place and, if it comes out dry, the cake is ready.

We remove the walls of the form and paper walls. Cool the chocolate sponge cake itself - it is best to do this on a wire rack (then the bottom will not get damp). In about 40 minutes (this is for those in a hurry), the baked goods will completely cool down. If you transfer it to the balcony, maybe even less ...

While we are cooling down the chocolate base for the future Black Prince cake, let's start with the filling. Put 250 grams of berries in a small saucepan or stewpan (if you have pitted cherries, remove them), add 70 grams of sugar and 1 tablespoon of cornstarch.

We put everything on medium heat and, stirring, boil for 2-3 minutes after boiling. During heat treatment, the berries will give juice, the sugar will completely dissolve, and the starch will thicken and bind the liquid. After complete cooling, you get a thick jelly with whole berries.

When the chocolate sponge cake on kefir has completely cooled down, it will need to be cut into 3 cakes. Since the hat turns out to be convex, it is advisable to cut it off (most conveniently with a file knife), but a little - just a couple of centimeters, which stick out strongly. Cut the biscuit itself into 3 identical cakes. I do it this way: first, I make shallow cuts around the circumference with a saw-knife, and then I cut the biscuit using a regular thread. This time I decided to use a special string, but when working with it, you need to have a couple more hands (I asked my husband to hold the biscuit, otherwise he was constantly fidgeting).

Finally, let's prepare sour cream, which consists of only 2 ingredients and is easy to do. Put 400 grams of fatty sour cream in a beating container - it should be cold. Add 80 grams of powdered sugar (if you wish, you can take more or less). I recommend using the powder, since even with prolonged beating in cold sour cream, not all granulated sugar crystals can dissolve. A few more words about sour cream itself: for the Black Prince cake, Paul Robson, Pancho and others like him, always choose an exceptionally fatty product. I read on many culinary sites that, they say, lovers of all kinds of diets can easily use at least 10% sour cream if they are afraid of extra calories. No, it’s wrong! Low-fat sour cream will never beat up in life, but will remain a liquid kefir (sugar will make it even thinner). Either it is fatty - it is whipped into an airy, light and relatively (not so much as to be deposited with the help of a pastry bag) stable cream.

Beat the sour cream with powdered sugar with a mixer at the highest speed for about 10-12 minutes, until it expands. Another landmark of the readiness of sour cream: it will have a relief, that is, clear and fairly stable stains will remain from the whisk that do not float. In other recipes, the girls wrote in the comments that homemade fatty sour cream is instantly interrupted (in just a couple of minutes), turning into butter. That is why carefully monitor the whipping process if you have such a fatty product!

Let's start assembling the Black Prince chocolate cake. Put the bottom cake on a flat plate or dish. I stack the cakes in the reverse order (that is, turning the biscuit over) so that the slightly convex top fits perfectly into the not perfectly flat dish. We grease it generously with sour cream. In general, it is important to calculate the amount of cream so that there is enough for a layer of 2 cakes, for the sides and top of the cake (there should not be very much cream on top).


