Natural dyeing of fabric for tilde tea.
I have been sewing different dolls for about two years now. Not a long time for a master. But I already have my secrets. I will share one of them with you.
Any craftswoman who is going to sew dolls asks herself questions:
1. What material to sew the doll's body from.
The answer is: there are several options. You can buy ready-made linen, calico or knitted fabric. There are a lot of such fabrics in online stores. A huge disadvantage of such purchases is that they seriously hit the wallet. Increase the cost of the finished work if you sew to order. And the quality of the fabric (I'm talking about knitwear) is sometimes very disappointing.
What to do: Buy regular calico. Yes, yes, the most common. When doing this, pay special attention to the density of the fabric. Calico should be very dense. Otherwise, the seams on the doll will crawl, the stuffing will not be even and the doll will be sad) We don't need this! We need funny dolls!
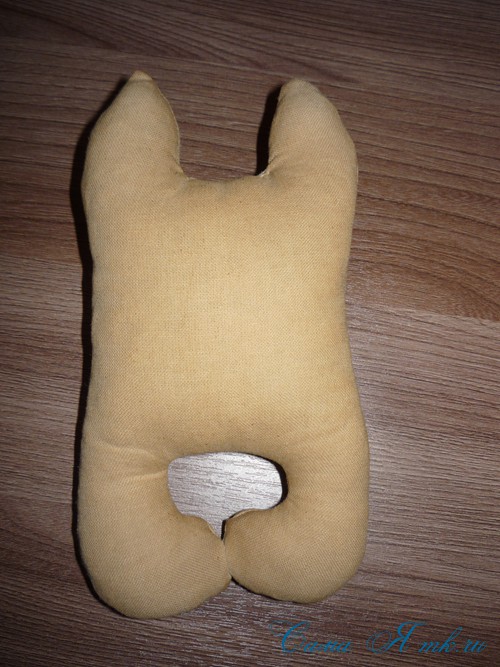
Such, for example!
2. question “But calico is white, like snow. And we need a doll with a delicate tan on the "skin", not a white moth! "
I answer: We will tint the coarse calico. And then we begin to wander through the Internet in search of an answer: how to tint coarse calico. I'll tell you a secret: I tried many options while working. There are many recipes. Different and no perfect!
What to do:
1. Tint small pieces of fabric. Approximately 70X70 cm. This way the fabric will dye better and there will be fewer ugly stains on it. (they will be with this coloring, but less)
2. Be sure to wash the fabric in a very copious solution of laundry soap. This is important for staining. For example, I leave the fabric overnight.
3. Pour half of cold water, 4 tablespoons of instant coffee and 1 tablespoon of salt into a large saucepan (5 liters for me). We take the cheapest coffee. It is he who paints perfectly. Guess why? Yes) It has more dyes, I guess.

I take this.
The water boiled. Place the cloth in the pot. Cook for 20 minutes over low heat. You can then leave the cloth in a saucepan for 30 minutes. The tone of the fabric will be richer.
4. We take out the fabric. We rinse. We hang evenly. Dry. We iron it. Done!
 This is for comparison. Coarse calico ordinary and tinted by this method.

You can paint on the fabric. Then it will turn out like this.
Be creative and everything will work out.
An easy way to try dyeing fabric at home is to use an ingredient such as coffee, which you probably already have in your home. To dye fabric with coffee, you only need a few simple items, which you will most likely have in your kitchen cabinet too. It is best to use natural fabrics for work, such as cotton, wool or linen. The entire dyeing process is fairly quick and relatively accurate, while allowing you to change the look of almost any fabric as you see fit.
Steps
Dyeing fabrics by soaking in coffee
- As an alternative to brewing several servings of coffee beans at home, you can use instant coffee or purchase ready-made coffee at your nearest cafe or coffee shop. However, the latter option will cost you significantly more.
-
Fill a pot with water. Place it on the stove and turn on high heat or heat.
- The size of the pot will depend on how much fabric you are going to dye. The general rule of thumb is that all fabric can be completely submerged in water.
-
Add the brewed coffee to the pot. When you're done brewing coffee, pour it into a pot of water.
Bring the mixture to a boil. After adding all of the brewed coffee to the pot, bring the coffee solution to a boil. Turn off the hotplate as soon as the mixture boils well.
Dip the cloth into the pot. When you unplug the hotplate and the coffee has stopped boiling, immerse the cloth completely in it. Stir the wet cloth gently in the pot to loosen any air pockets.
- Since the coffee solution has just stopped boiling, it is probably best to use a wooden spoon to avoid scalding and ruining your other cooking utensils.
-
Leave the cloth to soak in the coffee solution. The longer the fabric stays in it, the richer the resulting color will be. It will take you about an hour to get a noticeable lasting color result, but you can leave the fabric in the solution for longer to get an even deeper shade.
Remove the cloth from the pot and rinse. Remove the fabric from the coffee composition and rinse thoroughly with cold water. Do this until clear water comes out, which will indicate that all excess dyes have been removed.
Rinse the pot. When you finish dyeing the fabric, rinse the pan. Coffee can change the color of the pan if it is not promptly drained after the staining procedure and the dishes are not washed.
Wash the fabric with a mild detergent and dry. Set the washing machine for a delicate wash in cold water and add a mild detergent to it. After washing, the fabric can be dried in the dryer with a little heat, or simply hung to dry in the shade.
- The above method of dyeing with coffee will not give you a completely lasting result, since coffee is a natural dye, the color of which is gradually washed out with each successive wash.
Staining by rubbing the fabric with coffee grounds
-
Wash the fabric beforehand. Wash but do not dry the fabric before dyeing. This will remove grease and other contaminants that might interfere with the even coloring of the coffee grounds.
-
Make coffee. You will need brewed coffee grounds. To get coffee grounds, you can use a French press or a coffee maker.
- You will need enough coffee grounds to cover the entire area of \u200b\u200bthe fabric to be dyed. This will probably require brewing the coffee several times.
- Use a dark roast to dye the fabric a darker color, or use a lighter roast if you don't want to darken the fabric.
- This is a great way to make healthy use of your coffee grounds. If you regularly drink coffee beans, you can gradually accumulate the required amount of grounds for this coloring method.
-
Make a paste from the coffee grounds. When the coffee grounds have cooled down, place them in a large bowl and then add water there. You will need about one tablespoon of water for each cup of coffee grounds.
- Use a wooden spoon to mix the coffee grounds with water to moisten the mixture evenly. The ground coffee is not so fine, so it will be enough to stir the pasta only 7-8 times.
-
Apply a paste of coffee grounds to a cloth. Lay the fabric to dry on a waterproof surface. Be sure to completely cover the material with coffee grounds and rub in. This can be done with a wooden spoon or similar kitchen utensil, or you can simply rub in the coffee paste with your hands.
- The whole process is not very neat, so it's best to do it where it is not scary to create some kind of mess, for example, in the garage. You can also simply protect the floor or carpet with a thick layer of newspaper.
-
Dry the fabric. Hang the fabric to dry in a shaded area. You need to wait until it is completely dry. This can take from several hours to a whole day. You can also dry the fabric in the dryer at low heat for 30 minutes.
Sweep the coffee grounds off the fabric. You can do this with your hands, use a natural bristle brush, or simply shake the cloth to remove any grains of coffee grounds. If the fabric is not dark enough, repeat the procedure until the desired effect is achieved.
Iron the fabric with an iron if desired. The iron will help smooth out wrinkled fabric.
- For best results, the fabric should be completely dry when ironing it with a hot iron.
Tie-dye staining
-
Wash the fabric beforehand. Wash the fabric as usual before dyeing your fabric using the tie-dye technique. This will remove grease and other contaminants that can interfere with the uniform absorption of the dye composition into the fabric.
- The fabric can be washed with other garments or individually (depending on your own preference).
- Be sure to follow the fabric washing instructions (if any).
-
Make coffee. The amount of coffee you need to brew will depend on how dark you want the fabric to be. Stronger coffee will produce a darker coffee shade.
- If you need to dye your fabric a very dark coffee color, use more coffee or use a dark (strong) roast. If you require a light coffee shade, use less coffee, or use a light to medium roast coffee.
- As an alternative to brewing several servings of coffee beans at home, you can use instant coffee or purchase ready-made coffee at your nearest cafe or coffee shop.
-
Wait for the coffee to cool down. You can put it in the refrigerator for 20 minutes or just wait a couple of hours, leaving the coffee at room temperature.
- Then place your finger in the center of the fabric (or garment) and start turning it with your hand in a clockwise direction. Depending on the size of the fabric, you may need a plastic container or a zip-lock bag. Close the bag or container and place it somewhere warm for 24 hours.
- Coffee can achieve a light to medium-dark brown shade on light fabrics. If you want a warmer reddish hue, you can use the same methods, but substitute tea for coffee.
- Check the staining result with a test tissue beforehand. This allows you to assess the likely effect of the stain without accidentally ruining any fabric you have.
Warnings
- Dyeing your coffee grounds is a messy process, so be sure to make sure you can reliably protect the floor or carpet you will be working on.
- Dyeing the coffee grounds can cause scuffs on the fabric, so avoid this method if you want to keep the fabric intact.
Before dyeing the fabric, wash and dry the fabric as usual. This will eliminate grease and other contaminants that can interfere with the uniform absorption of dyes into the material.
Make coffee. The amount of coffee you need to brew will depend on how dark you want the fabric to be. The stronger the coffee, the darker the shade will turn out.
In my method, I put together several techniques tinting coffee toys, and the option turned out, as it seems to me, the most optimal for a beginner. The tinting is smooth, the shavchiks are clean.
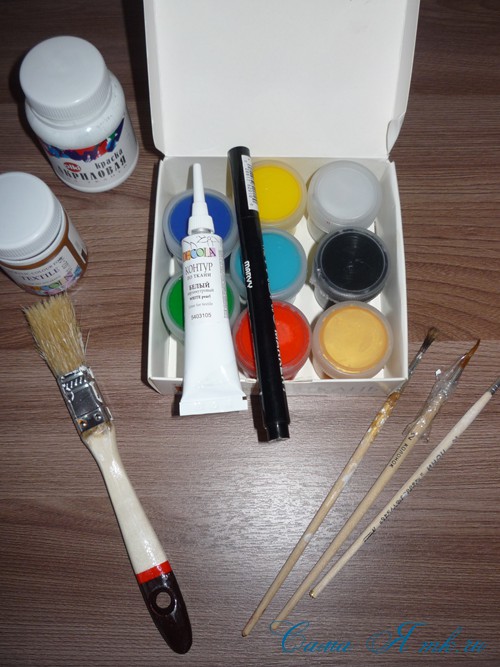
For tinting toys with a coffee mixture with PVA You will need:
- objects for tinting,
- instant coffee (the cheapest, granular or powder - it doesn't matter),
- warm water,
- pVA glue,
- ground cinnamon (optional)
- synthetic flat wide brush (many tint with a foam sponge, but somehow it didn't work out for me),
- old waffle towel.
First, let's prepare toning mixture for textile (coffee) toys: ground coffee, water and PVA glue.
Put 1-2 full tablespoons of instant coffee in a cup (granular - you can immediately 1.5-2, powder - start with 1 spoon, as it gives a richer shade, you can always add if you wish), add a little cinnamon. Here we proceed from our preferences, I love the smell of cinnamon, so I put in almost a third of a teaspoon.
Pour all this with about 50 ml of warm water and mix well. I did a little more, so I increased the dosage exactly 2 times.
Put 1 full tablespoon of PVA on 50 ml of water and mix thoroughly until smooth. The more PVA glue is, the harder, "woodier" the fabric will be after drying. 1 tablespoon is quite enough, the toys are moderately hard and this amount is enough to subsequently apply paint to the fabric.

Vanilla is not added to the solution, otherwise crystals will be visible on the fabric. We add it either at the stage of stuffing the toy inside, or slightly lubricate the back of the finished product.
Slightly dip the brush into the solution, squeeze it against the edge and from the middle of the toy we begin to tint the fabric moving in the direction of the seam. So, an almost dry brush will come to the seam, since if the seam gets very wet, stains will remain.


And the other side ...
For control, after tinting, I always immediately blot the toy with a waffle towel, it will absorb excess solution, if any.

Many people dry toys in the microwave, but I did not like this option, it happened that there were unwanted spots, so I dry naturally: I put the whole batch on batteries. It is very convenient, since the coffee cups touch slightly with their legs and a little with ears on top. And in winter, another plus, they dry faster. 🙂

Like this…

I will show, for example, the most "treacherous" places, it turned out quite neatly.

We paint the finished toy with acrylics on the fabric.
Shovchiki, if desired, can be tinted. There are also some nuances here.
I also tint with a flat synthetic brush, which I first rub dry on a sheet of paper.


Here is the result ...

Larger ...


Attention: coffee toys cannot be washed and taken with wet hands !!!
I was glad to help!
Today, the Tilda doll is becoming more and more popular, which can be used not only for play, but also for interior decoration. And if you make a housekeeper in this way, then he will become an excellent talisman for your house, capable of protecting him from everything bad. In addition, in the process of creativity, you can relax your soul and tune in to the positive.
Do not forget that you can present a self-made Tilda to your good friends, and believe me - it will be a great present. And do not think that the tilde can only be in the form of men. Not at all! You can shape it into all kinds of animals. The main thing in its creation is fantasy! And the colors can be original if you decide to dye the fabric at home using natural dyes.
Features of making Tilda dolls
As for the history of the appearance of these amazing dolls, then, most likely, our grandmothers still created something similar in childhood. But only in 1999, Tilda production was put on stream and they began to be used for room decoration. When purchasing such a doll for decoration purposes, you can purchase a Tilda filled with a collection of fragrant herbs that can fill your home with pleasant aromas.
When making such a doll, keep in mind that this work requires painstaking from you. You must sew even the smallest details carefully. Do not forget that thin arms and legs also need to be stuffed with padding polyester, and then carefully sewn. It is worth paying attention to the seam, which traditionally runs in the center of the face. Try to make the halves of the head equal, otherwise the face will look asymmetrical.
If we talk about clothes, then they are usually sewn to the body.
This must be done very carefully so that the seams are not visible to prying eyes. If you want your doll to sit, it is worth making a few stitches under the knee. In this case, the doll's pose will not look tense.
As for the seams, all parts of the Tilda need to be sewn together with a blind seam to make it look solid. And as we already said, in order for Tilda to not only decorate your interior, but also to flavor it, you can put special sachets with aromatic herbs in the middle. Moreover, you can add finely ground cinnamon or vanillin to the filling.
You can fill Tilda with sea salt. But before mixing it with filler, it is worth flavoring it. To do this, you can simply add a few drops of essential oil to the salt.

Another flavoring option is to add a small amount of crushed mint, lemon balm and other aromatic herbs to sea salt.
One of the peculiarities of making these dolls is the light brown color of the parts.
Unfortunately, it is with him that difficulties arise most often, because it is rather difficult to choose the right shade. And so today we will talk about how to dye fabric in the desired shade at home.
This can be done by adding the following ingredients to the water:
- Coffee,
- Zelenki.
And now we will consider the technology of coloring using the presented ingredients.
How to dye fabric with tea
There is nothing complicated in the method of painting with tea. First of all, in this case, you need to cook a special solution. To do this, you will need an enamel saucepan, a few tablespoons of black tea, and cold water.
We make the solution as follows:
- Pour cold water into a saucepan. Pour a few spoons of tea there. Attention! The amount of tea will directly depend on what color you want to get in the end.
- Put water and tea on fire and bring to a boil. At the same time, make sure that too much water does not boil away, since in this case you will not have anything to dye the fabric in.

After the solution is ready, filter it through a two- or three-layer gauze. Add a little salt to the resulting liquid. This is done so that natural dyes are more absorbed and practically not washed out.
To paint our future Tilda, you need to do the following: just dip the cloth in water and boil in the solution for an hour and a half.
Attention! During boiling, do not forget to stir the fabric periodically so that it does not stain with streaks. And one more thing: never dry the fabric in an upright position, since stains are definitely formed in the place of contact of the fabric with the rope or clothespins.
How to dye fabric with coffee
Before you start dyeing fabric for Tilda in this way, keep in mind that after such a procedure, the doll will most likely smell like coffee. You can give your Tilda a light tan color by preparing a solution of coffee, which should be applied to the fabric with a regular brush.
The solution in this case must be prepared as follows:

- In half a glass of water, dissolve from three to five tablespoons of ground coffee. Attention! The coffee should be natural, not instant, because otherwise it will be almost impossible to predict the color of the fabric. By the way, if you wish, you can add half a teaspoon of vanillin to this solution to give the fabric an even more refined and multifaceted aroma. Also, pay attention to the fact that the solution must be thoroughly filtered before use, as coffee lumps may cause dark brown spots or streaks on the fabric.
- In order for the fabric to be dyed evenly, be sure to wash it thoroughly before dyeing it with laundry soap.
- Before dyeing the fabric, it is best to completely shape all parts of Tilda's body. If the color is too saturated, then you can simply squeeze out the part with a damp cloth or gauze. And then all the extra color will remain on it. And one more nuance: when drying, try to do so that the fabric does not come into contact with other surfaces, since in places of contact the color will be less saturated.
How to paint a fabric green

If you need to paint some details of your Tilda's outfit in emerald color, then for this you can use green paint.
Behind the seeming primitiveness and deliberate negligence of the attic doll's execution, the painstaking work of the craftswoman who created it is hidden. In order for a new Tilda doll to appear, the needlewoman has to work hard.
It all starts with a picky choice of a suitable fabric. For the manufacture of Tilda dolls, natural fabrics are used: linen, cotton. However, the colors of fabrics made from natural fibers are inconspicuous and have a monotonous, inexpressive color scheme.
What if you want to make an attic doll bright and spectacular, but you don't want to spend a lot of money on buying special expensive American fabrics? There is an exit! You can dye linen or cotton fabric yourself to create Tilda in different colors using the tools at hand that are available in the kitchen of every housewife.
The most common Tilda fabric dyeing methods are:
Dyeing coffee fabric;
Dyeing the fabric with turmeric

1 - fabric before dyeing,
2 - fabric dyed with instant coffee,
3 - fabric dyed with turmeric.
Let's consider in detail each of these methods.
It is very important to wash the fabric with laundry soap before any staining. Then the fabric after painting will acquire an even shade.
Wet the fabric before immersing it in the dye solution. This will also help to dye the fabric evenly and avoid streaking.
To fix the color obtained by dyeing the fabric, you can add 1 tablespoon of table salt to the dyeing solution.
It is better to use enamel dishes for dyeing fabrics.
0.5 liters of boiling water,
5 tablespoons of instant coffee (coffee can be taken the cheapest and completely unusable for its intended purpose :))
Dissolve coffee thoroughly in boiling water. Place a cloth in the solution and boil, stirring occasionally, for 40 minutes.
After dyeing with instant coffee, the fabric acquires a pleasant light chocolate shade and a delicate coffee aroma.

To make the fabric dyed with instant coffee even more aromatic, vanillin and ground cinnamon can be added to the dye solution. Only in this case, the solution will have to be pre-filtered to remove non-dissolving pieces of cinnamon. Otherwise, dark brown specks will form on the fabric when dyed.
A solution of coffee, cinnamon and vanilla can also be dyed on an already sewn attic toy.
0.5 liters of water
4 teaspoons of turmeric
Strain the solution. Place the cloth in the solution. While stirring, bring to a boil. Boil for 10 minutes.
After staining with turmeric, the fabric takes on a cheerful, bright lemon shade.

Dyeing fabrics with instant coffee and turmeric has a fairly long-lasting effect. However, with subsequent washings, such fabric will still lose color. To fix the resulting shade, the dyed fabric can be dipped 1-2 times in a solution of 1 liter of cold water and 2 tablespoons of vinegar (do not rinse, just dip!). Also, to fix the color, the dyed fabric should be ironed with a hot iron without steaming, first from the wrong side, and then from the front side.
The dyed fabric does not need to be rinsed or wrung out. After dyeing, the fabric must be dried by hanging it vertically and stretching it as much as possible. This will prevent streaking.
The above methods are used to dye not only fabric for making a Tilda doll. You can also dye your embroidery canvas with instant coffee or turmeric.
By the way, if you liked the Tilda model, which demonstrates how to dye fabric with natural coffee dyes and turmeric, you can sew a Tilda doll using this pattern:

1 - part of the upper body (2 parts),
2 - detail of the leg (4 details, the dotted line shows the place where the leg is bent at the knee),
3 - hand detail (4 parts)
Create with HobbyMama!


