Soap cake. Do-it-yourself soap cake - the safest dessert for a figure Do-it-yourself soap cake
Variations on the theme… Handmade soap "Coffee Cake" - a cake for a passionate coffee fan. Layers from bottom to top:
coffee, cappuccino, vanilla, chocolate. Almond heart. The girl for whom I made this handmade soap said that it even looks like a Prague cake. Almond-coffee-chocolate is a great combination!


And one more - chocolate:
Layers from bottom to top: coffee, chocolate, whipped soap base flavored with chocolate. The cake was decorated with coffee beans and a cut soap base poured onto a textured sheet.


I offer you a master class on making soap with your own hands "Vanilla Cake".
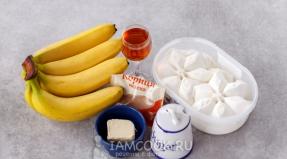
To make soap with your own hands, we need:
Consumables:
Soap base: transparent and opaque, optional jelly soap base.
Dyes "edible" color (yellow, red, etc.)
Instant and / or ground coffee, a couple of grains for decoration.
Flavoring as desired. I have vanilla.
Alcohol in a spray bottle.
Any vegetable oil for greasing molds.
Tools:
Scales, if it is difficult to determine "by eye".
Form for our cake (I made it myself from cardboard, pasting it with tape)
Several mugs for the melted base. You can get by with one, but you have to wash it after each time.
Mixing sticks.
Stationery knife.
The shape of a spherical object, or its half (I have a tangerine.)

Do-it-yourself soap "Vanilla cake" master class.

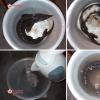
So, we make the filling for the cake. We melt the white soap base.

Lubricate the spherical shape.

And pour the melted base into it (I did not flavor it).

We put it aside, let it harden for now, and we will deal directly with the cake. We melt the base (any, but I like it more transparent), add ground and instant coffee (you can pre-diluted with water, but there should be little water, otherwise it will harden for a very long time + the base will be quite soft).

Mix thoroughly.

And pour into an oiled mold.

Meanwhile, our "hemisphere" froze. Cut it into pieces like an orange.

We melt the transparent base.

Add flavoring and coloring (I have yellow water-soluble coloring and vanilla flavoring).

We mix everything. The resulting base must be colored otherwise the whole effect of the fruit inside the cake will come to naught! And do not be afraid to "underpaint" the base.

Now the X hour is coming. We put pieces of chopped tangerine on top of the frozen coffee base and fix it with needles, pour a NON-HOT transparent colored soap base on top. I overheated a little, my white base floated.

The third layer is a pink-colored transparent base.

The second layer is a pink-tinted white soap base.

Do not forget to spray each layer with alcohol.

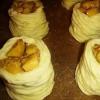
Let cool, remove the cake. We make decorations. We cut off the side part with a clerical knife (it is thin, so it is very convenient to use). The cut part should be thin so that it can be rolled into a curl.

We make any fruits, berries, meringues. I have a lemon jelly base.

This is what the top of the cake looks like. There was a romantic mood then.

We melt the white base, we collect it with a syringe.

Holding near the edge, gently squeeze out to get beautiful smudges.

Do-it-yourself soap "Vanilla Cake" ready. Here it is, our handsome - cake!
soap cake
To be honest, making a cake is not easy. Very labor intensive. But if you decide to do this, the result will exceed all your expectations!
I want to give you one piece of advice!
If you are a beginner soap maker and have not yet tried to take on such work, then do not rush. Practice on small forms first. Take, for example, a baking dish and experiment with it. Decide how many layers you will have, what smells, oils, dyes that you will add.
Be careful with smells. Each layer of the cake is a separate filling and smells in its own way. Create a composition that, in combination, will give a pleasant and tasty aroma. For the first sample, you can take one smell as a basis and shade it with another.
Also pay attention to dyes, monitor the quality of products, otherwise, if after cooking the colors migrate into each other, it will not be beautiful. And don't overdo the oils. If you have any questions, you can always contact me
So. Where did I start:
First, I came up with the recipe.
To begin with, I want to say that the cake was a birthday present for my sister. Looking ahead, I want to say that the cake shocked not only her, but the whole family. Sesta is satisfied. And even more so.
The cake recipe didn't arrive right away. I experimented several times with colors and scents on small forms. Then I went to a pastry shop and looked at the decoration of cakes. I understood that the cake should be not only beautiful, but also practical in future use. I came to the conclusion that there must be a chocolate biscuit, nuts and strawberry jam. Caramel and cream layers have already been thought out in the process.
If you want to, to have pieces of fruit on your cake, then I advise you to take care of the forms in advance. Don't skimp on them. Not always handy jars and boxes will help you. Or there is a great choice - to cast your own mold from the compound. I will return to work with the compound later. This will be the subject of one of the video tutorials.
What we have.
You came up with a recipe, practiced, composed a composition, bought molds, a base and everything you need. You can start. Don't disregard my advice. I know from my own experience how insulting it is later, when you work with your soul on soap, but it doesn’t turn out very well. This will definitely come in handy for you.
One of the main questions: “Where can I get a cake mold?”.
Large baking pans can be used, they have a plus - more often they are already with a ribbed pattern and there is less fuss with them, and it is also very easy to pull them out of them. But this plus can be a minus, it all depends on your recipe.
The curly shape did not suit me, because. I wanted to decorate the cake with cream, but the cream does not match with the pattern. In general, I bought a store-bought cake, they are packed in plastic boxes, which everyone usually throws away. Here it's the other way around. I bought the cake in just such a box, the shape of which fit my recipe. So, there is a form for the cake.
It was not in vain that I warned you to buy the base and molds in advance.
Take the basis based on the volume of your form. It took me a little over 2kg. And buy creamy - for cream. Let's get back to fruit shapes. They must be ready, because. what we fill in is fruit forms or nut. If you are making stuffing with whole nuts, like me, then you need to prepare them first.
So! First, we prepare nuts and fruits.
Then the process is easier - do each layer separately, following your own sequence. Let me remind you that layers must be poured onto the previous FROZEN layers. After all the layers have hardened, carefully remove from the mold and decorate to your taste.
Re-read the comments to my cakes - there is a lot of useful information. How to make candied fruits, jam, cream and nuts.
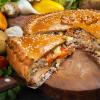
Description of my cake:
Layers are clearly visible in the section. I had 4 of them, icing and decoration on top.
I will start the description from the top layer, because Fill all layers upside down.
First, I filled the form with a matte base with the addition of cocoa butter and “cream” flavoring.
The first layer I had was caramel: clear base, caramel flavor, plain cocoa and caramel color. I added pre-cooked nuts to it. I made hazelnuts. On the cut - beautiful.
Hazelnuts are made in 2 stages:
First, we cut out balls from the matte base (according to the size of the hazelnut), or we make a mold from the compound and fill the base there. Then we dip the cut out (cooled) white lumps into a warm (I mean cooled down here) base. You pre-paint the base. I dyed with chocolate dye so that there was a contrast against the background of the caramel layer. You can add flavoring and oils if you like. I decided not to add, because. too small details and smells will be lost. Dip the nuts and let them dry. I put these nuts in my caramel layer.
The third layer is strawberry syrup.
The fourth layer is Chocolate Biscuit.
A transparent base is whipped with a creamy base in a small ratio. Just for the sake of being fluffy. Fillers: ground coffee, dark chocolate, cocoa butter, grated cocoa and a drop of Irish cream flavoring.
Everything. Layers are ready. We send to cool down.
Preferably for a day. But not in the refrigerator, but in the room.
After the cake has frozen, carefully remove it from the mold and cut off the bottom (remove bumps).
Now let's move on to decoration.
I poured strawberry syrup on top, like inside a cake. Decorated with pre-prepared walnuts (how to make them, see the comments on the cakes). And the final touch is cream decoration. I made the cream from whipped soap (creamy), with the addition of “cream” flavoring.
That's all. It remains to insert candles.
They were in the middle of the cake - it turned out great!
I'm sure you can too!
And remember that if you do what you love with your soul and in a great mood, then you will succeed!
soap cake
To be honest, making a cake is not easy. Very labor intensive. But if you decide to do this, the result will exceed all your expectations!
I want to give you one piece of advice!
If you are a beginner soap maker and have not yet tried to take on such work, then do not rush. Practice on small forms first. Take, for example, a baking dish and experiment with it. Decide how many layers you will have, what smells, oils, dyes that you will add.
Be careful with smells. Each layer of the cake is a separate filling and smells in its own way. Create a composition that, in combination, will give a pleasant and tasty aroma. For the first sample, you can take one smell as a basis and shade it with another.
Also pay attention to dyes, monitor the quality of products, otherwise, if after cooking the colors migrate into each other, it will not be beautiful. And don't overdo the oils. If you have any questions, you can always contact me
So. Where did I start:
First, I came up with the recipe.
To begin with, I want to say that the cake was a birthday present for my sister. Looking ahead, I want to say that the cake shocked not only her, but the whole family. Sister is happy. And even more so.
The cake recipe didn't arrive right away. I experimented several times with colors and scents on small forms. Then I went to a pastry shop and looked at the decoration of cakes. I understood that the cake should be not only beautiful, but also practical in future use. I came to the conclusion that there must be a chocolate biscuit, nuts and strawberry jam. Caramel and cream layers have already been thought out in the process.
If you want to, to have pieces of fruit on your cake, then I advise you to take care of the forms in advance. Don't skimp on them. Not always handy jars and boxes will help you. Or there is a great choice - to cast your own mold from the compound. I will return to work with the compound later. This will be the subject of one of the video tutorials.
What we have.
You came up with a recipe, practiced, composed a composition, bought molds, a base and everything you need. You can start. Don't disregard my advice. I know from my own experience how insulting it is later, when you work with your soul on soap, but it doesn’t turn out very well. This will definitely come in handy for you.
One of the main questions: “Where can I get a cake mold?”.
Large baking pans can be used, they have a plus - more often they are already with a relief pattern and there is less fuss with them, and it is also very easy to pull them out. But this plus can be a minus, it all depends on your recipe.
The curly shape did not suit me, because. I wanted to decorate the cake with cream, but the cream and the pattern do not match. In general, I bought a store-bought cake, they are packed in plastic boxes, which everyone usually throws away. Here it's the other way around. I bought the cake in just such a box, the shape of which fit my recipe. So, there is a form for the cake.
It was not in vain that I warned you to buy the base and molds in advance.
Take the basis based on the volume of your form. It took me a little over 2kg. Also buy creamy - for a cream. Let's get back to fruit shapes. They must be ready, because. what we fill in is fruit forms or nut. If you are making stuffing with whole nuts, like me, then you need to prepare them first.
So! First, we prepare nuts and fruits.
Then the process is easier - do each layer separately, following your own sequence. Let me remind you that layers must be poured onto the previous FROZEN layers. After all the layers have hardened, carefully remove from the mold and decorate to your taste.

To create even, identical pieces, use a silicone baking dish. It is very easy to extract the finished soap from it.

The author needed 800 grams of a transparent English soap base (100 grams for each piece).
As base oils for different pieces, we take olive oil, sweet almond, peach and wheat germ oil.

We use food flavorings and food coloring to your liking.

Order of adding components:
1. Base oil 1/3 teaspoon per 100 grams of soap base
2. Dye 1-5 drops per 100 grams of soap base
3. Flavor 3-7 drops per 100 grams of soap base
Everything was mixed and poured into a mold.

Each layer must be completely dry, otherwise a new hot layer may melt the previous one. When the first layer has hardened, pour the next one.
It is important to scratch the surface well and sprinkle it with alcohol - this is necessary so that the layers adhere as firmly as possible.

It is important to remember that multi-layer soap should not be put in the refrigerator - let all layers harden at room temperature.
To make the cake look more interesting and appetizing on top, decorate it with bright fruits. Silicone molds were used.

Then we lay out the corresponding fruit slice on the desired piece. And then we fill everything with an already transparent soap base without any additives (base oil and fragrance).

It is important to know that it is impossible to fill fruit with a very hot base, because. she can flood them and the whole appearance will be spoiled.

material from the internet