Ossetian cheese pie - recipes for the right dough and delicious fillings. Ossetian pies with cheese and herbs - that unusual taste! Recipes for Ossetian pies with cheese and herbs from different dough
The preparation of the Ossetian pie can be divided into several stages. This is kneading the dough, preparing the filling and baking itself.
Kneading the dough
It is very important to knead the dough for the Ossetian pie yourself, the purchased dough is not suitable for this dish. Correctly kneaded dough with your own hands is the basis of a delicious dish.
Ingredients required for the dough:
- Half a glass of warm water;
- 300 grams of flour;
- 4 large spoons of olive oil;
- Salt on the tip of a teaspoon;
- A teaspoon of dry yeast;
- One and a half teaspoons of sugar;
- One chicken egg for lubrication.
Cooking method:
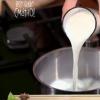
- The prepared amount of yeast must be poured with half a glass of warm water and left for a few minutes to swell.
- While the yeast is swelling, you need to sift the flour.
- Already sifted flour should be gradually added to the yeast.
- Further, in the same way, slowly, the rest of the products are added: sugar, salt, vegetable oil.
- All products should be mixed with your hands until the mass resembles plasticine to the touch.
- The resulting dough should be covered with a towel and left for half an hour.
- If the dough hasn't swollen enough in half an hour, then it's tedious to give it even more time. Basically, the speed of this process depends on the temperature and the quality of the yeast. That is why it is recommended to buy only the highest quality yeast.
There is another recipe for an Ossetian pie with cheese and herbs (photo) without yeast. Following this recipe, the dough is kneaded without using yeast. The baking method and filling are the same for both recipes. How delicious is prepared.
To knead the dough for an Ossetian pie without yeast, you will need the following products:
- One and a half glasses of kefir;
- Three glasses of flour;
- A teaspoon of sugar and the same amount of baking soda;
- Salt on the tip of a knife;
- A tablespoon of margarine.
Cooking method:
- Mix all the indicated ingredients together in order.
- Stir in the dough until the mixture is smooth.
- Leave the resulting dough for 30 minutes in a dark place.
Making the pie filling
When the dough according to the selected recipe is ready, well, or while it is infused and swelling, you can start preparing the filling for the future Ossetian pie. From the name of the dish, it becomes clear that the filling for the Ossetian pie, according to the traditional recipe, is based on cheese and herbs.
For the filling you will need:
- Dill;
- Spinach;
- Parsley;
- Green onions;
- Pickled cheese.
Important: all ingredients are mixed in free proportions depending on how rich you want the cake to be.
Advice: the filling should not be wet, so it is better to use pickled types of cheeses, for example, mozzarella.

Cooking method:
Sp-force-hide (display: none;). Sp-form (display: block; background: #ffffff; padding: 15px; width: 600px; max-width: 100%; border-radius: 8px; -moz-border -radius: 8px; -webkit-border-radius: 8px; border-color: #dddddd; border-style: solid; border-width: 1px; font-family: Arial, "Helvetica Neue", sans-serif;). sp-form input (display: inline-block; opacity: 1; visibility: visible;). sp-form .sp-form-fields-wrapper (margin: 0 auto; width: 570px;). sp-form .sp- form-control (background: #ffffff; border-color: #cccccc; border-style: solid; border-width: 1px; font-size: 15px; padding-left: 8.75px; padding-right: 8.75px; border- radius: 4px; -moz-border-radius: 4px; -webkit-border-radius: 4px; height: 35px; width: 100%;). sp-form .sp-field label (color: # 444444; font-size : 13px; font-style: normal; font-weight: bold;). Sp-form .sp-button (border-radius: 4px; -moz-border-radius: 4px; -webkit-border-radius: 4px; background -color: # 0089bf; color: #ffffff; width: auto; font-weight: bold;). sp-form .sp-button-container (text-align: left;)
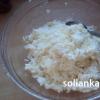
- The cheese should be well drained.
- Mash the cheese with a fork if it is a soft variety. If the cheese is hard, grate it. If the cheese resembles a curd mass, then it is also kneaded with a fork.
- All greens must be well chopped.
- Mix cheese and herbs, add salt to the filling.
- The resulting mass must be rolled into small balls equal in volume to each other.
Advice: To make the filling even more delicious, you can use different types of cheese. For example, hard cheese, curd cheese and pickle varieties.
Final step: baking the cake
When the dough swells and the filling is ready, you can start shaping and baking the pie.
How to cook Ostankino pie:
- The swollen dough should be divided into 3 equal parts. Roll balls from each part.
- Place each part on a baking sheet and knead until flat cake.
- Place one ball of filling in the center of each cake.
- Further. It is necessary to very carefully collect the edges of the cake in the center to make a bag.
- The edges of such a bag must be firmly connected to each other, and again knead the bag to the state of a flat cake.
- Each cake must be sent to the oven, preheated to 180 degrees, for 30 minutes. It is better to make an incision in the center of the cake so that the filling is baked well.

Ossetian pie with cheese and herbs (recipe with photo) turns out, but it is impossible to resist it! A fragrant warm pie, with a juicy filling and a golden brown crust, just ask for a mouthful. Making a cake like this is a good way to surprise your loved ones with something delicious.
Bon appetit and ruddy pies!
Say thanks for the article 0
I was very surprised that the recipe for a pie with herbs and cheese, which had been lying in the store for a long time, was somehow forgotten. But this delicious pie never let me down: the base turns out to be crispy and crumbly, and the filling is aromatic and moderately spicy. And very cheesy. Today I am preparing a filling from a mixture of hard and processed cheese. In this combination, the middle turns out to be soft, and the crust is golden. But you can make melted cheese pie. And I also really like the Adyghe (then the filling is salty) or mozzarella (which is sold locally in small heads).
Shortcrust pastry, at first glance, is the easiest to prepare - you don't need to beat it, or let it stand for hours, or roll it out countless times. Mixed butter with flour and egg - and you're done. It's such a win-win. Delicious and fast.
Dough:
- 250 g wheat flour;
- a pinch of salt;
- 1 yolk;
- 125 g butter;
- 2 tbsp. spoons of cold water;
- ½ teaspoon of baking soda, slaked with vinegar.
Filling:
- 1 bunch of dill;
- 1 bunch of parsley;
- 300 g of semi-hard cheese (like cream cheese);
- 70 g processed cheese;
- 3 eggs;
- 1 protein;
- salt, black pepper.
Preparation:
- Make shortbread dough first. If you do not know how to make shortbread dough for a pie, I will show you a very quick and simple recipe. Sift flour into a bowl, mix it with salt. Grate the butter there (take it out of the refrigerator), add the yolk, water and soda quenched with vinegar.

- Quickly knead the shortbread dough with your hands, form a ball out of it and, wrapping it in cling film, put it in the freezer for 15-20 minutes.

- While the dough is cooling, fill it. Rinse the herbs under running water, tear off the dill sprigs and parsley leaves from the stems, dry and chop finely.

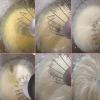
- Beat the four egg whites until stiff.

- Combine both grated cheeses with medium holes in a bowl. Add three yolks, separated from the whites, salt and pepper the ingredients. Mix the mixture well. Add chopped greens and beaten egg whites, stir the cheese filling again.

- Preheat oven to 180 degrees. Remove the dough from the freezer and roll it into a circle about 5 mm thick (5-6 cm larger than the mold - this will be a margin for the sides). Gently transfer the layer to a split pan lined with baking paper.

- Distribute the filling over the cake, wrap the edges of the dough inward to form a small side.

- Place the shortbread pan in the oven and bake for the first 10 minutes with bottom heating, then turn on heat from the top and cook for another 15 minutes.

- After removing from the oven, open the pan and let the cheesecake cool.

- Cut the cheese and greens pie into triangular pieces and serve with broth or light vegetable soup. Or maybe just for breakfast, to school for children or guests as a snack. Bon Appetit!
Recipe for Ossetian thin pie with cheese and herbs. We start yeast dough, make cheese filling: grate Adyghe cheese and chop greens. Next, roll out the dough, spread the cheese filling abundantly in the middle, pinch the edges and form a thin cake. We bake the pie with cheese filling until golden brown in the oven. As you can see from this step-by-step photo of the recipe, preparing this Ossetian cheese pie is quite simple, especially if you have some skill.
Ingredients:
Dough for 4 Ossetian pies
- Warm water - 1 glass;
- Wheat flour - 3.5 cups;
- Yeast (fast acting) - half a pack;
- Egg - 1 pc.;
- Salt - 1 tsp;
- Sugar - 2 tbsp. spoons;
- Vegetable oil - 3 tbsp. spoons;
Cheese filling
- Adyghe cheese - 500 g;
- Butter - 70g.;
- Chicken egg - 1 pc .;
- Green onions - a small bunch;
- Fresh dill - a small bunch;
- Freshly ground black pepper - to taste;
Recently I realized one terrible thing - as it turned out, there are no recipes for Ossetian pies in my cookbook, despite the fact that I am a great connoisseur of them. Moreover, I have already cooked them several times, but considering that creating a photo of a baking recipe is fraught with some difficulties (both hands are constantly busy, and they are also in flour, so there is nothing to photograph!), Apparently I was just lazy. But this is in the past, because I forced myself and photographed the whole cooking process, so now I will tell you how I prepare an Ossetian pie with cheese and herbs.
Dough for Ossetian pie
In this recipe, I use regular yeast dough mixed with warm water. To prepare it, you can visit the page with a step-by-step photo recipe for yeast dough. or you can use the short recipe below.
Pour 3.5 cups of flour into a bowl (I use a "glass" of 400 ml, if I take a smaller glass, the dough will only last for 3 pies), on top of the flour - half a pack of yeast, salt and sugar, mix all the dry ingredients of our future large canteen dough spoon. Let's make a small depression in the middle of the hill with flour, pour a glass of warm water into it (the measuring glass for water should completely coincide with the glass with which we measured the flour, this is important!). Add one egg on top of the water, mix it well in water, so that the liquid mixes a little with the flour, then pour a few tablespoons of vegetable oil into a bowl, and knead the soft dough (the dough should not turn out steep!) With our hands. Put the finished and kneaded dough in a plastic bag, and put it in a warm place to rise. In the process of bringing the dough to the desired consistency, before using it, it is necessary to learn at least once after it rises, and then, to wait until it rises again, to learn it and only then start cooking Ossetian pies! We figured out the dough, now let's start preparing the cheese filling.
Cheese filling
The filling for these Ossetian pies is made from the Adyghe cheese available in Siberia, and even more affordable greens. This time I used green onions and dill plucked from my mother in the garden, but various options are possible: wild garlic, green arrows of garlic, parsley, cilantro. When choosing greens in a cheese filling, we are guided by our own preferences.
Preparing the filling is simple. Chop dill and onions,
Rub the cheese on a coarse grater.
Add one egg to the cheese, and pour this whole thing with butter melted in the microwave,
Combine chopped greens with cheese,
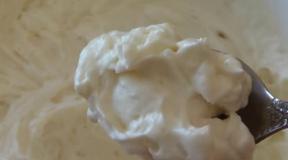
Mix everything well. Our filling for Ossetian pies with cheese and herbs is ready. And now we just have to wait for the moment when our dough rises a second time.
Cooking Ossetian pies
As soon as our dough rises a second time, it needs to be softened again,
And divide into 3 or 4 parts, depending on the volume of the measuring cup you used.
We put three pieces of dough back into the bag (so as not to wind), and the fourth, roll out with a rolling pin, not forgetting to sprinkle both the rolling pin and the surface of the dough and the table with flour. The thickness of the rolled dough should not exceed approx. 3 mm.
Then pinch the edges of the dough so that the filling is inside the dough,
Now we just have to sprinkle flour on the baking sheet,
Lay our Ossetian pie on it with the seam down,
And using a rolling pin (and mainly your hands), gently and evenly align the cheese pie over the entire surface of the mold. It is very important here not to allow the test to break. By the way, if you do not have a pizza dish, you can simply distribute the pie over the surface of a standard oven tray. It will not turn out perfectly round, but this will definitely not affect the taste of the pie!
After our cake is fully formed, we send it to the oven preheated to 210-220 degrees to bake,
And as soon as it starts to brown (after about 15 minutes), take out the Ossetian pie from the oven, grease it with a beaten egg,
after which, we send the cheese pie to bake until tender (this is about another 7-9 minutes),
We determine the readiness of the pies by the rosy color of your baked goods.
Serve the Ossetian pie with cheese and herbs directly from the oven to the table hot, and prepare the rest of the pies as described above.
But the recipe would not be complete if I didn’t show what happened inside. So I cut the pie with a pizza knife
And once again he served it to the table, already sliced into portions! By the way, even now looking at the cutaway photo of the resulting pie, there is a slight feeling that the fillings could have been added to the pie and more ... But even so it was quite delicious! Bon appetit and good luck in preparing Ossetian pies with cheese according to the recipe described above.
Ossetian cheese pie in Ossetian sounds like ualibah. This is a large round flat pie made from thin tender dough with a juicy filling. Ossetian pies are good on their own as an independent dish with teas and sour milk or served as bread for soups and main courses.

In general, almost any filling in Ossetian pies can be accompanied by cheese, except for meat, i.e. cheese can be added to herbs, potatoes, cabbage, beans, pumpkin and other fillings. The ratio of filling and dough should be close to 1 to 1, for example, for 200 grams of filling, take about 200 grams of dough.
The dough for Ossetian pies can be unleavened or yeast, but always soft, as if flowing and at the same time fluffy. Professionals or experienced housewives who bake Ossetian pies almost every day are able to form pies of a rather large diameter, about 30-40 cm, 2-3 cm thick, out of mobile and sticky dough, and for beginners, for their culinary experiments, it is better to practice molding pies with a diameter of 15 -20 cm. It is necessary to try so that the filling does not break through the dough, and for large pies on the first attempts, this is almost inevitable both during modeling and when transferring the blank to a baking sheet or baking dish.
But not only the size of the Ossetian pies has undergone adaptation to the home cuisine of cooks of other nationalities, but also other aspects. Dry active yeast began to be used, and the dough itself is often kneaded not by hand, but with the help of household appliances.
Ossetian cheeses are not sold everywhere, so they are remarkably replaced by Adyghe, homemade, feta cheese, and sometimes just cottage cheese and yellow cheeses of hard or semi-hard varieties.
In addition, simplified pie shaping is quite acceptable, the dough for one pie is divided into two parts, one will be the bottom of the pie, and the second will cover the top and the filling, all that remains is to blind the edges and pinch. This method is especially appropriate when the fillings are added in significant quantities.
Total cooking time - 1 hour 30 minutes
Active cooking time - 0 hours 20 minutes
Cost - Average Cost
Calorie content per 100 g - 250 kcal
Servings Per Container - 2 Servings
How to cook an Ossetian pie with ualibah cheese
Ingredients:
Flour - 1.5 tbsp. (200 ml) and more for adding a table
Milk - 0.5 tbsp. (200 ml)
Butter - 1 tablespoon in dough
Egg - 1 pc. small C3
Yeast - 1.5 tsp dry
Salt - 1 pinch (s) per dough
Sugar - 0.3 tsp
Adyghe cheese - 400 g
Kefir - 2 tablespoons for 1 serving of filling
Dill - optional
Salt to taste in the filling
Butter - 1 tablespoon to serve
Preparation:
To make yeast dough, heat the milk and place a lump of butter in it. Mix the egg with salt.

Sift flour, mix with sugar and dry yeast and add egg and milk mass.

At first glance, it may seem that the consistency of the dough is quite liquid - this is how it is and should be!

Lubricate your hands with vegetable oil so that the dough sticks to them less and, overcoming the desire to mix more and more flour, you can knead the sticky soft dough. And it's easier to entrust this matter to household appliances: a bread maker or a blender with a kneading function.

Place the rising dough in a warm, draft-free place, protected from drying out. If it was kneaded in a bread maker, then it is usually left there on the "yeast dough" mode, which lasts about 1.5 hours, but usually when using dry fast-rising yeast, one hour is enough.
If you have a multi-cooker with the "yogurt" mode or with the "multi-cook" function, which allows you to set the temperature of 30-40 degrees, then use. The bread maker will mix the dough itself once in the second half of the rise time, and in other cases, you will need to knead the dough yourself once and let it rise again.

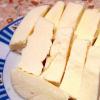
When the dough is almost ready, start filling, i.e. in this recipe - cheese. The cheese needs to be grated, more often this is done through a grater with large cells.
Simply grated cheese is a popular filling option. Find your bearings in the amount of salt. Please note that feta cheese, suluguni and chanakh are usually quite salty, while Adyghe is not.

Any greens to taste can be added to grated cheese: dill, parsley, etc. I took the dill.

Another option for the filling is adding eggs, milk or kefir to the grated cheese, after which the filling needs to be kneaded a little. I added kefir.

Let's start forming the pies. Divide the amount of dough obtained into two portions, i.e. for two pies. The dough is sticky, so the work surface of the table or board should be well sprinkled with flour.
Pull a portion of the dough by hand, and not with a rolling pin, into a round cake and place a portion of the filling on it.
Autumn does not make us happy with fine days. But why do we need a pouring rain when the house is warm, cozy and the smell of freshly baked Ossetian pie filled with soft cheese and fragrant herbs is heard.
A step-by-step recipe for an Ossetian pie with cheese and herbs
Ingredients
For the test:
- flour - 300 g;
- water - 100 ml;
- milk - 100 ml;
- dry yeast - 1 tsp;
- sugar - 1 tsp;
- butter - 30 g + a small piece for greasing the finished cake;
- salt to taste.
For filling:
- Adyghe cheese - 300 g;
- green onions - 1 large bunch;
- parsley - 1 medium bunch;
- ghee - 1.5 tbsp. l .;
- sour cream - 50 g;
- salt to taste.
Cooking time: 1 hour 50 minutes;
number of servings: 6-8;
cuisine: Caucasian.
Preparation
1. In any convenient bowl, mix 100 ml of water and 100 ml of milk. Add dry yeast and sugar (1 tsp each), mix. 
Many are more accustomed to putting the dough on fresh yeast. For this recipe, you need 10 g.
2. Add 300 g flour, mix well. 
3. Melt butter (30 g) in the microwave or in a water bath. 
4. Add to the dough and knead thoroughly. 
I usually knead by hand, so you feel the consistency and you won't be mistaken with the amount of flour, the dough is elastic and soft. But it is not forbidden to use a mixer if you want to save time.
5. If necessary, add flour. Then we roll the finished dough into a ball. Cover the bowl with cling film or a towel on top and put in a warm place for 1 hour. During this time, we will prepare the filling for the pie. 
6. Finely chop the green onion feathers and parsley with a knife. However, it is not necessary to be too small. Love bigger, please. 
7. Put the cheese (300 g) into a bowl and knead well with a fork. 
The original cheese recipe requires 200 g, but in my opinion, this was not enough, so I did not skimp and took all 300.
For the filling, you can take homemade feta cheese made from cow or goat milk. Add your favorite herbs to greens - cilantro, dill, a little basil. And in the summer season - take beet leaves. Well, a mixture of peppers will complement this juicy and appetizing mass.
8. Add chopped greens, 1.5 tbsp. l. ghee and 50 g sour cream. Mix everything well. 
9. Put the dough that has come up on the board or directly into the form in which we will bake the pie. Use our palms to knead it into a cake about 7-10 mm thick. Put all the filling on top. 
10. Wrap the edges of the dough to the middle. 
11. Combine them and begin to level, distributing the filling from the middle to the edges, pressing slightly to make the dough thinner and get a round flat cake. 
12. In the middle we make a small hole for steam to escape. 
13. Preheat the oven to 200 degrees and set the pie to bake for 15-20 minutes. 
14. Take out the finished pie and immediately grease with a piece of butter. It is better to serve it hot, as it tastes even better. Bon Appetit! 
She began to study recipes of Caucasian cuisine quite recently. And she was one of the first to try Ossetian pie, with us it is eaten by both cheeks. And there are plans to try many more other dishes. I will definitely share my recipes and impressions with you.
In the meantime, share in the comments which dishes of national cuisine you like to cook the most.