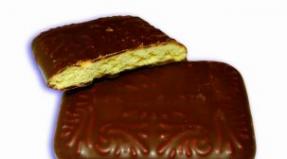
At what temperature to bake the biscuit in the oven. How to properly prepare a classic biscuit
Hello to all beauties! **
The fight against cellulite in our time has become just a mania.
Girls buy a huge amount of expensive and cheap creams from the hated bumps on the skin, but do not get the desired result.
I was that kind of girl too.
When I gained weight from 52 to 59 kilograms, then I decided to smear with creams in order to somehow improve the condition of my skin.
You can read more about my fight against excess weight and how I lost 7.5 kg in 2 months without diets.
Naturally, there was no result from the creams I used. After all fighting cellulite is a comprehensive strategy.
******
Therefore, as an experienced person in losing weight and fighting for a slim body, I can now tell you about an amazing budget tool that helps me in the fight against cellulite - about dry brush massage.
The effectiveness of anti-cellulite massage with a dry brush is as follows:
I would also like to dwell on the contraindications to the procedure.
It is forbidden to do massage:
**************************************
Well, now about my dry brush massage in more detail.
I have such a double-sided brush.

I love that I can massage the skin like bristles,

and these interesting things

I chose right away on a long handle- so it is more convenient to reach the lower thighs without bending over
Professional massage for cellulite in the salon will cost a pretty penny, therefore, we will use such a budgetary tool that has an excellent result
Brush price was 250r in Auchan. I bought it a couple of years ago.
This is my second brush. The first was on a short handle. Personally, I like the long brush better.
Anti-cellulite massage at home with a brush stimulates irritation of the nerve endings. As a result, the general condition of the body improves.
**********************************
I will describe several points that I have highlighted for myself and which you should pay attention to when choosing a brush and using it:
- The brush should be made of natural bristles
Do not buy brushes with synthetic bristles - they are not durable and will not work well.
Brushes are:
With synthetic bristles
Natural bristles (best of Australian cactus or horsehair)
It is better to buy a brush on a wooden handle and only with natural bristles. I have just such.

*******************************
2. Take a shower half an hour before the massage.
Personally, I like to shower with some kind of scrub.
I carefully prepare my skin for massage, so I scrub it so that dead particles are removed and the massage is more effective
*******************************
3. For massage, the skin must be dry.
Also, do not apply any creams or oils prior to massage.

******************************
4. Regular massage is the key to success.
We are all human and are often lazy to do massage.
I myself am.
But if you want to succeed and get the body of your dreams, then you need to be too lazy to win.
Having done a massage every evening for at least 5 days - you will already feel the improvement - CHECKED!
***********************************
5. Massage is always carried out from the BOTTOM UP!


Brush massage is done in the direction of lymph flow in our body, and it moves up to the heart.
From bottom to top and nothing else... If you massage in a circular motion, then also in the direction from bottom to top.
I want to note that in my review I am talking about the massage of the thighs and buttocks.
Massage of other parts of the body has its own characteristics:
Places with lymph nodes should be treated very carefully (groin, armpits)
Gently treat the neck and décolleté
In no case MASSAGE THE FACE! For facial massage, completely different brushes are used - specially designed for this area.
6. We massage thoroughly and carefully
Try to focus on efficiency rather than speed or maximum pressure.

You need to move at an average speed, pressing moderately, but at the same time do not damage the skin.

I saw on the Internet how girls rubbed themselves to such an extent that the skin looked like boiled cancer - this is fundamentally wrong!
The main thing here is regularity, not the maximum redness of the skin.
***********************************
7. How long should you massage?
I massage each leg for 5 minutes - that's enough.

To begin with, on the Internet, it is advised to start massage from 3 minutes. and gradually increase the time.
But what will not be written on the Internet, but I will tell you, so this is that in 5 minutes of massage of the thighs and buttocks with one hand - she gets so tired that it seems that I went to the gym.

Therefore, for me personally, 5 minutes is enough for me, and the one who can massage with one hand for 10 minutes is it's just a zombie pitching)))
8. Drink water immediately after the massage.
As soon as you have finished the massage - drink a glass of water... It will help remove toxins from the body.
It is allowed to drink green tea or water with lemon.
****************************************
9. Strange itching ...
After the massage, it may seem that the skin is itching or burning a little, DO NOT WERE - this is a normal reaction that will go away in 5-10 minutes.
But, if itching persists, then you overdo it with the pressure on the brush. The way out is to apply a soothing cream and do not touch the skin with loofahs and scrubs for several days.
***************************************
10. At the end of the massage, apply your favorite anti-cellulite cream.
At this stage, the skin is ready to accept the active ingredients of the cream, as the blood circulation has improved.
I just love this cream from Arabia. He is perfect for me

I have other remedies, but they are more warming.

After a warming massage with a brush, you want to cool your skin and Arabia cream does an excellent job with it.
A cellulite brush is a great way to tone problem areas. Correct massage anti-cellulite movements help get rid of the hated orange peel pretty quickly. If you perform a “ritual” with a brush at least a few times a week, as well as eat right and exercise, you will definitely put your body in order! Read more about the brush massage technique - read further on!
Anti-cellulite massage is one of the most common cosmetic procedures in beauty salons. It is not cheap, given that it is necessary to complete the full course. And the use of special creams, massage oils, increase the cost of the service.
A cellulite brush is an equally effective way to get rid of figure flaws.
What are the benefits of using an anti-cellulite massage brush?
- the effectiveness of the procedure;
- ease of use;
- low cost of anti-cellulite "program".
Each of us can use a brush for getting rid of it at home. The effect will be no worse than after visiting a beauty salon.
The benefits of a massage brush
A brush massage helps:
- smooth the skin;
- activate metabolic processes;
- remove toxins;
- restore skin tone;
- model a figure;
- start regeneration processes;
- muscle tension;
- saturate the tissues with oxygen.
In addition, massage with a brush is a good way to further the appearance of cellulite.

How to choose an anti-cellulite brush?
1. Stiffness of the massage brush. The harder the brush, the faster and better it will do its job. A soft brush will warm up your skin for longer, and therefore less rubbing effect. If the anti-cellulite brush you bought is very hard, steam it in boiling water (if the material of manufacture allows it) before use.
Rest assured that after a few sessions of brushing you will get used to the hardness of the brush.
2. The material of the anti-cellulite massage brush. Pay attention to natural materials: wood, pile.
Massage brushes are also available:
- different shapes (round, oval);
- with or without a handle, with a holder for the palm;
- with a work surface on one or both sides.
Choose one that is comfortable to hold in your hand. I prefer brushes with a long wooden handle and natural bristles on one side and wooden bumps on the other.
Remember: the massage brush should not injure or scratch the skin!

Anti-cellulite brush massage technique
1. Before you start massaging cellulite-affected areas, prepare your skin. Take a hot bath. Use a scrub. It gives a good anti-cellulite effect, which you can do yourself.
2. Then you need to wipe the body dry. I recommend doing this with a rubbing motion to redden the skin. This is a good sign that blood circulation is improving.
3. The cellulite brush is applied to a dry body.
We begin movements from the bottom up: from the feet to the knees, from the ankles up, from the wrist to the elbows, from the elbows to the shoulders. Circular movements are applied on the thighs, buttocks and abdomen. The back should be rubbed with long movements from the lower back up. We work on the waist from the hip to the chest.
Remember: no back and forth movements!
4. After using the massage brush, shower and apply a cream (moisturizing, nourishing or anti-cellulite) to the body.
The duration of the procedure is 10-20 minutes, with a gradual increase. Do not overdo it the first time. Then you yourself will feel with what force and intensity you need to massage with a brush.
Contraindications to anti-cellulite dry massage with a brush are inflammatory processes on the skin, dermatitis, and rashes.
The effect of such a massage will be visible only if you also eat right, lead an active lifestyle, drink enough water, avoid stress, and get enough sleep.

I wish you health and beauty!
In case you haven't noticed, some healthy habits come with significant costs - whether money, time, or other resources.
Load the refrigerator with healthy food and a hole will be drawn in the budget. An active lifestyle can cost you several hundred dollars for an annual gym membership - not to mention the time spent exercising.
Even relieving stress through yoga can eat up 30-45 minutes at a time.
Do not misunderstand me. The benefits of these activities outweigh the costs of them, but when time is tight, it can be difficult to find enough hours a day to cram another healthy habit into your already busy schedule.
What if I told you that for less than $ 20 - and in as little as 10 minutes a day - there is a way to look and feel better and improve your health in addition?
Rubbing with a brush can dramatically improve skin health.
And since the skin is the largest organ in the body, responsible for the lion's share of our detoxification needs, maintaining its health means maintaining overall health. Brushing is not a substitute for a good diet and regular exercise, but it is a wonderful addition to your healthy lifestyle.
Best of all, dry cleaning is easy and effective.
If you wake up in the morning just 10 minutes earlier, you can have time to do a dry massage. Yes, yes, this practice does not require you to devote long hours to yourself and will not be devastating to the wallet, while remaining useful.
So why not give it a try?
Let's take a look at the reasons why everyone should start brushing to promote health. You will be surprised what effect this simple technique has on you.

1. Improves blood circulation
By rubbing the skin with a brush, you increase circulation and improve blood flow, so that skin cells are renewed faster.
Poor blood circulation can cause pigmentation, blemishes, and slow healing from cuts.
Regular exposure to bristles, on the other hand, can give the skin a more uniform color, improve smoothness and even soften the appearance of signs of cellulite.
Good blood circulation also helps maintain overall health by providing abundant access to oxygen-rich blood. And this is what dry brush massage is useful for for all organs, from head to toe.
For best results and even more circulation, make sure you rub in the direction of the heart and not away from it.
2. It's nice
Many people start rubbing because of its health benefits, but end up continuing simply because it feels good.
In addition to making your skin brighter, firmer and brighter, dry brushing your body is a great way to wake up and invigorate yourself in the morning.
And when you get into the habit, you will find that the feeling of smooth, firm skin tone you too.
3. Promotes skin exfoliation
Another benefit of dry brushing is that it helps to exfoliate the skin and get rid of dead cells, which allows the skin to absorb more liquid and stay hydrated.
The massage movements also help the skin renewal process. As the dead and non-viable cells are removed, it becomes possible for new ones to form. It also prevents the skin from clogging up and keeps the pores clean.
This means that the skin will look more vibrant and vibrant. Exfoliation also evens out uneven skin texture. why it becomes smoother and softer.
Bonus: Regular exfoliation can prevent the formation of wrinkles and folds while maintaining a youthful appearance.
4. It can improve digestion
That's right, one more surprising aspect on top of the rest of the list: brushing can aid digestion.
When you massage with a brush, you remove dead skin cells and unclog blocked pores. This allows the skin to breathe better and also stimulates its ability to effectively eliminate toxins.
The health of our skin, the largest organ in the body, has a significant impact on the health of the entire body. This is the first line of defense against bacteria trying to invade it.
yam access to the body at the very beginning, this will prevent the digestive system from doing this in the later stages.
5. It relieves stress

Many people find brushing almost therapeutic and meditative. In addition to relaxing and softening the muscles, it can also relieve stress.
To make rubbing a calming measure for you as well, set aside a specific time each day when you can create a quiet atmosphere, clear your mind of distractions, and focus on using the bristly massager as something you do just for yourself.
Maybe it will be an invigorating start to a new morning for you, or a calm time to wait for as a way to unwind after a long day. Either way, this personal pastime will help you calm your worries.
6. It increases muscle tone
Rubbing with a brush (its naturalness is very important) is useful not only for blood circulation and digestion, but also for maintaining muscle tone.
The process activates the nervous system, which helps to improve muscle tone by stimulating muscle fibers. It also improves circulation by allowing oxygen-rich blood to be delivered to the muscles, which promotes recovery and tone.
Through this mechanism, brushing can make skin firmer, which is important if you have recently lost weight and are looking for a way to naturally eliminate sagging.
7. It helps to detoxify the body
The lymphatic system runs throughout the body and helps to flush out toxins and waste in the blood, essentially working as your personal cleaning team. This system collects waste from tissues and organs and removes it from the body through the circulatory system.
A healthy lymphatic system is essential for maintaining overall health. If its functioning malfunctions, toxins slowly accumulate, which ultimately leads to infection and disease.
Brushing stimulates the lymphatic system and helps to activate lymphatic drainage. It helps flush out toxins and strengthens our immune system, preventing inflammation and promoting overall health - as evidenced by user reviews.
8. It improves kidney function
The skin and kidneys are closely related in several key ways. Both organs are responsible for detoxifying the body by removing toxins from it.
In the case of the skin, this means sweating through the pores. The kidneys filter the blood and remove waste products.
Brushing is a treatment that improves skin health by removing dead skin cells and unclogging pores so that the skin can properly flush out toxins.
Retention and elimination of toxins early on helps relieve the burden on the kidneys so they don't have to work so hard afterwards, which allows them to function better.
9. It reduces cellulite
One of the biggest skin problems that both men and women face is cellulite.
Cellulite looks like bumps and pits in the skin, usually on the thighs, buttocks, flanks, or abdomen.
Sometimes the fight against cellulite resembles Sisyphean labor. Sometimes, when you have a patch of cellulite that stubbornly refuses to fade away, it seems like it doesn't matter how many salads you eat or how many hours you spend in the gym.
Rubbing such an area with a brush, if done correctly, can reduce its severity when it seems that other anti-cellulite methods are hopeless.
It does this by increasing blood circulation and stimulating the lymphatic system, which can help improve skin texture. Rubbing does not permanently eliminate cellulite, however, so you need to keep working on your skin to maintain the change.

The right brush for dry massage
As you can see, brushing is beneficial to the entire body, all for less than $ 20.
My favorite Wishmore brushes. They look very stylish, they are of excellent quality and the best price compared to competitors, I recommend choosing the Wishmore Cactus long-handled natural bristle brush so that you can easily reach any part of the body.
Are you ready to try it?
How to massage with a dry brush for cellulite
- Take off your clothes and stand in the shower or on the tiles. This will make it easier to clean the floor later.
- Using long, fan-shaped strokes, start rubbing with your feet and work your way up. Make sure to rub the same area at least several times and, as a general rule, always rub towards the heart to promote blood circulation and natural lymph flow.
- In more sensitive areas, do not rub too hard. Over time, with regular rubbing, the skin will become less sensitive. The total rubbing time should be between 5 and 10 minutes.
- After you've rubbed your entire body, it's time to take a shower. Change hot and cold water to disperse the blood and promote its circulation.
- After you shower, be sure to moisturize your skin. Coconut oil is great for this, it cleanses and softens skin that becomes especially dry after rubbing.
- To keep your procedures hygienic, wash your brush with soap and water every week. After that, it must be dried immediately so that it does not ooze or become moldy.
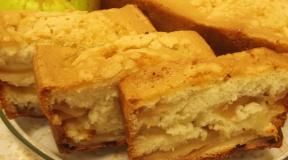
Who among us does not like delicious cakes and pastries, with which it is so pleasant and effective to seize any stress and troubles! And what hostess would not like to bake a miracle of culinary art on especially significant family celebrations - a crumbly and light homemade cake. Trying to make a lush sponge cake at home, many women were faced with the fact that it is not always of excellent quality. What is the reason that instead of a light and airy crust, you get a flat and dense pancake? How to bake a biscuit properly? More on this later. And the thing is that there are rules for baking biscuits, knowing which, baking a high-quality cake is not so difficult.
What does a hostess need?
Baking a porous and weightless cake requires a lot of experience and dexterity, which are gained through regular practice. Over time, you can learn to feel the dough, but many factors play a role in baking a biscuit - the freshness of the food, the order in which they are mixed, the amount of ingredients, the size of the baking dish, as well as the baking temperature and time in the oven.
Undoubtedly, the products for the dough must be of high quality and fresh, and the dishes and the beater must be perfectly clean and wiped dry. prepared in advance - the bottom and walls are covered with special baking paper to avoid sticking of the finished cake, or greased abundantly with butter, you can thoroughly grind them with flour. If the technology for baking the biscuit is done correctly, then the cake will come out very appetizing and aesthetic in appearance.
Mixing order
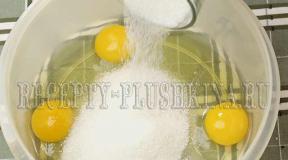
According to the order in which the products are mixed, the following scheme should be followed:
- eggs, be sure to at room temperature, beat thoroughly until a strong foam appears;
- add granulated sugar, beat again;
- Pour wheat flour last, which should be mixed with starch and sifted through a sieve - to add fluffiness.
Cooking features
It is best to beat eggs with a mixer - this is faster, and the mixture turns out to be of better quality, but you can work with an ordinary whisk, however, you will have to beat it for a very long time, until the mass becomes three times larger and in density and color does not resemble cream. When adding sugar mixed with vanilla, it should be added in small portions so that the grains are completely dissolved in the mixture, and beat for 10 minutes. The flour is introduced gradually at the minimum mixer speed. The dough should be kneaded for no more than 15-20 seconds, otherwise the biscuit will turn out to be too dense and heavy.
Pastry chefs simply stir the flour with their hands and do it for no more than two minutes, but housewives can decide on this only when they already have a wealth of experience and practice, since inept actions with the dough will lead to the loss of airiness and lightness in the confection. You can add zest to the dough for taste, but after the flour is completely mixed. When the dough is ready, it must be immediately sent to the oven, since it cannot stand after beating. Carefully pouring the mass into the mold, it should be carefully, without shaking and loud noises, transferred to the oven and continue to observe silence, since from any sharp knock or cotton the dough can instantly settle and no splendor, and airiness will no longer work.
Baking temperature and time
Since the temperature and baking time of the biscuit are very important, this point needs to be taken seriously. At the time of planting the dough in the oven, its temperature should be 180 degrees. At this temperature, the cake is baked for 30 minutes, during which it is not recommended even to approach the oven, let alone open it or look in there. After baking for half an hour, the temperature is lowered to 160 degrees and baking is continued.

The fact that the baking temperature of the biscuit in the oven plays an important role in the process of baking a high-quality crust is illustrated by the fact that the dough during baking can puff up and become a "hump". This trouble happens when the oven heats up unevenly. In order to avoid this next time, you need to place an additional baking sheet on the upper level. If the bottom of the cake burns in the lower part of the oven, put water in a heat-resistant container. After the biscuit is completely baked, it must be kept in the oven for another 10-15 minutes, then remove and carefully release the mold.
The biscuit is cut with a special string, so the cakes come out even and neat. To bake a biscuit, you will need chicken eggs - 10 pieces, sarah sand and flour - 250 grams each, vanilla sugar - 2 teaspoons, starch - 1 tablespoon.
What is the required temperature and baking time of the biscuit?
Ensuring correct biscuit dough when baking is one of the most important conditions for a successful result. Without this, a good cake will never come out. But the degrees of baking biscuit in different devices may differ, as well as the cooking time. At the present time, housewives have a wide choice on which heating appliance to cook food and where to bake a biscuit. Only their features should be taken into account: the baking time of the biscuit in the oven, multicooker, bread maker is set depending on the technical characteristics of the device. It is possible that in the first case, the preparation process of the product will take longer.
Baking a biscuit in a gas oven
The optimum temperature for baking a biscuit in a gas oven is in the range of 175-185 degrees Celsius. It was determined on the basis of physical processes that occur during thermal exposure to the dough. The dough becomes airy thanks to air bubbles that have entered the dough mass together with protein foam and sifted flour enriched with oxygen. These bubbles expand significantly during the baking of the biscuit and make the mass fluffy and plump. But if at the same time the temperature inside the oven is below 175 degrees, the expansion of the bubbles will not reach the required level in volume, and at 185 degrees a hard crust will already begin to form on the surface, although the inside of the cake remains insufficiently baked. In addition, the thickness of the cake itself is of no small importance.
When baking the base for the roll, the hostess should set the baking temperature of the biscuit to 200 degrees at once. The process will take, as expected by technology, 30-35 minutes. One of the main disadvantages of gas-heated ovens is that the bottom heats up too much in them, and to adjust the temperature, you have to line the lower part of the chamber with thick foil or use a special baking stone to reduce the heating level. And the form itself is installed on the middle shelf of the chamber, because the top is no less hot than the bottom.
Baking in an electric oven

If the hostess has an electric oven in use, then the baking temperature of the biscuit in the electric oven can remain identical to that set for the gas oven. That is, we mean 175-185 degrees. But ovens with electric heating are equipped with a convection function, which contributes to an even distribution of temperature throughout the oven space, which ensures good baking of the dough. It should be understood that when using convection, which provides good airflow to the oven, the baking temperature of the biscuit increases significantly. Therefore, if this mode is enabled, then the oven should only be heated to 160 degrees.
Baking a sponge cake in a slow cooker
To cook a pie in a multicooker, it is enough to mix all the ingredients and load them into a special compartment, then turn on the baking mode. As a rule, baking a biscuit in a multicooker takes place at a temperature of 160 degrees, and about one hour is allotted for this if the bowl is quite large in the device, or 80 minutes if it is small. When the cake is ready, the multicooker will give a signal, but you do not need to turn it off for now - let it still be in the heating holding mode for 10 minutes. The cake in a multicooker comes out lush and tall, besides, its top remains white. If desired, you can brown it by turning it over and sending it to the oven for another 10 minutes. After that, the ruddy fluffy biscuit is ready for cutting.
Baking a biscuit in the microwave

Microwaves are also suitable for baking cakes. Only they must be round, otherwise the corners of the cake will dry out. To use the microwave for this purpose, you need to decide how many degrees it should provide for baking a biscuit. True, this device does not take into account the degrees as such, but the power of the device itself. So, with a power of 700 W, the baking time will be 6 minutes and 25 seconds, and with 850 W - 5 minutes and 20 seconds. Every 50 watts of power boost reduces the biscuit time by 20 seconds. When the biscuit is ripe, it can be removed after 5-7 minutes. In this case, the cake will be completely white.
Baking biscuits in a double boiler and in a water bath
The steamer can also be used to make this cake. In this case, the baking temperature of the biscuit, taking into account the convection function, is 120 degrees. And if necessary, you can cook a decent sponge cake in a water bath - at a temperature of 100 degrees. The container with the dough is placed in a large saucepan with boiling water for 40 minutes, tightly covered with a lid. In this case, the cake comes out very tender and incredibly airy, but this method is not very convenient, therefore it is rarely used.
What to do to prevent the biscuit from settling?
Many housewives had to observe how baking a biscuit in the oven leads to a very deplorable result - the cake settles and becomes dense and flattened. Why does such a nuisance happen to him? Let's consider the reasons for this unpleasant phenomenon.
Baking a biscuit is a very delicate business that requires a special approach and some practical skill. But even with strict adherence to the baking parameters, the finished cake suddenly loses its bulk and porosity and turns into a flat pancake. What factors affect the height and splendor of the product? Consider mistakes when baking a biscuit cake.
One of the most common mistakes is not whipped proteins well enough. Their airiness is achieved thanks to air molecules trapped in the dough. They keep its curvy shape after cooking. Poorly whipped proteins do not allow the dough to rise enough when heated, so after cooling it will quickly settle, as air will leave it. But proteins that are too broken are also undesirable, in which case the sugar will have an astringent effect on the dough, and it will look like rubber.
Another reason for cake sagging is improperly mixed foods. The dough for making biscuits is very delicate, which is why it is mixed in a certain order, carefully and accurately, otherwise airiness cannot be achieved.
In some recipes, it is advised to grease a bowl with lemon or add a pinch of citric acid directly to the protein mass for better whipping of the proteins. It is better not to do this, otherwise all your work will be lost, because the protein, coming into contact with acid, can simply curl up.

Another common mistake that many housewives make is long pauses in the dough preparation process. Starting to make the dough for a biscuit, all products should be prepared in advance and distributed in the order of preparation. Having started the process, do not be distracted by anything, perform operations in strict order and do not interrupt it for more than 15-20 minutes. Otherwise, you run the risk of getting a very bad creation.
The reason for the failure may be hiding in the quality of flour, which does not contain enough gluten. And this is not a mistake of the hostess, but the fault of the manufacturer of the product. Visually, the gluten level cannot be determined, so first you need to check it on other types of baked goods. After making sure that the dough does not float, you can use this flour to make a biscuit.
It is possible that the wrong mode has been selected, when the temperature and baking time of the sponge cake are not correct. Proteins stick together from too high temperatures. Since the air in them evaporates very quickly. For this reason, the temperature set in the oven should not be higher than 180 degrees.
Well, the last reason is peeping at the biscuit cake while it is in the oven. But opening the oven door ahead of time leads to a sharp temperature drop, and this will negatively affect the splendor of the cake.
Secrets of baking a fluffy biscuit

Having studied the possible mistakes, you can move on to various culinary secrets and little tricks used by professional pastry chefs. Here are some of them:
- The baking dish must be prepared in several stages - grease the bottom with softened butter, cover it with special baking paper, grease it on top again, define the baking dish in the refrigerator for 20 minutes, then pour the dough into it.
- To achieve good splendor, flour is mixed with starch - 15 g of starch for 1 cup of flour.
- Sift flour with starch before adding them to egg yolks.
- Cool the whites carefully separated from the yolks for 10 minutes in the refrigerator and beat vigorously in a dry and clean bowl.
- Add sugar gradually, a teaspoon at a time, and beat together.
- Whipped whites with sugar, add 2-4 tablespoons to the mixture of yolks with flour and starch, mix gently from top to bottom.
- Bake the pie for 15 minutes in the oven at 180 degrees, then lower it to 150 degrees.
- Do not touch the oven door for 20-30 minutes from the start of baking.
- Do not check the readiness of the biscuit by piercing it with wooden toothpicks, for this it is enough to press on the top of the cake with a silicone spatula - if it is springy, then it is ready.
- Put the finished cake in a mold on a wet towel for 3-4 minutes.
The perfect biscuit can be made at home. Here are some recipes that will help you diversify your assortment of baked biscuits.
Classic biscuit
Products required: eggs - 4 pcs., Premium flour - 140 g, sugar - 200 g, vanilla.
Preparation:
- Separate the protein and refrigerate.
- Heat the yolk to ambient temperature.
- Sift flour with vanilla.
- Beat the yolks with sugar until it is completely dissolved.
- Beat the cooled egg whites with a cold whisk.
- Add flour and vanilla to the yolk-sugar mixture.
- Carefully introduce the protein foam, the operation is carried out manually using a wooden spoon or a silicone spatula.
- Put the resulting mass (as thick as sour cream) into the form and send to the oven.
Fast biscuit

For cooking you will need: eggs - 4 pcs., Sugar and flour - 150 g each, baking powder - 1 tsp.
Preparation:
- Break the eggs, mix them with sugar and place in a very low heat water bath.
- Beat the heated mass with a whisk until completely homogeneous and remove from the water bath.
- Beat with a mixer on high speed for 8-10 minutes.
- Add flour and baking powder, stirring from top to bottom.
- Put in a mold and bake.
Light biscuit that everyone can get
Products for cooking: butter - 300 g, sugar - 350 g, eggs - 6 pcs., Flour - 300 g, starch - 100 g, milk - 100 ml, baking powder - 15 g, salt - a pinch.
Preparation:
- Mix butter with salt and sugar, beat until fluffy.
- Drive in eggs one at a time, stirring constantly.
- Mixed with starch flour, as well as baking powder, add to the butter-egg mass, alternating with milk.
- Pour into a greased and lined dish with paper and bake.
A celebration is coming, a three-tiered cream giant looms in the plans and you want to conquer all guests with the talent of an excellent pastry chef? Then especially you need to know why the biscuit is not baked or falls off after baking, as well as at what temperature it is baked and how long. You can get all the necessary information regarding the insidiousness of the biscuit from this post, and using it, you will be successful.
All women are impossible sweet tooth. Craving for confectionery sometimes cannot be overcome even by such pesky extra pounds. And in a fit of true love, many housewives try to conjure some delicious trifle for tea in the kitchen.
Three-story cakes, rolls stuffed with creams, the most delicate cupcakes, in general, something based on it, this incredibly tasty, but no less capricious, biscuit, can act as a "trifle".

However, this "Olympus" is not so easy to conquer, and often the ardor of the culinary experts fades away at the sight of a failed masterpiece. So much work, and all down the drain. It is not surprising that the activity of a pastry chef, started so spontaneously, is supported by a host of pressing questions: "Why is the biscuit raw inside, how many minutes does it need to be baked, at what temperature, or why does it settle?" and others, others ...
However, it is worth dealing with everything in order.
Question # 1: Why is starch added to the biscuit?
Often in recipe descriptions, you can notice that starchy powder is added to the dough along with the main components. In this regard, a reasonable question arises, why is there starch in the biscuit?
Probably, one should start with the fact that, depending on the plant from which it is extracted, this component is presented in a fairly extensive assortment, namely, corn, soybean, cassava, rice and other types of starches are used in cooking. In confectionery, they often resort to potato and wheat.

The starch in the biscuit is designed to eliminate excess moisture, which allows the product to be airy and tender. If, when kneading the dough, 30% of the flour is replaced with wheat starch, then you will notice that the volume of the cakes increases during baking, their structure turns out to be lighter and more grainy, and the cake or roll comes out incredibly soft.
However, it is worth remembering that if you use potato powder, then it should be dissolved in dairy or fermented milk products, and also pay special attention to vanilla or any other flavoring agent, since potato starch helps to suppress the taste of the finished product.
Question # 2: How to make a fluffy sponge cake?
You've probably noticed more than once that store cakes are the owners of such thick cakes that willy-nilly you feel a prick of envy and try to find out how to achieve this in your homemade baked goods? It should be noted that this is not one or two rules, but a whole set of measures aimed at achieving an excellent result.

Question # 3: Why does the biscuit fall off or not rise at all?
Many hostesses had to deal with such a problem that when baking the biscuit does not rise, and if it does rise, then it must fall afterwards. And it becomes so offensive, because we are trying to comply with all the subtleties and rules, but apparently we are missing something. And this is exactly so, there are several reasons for this "piggy" behavior of the cakes.

- The temperature regime is extremely important for baking such a confection, therefore even the slightest violation of this rule entails negative consequences. An old oven can allow air to pass through, thereby disrupting the temperature, this can also include the regular opening of the oven door in the midst of the process. In addition, a malfunction of the oven can lead to uneven heat distribution and the cake threatens to turn out to be lopsided. And this is just one of the factors why the biscuit settles after baking.
- Violation of the cooking technique can also have a deplorable effect on the quality of the pastry chef. Perhaps, during the kneading process, the proportions were not observed, or the products were excessively chilled, the whites were poorly whipped, a bad baking powder was used, and so on.
- Inaccurate handling of the dough is another reason why the biscuit shrinks. For example, if you hit or shake a form with a mass poured into it, then, alas and oh, you shouldn't even dream of a lush cake. Also, do not knock on the bottom of the baking sheet when removing the biscuit, because it is so tender.
- The early extraction of baked goods, as a rule, makes a kind of a bowl out of a beautiful even biscuit. Make sure that the dough is baked evenly.
- After preparing the dough, you have absolutely no time to chat with your girlfriend or take a break from the kit-kat, you need to immediately put everything in the form and go ahead with songs in the hot oven.
For the hostess of the multicooker
Owners of multicooker, for example, often boast of huge biscuits, but among them there are "losers" who get a flat pancake instead of a plump sweet roll.

The rules for this unit are, in principle, similar to a conventional oven: set the correct temperature and time regime, do not open the lid during the baking process, but here is one rather tricky point. Some are trying to create an incredibly tall monster, such that when raised, it closes the valve of the multicooker and spoils all circulation of warm air.
Well, ladies, dear, do not be lazy, well, better make two mediocre and successful cakes, then happiness will smile at you.
Question # 4: Why is the sponge cake not baked in the middle and how to check if it is cooked?
Many newly-minted "pastry chefs" are wondering how to determine if the baked goods are ready, whether they are baked? There are a couple of ways to find out.
You can check the readiness of the cake by piercing it in the center with a wooden stick. If after removing our "dosimeter" from the baking at the end it is dry, then hurray, comrades, the biscuit was a success, because otherwise the piece of wood will be sticky, with the remnants of dough.

Another factor signaling the readiness of the biscuit is its appearance, if you find that the baked goods have shrunk somewhat in the form, that is, they have moved away from the walls, then this can be regarded as the readiness of the product.
However, such breakdowns often happen that the outside of the cake looks amazing, but inside it is soft, floundering and clearly unprepared. So what if the biscuit is not baked?
Initially, you need to determine what exactly happened such nonsense.
Large dose of sugar
Often, a semi-baked cake can be the result of a technology error in kneading the dough. If, hoping to make the future cake even sweeter, a naive housewife put 2 times more sugar in it, then you should not expect a perfect biscuit. The same applies to flour, put less is bad, put more - the same. It is worth remembering once and for all, jokes with a biscuit are bad and neglect of proportions is a sure "death" for the future confectionery.
Temperature regime
The second and most common mistake is the broken biscuit baking mode, that is, the temperature and time were not chosen correctly. Or you have overheated the oven so that the dough is simply baked too quickly around the edges without reaching the center. Or, on the contrary, the degrees in the oven are not enough and the time that you measured for baking is simply not enough.
How to finish a biscuit
But how to save such a “miracle-yudo” and bake it to full readiness? First, check the temperature in the stove, if it's high, lower it, if it's low, add it. Secondly, so that the biscuit, which is already fried enough on top, does not burn, it should be covered with foil and left in the oven to bake, periodically poking with a stick to check. That, in principle, is all science.
Question No. 5: How long does it take to bake a biscuit?
Many recipes for biscuit confectionery prescribe a baking time on average of 30-40 minutes, but this does not mean that any cakes are baked that much.
Of course, its taste parameters and quality characteristics depend on how much the biscuit is prepared. After all, if you overexpose the product in the oven, it will become dry, dense and tasteless, and if, on the contrary, underexpose, then there is a risk of getting a sticky and dull mass, instead of a tasty and tender crumpet.
Naturally, the baking time also depends on the exposure temperature, as well as on what kind of cake you need, whether it is for a cake or for a roll, that is, the thickness of the dough is of primary importance.
- For a roll, the time regime varies within 10-15 minutes.
- For cakes, from 25 minutes to 1 hour.
Question No. 6: At what temperature does the biscuit oven?
Cooking a biscuit is certainly a tricky business, in which every nuance can be reflected in the appearance and taste of the product. Therefore, you need to take into account everything, even the choice of temperature for a certain type of dough.
- For butter biscuits, the baking temperature should not exceed 180 ° C.
- The simplest crust should be baked in a well-preheated oven at 200-220 o C.
Put the form with the dough in the oven only after making sure that it has warmed up enough, otherwise you will have to re-read question number 3.

In addition, after the end of cooking, you cannot leave the product in the oven so that it does not dry out. This rule does not apply to multicooker. When working with this device, on the contrary, after the end of baking, the cake should be left inside for 10 minutes, so you can avoid the rapid fall of the biscuit.
Question No. 7: Why does the biscuit crack and slide up?
And what nasty things the biscuit does not come up with to make the hostesses nervous. It does not rise, and falls, and is not baked, but besides, it does absolutely terrible things - it swells up like a slide, bursts and pretends to be a volcano, spewing out a liquid dough from itself.

Heat
What could be the reason for such a character trait of this whimsical baking? Heat! This is the main point. If you heated the oven to hellish flame, then the biscuit will behave inadequately, the top will bake quickly, and inside the dough will simply boil and under pressure will raise a mound, and in more advanced cases it will burst and flow out.
Girls, dear, remember, how long and at what temperature you will bake a biscuit depends on the outcome of the entire culinary event.
Overdose of flour
However, baking can crack not only for this reason. It is especially noticeable on cupcakes that cracks appear on top of the finished product. Everything is explained by the banal excess of the proportions of flour in the recipe, or when baking you simply overdried the biscuit.
Question # 8: Why is the biscuit rubbery?
One of the most popular mistakes in making biscuits is eggs, or rather incorrectly beating them. Firstly, the eggs should be very carefully divided into whites and yolks and beaten separately with sugar, and the dosage of sand should not be changed, but followed strictly according to the recipe. Yes, yes, biscuit is a capricious thing. If the beaten egg foam is not firm enough, the crust will end up "rubbery".
You should also mix all the ingredients as gently as possible so that this foam does not precipitate.
Question # 9: Why does the biscuit smell like eggs?
And so he succeeded, chic, lush and airy. But what is this ?! The smell of eggs spoils all the hard work done. The biscuit recipe contains a large number of eggs, for some this smell in the finished product is not perceptible, but some especially sensitive individuals simply cannot bite off a tiny piece. In addition, eggs from domestic chickens make the smell even more expressive than store goods. In addition, those biscuits that contain baking soda also smell like an egg.

What to do in such a situation? If soda can still be replaced with a more innocuous baking powder, then giving up eggs is not an option at all. Then there is only one solution, masking the smell. For this, vanillin or various artificial food flavors are added to the dough.
Another way to overcome the unpleasant aroma is to impregnate the cakes with syrup or confectionery cognac, which will also give the cake or roll a peculiar rich taste.
Question number 10:
The originality of the baking design makes it even more attractive for those with a sweet tooth. Making a dark or striped cake is not such a difficult task, just add cocoa powder to half of the cakes (mix it with flour while kneading the dough).

You can also often see orange, pink and other rainbow biscuits, the coloring of which is achieved using food colors added to the dough. Such products are incredibly colorful, interesting and children like them. However, are you ready to stuff a tasty treat with chemistry for the sake of momentary beauty?
Question number 11:
Biscuit, in comparison with many other flour products, has a rather modest calorie content.
- The "enemy" biscuit in the classic recipe, which uses sugar, eggs and flour, has 258 kcal per 100 g.
- Butter biscuit has an energy value close to 300 kcal per 100g.
- If you add cream, jam and other grease, with which it is so abundantly customary to coat confectionery, then you can safely, without giving a damn about all the diets, grump the cake without a twinge of conscience. And why is there, if 0.1 kg contains more than 400 kcal, then what difference does it make how much to eat, you still won’t get any thinner.

Having measured how much time it takes to bake a biscuit and the amount of nerves spent on it, you can think about whether it is worth bothering with it at all. However, having mastered the skills of cooking this seemingly simple, but terribly moody confection, you certainly will not experience problems with others.
Read also ...
- Recipes for making coffee with ice cream at home
- Strawberry panna cotta - a classic of world culinary What is panna cotta with strawberries
- Cream of curd cheese for cake - the best recipes for impregnating and decorating dessert
- Profiterole recipe and three original custard recipes Protein cream for profiteroles