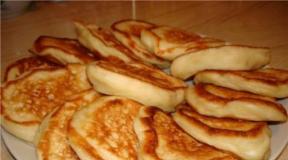
Salt dough snowflake for children. Souvenir "Snowflake from salt dough with your own hands"
Blinyaeva Tatiana Nikolaevna
Joint creative
activity is an interesting and exciting pastime.
We invite you to make a craft with your whole family to decorate your home. And you can do it So:
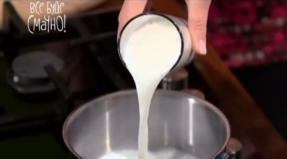
For creating snowflakes a cardboard template is required - Snowflake, gouache, brush, salty dough(you can cook So: hot water 1 / 2st. and dissolve 1/2 tbsp in it. salt, when the water cools down add 1 tbsp. knead flour dough and put in the refrigerator for an hour wrapped in a plastic bag). So that salt crystals do not come across in the finished product, and the surface is smooth, salt for cooking test should be finely ground and before kneading test it should be ground in a coffee grinder
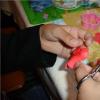
Roll a piece dough in a ball, then we make a cake from a ball and roll it into a layer of about 5 mm. And by applying a template, we cut out the contour snowflakes... Salted blank test transfer to foil.


With the help of a brush and water, you need to smooth out the edges and even out the contours. Make holes with the other end of the brush.


Now let's liven it up with decor that will make it even more interesting and funny.

Dough bake in the oven for 15-20 minutes at a temperature of 140 degrees, thereby drying dough.
Now it remains to paint everything. We will work with gouache - premium 12 colors. Spray technique, after which we draw details with a thin brush)


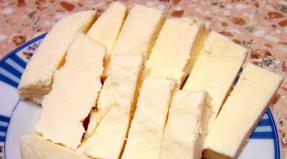
Our the snowflake is ready.


What is the New Year's interior in the house, school or kindergarten without snowflakes? Snowflakes can be made from paper, from pasta, from fabric, from beads and other materials. We suggest you make snowflakes from salt dough.
Salted dough snowflakes. Step-by-step instructions with a photo

Materials (edit)
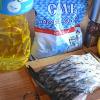
200 g flour
200 g fine salt
Round rhinestones in white
Flat faceted crystals in the form of a drop
Light blue gouache
Super glue
Aluminium foil
Work sequence
Pour flour and salt into a bowl, stir, add 3/4 cup water and stir thoroughly. When the salted dough becomes elastic, divide it into lumps, roll them up with flagella and make the base of the snowflake. Bend short flagella with a corner. Make small circles from the remains of the dough.

On the base of the snowflake, stick bent flagella like crossbars between the rays, and at the ends of the rays and in the center there are circles. Put the snowflake on the foil and ask the adults to bake your product in the oven: first, on foil at a temperature of 100 ° C for about half an hour, then remove the foil, leaving the snowflake on the wire rack, and increase the temperature to 125 °. Let the snowflake remain in the oven for another half hour.
When the snowflake has cooled down after the oven, paint it with light blue gouache and let it dry. Use super glue to fix rhinestones and crystals in the form of drops on the snowflake.
Today we invite you to find out the manufacturing technology do it yourself salt dough snowflakes.
Materials and tools for manufacturing:
- salty dough
- plaque and rolling pin
- 2 square cutters of different sizes
- breadboard knife
- embossed button
- paints (watercolor, gouache or acrylic)
Salted dough snowflakes - master class
Roll out the dough into a 3mm thick layer.

Use a square boat to mark the test.


Then we place the cutter so that its corners become perpendicular to the edges of the intended square.


After that, using a mock knife, cut out our snowflake along the contour.

In order for our snowflake not to be boring, it needs to be given some kind of relief. You can do this with anything. Find an embossed button like mine, a knitted napkin or lace, print from an embossed notebook, etc. Everything here is limited solely by your imagination.


After we have given the texture to the snowflakes, we create the centers. Using a smaller square cutter, we squeeze out the track without pushing it to the end.

In another snowflake, we do the same and cut out the middle with a breadboard knife.

Another type of snowflake can be made by rolling out a thin dough rope 2-3mm thick.

Then it must be divided into smaller segments 1.5-2 cm long and bend them so that the shape of a drop is obtained.

Blind five "droplets" together

and in the intervals we attach more "rays".

We will get these snowflakes.

Ours in the form of snowflakes need to be left for a day or two to dry.

After the snowflakes dry out, you need to paint them. This can be done with any paints: watercolors, gouache or acrylics. The only thing is that when using watercolors, the paint layer will need to be applied twice, because it is very strongly absorbed and the color becomes faded. And now, ours are ready to celebrate the holidays! Alternatively, you can make and manufacture which you will find on the website.
Decorating a Christmas tree is one of the most joyful and exciting experiences in every family. This is a reason to get everyone together and prepare your home for the long-awaited holiday.
If you want to somehow decorate the New Year tree in a special way, then you will like our master class. So, let's start creating New Year's snowflakes from salt dough.
For this you will need:
- 2 cups of flour;
- 1 glass of salt;
- 1 table. a spoonful of lemon juice;
- mixing water.
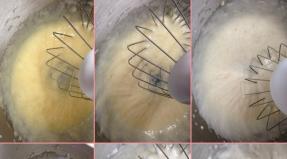
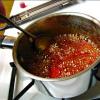
Combine all ingredients in a deep cup and dilute this mixture with water until the dough is elastic and smooth. Salted dough should not stick to your hands, make it as close as possible to plasticine.

Take a small piece of salted dough and roll it out into a 1.5-2 cm thick plate. Squeeze a snowflake onto a plate of salted dough using a mold. Get creative using snowflake shapes of different sizes, as shown in the photo. Remember to make a small hole in the snowflake so you can hang it on the tree.

Repeat these steps with the remaining test.
When all the snowflakes are ready, place them on a baking sheet lined with parchment paper. Bake the snowflakes for 4 hours in an oven preheated to 80 degrees Celsius. Check the items every 30 minutes to ensure they don't burn.
Salted dough snowflakes can also dry out without an oven. It is enough to leave them to dry in the fresh air for several days.
The edges of the finished products need to be slightly sanded with a nail file to get rid of unpleasant roughness.


After the salted dough dries up, you can proceed to the most pleasant stage - painting and decorating snowflakes.
You can paint salted dough products with special food colors, watercolors, acrylic paints or gouache.
In our case, we will use silver acrylic paint. Using a thick brush, completely cover the surface of the snowflakes with paint. 

After the paint has dried, use a thin brush to decorate the snowflakes with various patterns. There are no special rules here, show your imagination and paint the snowflakes at your discretion, decorate them with beads, beads or other decorative material.

To fix the color, cover the snowflakes with a layer of colorless varnish or transparent acrylic paint in several layers.

Thread a pretty string or ribbon through the hole. Salted dough snowflakes are ready.

Children will really like creating with their own hands. It's safe and fun. In addition, such snowflakes are a great idea for a small gift to friends and family.
Children will really like making New Year's crafts from salt dough with their own hands. It's safe and fun. In addition, this is a reason for everyone to get together and prepare your home for the long-awaited holiday. Salted dough snowflakes are a great idea for an unusual decoration of your home for the New Year. The master class is presented in the form of an author's fairy tale and has step-by-step instructions. But in order to start its implementation, you need to prepare a salty dough. To do this, take 2 cups of flour, 1 cup of salt, 1 cup of water for kneading. Combine the flour and salt in a deep bowl and dilute this mixture with water until the dough is elastic and smooth.
Materials and tools
Once upon a time there was a lump of salt dough in the refrigerator. Nobody wanted to be friends with him.

All the edibles in the fridge teased him:
Salty, tasteless, no one needs ...

The piece of dough was sad, and sometimes I even wanted to cry.

But one day ... a miracle happened. The refrigerator door opened and the dough heard the girl's voice:
Mom, what is it? White, soft? Can I eat it? Can I take?

Then the lump got upset again, sighed and thought:
Again I won't be of any use to anyone.

He closed his eyes, closed his eyes tightly so as not to see how he was again pushed aside.

A lump opened his eyes, and he was already on the table. I began to listen to the conversation between mother and girl. Mom said to the girl:
I will tell you how to turn this piece of salty dough into a New Year's miracle. After all, the New Year is coming soon!
The girl, of course, agreed to listen and do everything exactly.
And when he heard about the New Year and about snowflakes, a lump of dough took his breath away with delight:
Blimey! It's so beautiful! White, delicate, silvery ... It's so beautiful, so elegant!

The little lump waited patiently while they crumpled it with their palms, rolled it on the table, pricked it. He just really wanted to become beautiful and useful to someone. Let not tasty, for that beautiful!
Mom said that you need to prepare everything you need: cookie cutters, cutting stacks, paints, brushes, a rolling pin for dough.

A piece of salted dough should be rolled out into a 1.5 cm thick plate.

Using a regular saucer, squeeze out the circle.

In order to get an even, beautiful snowflake, you need to find the middle correctly.

Get creative with different sizes and shapes of molds, as shown in the photo.

Put the cut snowflakes on a microwave dish and bake them for 1 minute.

Here's what we got. The snowflakes must cool down before painting them.

Let's make some of the snowflakes white and some blue. To give them a magical look, apply some silvery glitters over the paint.

The snowflakes are ready. We leave them until the paint dries.

The girl laid out a New Year's composition from snowflakes, and her mother put a Christmas candle in the middle. And silver sparkles sparkled on the magic rays.

The lump of dough admired its reflection in the Christmas tree decorations. He really liked his new look. The girl said:
Mom, look at what beauty the lump of salt dough has become. The little lump was proud of himself and thought:
So what, what is not edible. It's even better, no one will eat me!
And when the guests came, I heard enthusiastic voices:
What's the beautiful! This is just a New Year's miracle!