Thermal labels on eggs - how to glue. How to glue stickers on Easter eggs
Today, there are so many options for decorating Easter eggs. Thermal stickers or thermal labels are a very simple way to decorate eggs for Easter. They are made, as a rule, from a shrink film, which, under the influence of high temperatures (for example, when immersed in boiling water), is compressed and tightly tightens any object. Modern manufacturers produce thermal stickers with different designs, which will allow everyone to choose a color and style to their liking.
Advantages of thermal stickers for eggs:
- efficiency: with their help, you can decorate Easter eggs in a matter of minutes;
- convenience: they are easy to use, do not get dirty;
- profitability: thermal labels have gained immense popularity due to the fact that they are very cheap;
- environmental friendliness: do not contain chemical compounds capable of penetrating under the shell.
An egg covered with decorative thermal sticker is unlikely to crack even if you accidentally drop it: the film also has a protective function. True, on the other hand, a significant plus can turn into a minus: peeling finished eggs in order to eat them, in this case, is not easy. The film sticks tightly to the shell and does not want to “tear” at all when trying to separate it. But almost no one pays attention to such inconvenience. For people, it is much more important that thermofilm allows you to decorate Easter eggs fantastically quickly. After all, it is much more difficult to deal with onion peel.

Important: check the proportionality of the thermal stickers and eggs prepared for decoration. All labels have standard diameters and are difficult to pull on large eggs (especially from poultry). But they are ideal for eggs that are sold in stores under the markings C1 and C2.
How to use thermal stickers for Easter eggs

1. First, cook the chicken eggs in the usual way, and then cool them in cold water. The eggs will not crack when cooking, unless you put them in hot water directly from the refrigerator, and let them warm for several hours at room temperature, and only after that you will cook. Put a tablespoon of salt in a pot of water - there is such a way to prevent cracking on the shell during cooking.

2. We put thermal stickers on the boiled eggs. Boil water again - in a separate small pan.

3. Carefully so that the label does not move out, dip the egg in boiling water with a tablespoon.

4. Keep the egg in boiling water for only 3-5 seconds and get it. Thermofilm envelops the egg, taking its shape.

5. Done! In the same way we decorate all the remaining eggs.

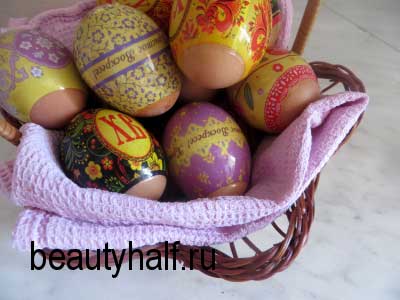
How to arrange the overall composition? To create a festive mood, you can put the eggs in a basket, after laying a waffle towel or napkin in it. Happy holiday!
If you have absolutely no time for creativity - there is no time to invent drawings and patterns, you can just buy special stickers. All of them are bright and beautiful, there are with the faces of saints, with animals and birds - an option for children. There are pictures that will give Easter eggs the look of painted ones - the choice depends on your preference. How to stick stickers on easter eggs? Find out today. 
Will need
- medium sized eggs
- stickers on the number of eggs.
How to cook with photos step by step
Keep in mind that the size of the stickers is standard, but the eggs are very large. Small eggs fit, then the stickers can crumple into an accordion, which will not look very nice. 
Before sticking Easter stickers, you need to boil hard-boiled eggs. Cut the strip of stickers along the dividing lines. Put each piece on the egg, make sure that it turns out smoothly. Otherwise, when the picture is stuck, it will turn out crookedly, but to redo it, you will have to remove it and repeat the whole procedure again. 
Pour water in a bowl, about a liter, and bring to a boil. Take a tablespoon or even larger, lay the egg with the sticker and gently dip in boiling water. Due to the effects of high temperature, cellophane will shrink in the shape of an egg. 
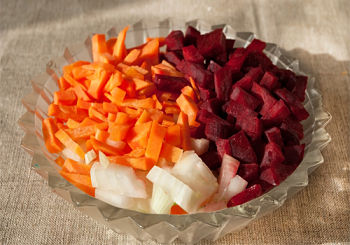
By wiping with a towel, you can immediately serve Easter eggs to the table. To make them look even brighter and more beautiful, you can pre-color them in any color using dyes or improvised means (such as beets, blue cabbage, etc.).
Such an occupation can be entrusted even to children, but preferably of school age, since there is close contact with boiling water. The only inconvenience is that during the cleaning of the egg you have to pry the sticker from the cellophane with a knife, then it will easily break. That is, it is advisable to have something sharp at hand during the festive meal.
Happy Easter! 
In recent years, preparing for the Easter holiday, many housewives have bought and wrapped Easter eggs with various stickers. It looks very nice and it takes much less time to make such an egg.
If you are a believer, it is better to paint the eggs the old fashioned way or use stickers with various beautiful patterns. But the priests urge not to use stickers with icons, since the icon on the egg will have to be peeled off and then thrown away, and this is an abuse of the Christian shrine.
It has become fashionable to stick stickers on eggs, thermal stickers are sold not only in stores, but also in churches. I think that it’s okay if there is a biblical theme image on the painted egg. There is no sin and no blasphemy. Throw away after use, chopped with scissors if in doubt.
If there is, even a little doubt, it is better not to use such stickers, to buy stickers with flowers and patterns.
They say that you can’t stick Easter stickers on eggs? Why?
In fact, these stereotypes and artistic values or other sacred meanings of thermal stickers are not carried for the average person. They cover Easter eggs in order to decorate the table, and if it is not cut, then it will be impossible to remove without tearing.
This method is convenient to use and not costly. They make labels in the factory and all the paintings on them are art paintings.
If you are a believer, then after removing them, wrap everything in a bag. You can grind everything beforehand if you are in doubt about this.
Another thing is if the icon painter painted the egg, then the shells would have to be buried with prayer or burned.
Indeed, such questions about stickers did not arise before, because people painted eggs, which were later called krashenki, or painted them artistically, which were called Easter eggs. In Ukraine and Belarus, such names are still in use. Then came various stickers that are considered thermo.
If the question is not about the harmfulness of the sticker itself, but about the fact that they use pictures with the faces of saints, with temples, or with some biblical subjects, then the church does not prohibit this either. The only stickers to throw out later are not worth it in the trash, like the shell. It is enough to collect all this in a bag, take it to a clean place on the street and burn it with prayer.
Therefore, what they say - you can’t use stickers is nothing more than speculation invented by people. Ostensibly the shell after and the stickers are thrown into the garbage, and there the saints are depicted. Believe it, glue abstract pictures, there are many different options.
Adults and children every year look forward to the Easter holiday, on the eve of which there is always a special ritual - the decoration of Easter eggs. This is done in a different way. Someone, adhering to ancient traditions, makes unique Easter eggs, someone paints eggs with dyes, and some keep up with new trends and paste eggs with colorful thermal stickers. We will tell about how to stick a sticker on an egg correctly.
How to stick stickers on eggs: choosing the right products
Before decorating eggs, you need to prepare the following ingredients:
- Eggs On average, you will need 8-12 eggs. The quantity should match your preferences and family size. One is enough for 5 eggs, and some need more than 10 pieces. The caliber of the eggs is also important. They should be medium in size: too small eggs will slip out of the sticker, and very large eggs will not fit into it. In addition, it is better to buy eggs exclusively in white to emphasize the beauty of the stickers.
- Water. In order for the eggs to completely "drown", it will take 1.5-2 liters of water and a shallow stewpan. Water should only be filtered, otherwise when boiling, it will leave an unsightly coating on top of the stickers.
- Salt. It takes half a teaspoon.
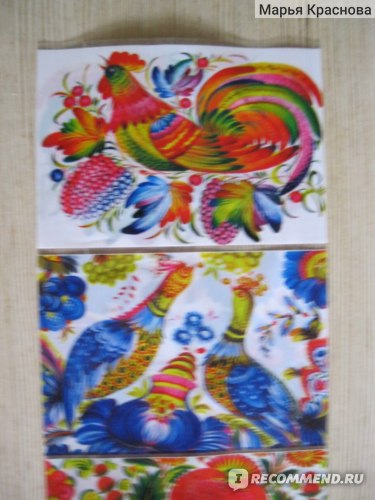
- Set of 10 easter thermal stickers. The variety of drawings on the stickers is very large: cartoon characters, traditional patterned and floral motifs, church symbols, faces of saints, as well as the image of temples.
There are many contradictions regarding the use of church symbols. The shell with such stickers requires special treatment - it cannot be thrown away. After the holiday, as a rule, the shell is burned or taken to the temple, where it is disposed of according to church canons.
The process of decorating eggs with stickers
- Boil the eggs. To do this, boil water, add salt, and then immerse the eggs in boiling water. After a minute, reduce the gas and continue to cook them for 3-4 minutes. After that, remove the eggs and refrigerate in cold water. Then dry the shell thoroughly. Do not pour out water, as it will still be needed.
- Prepare the stickers. Use scissors to cut the tape into individual labels.
- Put the stickers on the eggs. Carefully insert the egg into the sticker, trying to place it strictly in the middle. This will allow the sticker to stick tightly to the surface of the egg, without defects in the form of a curved pattern with creases.
- Fix the sticker with boiling water. Heat the water in which the eggs were boiled, gently lower the eggs with the stickers into it for 7-9 seconds, and then pull them out. The stickers will immediately take the shape of an egg and stick tightly to the shell.
- Lay the eggs on a kitchen towel or paper towel until they are completely dry.
Not so long ago, we discovered this modern, fast and very convenient way to decorate Easter eggs. Of course, there are nuances, but we'll talk about them directly in the recipe.
Ingredients for decorating Easter eggs with thermal labels:
thermal labels
hot water
Drawing thermal labels on eggs:


Shrink labels are sold here in these sets. When buying them, pay attention that they are not skukozheny, because they are very sensitive to heat and quickly lose their shape. If labels "led" their use will be very difficult. Also pick up the eggs so that they are covered with thermal labels. Judging by the assortment in our city, the desired eggs can be chosen among the 1st category. The second will be too small.


Cook the eggs. You can apply a thermal label to already painted eggs, but if the eggs were painted with food colors, keep in mind that when dipped in water, the coloring will begin to dissolve and it will be possible to apply the label only to eggs of the same color. Put the thermal label on the egg as shown above. Dip the egg in boiling water, literally after 20-30 seconds, sometimes a little longer the label will tightly fit the boiled egg. Dry the egg in the label and that's it. Beautiful easter eggs are ready.
Comparison of methods for decorating Easter eggs:
Like everything classic, very familiar to the eye. Moreover, thanks to natural products, you can not worry about the safety of these eggs. The color of onion husks is very durable and does not get dirty. If you take such an egg in your hands, they will remain clean. If you put an egg in water, the water will not stain. These eggs can additionally be decorated with thermal labels without any reservations. I prefer this method of coloring eggs, especially since there are children in the family.
Of course, beautiful and bright. But I try not to use this method, because it is not known what these dyes are made of and how safe they are for health. Moreover, if you pick up such an egg, it is very painted and dirty. So, inevitably, some part of the dye is used internally. You can apply a thermal label to such an egg, but the paint will partially wash off and may become uneven. Although it’s fun to decorate such eggs, I wouldn’t give them to children.
Described above, I consider it safe, harmful substances from this label do not enter the food. This is a very beautiful and varied decoration of eggs. But you will have to clean such eggs either with the use of scissors or a knife. Thermal labels are quite durable. Despite this small minus, we love to decorate eggs in this way. After all, the process itself is interesting and enjoyable. Enjoy your meal!!!