Figures from mastic how to sculpt. Figures from mastic: a master class for beginners with photos, videos and detailed explanations
Confectionery mastic is a soft edible mass that bears some resemblance to plasticine. It lends itself quite easily to sculpting. You can beautifully and unusually decorate a cake for any celebration with themed figurines made of mastic. Children, seeing such decor, are usually delighted and eat it with great pleasure. And adults can rarely deny themselves a treat.
Classic mastic recipe
Ingredients:
- marshmallows - 100 gr;
- starch - 100 gr;
- icing sugar - 150-200 gr;
- butter - 1 tablespoon;
- water;
- food colorings;
Cooking steps:
- Mix the marshmallows with oil and heat in the microwave or water bath for about 15 seconds. During this time, the mass will warm up, increase in volume and become soft.
- We mix starch and icing sugar. To avoid the formation of lumps, they can be sieved through a sieve.
- Add 100 gr. the resulting mixture into melted marshmallows and mix until a thick, homogeneous gruel.
- Next, you need to dilute the food coloring in warm water according to the instructions on the package and add it dropwise to the mixture. Continue kneading until the mixture is completely thickened.
- Pour some powdered sugar on the table and put the resulting mastic from a bowl there. Continue kneading it with your hands until it is as elastic and resilient as plasticine. Pre-grease your hands with butter so that the mass does not stick.
If you plan to do the sculpting later, wrap the finished mastic in several layers of cling film and put it in the refrigerator. To prevent the material from losing its elasticity and drying out, do not allow it to come into contact with air for a long time.
Before sculpting the figures, the work surface is sprinkled with starch. On it you will roll out the cakes of the required thickness.
What can be sculpted

It is mainly used to decorate children's and wedding cakes and desserts.
Children will be delighted with the fabulous and cartoon characters from the mastic. Making them is not so difficult. The main thing is that the hands obey, and there is a sense of proportion.
But for wedding products you need to make only flowers and petals of delicate flowers, as well as figurines of a wedding theme - the bride and groom, doves, rings. They will look great on top of the cake.
If you wish, you can make a figurine in the theme for any celebration. You just need to show your imagination and bring it to life, because creativity and unusual design are welcomed here.
In terms of time, the process of making figures is long, especially for those who do not understand anything in the theory and practice of modeling. However, with a systematic approach, you can easily get used to making certain figures pretty quickly.
In the early stages of your learning curve, it is best to practice decorating one type of cake.
How many figures are stored

If you put the item in the refrigerator, it will stay there for several weeks. You just need to put them in a container so that they do not get moisture and sunlight.
If you do not have time, and the figures are needed by a certain date, then you can make them a few days before the holiday. Put the finished product in any container that closes and send it to the refrigerator.
The same goes for the mastic itself. If after sculpting you have material left, you can wrap it in a plastic bag and put it in the freezer, where it can lie as long as you like.
A few more mastic recipes
- Milk mastic preparation is very simple. To do this, you need to prepare the components - milk powder, cream and powdered sugar - in equal quantities. Gently mix everything and start adding condensed milk little by little. Stir until the mass is elastic. Also, during the mixing process, 2 tablespoons of lemon juice and one spoonful of brandy are added to the mixture. Just don't be scared, cognac will not spoil anything, but will only add flavor. We look all the time at the consistency (it should be like plasticine).
- Chocolate mastic has an incredible taste and beautiful color. For cooking, you can use both white and dark chocolate. The main condition is for it to be milk-based. Take 100 g of chocolate and melt in a water bath. Add 2 tablespoons of honey. Mix everything thoroughly. Place the mixture in a bag to cool completely and use for decoration.

- Marshmallow mastic in terms of properties and preparation process, it is similar to the one where marshmallows are used. The difficulty lies in the fact that it is very difficult to find a suitable marshmallow that does not spoil the quality of the material. This is the only thing to worry about. You should also pay attention to the fact that it is better to take marshmallows more than 100 grams. Better to stay than not enough at the most inopportune moment.
- Making mastic from gelatin will take a little longer than the rest of the options. Dissolve 2 tablespoons of gelatin in water. Then you need to put on low heat and cook until you get a homogeneous mass. Do not bring to a boil! Wait for the mixture to cool, add 1 tablespoon of lemon juice, a teaspoon of vegetable oil. Then gradually add the icing sugar (40-50 tablespoons) and knead for about 15 minutes. As a result, the mass will look like soft plasticine, which is ready to use. It is as flexible as possible in work and it is easy to paint it in different colors.
Mastic figurines are a unique way to make a cake of any theme. And the frozen heart cake is no exception. It is enough to cook a regular cake (single-tiered or multi-tiered) and simply decorate it with edible figurines. In particular, today we will consider master classes on how to make Anna from mastic.
How to make a figurine of Anna from a cold heart with your own hands
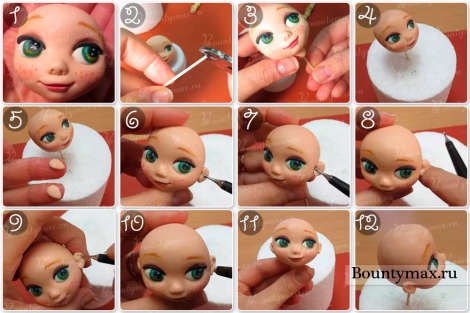
When creating any image, the most difficult thing is to gently blind your head and draw a beautiful face. Therefore, we begin with a step-by-step photo of a master class on sculpting Anna's head from a cold heart.
For a natural look, we insert white mastic into the "eye sockets", and black into the mouth. On top of the white, carefully paint the eyes with food paint.

Having finished drawing the eyes and eyebrows, glue a piece of white on top of the black one and form teeth from it. We paint the lips. And we start creating hair and weaving braids.

The result is a very beautiful and delicate image of Anna.
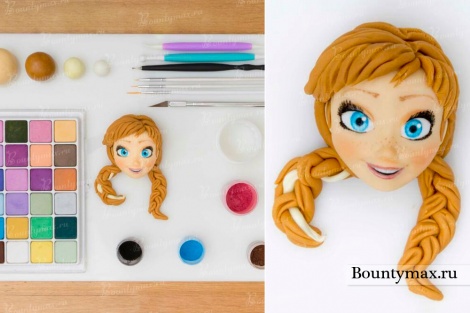
Of course, you will not be able to 100% repeat Anna from the cartoon cold heart. But, in my opinion, this is not a cause for grief. You can make a simply beautiful statuette in her style, slightly different from the original, but no less attractive "Anna". Or you can even make it like a cartoon, as shown in the photo instructions below.


In addition, you can dazzle Anna in the form of a baby.


Eyes are made for the same principle. Note, here the eyelid was made of dark brown mastic. We painted eyes, eyebrows, blush and adorable freckles.

Then the ears were blinded.
And we started to create a hairstyle. The bangs were rounded using a brush handle (you can take a round pencil). Ponytails were blinded from several pieces of mastic. Forming each tail from 3 pieces, at the end they attached black stripes around them, imitating a ribbon.


The finished head looks nice.


Let me especially note that in order to make a proportional figure of Anna from mastic, it is better to draw a drawing in advance. This will make it much easier for you.
Based on the drawing, we sculpt the legs and arms.

Following them is the body. We fasten the legs to the body using wooden skewers. And let's start creating the dress.


As a result, we got a beautiful figure of Anna from a cold heart.

If you do not have time to create a complex image, pay attention to the photo master class presented below.


The result is a pretty figurine, and most importantly, you can make such an Anna figurine with your own hands quickly and easily.

You can compensate for the simplicity of the figurine with the originality of the decor of the cake itself.

How to blind Anna from mastic video tutorials
Video lessons are more informative than photo instructions. Therefore, I bring to your attention a few video tutorials.
Here is the most simplified version. If you watch this video first, you will also see a bunk cake assembly.
In addition, pay attention to the video lessons on modeling from plasticine and plastic.
And finally, mk on sculpting a charming figurine in chibi or chibi styles.
Good luck with your experiments!Not so long ago, figures from mastic began to be used to decorate cakes. But ordering a cake from a professional pastry chef is not always affordable, and there is no way to control the quality of the ingredients used in the process of baking and assembling the dessert. In this case, a home-made decor will be the way out.
A detailed description of all stages of work, from the choice of the necessary tool and the preparation of mastic at home to the algorithm for sculpting individual characters, will help to master the sweet sculpture even for those who last sculpted at school in fine arts lessons.
Every mother wants to please her child with a beautiful and delicious cake. One way to decorate it is with mastic figurines.
The process of their manufacture includes the following stages:
- Preparation of sugar mass for molding.
- Direct modeling of figurines.
- Drying the finished decor and placing it on the cake.
What tools and materials are required to create sweet sculptures will be discussed in more detail below.
If you have doubts about whether you will be able to make mastic decor yourself, you can always pre-practice on plasticine, and when the desired result is achieved, start sculpting from mastic.
What tools are needed for sculpting
In confectionery stores, eyes simply run up from a wide assortment of all kinds of devices for working with mastic, therefore, in order not to buy too much, it is better to familiarize yourself in advance with what these or those tools are needed for.
Confectioners use mastic for the following purposes:
- wrapping the finished cake to make the surface smooth or a certain texture (wood, leather, etc.);
- to create flower arrangements (sugar floristry);
- creation of miniature sculptures (people, animals, fairy-tale and cartoon characters).
For each type of mastic decor, its own tools are used.
So, in order to cover the finished cake with sugar mass, you need to have:
- rolling pin for mastic (regular or textured);
- silicone mat for rolling;
- and a flat iron to smooth the finish to avoid creases.
Sugar floristry uses:
- cuttings or plungers of flowers or their petals;
- silicone veiners to give the workpieces a more natural look;
- soft rug for thinning the edges of leaves and petals;
- devices (tables) for drying workpieces,
- food wire and artificial stamens;
- brushes with artificial bristles.
To sculpt figures from mastic, you need to purchase a set of special stack tools:
- Dresden wand for depicting facial expressions on faces;
- stack-cone (round, even), which will allow making blind cone-shaped indentations;
- a shell tool for sculpting animal paws, shells, human hands and feet;
- underwire stack will help create ruffles or wavy edges
- a tool with balls at the ends is used to form eye sockets or other round indentations;
- stack arc to create smiles on the faces of mastic figures.
In addition to these tools, you will need food coloring for coloring the mastic, brushes (always with artificial bristles) and food glue for gluing the parts of the figure.
Cooking mastic for modeling with our own hands
Before making cake figures, you need to prepare the sugar mass for modeling.

Mastic for creating flowers and figures should be flexible so that it can be easily worked with, and quickly dries so as not to waste a lot of time drying figures.
These properties are possessed by mastic made from:
- 1 ½ teaspoon instant gelatin
- 40 ml of water;
- 3 teaspoons of liquid honey or syrup (invert, glucose or any other);
- 2 teaspoons butter or any other hard fat (margarine, coconut oil)
- 1 teaspoon of liquor (can be substituted with other alcohol);
- 500 g icing sugar;
- 25 g corn or potato starch.
Cooking technology:
- Soak gelatin for the time specified in the instructions for its use.
- Combine the syrup, butter and liquor in a saucepan and heat until smooth. Then add the swollen gelatin and heat until it is completely dissolved.
- Sift the powder with starch with a slide, in the center of which make a funnel. Pour the liquid component into the depression and knead the mass like a regular yeast dough.
- Put the finished mass in a tight bag greased with butter from the inside, drive out all the air as much as possible and leave the mastic to lie down for a day at room temperature. After that, you can start sculpting.
The simplest mastic figures for beginners
Simple figurines of animals that do not pretend to be sculptural are molded using the same technology:
- For the torso, roll a ball, which to give a teardrop shape.
- The head is just a slightly smaller ball that is connected to the torso with a toothpick.
- The front and hind legs are molded from mastic flagella, which are glued with food glue or raw protein.
- Then ears are sculpted: for a bunny - from two wide flagella-stripes, for a cat or tiger (lion) - pointed triangles, for a bear, monkey - two circles with a depression in the center.
- Also, from a flagellum, but thinner, a tail is formed. If necessary, sculpt a hairstyle, for example, a mischievous forelock for a monkey or a mane for a lion.
- Finish the modeling of the animal figurine with the design of the muzzle - nose, mouth, eyes.
It is not difficult to make various machines out of mastic that will be appropriate on a cake for a boy.
The simplest option is from a single piece of mastic:
- Give a solid rectangular piece of mastic of the corresponding color to the shape of the car body.
- Blind wheels-washers from four balls and glue them into place.
- Cut glass (front, rear and side) from thinly rolled white or pale blue mastic and attach them where necessary.
- Make headlights from small balls of yellow mastic.
- Add the necessary additions, such as lettering or eyes, and the machine is ready.
Master class on how to sculpt children's mastic figures
Children's mastic figures are usually the heroes of their favorite cartoons. Among the huge number of fairies, animals, robots and cars, the heroes of the Smeshariki cartoon will be ideal for a novice sculptor. Their modeling is carried out according to a principle similar to that already described.

First, the mastic is painted in the desired color (or colors), then a ball-body is rolled out of it, and then they act as follows:
- Bunny Krosh. For the handles and legs, roll up two bundles, cut each of them in half and do with a stack or a regular toothpick separating the fingers. Form the ears from two wide stripes. Then it remains only to design the face, gluing eyes from white mastic, and eyebrows from blue, draw pupils and a smile.
- Barash. Roll up thin flagella, form curls from them and glue them with food glue or egg white. Sculpt the arms and legs in the same way as Krosh's legs, but making at the ends of the hoof. Sculpt horns from the flagella of the darker mastic. Make up your face.
- Hedgehog. Roll up small balls of blue mastic, shape them into cones-needles and glue them onto a spherical body. Sculpt the handles-legs, as for a bunny. Add glasses, eyebrows, nose, ears, smile and the Hedgehog is ready.
- Nyusha. First, you need to draw hearts-cheeks and mold paws with hooves, as for Barash. Form a nose-patch from a small ball, making two indentations in it with a toothpick. Weave and glue a braid hairstyle, shape your face.
How to dry mastic figurines
Making mastic figures is only half the battle. They still need to be properly dried. When the figures do not dry evenly, they can crack, and if the drying temperature is too high, they melt, and the result of long work cannot be saved. All the intricacies of this process and ways to speed it up will be discussed below.
The simplest and correct, but also the longest drying method is self-drying at room temperature. It can take up to several days to dry the figurines, depending on their size.
Large figures, consisting of several parts, are usually dried disassembled, and then all the elements are glued together using confectionery glue, raw egg white or vodka. During drying, the figures or their parts must be covered with napkins so that they do not fall on dust. Also, the napkins will absorb some of the moisture.
If time permits, then the figures should be dried only at room temperature.
And if you urgently need to make a decoration from mastic, then you can speed up the drying in one of the following ways:
- Hair dryer. It is much faster to dry the mastic decor by blowing it at a considerable distance with a hairdryer operating in the "Cold air" mode. In this way, you can dry the figurines in just a few hours.
- Oven. Using the oven, you can quickly dry flat mastic decorations (for example, letters), but the drying temperature should not exceed 80 - 85 degrees, and its duration should not exceed 5 minutes.
- Microwave. The drying principle is the same as in the oven. Figures heated in a microwave oven harden after cooling. But due to the different power of the devices, the drying time will have to be selected empirically on a small piece of mastic.
How much and how are such jewelry stored
Cake mastic figurines can be prepared well in advance of baking and assembling the dessert, but to keep them soft enough inside and edible, they must be stored properly. Storage conditions for such decor: an airtight container placed in a cool place away from direct sunlight. The shelf life of the decor, subject to these rules, will be within 1 - 2 months.

After eating the dessert, sweet sugar sculptures can be left as a memory of the solemn occasion. In this case, the storage conditions are not so harsh: the figurines can simply be placed on a shelf, which is not exposed to direct sunlight, so that their colors remain bright longer. But it is not recommended to eat them after that.
Recently, you will not surprise anyone with an ordinary cake. Therefore, confectioners are trying to come up with some new decorations to make their baked goods a real work of art. Figures made of mastic have become very popular.
Moreover, they are made not only by professionals, but also by simple housewives. And why not try your hand at such an art, when the entire Internet is teeming with master classes on making mastic figures. If you make a little effort, you can create beautiful roses on a cake for your beloved daughter or sculpt unusual cars for your only son.
The main thing is to have a desire, and for beginners to try to sculpt something simple. Swinging straight at a complex structure, you can fail and give up creativity forever.
In order to start your own baking decor, you will need some mastic. You can make it yourself, there are many recipes for cooking, or you can buy it in a store. From which mastic is better and easier to sculpt figures, it is difficult to say. If you are a beginner, you can try your hand at the purchased one first.
If you like such creativity, you can always prepare the composition for modeling yourself.
To make figurines, you will need not only dexterous hands and desire, but also some tools:
- a mat made of silicone;
- various molds that help to create separate parts for future figures;
- brushes, etc.
It is worth saying that more and more new accessories are constantly appearing in stores that make it easier to work with the mastic mass. But all these devices (including those listed above) are not required attributes for work. They only facilitate the creative process. No more.
Even before starting any work, it would be nice to have a certain idea and at least the slightest idea of how this can be done. If you are in difficulty with imagination and implementation of ideas, then immediately abandon the creation of complex figures.
It is better to look on the Internet for the process of making simple things, and also use the following tips:
- when creating figures from several separate parts, lubricate the places where they are fastened with water, this will allow the pieces not to fall off;
- if you sculpt a product from different shades, then it is not at all necessary to take colored mastic, you can decorate a ready-made little thing. The main thing is that it is dry;
- when using artificial food colors, give preference to those that do not contain salt;
- If possible, replace artificial colors with natural ones, such as beet juice or carrot juice.
Don't chase after complex shapes right away. Start with something simpler: learn how to make flowers and cars, and how, we will discuss further.
How to sculpt roses from mastic?
You can create mastic roses for a cake in various ways. Some are simpler, others are complex. But if you are new to this art and are wondering how to sculpt roses for a cake from mastic, then the method of creating flowers, which will be given below, will suit you perfectly. For work you will need: a cutting board, a mastic mass you need colors (purchased or homemade - you decide), a rolling pin and a scalpel.
When all the accessories are ready, you can move on to creativity:

- roll the mastic mass in your hands and form an oblong "sausage" from a small piece (here it would be nice to remember the basics of modeling with plasticine);
- roll out the workpiece with a rolling pin, but not too thin;
- define one of the edges of the prepared mastic as the top of the rosette. Carefully smooth this place with your fingers and begin to fold the workpiece from one end, while pinching at the bottom.
When you finish all the manipulations, you will have a beautiful and delicate rose. You can vary the size of flowers yourself, the larger the initial blank, the larger the product "at the exit".
Of course, such tips for creating roses are more suitable for beginners, more skillful ladies can try to create something more sophisticated, unusual.
But gaining experience creating such flowers is very useful.
We make a beautiful car from mastic
If you decide to please the little boy by decorating the cake with mastic, then you will have to sculpt some cute machine. This can be done in several ways. The simplest one is to create a semblance of a car body from a small piece of mass, and make wheels and headlights in a different color. This version of the figure will be similar to the one that we usually sculpt with children from plasticine. It may not turn out very original, but simple.
If you are confident in your abilities and are ready to buy additional materials for work, then try to create a racing car. For creativity, you should stock up on white mastic, black and blue food colors, food glue, a mastic cutter and stack, a rolling pin, wheel cutters and a pastry spatula.
If everything is available, you can start the creative process:

- separate a piece from the total mastic mass, it should be enough for 4 wheels, a racer's head and a spoiler for a car. Color most of the paste blue, mash thoroughly and form an oval, which will have pointed tips;
- armed with a spatula, level the workpiece and leave to dry;
- now you should make a spoiler. To do this, separate a piece from the remaining paste, paint it blue. Then roll it out with a rolling pin and carefully cut it into a rectangular shape;
- separate a part from the remnants of the white paste, paint it black, cut it out with the help of the wheel molds;
- take a blue blank and use a stack to make a small dent in it in the middle;
- paint a piece of white mastic with black and make a circle out of it, fix it with glue in the dent. It turned out the head of the racer;
- fasten the wheels on the sides of the machine;
- attach the spoiler and the car is ready.
If you wish, you can make a figurine of any color by adding some of your own decorations to the resulting car. This is your business, the main thing here is to grasp the essence of creating a figurine, and then fantasize.
Today it is one of the most popular materials for making decor, and not only for cakes, but also for cakes, muffins and other baked goods. This demand is understandable - the material is malleable, looks elegant, allows you to create the most natural and similar jewelry to the original, and, most importantly, it is edible. It is especially convenient to make figurines from mastic for children's cakes.
Mastic is a plastic, homogeneous substance that is similar in consistency to plasticine. It is created on the basis of powdered sugar, marzipan and other components, the easiest way of preparation is from ready-made marshmallow marshmallows.
You can make at least 5 types of mastic with your own hands, in addition to the fact that you can purchase ready-made:
- dairy;
- gelatinous;
- honey;
- from marzipan;
- from marshmellow.
For beginners, the simplest recipe for mastic is suitable, which is suitable, including for creating voluminous or flat figures for a cake:
- Melt a pack of marshmallows weighing 100 g in a steam bath or microwave.
- Pour fresh lemon juice (20 ml) into a slightly cooled mastic and add 1–1.5 cups of finely ground powdered sugar.
This recipe also has its own tricks. For example, if you bought a two-color marshmallow (white-pink), then the mastic will turn out to be light pink. Other colors may be required for the cake. In this case, you need to look for white marshmallow candies or separate the pink part, but take twice as much white marshmallow. Only liquid food dyes are used, they must be added when you have taken the mass out of the microwave, and it has not yet frozen, and only then make the mastic completely.
The material is kneaded on a table sprinkled with powdered sugar. Too much powder - it will not roll out well and harden quickly. A little powder - it will stick to your hands and figures from it will quickly lose their shape, especially voluminous ones. Therefore, focus on the master class and your own feelings.
Flowers from mastic
The simplest mastic flowers for beginners consist of two colors of mastic - pink and green. The master class is simple, everyone will be able to make cake figures using it with their own hands:

- Prepare the mastic, paint half pink, the other half green.
- We start to make a flower from petals, so wrap the green part tightly with foil.
- Tear off a small piece of mastic for the first petal to make it easier to work with the material, grease your hands with butter.

- Roll out the layer, cut out circles of different diameters with a shape with sharp edges or with an ordinary glass. This should be done on a table or other flat surface.
- With a sharp knife, you can make grooves, imitating the structure of the petal.
- You can make a wavy edge with the underside of a teaspoon, remember to dip it in the powdered sugar. Do the same with all the petals and lay them out to dry. They should dry vertically, for this you need to use a container for storing eggs.

- The leaves must be made of an oblong shape from the green part, also give them a relief with a knife and process the edge with a spoon.
- Assembling the flower: grease each petal from below with thick syrup or special gel - first the largest, then the smallest in diameter. Attach the leaves, this must be done carefully. The core of the flower can be decorated with golden dragees or powder (focus on the master class). The flower is then transferred to the cake.

You can also do other mastic figures with your own hands - roses, for example. Flat flowers like daisies are even easier to make - just cut out a few thin petals and gather them to the core using gel or syrup.
More on the topic:
Animal figurines
Figures made of mastic for cake in the form of animals look especially organically on children's confectionery. You can make a cartoon character or any animal that your child likes. A master class on creating a figurine of a donkey from the cartoon about Winnie the Pooh and his friends for beginners will help you.

You will need mastic in the following colors: blue, lilac, pink, light orange, black and white. In addition, powdered sugar for rolling out, a convenient rolling pin especially for mastic, a sharp knife and a board. The material can be any, but keep in mind that the gelatinous mastic dries and hardens quickly, and on the basis of marzipan it turns out to be insufficiently plastic and homogeneous. The ideal option in this master class is ordinary mastic based on powdered sugar or marshmallows.
It is easy to make a donkey step by step, even with your own hands:
- Roll out the mastic, divide into several parts, paint the largest blue. Wrap the unused parts of the mastic with foil.
- Blind the lower body of the donkey in the shape of a pear, form the "legs". Lubricate your hands with oil if the mastic is too thick.

- Roll out a piece of lilac mastic, cut out an oval and use glue gel to glue it on the donkey's belly.
- Then you need to make "hands". To visually shade them, add a piece of lilac to the blue part and mix thoroughly. Blind 2 cylinders, attach to the body with toothpicks.

- On the inner surface of the "arms" glue 2 ovals of lilac material.
- Make the donkey's head out of two parts: blue and the nose out of light orange. Fasten them together with a toothpick. Make notches on the nose with a knife. Attach with a toothpick to your neck.

- Make 2 ears of blue mastic, inside with gel, glue 2 petals of pink mastic. Glue the ears with gel.
- Attach a ponytail with a black mastic tip on the back. Put a bow figure on it.
- Attach mastic eyes, white with black dots, on the head - a "mane" from a piece of black.

The master class shows only the basics of making figurines for decorating a cake. You can do whatever the shower requires and the overall design of the cake. The easiest way for beginners will be to create simple flat figures, volumetric ones require some skill.
It will also make it easier for beginners to work with large shapes. For example, the same donkey can be molded from a single piece, attaching only the eyes and tail. You can make your work even easier if you make a voluminous white figure and simply paint it in the desired colors with a thin brush and liquid dyes.