Arab bakery products. Pita - arabic bread
Pita bread is popular in the Middle Eastern and Mediterranean countries.
Outwardly, this bread looks like a cake, but inside it is hollow.
Pita can be made from fresh or yeast dough. You can bake in the oven or in a pan.
With short baking pitas at high temperature, the dough swells and forms a pocket that can be filled with any filling.
Such bread is a great option for breakfast or a snack in nature.
A variety of fillings are suitable for pitas: meat, cheese, vegetables, scrambled eggs, salad ... Everything your heart desires.
Remove oil in advance from the refrigerator.
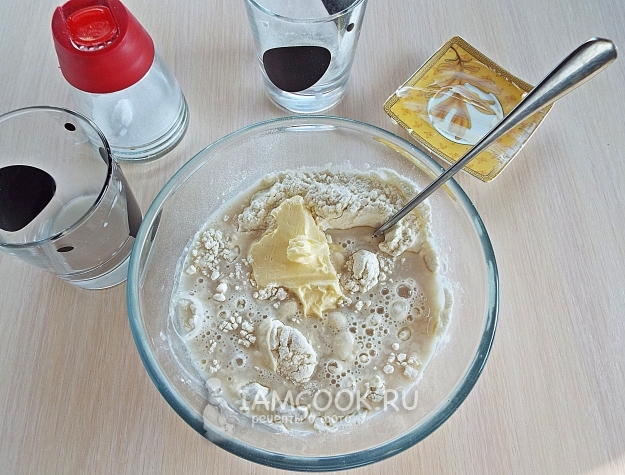
Pour flour into a bowl, add salt. Dissolve yeast in water and pour into flour.
Add soft butter.

Knead the dough. Remove to rise to heat.

Divide the dough into 6 equal parts. Roll each piece into a flat cake.

Put the cakes on a baking sheet with a rug or paper.
Cover with a towel and leave for 15 minutes.

Preheat the oven to 250 degrees. Bake pita for 6-7 minutes.
You should not wait until pita bread is very browned.

Put hot pita on a towel and cover. Once the pita has cooled a little, you can taste it.

Enjoy your meal.

Similar flat cakes are loved throughout the Mediterranean: in Jerusalem, pita goes hand in hand with falafel, in Arab countries all kinds of pita are served in pita, in Greece, dried pita is an indispensable companion of other mezes. This is not surprising, because the first mention of pita is contained in the Old Testament! Like any bread, pita begins quite mundane - kneading, proofing, molding - but in the oven or in the oven with pita, a transformation occurs: a flat cake suddenly swells like a ball, and the same “pocket” appears inside which it is so convenient to put stuffing.
This is precisely the main difficulty in baking pitas. Once upon a time I was trying to bake pita, but the “pocket” did not work inside, but it was worth taking Alena Spirina’s recipe (she herself refers to Claudia Roden) as the desired result was not long in coming. But I will not lie that the whole thing is only in the recipe - except for the correct proportions, you need a skill that only appears with practice. And even if it doesn't work out very well the first time, this “wrong” pita will be just as tasty.
Middle Eastern Pita Bread
High
3 hours
Ingredients
6 cakes
250 g wheat flour
135 g of water
3 g dry yeast
3 g salt
15 g olive oil
2 tbsp cornmeal
Mix wheat flour, water and yeast, add olive and knead with your hands or a mixer until a smooth, elastic and soft dough is obtained. Roll the dough into a tight ball, place in a bowl or pan, cover with a towel and leave for 40-60 minutes in a warm place until it doubles in size.
The dosage is for dry yeast, 11 grams of which (1 sachet) are used per 1 kilogram of flour. Carefully read the labels on the package, if necessary, adjusting the required amount of yeast.
Mash the dough, releasing air (more precisely, carbon dioxide), divide into six identical parts, roll each into a small ball, cover and let rest for another 15 minutes.

And now, we ... step back from the recipe that I referred to at the very beginning. Set aside the rolling pin and, taking the ball in your hands, gently and persistently with your fingers stretch it into a cake a little more than 0.5 cm thick. Do not spare the cornmeal so that the surface of the cake is not sticky, stretch the balls evenly and without rushing, and then the pita will rise without any problems in the oven. Transfer rolled pitas to a greased film or a towel dusted with flour, cover with the same film or towel and leave for another 60 minutes. Pitas should rise markedly in height, so even if some of them are not completely blown out in the oven, you still can easily make a pocket in them.
Preheat the oven to 240 degrees by placing a baking stone or just an inverted baking sheet inside. After that, put pits on it 1-2 at a time and bake for about three minutes - until each of them swells like a ball. When the pita stops bloating, it’s time to take it out, otherwise it may harden and you will get not pita, but crispy chips (also, however, very tasty). Clean the prepared pitas in a pan, on the bottom of which there is a paper napkin, and cover with a lid: there they will deflate and become softer. Serve pitas while they are still warm, although you can eat them the next day, if you quickly warm up before that.
We grow yeast in a small amount of warm water.
Sift the flour (if grains, take a sieve with large cells).
Salt is also soluble in 0.5 cup of water.
In a slide of flour, we make a depression, pour in the yeast and mix gently, gradually add salt water. The dough should turn out steep, but elastic. Add water if necessary. Knead until the dough begins to lag behind hands. You can stand the dough for about an hour to make it, impatient ones can bake right away.
We divide the dough into balls the size of ping-pong or a little more. We roll out about 2 -3 mm thick on a table sprinkled with flour.
Roll slowly and evenly so that the surface of the cake is without holes. And put on a dry baking sheet. The oven is heated to the maximum, we put the baking sheet on the lower level, because the bread will open. That is, how to inflate, like a ball, we immediately take it out.
The process, depending on the oven and the thickness of the cake, may take from 2 to 5 -7 minutes. For lack of an oven, you can bake in a pan, also dry. We follow the process and, if necessary, carefully flip the cake. Do not damage the surface, otherwise the bread will not rise.
Choose the size and thickness yourself, it depends on the size of your oven and pan. I baked both in an electric and gas oven, and in a frying pan. The skill comes with experience and don't be upset if it doesn't work out right away.
This dough is also used for tannur (a furnace in the ground, slightly rising above the surface). If you have a frying pan of the “vogue” type, that is, it has a concave bottom, then wash the outer surface of the pan well and, putting it on the gas upside down, heat it up well and put out a cake, do not forget to turn it over. Follow fire safety rules and do not risk much in vain.


This recipe is a shareholder "Cooking Together - Culinary Week". Discussion of cooking on the forum.
Simple and very tasty food - Arabic pita cake, you can serve it for dinner or for a snack, adding your favorite filling to pita.
This is a very simple home baking, which uses only the most affordable products. A peculiarity of pitta is its round flat shape, and also the emptiness in the middle. Thanks to the water vapor that forms inside the cake during baking, the dough swells like a ball and exfoliates. It turns out a kind of pocket in which you can easily put absolutely any filling of your choice.
Pitas are usually made from wallpaper flour, but I prefer to use premium wheat flour. Of course, the prepared cakes will not be ruddy, but this does not at all affect the taste and aroma of this unleavened bread. In a city apartment, baked goods are baked in a well-heated oven at high temperature directly on a dry baking sheet. I hope that the recipe comes in handy and you will often indulge in homemade Arab pitas.
- wheat flour - 500 gr
- water - 300 ml
- vegetable oil - 50 ml
- fast-acting yeast - 1.5 tsp
- salt - 1 tsp

For the preparation of these fresh Arabic cakes, we take such simple and affordable ingredients as wheat flour (of the highest or first grade), water, refined vegetable (I have sunflower) oil, salt and yeast. I used high-speed yeast, which does not require prior activation in the liquid, but is added immediately to the flour. If you just have dry (also 1.5 teaspoons) yeast or pressed / fresh yeast (15 grams), you need to dissolve them in warm water and let stand for 10-15 minutes.


Add 1.5 teaspoons of high-speed yeast and 1 teaspoon of salt (preferably fine). If the salt is large, it is advisable to pre-dissolve it in warm water. Mix the flour and yeast with your hand or a spoon to make the mixture relatively homogeneous.


Knead a rather soft dough that holds its shape perfectly and practically does not stick to your hands. You need to knead long enough (with your hands - at least 10 minutes), so that the dough becomes completely homogeneous and smooth. Tighten the bowl with cling film or cover with a towel and leave it warm for 2 hours. After 1 hour of fermentation, we make a light warming to release the gas, round the dough and again into the heat for another 1 hour.

After 2 hours of fermentation, the yeast dough for tortillas is very suitable and grows in volume by at least 3-3.5 times.

Divide it into small pieces of the same size, round each, giving the shape of a ball. We leave it on the work surface, slightly dusted with flour, cover with a film or towel and let the workpieces rest at room temperature for about 15 minutes.

Then we roll each piece of dough into a flat cake (not more than 5 millimeters thick), not forgetting to sprinkle the dough with flour (slightly) so as not to stick to the rolling pin. Thus we roll out all the workpieces. Let them rest for 10 minutes on the table.

In advance (about 30 minutes before baking) we turn on the oven to warm up to 220 degrees with a baking sheet - it should be hot. When the oven heats up properly, we take out a hot baking sheet (you can not get it out, just push it out) and quickly put a few blanks on it.

Immediately close the oven door and cook pitas at an average level of about 7-8 minutes. During this time, they swell like balls, and completely bake. When the first batch is ready, remove the cakes from the pan and immediately bake the rest.

Ready pitas, if you have done everything correctly, are well inflated, while not tearing - all the air will remain inside.


We serve pitas warm, although even after cooling they remain fresh for several days when stored in sealed containers or a tightly tied bag. These cakes, by the way, can be frozen.

Arab pitta cakes are soft, delicate, aromatic and very tasty. They are hollow inside and are great for filling with a wide variety of fillings. Try it, you should like this simple but delicious homemade bread.

Recipe 2: Pita Yeast Cake (Step by Step)
In ordinary home conditions it is difficult to repeat the traditional technological process, but still our hostesses were able to adapt the recipe for making this amazing bread, and now pita can appear on every table. It will take a very high fever and knowledge of some secrets. With short baking, the pita cake swells violently and forms inside the pockets, which can be filled with any filling after cooking. Pita is perfect for first and second courses, it is convenient to take with you on the road, to work. Any recipe for pitta at home is simple, because products that are in any kitchen are used.
- water 200 ml
- salt 1 tsp
- sugar 1 tsp
- dry yeast 2 tsp
- olive oil 2 tbsp
- wheat flour 350 g

Before you cook pita at home, prepare basic foods. Pour water at room temperature into a deep bowl. Sprinkle salt and granulated sugar. Stir until dissolved.

Sift the wheat flour into another bowl with high sides. Pour dry yeast. Arm yourself with a whisk and mix so that the yeast is evenly distributed throughout the flour.

Pour liquid into the flour mixture. Start kneading with a spoon until a thick dough is formed. Continue kneading on a dusted board until soft dough is formed.

Transfer the ball of dough back into the bowl. Pour in olive oil. Stir until the oil is absorbed into the test bun.

Cover with a kitchen towel and leave to rise in a warm place for about 40-60 minutes. If the room is very warm, the dough will rise faster.

Mind the rest of the dough. If necessary, add a little flour. Divide into 8 pieces. Form a ball from each piece. Cover the blanks with a towel and work with each separately.

Roll into a round layer 5-7 mm high.

Turn on the oven in advance. Cover the baking sheet with parchment and send to the oven to heat up. Set the temperature to 260-270 degrees. Place rolled blanks immediately in the oven on a hot baking sheet.

Bake a loaf of bread for 5-7 minutes. Pete should stay white.

Fancy cakes are ready. Serve to the table warm without anything or stuff. Absolutely any filling for pita is prepared easily. Enjoy your meal!

Recipe 3: Homemade Air Pita
- Flour - 1 kilogram
- Salt - 2 teaspoons
- Sugar - 2 teaspoons
- Dry yeast - 1.5 teaspoons
- Vegetable oil - 4 tablespoons
- Water - 600 milliliters

Sift one kilogram of flour into a mixer bowl and, stirring at low speed, add two teaspoons of salt and two teaspoons of sugar. When the flour is well mixed with sugar and salt, add 1.5 teaspoons of dried yeast and mix well again.

Gradually, while continuing to mix, pour about 600 milliliters of warm water into the flour.

Knead at low speed until a homogeneous dough is obtained and gradually, continuing to knead, pour 4 tablespoons of vegetable oil. Knead the dough for about 10 minutes.

We shift the dough into a large bowl, cover with a kitchen wrap or a slightly damp towel and leave at room temperature to rise for about an hour and a half, the dough should double in volume.

We crumble the rising dough or fold it several times. And once again, put in a bowl, cover with a film or towel and leave for 20-30 minutes.

After 20 minutes, crush the dough, divide into four parts. We roll each part into a ball and divide it again into four parts.

We got 16 identical pieces of dough, cover them with a towel and leave for 10 minutes.

After 10 minutes, we roll each piece of dough into a ball and, observing the order, we roll each ball into a cake with a diameter of 15 centimeters.

We put the pitas on a baking sheet lined with baking paper and bake in a preheated oven at a temperature of 250 degrees Celsius for 5-6 minutes. At the same time, pit should be soft and not ruddy.

We take out the finished pits from the oven, transfer to a wooden board, cover with a towel and let cool a little.

We serve pitas to the table warm to meat and salads.

Recipe 4: a hollow pita cake (step by step photos)
- Flour - 750 g
- Fresh yeast - 25 g
- Sugar - 2 tsp
- Water - 450 ml.
- Sunflower oil - 2 tbsp.
- Salt - 1 tsp

First of all, we dissolve sugar in warm water, add yeast, mix well. Cover with a napkin, leave alone for 15 minutes.

After 15 minutes, the liquid should bubble up.

Meanwhile, sift the flour into a bowl, add salt. Pour all the flour right away. Better then, when mixing the dough, add if necessary (it may be needed and vice versa - more)

Add the yeast mixture to the flour, knead the dough. The dough should not be “jammed” with flour, it should be quite soft. Knead should be at least 10 minutes, the dough becomes smoother, softer every minute. And best of all - to entrust this business to the bread machine!

Sprinkle the bowl with flour a little bit, send the dough here, after rolling it into a ball. Cover with a film, leave in a warm place for 1-1.5 hours until the volume doubles. Now the most suitable place for this is the oven with the light on.

After the specified time, we take out the dough, crush it.

Cut it into 12-15 approximately equal parts. We roll each part into a ball. Do not forget to cover the balls with a napkin to avoid chapping. Leave them alone for 15 minutes, covering with a napkin and protecting from drafts.

In the meantime, prepare the baking sheets. In order to save time, I use 3 pieces (but bake ONLY one at a time!). Put parchment paper on them, sprinkle with flour a little. Turn on the preheat oven to 250 degrees.
After 15 minutes we take the ball that we molded first, roll it out. The thickness should be approximately 6-8 mm. Spread on a baking sheet. So do the second, third, and so on. balls.

I prefer to prepare all the blanks at once, as we will continue to act very quickly and they will be baked instantly. After heating the oven to 250 gr., Quickly put the first batch there, trying not to keep the oven door open for a long time. Bake for about 8 minutes.

That's how they swell in the oven in the 6th minute, but you should always navigate your oven!
Pitas should not lightly brown, otherwise they will be dry. 2-3 minutes after “bloating” is enough (again, remember the nature of your oven).
We bake only one baking sheet in the “bottom” or “bottom + top” mode (not allowing them to lightly brown).
When the first batch is ready, we quickly get it, let the oven warm up again to 250 g., Repeat the process.
I usually bake one batch at 180 degrees, we get ordinary, but very tasty bread cakes.

Recipe 5, simple: pita cake without yeast
This easy recipe will help everyone to cook Arabic pita bread without yeast. The cake is prepared easily and simply, it can also be baked in the oven at a temperature of 250 degrees. Be sure to try to cook it at home and you will not regret it!
- Wheat Flour - 2 Glasses
- Salt - 1 Teaspoon
- Vegetable oil - 4 Tbsp. spoons
- Water - To taste (How much will the dough take)

In a separate container, mix wheat flour and salt, add oil and mix everything thoroughly with your hands. Gradually add water to the mass and begin to knead the dough. We do this until the dough becomes elastic and sufficiently sticky. Cover the dough with a towel and leave it in a warm place for 10 minutes.
At the end of time, we begin to roll out the dough on a work surface previously sprinkled with flour. Roll out a thin cake from the dough and put it on the pan without oil. Bake over high heat, turning over. Each side will take about 30 seconds. Now we shift the cake to the grate over the fire and bake until bubbles appear. Pita without yeast is ready, bon appetit!
Recipe 6: Crispy Pita Stuffed Cake
- Wheat flour / Flour - 150 g
- Water - 100 ml
- Yeast (dry) - 5 g
- Salt - 1 pinch.
- Sugar - 1 tsp.
- Vegetable oil - 1 tsp.
- Cucumber - 1 pc.
- Lettuce / Salad - 6 pcs.
- Chicken (boiled) - 100 g
- Champignons (fried) - 3 pcs.
- Green onion - 2 sprigs.
- Mayonnaise - 2 tbsp. l
- Black pepper (to taste) - 1 pinch.

Dissolve yeast in warm water. Then add salt, sugar and butter. Leave alone for 5 minutes.

Then add the flour and knead the dough. Leave to approach for 40-50 minutes.

Divide the dough into 6 parts. Each thinly rolled into a circle. We bake on a wire rack, it is possible from a microwave, in a preheated oven 250С. While rolling out the next, the first is ready.

You will see if the pita has pouted and becomes golden, then it is time to take it out.

For the filling, you need to cut the cucumber and green onions. Boil chicken and fry mushrooms.

Cut the pita from one edge.

We spread the sixth part of the filling and pour a little mayonnaise. Pepper to taste.

Arabic pita bread swells a lot during baking. Due to this, a “pocket” is formed in the middle, into which you can later add a filling. Pita can be used for lunch (filling it, for example, with baked meat and vegetables or served as bread for meat dishes), and for breakfast (you can put a little salad or canned vegetables inside).
Such cakes are the oldest type of bread, do not require special tools or ovens. They could easily be obtained by nomadic peoples, for example Bedouins, who mixed flour with water and formed round cakes that they fried on fire. The word pita comes from Greek (????) and means flat cake, and probably comes from the ancient Greek words pektos means "solid." From Greek pita translates as pita bread. In Arab countries, pita bread is called khubz arabi or Arabic bread.
This is one of the oldest types of bread made by man. It is common in the cuisines of many countries in the Mediterranean. It is popular in the countries of the Eastern Mediterranean (for example, Greece, Cyprus, Turkey, Egypt) and North Africa. This round wheat bread is popular in the Middle East and often pita bread can also be bought in our stores. There is Turkish pita bread and Arabic pita bread. As a rule, it is served with spicy sauce, but its versatility in the kitchen allows us to open our imagination in terms of adding fillings to it. How is this type of bread different from traditional ones and how can you make fluffy pita at home?
This is bread made from the usual simple dough, the same from which ordinary bread is made or. The dough includes flour, water, salt, sugar and yeast. As a rule, pits are cooked in a hot oven at a very high temperature - up to 230 degrees, while the dough rises very quickly. The outer layer of thin dough grows rapidly under the influence of temperature, carbon dioxide and water vapor, thus, after separation of the upper layer from the bottom, well-known pockets of bread appear. Some pitta recipes suggest frying it in a pan, but it’s not a fact that with this method you will get the corresponding pockets.
Pita bread - what to eat with
Pita is often called Arabic bread. Interestingly, in Greece, it takes the form of a cone, which is filled with filling. As for the ingredients that can be added to it, there is a huge variety of them. It can be used to prepare Cypriot sandwiches with halumi cheese or, according to a recipe from Brindisi, with anchovies, olives and herbs, such as spinach.
These bread rolls traditionally play two roles - food and dishes for food, successfully replacing cutlery and plates. Sliced \u200b\u200bin triangles, they are used to scoop sauces and dip, for example, hummus (lentil dip) and taramosalata (Greek pasta with caviar). In these bread rolls, as if wrapped in various components or put them in an inner pocket. Examples are the famous Greek and Turkish dishes - kebabs, falafel, gyros and souvlaki. In Arab countries, almost any dish can be eaten with pita. It can also serve as the bottom of pizza, which is popular in Turkey, where they are covered with minced meat and herbs.
Pita bread toppings:
- Very well, this cake will be in harmony with kebab and hot sauce.
- A good idea would also be to split the tortillas in half and to place in the middle a nutrient mixture of vegetables and meat. For this composition, you can add garlic sauce or mayonnaise, which will give an exquisite taste, or just pour the ingredients with olive oil.
To fill pita bread, the filling can be varied:
- finely chopped cabbage,
- tomatoes
- pickles,
- cheese slices
- pieces of fried bird.
Greek pita is also good as an oven baked appetizer. Thus, we can add to it previously fried minced meat with the addition of grated cheese, pineapple, red beans and corn. The bread obtained in this way is enough to bake slightly so that the ingredients combine well and the cheese melts. These snacks can be used as a side dish for lunch with a spicy Mexican-style sauce. This food is quite high-calorie, and harmoniously combines carbohydrates and fats.
How to cook pita?
A characteristic feature is that during baking a pocket is formed in the dough, which greatly facilitates filling it with minced meat.
Pita bread - recipe number 1
In order to cook pita you must have the following ingredients:
- 1 kg of flour
- 1.5 cups of milk
- 4 grams of yeast
- 6 tablespoons of olive oil,
- 2 tablespoons of sugar
- 2 tablespoons of salt,
- 600 ml of warm water.
Yeast should be combined with milk and sugar, then add 4 tablespoons of flour. The prepared mixture is put in a warm place, and when it doubles the volume, you need to add all the other ingredients and mix thoroughly. If the mixture is too thick, it may be slightly diluted with water, and then it must be set aside to rise for about 2 hours. You must remember that you need to cover the dough with a cloth, because in this case it will increase faster. After it grows, it should be kneaded on a floury table and divided into small pieces in the shape of an ellipse, and then rolled out the cakes, which are placed in the oven on a greased baking sheet with olive oil. Pita is ready when the dough grows and becomes puffy. It usually takes a few minutes, about 6-8. The oven should be heated to a temperature of approximately 220 degrees.
Pita bread - recipe number 2
- 300 g flour (approximately 2 cups.),
- 20 g of yeast
- salt,
- a pinch of sugar
- a spoonful of olive oil.
Mix the yeast with sugar and a few tablespoons of warm water. Let stand to grow up. Sift the flour. Add salt and yeast, mix by adding warm water (the dough should be like dumplings). Knead by adding flour until it leaves your fingers. Grease hands with olive oil and grease the dough on top and let it stand under the lid in a warm place. When it increases in volume, divide into four parts, leave to rise again. Form thin cakes and lay in dry trays, cover and let stand to grow. Bake at 250 degrees for about 10 minutes. Remove, wrap in a cloth so as not to dry. Serve hot, straight from the oven.
Note: You can replace half the flour with wholemeal or whole grain flour.
Pita in the bread maker:
All ingredients for the dough must be placed in a container for kneading in the order specified by the manufacturer of the bread machine. Install a program for kneading the dough and proofing the dough (about 1.5 hours), and then take out the dough, knead and proceed as described above.
Notes:
The amount of water required for the dough depends on the type of flour and moisture, so it is likely that the dough will consume a different amount of it. You should add more water little by little, and check the consistency of the dough.
Some chefs advise adding olive oil.
If you do not eat bread immediately, let it cool. Then you need to pack them tightly in a bag and store for 2-3 days. Sprinkle with water before serving and then heat in the oven.