Homemade ice cream recipe without an ice cream maker with a blender. Homemade coffee cream ice cream
There is a widespread belief among culinary enthusiasts that it is impossible to make ice cream at home without special equipment. We will try to dispel this myth and tell you how to make simple ice cream yourself.
Vanilla ice cream
Using this recipe as an example, you will learn how to cook many others, for example, fruit, berry or chocolate. A cream sundae is essentially a chilled custard made with an egg. Adults and children love it, and we will cook it at home like this:
- Pour one liter of 33% cream into a saucepan with thick walls, add vanillin or
- Place the dishes on the fire and, stirring constantly, heat the cream, but do not bring it to a boil.
- Using a mixer, beat eight egg yolks with 170 grams of sugar. After this, pour hot cream into them. Do not forget to stir the products all the time with a simple culinary whisk.
- Pour the resulting mixture back into the pan and place it over low heat. Stirring the liquid with a spatula, cook it until thickened, avoiding boiling.
- Remove the pan from the heat, let the contents cool slightly and add rum to taste or a couple of tablespoons of cognac.
- Pour the resulting mass into a plastic container, cool completely, and then place in the freezer.

Delicious ice cream will be ready soon. Before serving, place it in the refrigerator for half an hour to make the structure of the delicacy more tender.
Dairy ice cream
By preparing this treat yourself, you can enjoy its wonderful taste. No less pleasing is the absence of chemical additives. To make homemade ice cream without cream, you will need:
- Grind four yolks with one glass of sugar.
- Add vanillin to the mixture to taste, add two and a half glasses of hot milk and bring the resulting mass to simmer over low heat.
- While the future ice cream is being prepared, stir it constantly with a spatula. When the mixture thickens enough and the foam disappears, remove it from the stove.
- Strain the resulting mass through several layers of cheesecloth, then cool and place in the freezer in a plastic container.
Place the finished milk ice cream in beautiful shapes, decorate with chocolate and nuts. If desired, you can serve it with fruit or fresh berries.
Ice cream
Here is a recipe for a very tasty and very simple treat. Even a child can cope with its preparation, so feel free to get down to business. We will prepare creamy ice cream as follows:
- Stock up on ready-made waffle cones at the store or make them yourself using a waffle iron.
- Melt 100 grams of chocolate over the fire and use a special brush to grease the inside of the tubes.
- Whisk half a liter of heavy cream (35%) with ¾ cans of condensed milk. Add vanilla, chopped walnuts, grated chocolate to the mixture and mix everything well again.
- Using a pastry syringe or bag, fill the waffle cones with the resulting mixture.

Place the future ice cream in the freezer for several hours. To prevent it from leaking out and losing its beautiful shape, place the horns in cups or use an egg cassette.
Fruit ice cream in a minute
If you want to please your loved ones with the perfect delicacy with a fresh taste, then this recipe is for you. Plus, our popsicles don't contain excess fat or many calories. Here's how to prepare a light treat:
- Take half a glass of frozen pitted cherries (you can replace them with orange, kiwi, apples or any other fruit) and half a glass of natural yogurt (milk, cream, kefir or syrup are allowed instead).
- Combine the ingredients in a blender bowl, adding a couple of tablespoons of granulated sugar.
- Mix the products for one minute. As a result, they should turn into an elastic paste. If you think the mixture is too liquid, you can add a few more berries. During this period, you can add a little sugar if you decide that it is not enough.
- Place the treats in vases and serve.

If you want to please yourself with delicious treats all year round, then freeze more different fruits and berries in the summer. It will refresh you, lift your spirits and, most importantly, will not spoil your figure.
Cottage cheese creme brulee
This tasty treat is prepared simply, but it turns out very tasty. Read how you can make your own light homemade ice cream. Simple recipe:
- Mix 200 grams of full-fat cottage cheese and half a can of condensed milk using a blender or mixer. When the resulting mass becomes homogeneous, add 50 ml of milk to it and mix thoroughly again.
- Place the finished product into silicone muffin cups and then place in the freezer.
In a few hours, the curd ice cream without cream will be ready.
Chocolate ice cream
How to make delicious and healthy homemade ice cream? A simple recipe will help you please your loved ones with an original dessert that is no different from the factory one:
- Heat half a glass of milk on the stove, add three tablespoons of sugar and 100 grams of dark chocolate (it should be broken first).
- Place the products in a water bath and, stirring constantly, cook them until a homogeneous consistency is obtained. Remove the mixture from the heat and cool.
- Beat a glass of chilled heavy cream with a mixer.
- Combine the products, put them in a mold and place them in the freezer.

After a few hours, when the delicious ice cream has cooled sufficiently, it can be taken out and served.
Recipe "Two in one"
The dessert got its name for its unique ability - it can be used not only for making ice cream, but also for custard, which can decorate any cake. How to make homemade custard ice cream in your kitchen? A simple recipe in front of you:
- Mix one glass of sugar, one spoon of flour and two chicken eggs in a suitable bowl.
- Bring one glass of milk to a boil, and then pour it in a thin stream into the prepared mass. To prevent the eggs from curdling, the mixture should be constantly stirred.
- Pour the resulting product into a saucepan, place it on the fire and bring to a boil. After this, remove the pan from the stove and let its contents cool slightly.
- Add vanillin and two hundred grams of butter at room temperature to your future ice cream to taste. Quickly beat the ingredients with a mixer.
If you decide to make a cake, then the cream should be used immediately. If you plan to pamper your loved ones with delicious ice cream, then transfer the product into a mold and freeze it in the freezer. After a few hours, place the delicacy on plates, decorate it with chocolate and serve.
Lemon dessert
Making delicious ice cream from yogurt is very simple. To do this you just need:
- Mix one liter of curdled milk with 500 grams of powdered sugar.
- Beat the products at low speed with a mixer. Then add the juice and zest of two lemons. Mix the ingredients again.
- Freeze the food in the freezer for several hours.

Serve dessert garnished with sprigs of fresh mint and a slice of lime.
Coffee ice cream
This seemingly complex dessert will ultimately pay off your efforts and time spent on it. To prepare it, you will need:
- Prepare or buy savoiardi biscuits from the store.
- Mix 70 ml of milk with 15 ml of cream and place it on the stove to warm up. Mix one yolk with one tablespoon of sugar, a teaspoon of starch and vanilla. Pour the resulting mass into hot milk. When the liquid boils, stir the ingredients and remove them from the heat.
- Cool the resulting cream, cover with cling film and place in the refrigerator.
- To prepare the syrup, brew one hundred grams of coffee and dissolve forty grams of sugar in it.
- Next, prepare the mascarpone and white chocolate cream. To do this, whip 170 ml of cream to high peaks and combine it with 250 grams of mascarpone. Place the mixture in the refrigerator.
- Break white chocolate (200 grams) into pieces and melt in a water bath.
- Heat the cream and mix it with melted chocolate and add a little coffee.
- Place the cookies face down on the work surface and soak in the coffee syrup. Place popsicle sticks on top (if you make the cookies yourself, bake them with the sticks right away).
- Using a culinary syringe, spread the cream and place the treat in the freezer for several hours.

Cover the finished ice cream with chocolate glaze and sprinkle with cocoa.
Marshmallow-coconut dessert
We are sure you will love this delicious homemade ice cream. A simple recipe will save time, and the ingredients will make the dessert as affordable as possible. How to prepare it:
- Take 250 grams of any marshmallow and so on), break it into pieces and combine with 250 grams of cream. When the marshmallows have dissolved, remove the mixture from the heat and let it cool.
- In another bowl, bring 250 ml of cream to a boil over low heat and add 65 grams of coconut flakes. Mix the ingredients thoroughly, remove them from the heat and leave to cool to room temperature.
- Combine both masses in one pan and place it in a cup of ice water. Beat the mixture with a mixer for about five minutes at low speed.
Place the finished semi-finished product in molds or in a plastic container, and then freeze it in the freezer. You can taste a delicious dessert in just five to seven hours. Serve it to the table in the form of balls, decorated with nuts and grated chocolate. Bon appetit!
It is difficult to find a person who, at least as a child, did not like ice cream. So many pleasant memories are associated with this delicacy. Many people, even in old age, remember the very tastes that they enjoyed with pleasure in their distant, distant childhood.
Now in numerous shops and mobile stalls you can buy ice cream for every taste, and even color. However, not a single one of them will convey the taste of that same Soviet ice cream that delighted children just a couple of decades ago.
But nothing is impossible in the world, especially for a person with intelligence. And you can make delicious homemade ice cream “just like in childhood” without leaving your home. Let's talk about this.
Ingredients:
How to make ice cream from milk and butter at home
1
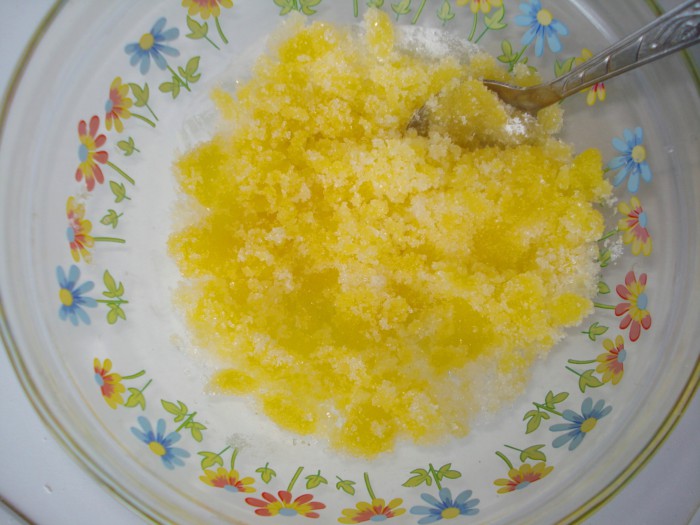
. Wash the egg shells well, then crack the eggs and carefully separate the yolks from the whites. We only need the yolks, which need to be mixed with sugar. Stir, grind the sugar until dissolved.
 2
. Add starch.
2
. Add starch.
 3
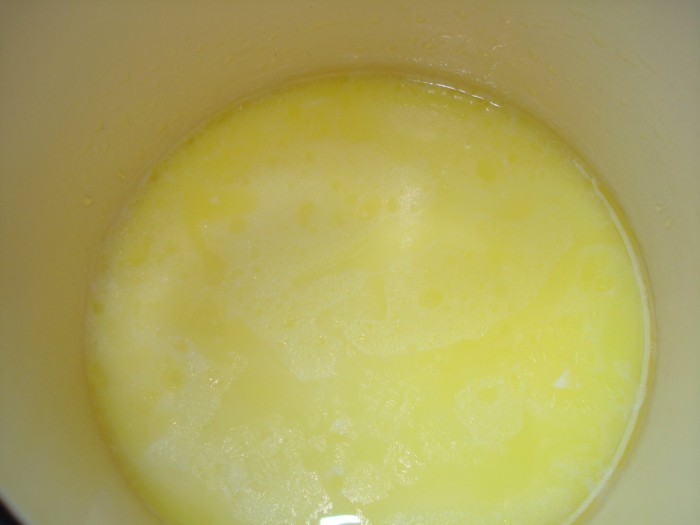
. Pour the milk into a saucepan and place on the fire. Do not forget to constantly stir the milk so that it sticks to the bottom of the pan and foam does not form on the surface. Once boiling, reduce heat to low. Add butter. Wait until the butter is completely melted in the milk.
3
. Pour the milk into a saucepan and place on the fire. Do not forget to constantly stir the milk so that it sticks to the bottom of the pan and foam does not form on the surface. Once boiling, reduce heat to low. Add butter. Wait until the butter is completely melted in the milk.
 4
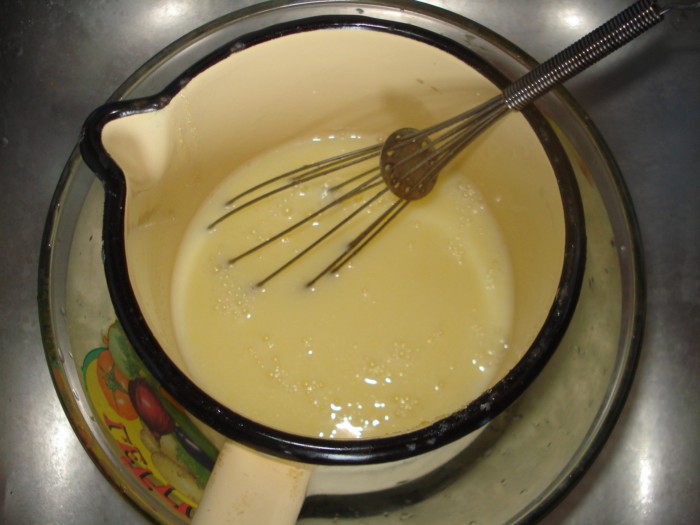
. Then pour a mixture of sugar and starch yolks into the milk in a thin stream. Bring to a boil and immediately remove the pan from the heat (note, the mass should not boil, but only warm up well, otherwise the homemade ice cream will turn out watery with pieces of ice, crumbly). It is advisable to strain the resulting mass so that it becomes homogeneous.
4
. Then pour a mixture of sugar and starch yolks into the milk in a thin stream. Bring to a boil and immediately remove the pan from the heat (note, the mass should not boil, but only warm up well, otherwise the homemade ice cream will turn out watery with pieces of ice, crumbly). It is advisable to strain the resulting mass so that it becomes homogeneous.
 5
. It is advisable to cool the resulting mass intensively by placing the cup of future ice cream in a bowl of ice. If this is not possible, put the ice cream in the freezer for 30 minutes.
5
. It is advisable to cool the resulting mass intensively by placing the cup of future ice cream in a bowl of ice. If this is not possible, put the ice cream in the freezer for 30 minutes.
 6
. Then take out the ice cream and beat the mass with a blender and whisk. And freeze again. Beat the ice cream 2-3 more times every 30 minutes.
6
. Then take out the ice cream and beat the mass with a blender and whisk. And freeze again. Beat the ice cream 2-3 more times every 30 minutes.
 7
. Gradually, homemade ice cream becomes more homogeneous and airy.
7
. Gradually, homemade ice cream becomes more homogeneous and airy.
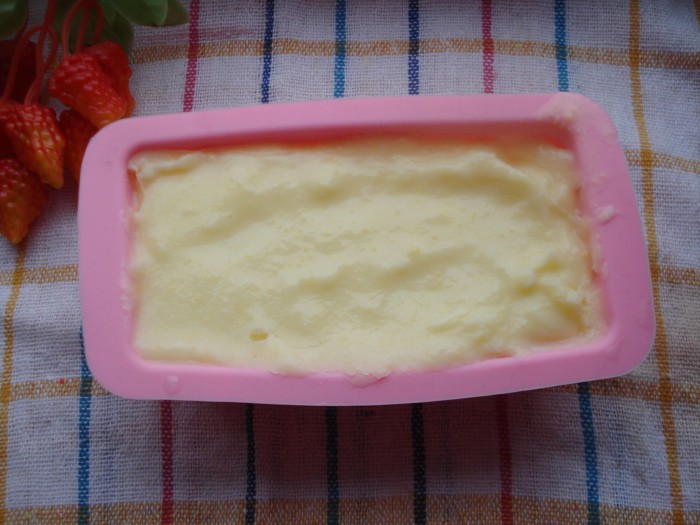
 8
. Pour into molds. Place in the freezer until completely frozen.
8
. Pour into molds. Place in the freezer until completely frozen.
 9
. You can add grated chocolate to the bottom of the mold.
9
. You can add grated chocolate to the bottom of the mold.

10 . And then pour in the ice cream mixture. This recipe makes homemade ice cream delicious, but it melts quickly, so don’t put the dessert on the table in advance.
Delicious homemade ice cream is ready
Bon appetit!

Creamy ice cream (classic recipe)
 Ice cream can be different. It all depends on the additives and fillers that are added to it. Therefore, you should start learning the art of making homemade ice cream with the simplest – the classic recipe.
You can, of course, follow the path of least resistance and purchase an electric ice cream maker. If you have such a device, you don’t need to do anything at all. It is enough to put all the ingredients in it and, after some time, enjoy the finished dessert.
However, it's boring. It’s much more interesting to learn how to do everything yourself from start to finish. And for this you will need to prepare:
- milk – 0.7 l;
- cream – 0.3 l;
- eggs – 7 pcs. (only yolks are needed);
- powdered sugar – 150 g;
- vanillin – 15 g.
First you need to put the milk to boil. Of course, we need to keep an eye on him. But at the same time, you can start preparing the base of the future dessert. To do this, carefully break the eggs into a bowl and separate the yolks from the whites. The whites are no longer useful, but the yolks need to be thoroughly ground with bulk ingredients - vanillin and powdered sugar. The mass should be absolutely homogeneous.
When the mixture is ready, pour half the dose of boiled milk into it and mix thoroughly again. Pour the resulting mass into a saucepan with the second half of the milk and cook over low heat, stirring constantly, for 3 minutes. The result should be a mixture with the consistency of standard sour cream.
After 3 minutes, remove the saucepan from the heat and allow to cool to room temperature, then place in the refrigerator for further cooling.
Now it's time to get to the cream. They must be beaten until stable “peaks” form. It is better to do this with a mixer. You can, of course, work with a whisk, but this is too labor-intensive. Add the whipped cream to the slightly cooled milk-egg mixture and mix everything well with the same mixer. The ice cream is almost ready. All that remains is to freeze the dessert. To do this, you need to put it in the freezer for 10-12 hours.
True, you shouldn’t forget about the future ice cream during all this time. For the first 5 hours, approximately once an hour, the mass must be taken out and mixed again using a mixer. For the last 5-7 hours, homemade ice cream can be left alone, and then served for tasting to household members or guests.
By the way, chocolate or various fruit syrups can be a good addition to this ice cream. They can be added either to a ready-made dessert or as one of the ingredients during the cooking process.
The simplest ice cream
This method of preparing frozen dessert is even simpler than the previous one. The ice cream is not GOST standard, but no less tasty. And most importantly, it simply cannot fail. After all, there is no need to cook something strictly according to time or stir it every now and then. To prepare it you will need the following components:
- milk – 100 ml;
- sugar – 100 g;
- dry milk formula (baby food) – 100 g;
- cream – 200 ml.
First you need to weld the base. To do this, mix milk, sugar, and milk mixture in a saucepan and cook over medium heat until the mixture has the consistency of condensed milk. When the resulting base has cooled, you need to mix it with cream using a mixer or blender. Now all that remains to be done is to put the almost finished ice cream in the freezer for 3-4 hours.
In principle, you can do without cooking at all. After all, in fact, it turned out to be homemade condensed milk in a saucepan. So if you don’t want to mess around, you can use ready-made condensed milk.
Homemade milk ice cream
 Such homemade ice cream resembles the taste of Soviet “Molochnoye” - for 10 kopecks. Anyone who has tried it will understand what we are talking about. Well, those who haven’t tried it can simply rejoice at the simplicity of preparation and the minimum set of the simplest (and inexpensive) products:
- milk – 200-250 ml;
- sugar – 50 g (about 2 tablespoons);
- eggs – 1 pc.;
- vanillin - to taste.
Break the egg into a bowl, add sugar, vanillin and beat well with a mixer. Pour the mixture into a saucepan, add milk and place on low heat. Constantly whisking the mixture with a whisk, bring it to a boil and immediately remove from the stove. Pour the finished mixture into any suitable tray, cool to room temperature and place in the freezer for 4 hours. The mixture must be taken out every hour and mixed thoroughly using a mixer.
Curd ice cream with orange syrup
 This homemade ice cream goes great with homemade orange syrup. Although even without it it remains incredibly tasty. To please your household with such a dessert, you need to take:
- fat cottage cheese – 500 g;
- cream – 350 ml.
For the syrup:
- water – 125 ml;
- sugar – 100 g;
- oranges – 2 pcs. medium size;
- butter – 50 g;
- vanillin – 15 g (1 sachet).
The starting point for making this homemade ice cream is syrup. To do this, mix water, sugar, butter in a small saucepan and bring to a boil over low heat, stirring constantly. After this, add the juice squeezed from the oranges and the zest grated on a fine grater to the mixture. Mix everything well and cook over low heat for about 5 minutes. Allow the finished syrup to cool to room temperature.
Now you can start making the ice cream itself. In a blender or using a mixer, beat cottage cheese with condensed milk. The result should be a fairly porous mass. Separately, whip the cream and mix with the curd mixture. Place almost ice cream in a container, pour in syrup and place in the freezer for 10-12 hours.
In principle, you can do without syrup. The ice cream won’t lose any of its taste because of this.
If instead of regular condensed milk you use boiled condensed milk, then the resulting dessert will taste like creme brulee, beloved by many.
DIY chocolate ice cream
 Ice cream prepared according to this recipe will certainly appeal to those who love chocolate varieties. It is also interesting because its structure does not form large crystals when frozen. This means that you don’t have to stir it during the last stage of preparing the treat. It must be prepared from the following products:
- chocolate – 200 g;
- condensed milk – 400 g (1 can);
- heavy cream – 600 ml;
- chocolate cookies – 100 g.
Break the chocolate into pieces and melt in a steam bath or in the microwave. By the way, if the last device is used, then it must be turned on at full power. Time required: 1-2 minutes. In this case, the melting chocolate must be stirred every 30 seconds. When the bar is completely melted, allow the chocolate to cool slightly.
Now you need to mix the cream with condensed milk and beat until soft foam using a mixer. This will take approximately 5 minutes. Add melted chocolate to the resulting mass in 2-3 additions. At the same time, after pouring in the next portion, the resulting mixture must be thoroughly beaten with the same mixer for about a minute.
The last thing to add to the semi-finished product is the cookies, crushed into fine crumbs. And mix everything thoroughly again. Transfer the finished mixture into a mold and freeze for 8-10 hours.
The recipe describes an option for making homemade chocolate ice cream from ready-made condensed milk. But you can also use homemade ice cream, prepared using the method described in the “Easiest Ice Cream” recipe.
This version uses chocolate cookie crumbs as an additive. However, you can use any other filling instead: hard chocolate, nuts, etc.
Homemade strawberry ice cream
 Despite the fact that the name of the recipe (and the description) says “strawberry”, you can make such a delicacy with absolutely any fruit: cherries, currants, apricots, etc., etc., etc.... It’s very simple to prepare it, the main thing is that found at home:
- heavy cream – 450 ml;
- sugar – 50-100 g;
- condensed milk – 200-250 g;
- butter – 50 g;
- strawberries – 250 g.
The preparation of such a dessert begins with working on the fruit. Strawberries should be cut into small pieces (4-6 depending on size). Place a frying pan over medium heat and melt the butter in it. Then add strawberries and mix them thoroughly with oil. It is necessary that every berry piece is covered with oil. After this, pour sugar into the pan and simmer the mixture for about 15 minutes, stirring it constantly. The finished mixture must be allowed to cool completely.
Whip the cream until stable peaks form. After that, add condensed milk to them in portions, gently mixing the resulting mass with a spatula. Then put the cooled strawberries there and mix everything carefully.
Transfer the finished mixture into a mold (preferably narrow and long) and place in the freezer for 8 hours. Strawberry dessert is ready.
Kulfi - Indian ice cream
 Ice cream is distributed all over the world, and the history of this dessert goes back more than one thousand years. Of course, the cold delicacy was and is most popular in hot countries. Here, for example, is a recipe for Indian ice cream, which requires not so exotic products:
- milk – 0.8 ml;
- sugar – 50 g;
- starch – 30 g (1 tablespoon);
- white bread – 30 g (1 slice);
- cardamom – 1 teaspoon;
- nuts – 10 pcs. (almonds or pistachios, naturally unsalted).
The first step is to pour boiling water over the almonds. After 2-3 minutes, the water can be drained and the skins removed from the nuts. Mix the peeled nuts with cardamom and sugar.
Cut off the crusts from the bread, chop and place in a blender. Add starch, 100 ml of milk there and mix everything. Pour the remaining milk into a saucepan and simmer over low heat for about 15 minutes until the milk has reduced by 1/3. Then add the mixture from the blender and continue cooking for another 5 minutes, after which pour the nut-sugar mixture into the pan. You need to cook the mixture for about 10 minutes. By that time it will begin to thicken.
All that remains is to pour the almost finished homemade ice cream into a container or mold, let it cool slightly and put it in the freezer for 7-8 hours. The kulfi can be served garnished with unsalted pistachios.
Above are the simplest recipes for making homemade ice cream. In fact, they can be used to prepare a huge variety of frozen desserts, including the most exquisite and incredible ones.
To ensure that homemade ice cream always turns out well, you should listen to some advice from experienced chefs. So:
- preparing ice cream requires careful adherence to the recipe and cooking instructions;
- the taste of ice cream directly depends on the quality of the products, so you shouldn’t skimp;
- ice cream will turn out more airy if you use milk, cream and other dairy products with maximum fat content;
- the ice cream will be more tender, and it will be easier to prepare it if you use powdered sugar instead of granulated sugar;
- In some recipes, gelatin is used as an ice cream thickener; in this case, before use, it must be completely dissolved in warm water in a steam bath;
- A couple of spoons of dessert wine (preferably white) makes homemade ice cream more tender, although you can add rum or cognac, but any alcohol will increase the freezing time of the dessert;
- The key to porosity and softness of ice cream is thorough mixing during the first 5-6 hours of freezing, incl. If possible, this should be done even if the recipe does not provide for this action;
- if you plan to add pieces of fresh fruit to the ice cream, then it is better to do this in the last 2-3 hours of freezing, but it is better to add syrup to the future delicacy immediately;
- The mass should only be frozen in containers or other containers closed with lids, since ice cream absorbs all foreign odors well.
Video recipe for homemade ice cream with cookies and chocolate
Cream- this is not just creamy ice cream. The same taste of ice cream made in the USSR, familiar to many from childhood, is achieved thanks to the delicate consistency of the delicacy. To the dismay of those who watch their figure, this can only be achieved with a sufficiently high concentration of fat and sugar. The ice cream recipe assumes a concentration of fat and sugar of about 15%, so the calorie content of the ice cream is 232 kcal. This is quite a lot, but for sweet lovers who are watching their figure, they are now releasing a lighter version of the ice cream, not so high in calories.
- 2 tbsp. Sahara
- 1 liter of milk
- 100 g butter
- 1 tsp. starch
- 5 egg yolks
Cooking process:
- Heat the milk and add butter to it. Bring to a boil.
- In another container, mix sugar, starch and yolks. Mix and grind until smooth.
- Add some milk to this mixture. You should end up with a mass similar in consistency to sour cream.
- When the milk boils, pour the yolk mixture into it in a thin stream, remembering to stir constantly.
- Bring to a boil. Then remove the pan from the heat and place it in cold water. Stir this mixture constantly until it cools and becomes warm.
- Leave the ice cream until completely cooled, remembering to stir occasionally. Then pour it into molds and put it in the freezer to freeze.

We will need the following ingredients:
- One liter of milk (preferably homemade or high fat).
- Two glasses of sugar.
- One hundred grams of butter.
- A teaspoon of starch.
- Five egg yolks.
Cooking process:
- We take a small saucepan, pour milk into it, but not all of it, leave 150 grams, put it on medium heat and heat it up.
- When the milk is warmed up, but not yet boiling, add the butter and stirring until it comes to a boil.
- We take another bowl, pour sugar and starch into it, add egg yolks and grind everything, mix until smooth, add the milk that you left to the mixture and mix everything again. You should end up with a mass like liquid sour cream.
- Meanwhile, your milk has already boiled, stirring gently in a thin stream, pour in the resulting yolk mixture, and again bring everything to a boil, stirring constantly.
- Remove the pan from the heat, place it in a large saucepan filled with cold water and stir constantly (you can periodically, after a couple of minutes), and cool the mass.
- When our mass has cooled down, but is still a little warm, put it in shapes of your choice and put it in the refrigerator to freeze completely.
- By the way, now you can buy waffle cups, fill them with the resulting mass, then freeze them, and the taste will be exactly like in your distant childhood.

We will need the following ingredients:
- cream from 33% - 200 ml;
- milk - 100 ml;
- egg yolks - 2 pcs.;
- sugar - 60 g;
- vanilla pod - 1 pc.
Preparation:
- Mix milk with sugar in a small saucepan with a thick bottom. Using a knife blade, cut the vanilla pod along its entire length, remove the seeds and also add to the milk mixture. Thanks to vanilla, the ice cream will be filled with a delicious natural aroma, but in the absence of this ingredient, you can get by with a bag of vanilla sugar or a pinch of vanillin. Heat the mixture until hot, but do not bring it to a boil.
- In another container, gently beat the egg yolks using a whisk. In this case, we just need to achieve homogeneity - we should not beat the mass, otherwise foam may form on the surface, which will complicate the process of preparing the ice cream.
- Pour hot milk into the mashed yolks in a thin stream, continuously stirring the mixture.
- Pour the resulting mixture into a saucepan, place on low heat and cook until slightly thickened. It is important not to overheat the milk, otherwise the yolks may curdle! To avoid this trouble, choose a thick-bottomed pan for cooking the cream and cook over low heat. Also, do not forget to continuously stir the cream, especially at the bottom (it is most convenient to use a silicone spatula for this).
- We check readiness as follows: run your finger along the silicone spatula. If the mark remains clear and does not float with cream, immediately remove the pan from the heat.
- Tip: if the yolks still curdle, you can grind the mixture through a fine sieve or puree with a submersible blender. However, unfortunately, it is no longer possible to avoid the eggy taste of the ice cream. In this case, it is better to remove the pan from the heat sooner rather than later.
- Cool the freshly prepared cream to room temperature. At the same time, whip the cold cream until thick.
- Add the cooled cream to the whipped cream mixture and mix. Chill the mixture in the freezer for 3 hours. During this time, it is necessary to remove the container 5-6 times and mix the mass thoroughly to avoid the formation of ice crystals and to obtain a smooth and uniform texture.
- When the consistency of the mixture becomes similar to soft ice cream and is difficult to mix, transfer the mixture into a silicone mold, cover with a lid and put it in the freezer for another 3-4 hours (you can leave it overnight).
- Before serving, let the frozen ice cream sit for a while at room temperature. Then scoop up the slightly melted mixture with an ice cream spoon and form into balls. If desired, complement the dessert with chocolate chips, mint leaves or berries.
We will need the following ingredients:
- 500-600 grams of whipping cream (fat content from 30%)
- 100 grams of powdered sugar (or fine sugar)
- a pinch of vanillin
Preparation:
- Place chilled cream, powdered sugar and a little vanillin in a deep bowl. Beat until fluffy and stable foam is achieved, 4-5 minutes.
- Place the whipped mixture in a plastic container.
- Place in the freezer overnight.
- We take out the ready-made ice cream, let it thaw a little and you can put it in bowls.
- This ice cream can be made in different ways - with the addition of cocoa (carob), frozen berries - it is especially tasty with honeysuckle (only the berries must first be pureed with a blender, and then added to the whipped mixture and beat again).

The recipe for homemade ice cream sundae can be reproduced at home, it will turn out very tasty, natural and taste like the Soviet ice cream.
We will need the following ingredients:
- egg yolks (4 pcs.);
- milk (300 ml);
- cream (33%, 300 ml);
- powdered sugar (180 g);
- vanillin (½ teaspoon).
Preparation:
- So, first of all, bring the milk to a boil and then cool it to approximately 30 degrees.
- Add powdered sugar and vanilla sugar to the yolks.
- Whisk.
- Pour in milk. Beat again.
- Place on low heat and stir until the mixture thickens. As everyone around advises, you can check the thickness by running your finger along the spatula - if a clear mark remains, the mixture is ready.
- Let cool to room temperature and then chill in the refrigerator.
- Meanwhile, whip the cream.
- Mix with cooled cream.
- We transfer the entire mixture into a container in which it will be convenient for us to mix the future ice cream with a blender.
- Then begins the most tedious and difficult job of making ice cream at home for impatient sweet tooths. Place in the freezer for 2 hours.
- Then take it out and quickly (so that the ice cream does not have time to melt) mix with a blender.
- Place it in the freezer again for 2 hours. We repeat the procedure 2-3 more times with an interval of 30-60 minutes. Thanks to the blender, the ice cream will have the desired structure. A blender allows you to crush ice crystals and form an airy mass.
- When the ice cream is completely frozen, take it out and use a special spoon to make balls. You can first put the ice cream in the refrigerator for about 15 minutes so that it melts a little - this will make it much more convenient to make balls.
- Place the ice cream in bowls and sprinkle or top with whatever you like. I - grated chocolate. Homemade ice cream tastes just as good as store-bought ice cream, and its content is guaranteed to contain no “extra” additives. Recipe tested.

We will need the following ingredients:
- milk - 1 glass;
- butter - 25 grams;
- egg yolk - 1 piece;
- sugar - ½ cup;
- vanilla sugar - 5 grams;
- starch - ½ teaspoon.
Preparation:
- In a deep, convenient container, mix sugar, starch and vanilla sugar.
- Add one egg yolk.
- Grind the mixture until smooth. Pour in a little milk.
- Place the remaining milk on the fire. Add 25 grams of butter. The butter must be real, consisting of 100 percent cream from cow's milk. Bring the mixture to a boil.
- Pour the egg mixture into the boiled milk. Stirring, bring to a boil. Remove from heat and place in cold water. Cool, stirring occasionally.
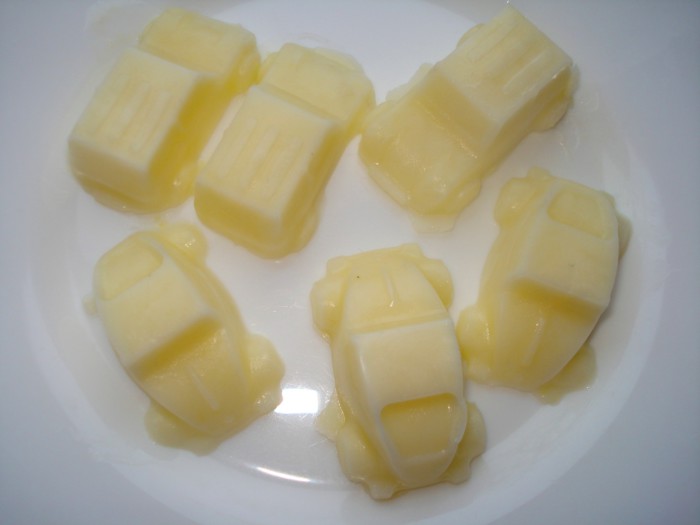
- Pour the cold mixture into molds. It can be a large form or small portions. I have a large silicone mold and molds for small cars.
- Place the molds in the freezer for a couple of hours.
- Ice cream from small molds will be ready in 30-50 minutes. Taking it out of the silicone molds is very easy.
- From a large mold, spoon ice cream onto serving plates. It is incredibly tasty, tender and aromatic.

We will need the following ingredients:
- 0.5 liters of cream (the higher the fat content, the tastier the ice cream will be)
- ¾ cup sugar
- 4 chicken eggs
- Chocolate chip cookies (or other flavors)
Preparation:
- Break eggs into a bowl and add sugar.
- Beat well with a fork and grind the sugar. Pour in the cream and mix well again.
- Pour the resulting mixture into a small saucepan and place over very low heat. Stir constantly, do not bring to a boil, otherwise the eggs will curdle. Remove from heat when the mixture begins to thicken; the consistency should resemble liquid sour cream.
- In total, the pan will spend 15 - 20 minutes on the fire. Well, you can also find out the readiness of the desired consistency by running your finger along the spoon. If the spoon is covered in cream and a fingerprint remains, the mixture for homemade ice cream is ready.
- After removing from the stove, pour the mixture into any container convenient for freezing. In general, any food-safe plastic container can be used.
- Add any filling (in this case, crushed cookies, or you can use berries, chocolate chips or pieces of fruit).
- Let sit for about an hour until the mixture cools slightly (the mixture will cool faster if you place the container in a sink with cold water). Then transfer the container with the mixture to the freezer. Homemade ice cream will harden and gradually thicken. The thickening time can range from 5 to 6 hours, so it is better to do it at night or in the morning so that you can enjoy it by the evening.
- Before serving, remove the container of homemade ice cream with cream from the freezer and place in the refrigerator for 20 minutes. Roll the prepared ice cream into small balls using a tablespoon (if you don’t have a special ice cream spoon) and place in tall glasses, bowls or plates. Ice cream can be decorated with grated chocolate or berries. Serve immediately. Bon appetit!
How to make ice cream from milk?

We will need the following ingredients:
- milk - 2.5 cups
- sugar - 1 glass
- vanillin - to taste
Preparation:
- Pour the milk into a homemade saucepan, bring the milk to a boil, then remove the saucepan from the stove and let the milk cool to a temperature of 36 degrees.
- Add sugar and vanillin to the egg yolks (if you want to make vanilla ice cream and not a regular ice cream). Mix well and grind the mass. You can use a blender for this.
- Stir the resulting mass constantly, pouring milk into it in a thin stream.
- Heat the final mixture over low heat, while continuing to stir. The mixture should become thick.
- Cool the resulting mixture and our cream first, then place it in the refrigerator.
- Pour the cream into a separate bowl. Whip the cream until it becomes thick.
- Add whipped cream to the cooled cream and mix the mixture.
- Transfer the mixture into a plastic container, cover with a lid, and place in the freezer for one hour. Then we take out the slightly frozen mixture, beat it with a mixer and place it in the freezer again. We repeat the procedure again.
- Then we leave the mass of future ice cream in the freezer for 3 hours. Now our ice cream is ready. To soften the ice cream slightly, place it in the refrigerator for 20 minutes before serving.

We will need the following ingredients:
- chocolate (bitter/milk) – 250-300 g
- cream 10% fat - 500 ml
- cream with fat content 33-35% - 500 ml
- granulated sugar – 150-180 g
- powdered sugar – 3 tbsp. l.
- chicken egg yolks – 6 pcs.
- potato starch - 1 tbsp. l. with a slide (if necessary)
Preparation:
- Carefully separate the yolks from the whites. The latter do not participate in the creation of the dessert. You can use them to make angel sponge cake, meringues, protein cream, French macaroons, etc. Or freeze them for now. Frozen protein will wait in the freezer for your culinary inspiration for about a month without losing its properties.
- Place the yolks into a deep container. Add all the sugar to them at once.
- Grind using a mixer. Beat for 4-7 minutes until the mixture thickens and the sugar has completely dissolved. The yolks will increase in volume by 1.5-2 times, become more airy and almost white. They act as a natural cream thickener in ice cream.
- Heat up the low-fat cream. Bring them to a boil. But do not boil so that the protein does not curdle. Then the ice cream will not turn out tender and homogeneous. Cool slightly. Pour the liquid in a thin stream into the yolk mixture. At the same time, mix with a whisk or mixer at minimum speed.
- Pour everything into a saucepan and place in a water bath. Cook until the mixture thickens. It is advisable to stir it continuously.
- The consistency of the mixture will be thick and homogeneous. As you noticed, we ended up with almost custard or crème anglaise using a simplified recipe. Based on it, you can prepare any ice cream by adding the appropriate additives - berry or fruit puree, caramel sauce, vanilla, floured nuts, etc.
- To get a rich chocolate flavor, I used store-bought chocolate bars. If desired, replace it with hard confectionery icing or cocoa powder. Chop the chocolate.
- Melt in a water bath or in the microwave. It is very important to prevent overheating and, as a result, separation of the chocolate. A properly melted tile will turn out liquid, homogeneous, and glossy.
- Pour the still warm chocolate mixture into the custard that has not yet cooled.
- Blend until smooth texture and even color. If necessary, use a blender with a foot. Let cool for at least 1 hour.
- Whip the heavy cream and powdered sugar until stiff peaks form. Introduce the powder gradually.
- Gently fold the creamy part of the ice cream into the cooled chocolate part. Add whipped cream in batches. Mix each part carefully with a spatula. The result will be airy, aromatic, real homemade ice cream, but in a liquid state.
- To freeze it, pour it into an ice cream maker. Turn on the device. Wait for it to thicken. Transfer to a container and place in the freezer until it is finally transformed into a frozen chocolate treat. If you don't have an ice cream maker, immediately transfer the ice cream to a container and place it in the freezer.
- After 40 minutes, remove. Beat with a mixer to break up the ice crystals. Return to cold. Repeat the procedure every hour until the dessert hardens.
- Take a sample! Homemade ice cream melts very quickly, because it does not contain synthetic thickeners or stabilizers. Read more:

We will need the following ingredients:
- Cream 33% - 500 g
- Milk - 200 ml
- Chicken egg - 4 pcs.
- Vanillin - 2 g
- Condensed milk - 100 g
- Powdered sugar - 6 tbsp.
Preparation:
- Separate chicken yolks from whites. Beat the yolks with three tablespoons of powdered sugar until the yolk mass is clear. Beat the egg whites to stiff peaks with the remaining powdered sugar.
- Pour milk into the yolk mixture and whisk with a whisk.
- Beat the cream with a mixer until creamy. Add condensed milk. Stir until smooth.
- Add the yolk-milk mixture and vanillin to the creamy mixture. Whisk.
- Add whipped whites. Beat with a mixer or whisk.
- Cover the container with cling film and place in the freezer. After an hour, remove the ice cream and stir. Repeat this procedure 2-3 more times and leave until completely frozen.
Homemade ice cream is ready!
Making ice cream according to simple recipes without eggs at home: cream, vanilla, ice cream, popsicle, cottage cheese, berry, fruit, chocolate, banana. We have selected step-by-step recipes for our caring parents, according to which you can easily prepare wonderful ice cream from milk, cream, yogurt, cottage cheese, kefir, juice, with berries, fruits, chocolate or cocoa at home, with or without an ice cream maker. Please your children with a delicious ice dessert, which is also natural, without dyes or preservatives.
Nowadays, it is better not to buy ice cream in stores - there is no benefit from it, but there is a lot of harm, especially for children, since it is stuffed with all sorts of time bombs. It is preferable to make your own ice cream at home, which will be both tasty and healthy at the same time. By adding nuts, fresh berries and fruits to it, you will make the dessert even healthier, unless, of course, your child is allergic to these products.
Pediatrician's advice: in order not to provoke allergic reactions in the child (in some cases very serious), chocolate and nuts can be given to him only after 3 years!
Information for those who are interested in the level of calorie content of ice cream: the lowest calorie is milk, followed by cream, then ice cream and the highest calorie is popsicle. But the higher the fat content of this dessert, the tastier it is.
Making ice cream at home
Making ice cream at home is easier than you might imagine.
If you have an ice cream maker, then before loading all the ingredients for ice cream into it, you need to mix them well with a mixer or blender. The ice cream maker should only be filled halfway.
And if you make ice cream without an ice cream maker, then during freezing you need to stir it several times so that ice crystals do not form in the dessert.
But you can simplify the entire procedure for making ice cream without an ice cream maker if you have a special container with a lid for freezing ice into cubes:
- make the base mixture for our dessert;
- pour into an ice-freezing container;
- place in the freezer for 30 minutes until the mixture is half frozen;
- transfer the cubes into a mixer container and add fillers there, if desired;
- thoroughly break everything up with a mixer fitted with a knife attachment;
- transfer the mixture into ice cream molds and place in the freezer for 2-3 hours. Ready!
 When making ice cream, use only very fresh dairy products. Of course, milk can be replaced with cream, and cream with milk, but keep in mind that milk and light cream also form crystals in ice cream. To avoid this, you can add corn syrup to the treat (and in portions not for children - just a little alcohol or liquor), honey.
When whipping, the cream should be cold (but not frozen) - it should be kept in the refrigerator for at least 2 hours; If they are at room temperature, put them in the freezer for 30 minutes. The cream should be whipped just until it thickens. If using a mixer, beat at low speed to avoid whipping the butter. Since cream whips quickly, it is better to whip powdered sugar with it instead of sugar, which takes a long time to dissolve.
If you add chocolate or honey to ice cream, you need to add less sugar. Otherwise, the ice cream will turn out too sweet and cloying.
Since ice cream expands in volume when frozen, the molds only need to be filled two-thirds full.
Nuts and fruits should be added to ice cream during freezing, before it hardens, and syrup should be added before freezing.
You can freeze the ice dessert in muffin tins, plastic cups, yogurt cups, or children's juice cartons (the tops of which need to be cut off and popsicle sticks inserted).
In addition to honey, it is good to add raisins, candied fruits, fresh or frozen berries and fruits, chopped nuts, pieces of cookies, and chocolate to ice cream. In addition, they can be used to decorate ready-made delicacies. Thin sesame seeds, coconut flakes, powder or cardamom will also be a good decoration for the dessert.
When making ice cream with berries or fruits, choose the ripest and juiciest fruits. If you take, for example, hard kiwis, they will still be unripe and too sour for this dessert.
If you decide to make chocolate ice cream, then before adding cocoa to the mixture, do not forget to first pour hot milk or cream into it and then cool it.
Freeze and store ice cream in a container with a lid or covered with plastic wrap.
Since homemade ice cream consists entirely of natural ingredients, its shelf life is short: no more than 3 days. Also, you should not refreeze melted ice cream.
You can serve homemade ice cream with a sponge cake in the form of a cake or pastries; or cut into small briquettes and place it between two cookies.
It is better to give ice cream to children in small portions and not immediately from the freezer, but leave it to melt a little. In addition, if you wait 10 minutes, the taste and aroma of the dessert will appear brighter.
3 easiest ways to make ice cream
- Stick an ice cream stick into a store-bought cup of yogurt and put it in the freezer for 1-2 hours;
- Stick ice cream sticks into two halves of a banana, you can dip them in melted chocolate and roll them in nuts or cookie crumbs and put them in the freezer for half an hour or an hour;
- In a similar way, you can prepare fruits in chocolate glaze: place peeled and cut into pieces fruits on sticks and leave in the refrigerator for half an hour; then dip them in the glaze and put them back in the refrigerator until hardened. You can find out how to make chocolate glaze at the end of this article.
Making creamy ice cream
Recipe 1 (basic):
If you add vanilla to this recipe it will be... vanilla ice cream; if you add cocoa (2-3 tbsp) it will work chocolate ice cream; if you add creme brulee (see recipe below), you get ice cream Creme brulee.
250 ml milk (3.2%)
250 ml cream (30%, if not, then 20%)
5-6 tablespoons sugar (or to taste)
Recipe 2:
In this recipe, creamy ice cream is prepared using condensed milk.
1 can of condensed milk (sugar and milk only, no additives)
300 ml 30% cream (if you don’t have it, then sour cream, yogurt or 150 ml of different products - you can vary)
Preparation:
1. Mix all the ingredients of the 1st or 2nd recipe well in a mixer or blender;
2. Transfer the mixture into an ice cream maker and then follow the instructions; if you don’t have an ice cream maker, then put it in the freezer for half an hour, take it out and mix, and do this 3-4 times for the first 2 hours. Then leave for another 2 hours. Ready!
Recipe 3: ice cream
To make creamy ice cream, which is fattier (at least 15%) than regular ice cream, you need to take:
200 ml milk (3.2%)
500 ml cream (30%)
6-7 tablespoons sugar (or to taste)
Preparation:
1. Beat cream with sugar;
2. mix well with milk;
3. pour the mixture into an ice cream maker and continue according to the instructions; if you don’t have an ice cream maker, then put it in the freezer for half an hour, take it out and mix, and do this 3-4 times for the first 2 hours. Then leave to freeze for another 2 hours.
Recipe 4: ice cream with gelatin
500 ml 20% fat cream
6 tbsp. tablespoons granulated sugar (or to taste)
1 teaspoon (small top) gelatin
1 teaspoon vanilla sugar
Preparation:
1. Pour half a glass of cold cream into a saucepan, add gelatin, stir and leave to swell for 30 minutes;
2. add vanilla sugar, granulated sugar, stir and, stirring, heat (but do not boil!) until the ingredients dissolve;
3. pour the remaining cream into the same saucepan, stir and refrigerate for several hours or overnight;
4. then beat the liquid but gelatinous jelly with a mixer;
5. put it in the freezer, remembering to stir it every hour (only the first 2 hours); and then we leave it for several hours to take it out for the last time and enjoy a delicious ice cream without grains of ice!
Making creme brulee ice cream
(classic recipe)
basic recipe cream ice cream (see above) add creme brulee.
Creme brulee:
2 tbsp. spoons of sugar
3 tbsp. spoons of cream
1. Mix the ingredients and heat over low heat until thickened and light brown;
2. Immediately add the resulting creme brulee to the creamy ice cream mass (it should be at room temperature), while mixing thoroughly;
3. transfer to an ice cream maker or freezer for freezing (in this case, do not forget to take out the ice cream and stir).
Making almond ice cream
To make this ice cream you need basic Add almonds to the creamy ice cream recipe (see above).
1. Peel almonds (it is better to buy them in shells and in sealed bags - this preserves all the vitamins and healing properties of almonds) - in the amount of 2 tablespoons;
2. scald the almonds and remove the shell;
3. finely chop the almonds;
4. fry the almonds in the oven until they acquire a light brown color;
5. Mix the already frozen mass well and add almonds.
Making curd ice cream
If you want the taste of cottage cheese not to be felt, you need to beat it with other ingredients longer.
Recipe 1:
0.5 cans of boiled condensed milk
200 g cottage cheese
100 ml milk
1. Loose cottage cheese with condensed milk and milk in a blender;
2. Distribute the mixture into molds and place in the freezer for 3-4 hours.

Recipe 2:
250 gr. cottage cheese
150 gr. milk
250 ml cream
75 gr. granulated sugar
250 gr. fruits (apples, apricots) or berries
you can add 2 bitter almonds and 1 beaten egg (if you have homemade eggs, because store-bought eggs are dangerous to eat raw)
1. Mix cottage cheese, milk and sugar and loosen in a blender;
2. add, if desired, egg and almonds, whipped cream, chopped fruit, mix;
3. Place the mixture in the freezer.
Making popsicles
300 ml cream 40% fat
sugar or powdered sugar (to taste)
300 gr. any fresh or frozen fruit
1. Beat sugar and cream until thick;
2. add puree or pieces of fruit, mix well;
3. set to freeze.
Making ice cream from frozen berries
300 gr. any frozen berries
0.5 cups cold cream
100 gr. Sahara
a little vanilla (you can do without it)

1. Place all ingredients in a blender and mix for several minutes;
2. put in the freezer for half an hour. Ready!
Making Banana Ice Cream
To make this delicious ice cream, you need to peel and coarsely chop the bananas in advance. Then spread them out so they don't touch each other and put them in the freezer for 2 hours or longer.
Recipe 1:
2 bananas
0.5 cups natural yogurt (or milk, kefir)
2 tbsp. spoons of cocoa
2. pour yogurt into the blender and mix everything;
3. freeze for 2 hours.
Recipe 2:
2 bananas
0.5 cups cream
1 tbsp. spoon of powder
1 tbsp. spoon of lemon juice
1. Remove bananas from the freezer, grind them well in a blender, adding cocoa;
2. add cream, lemon juice and powder to the blender and mix;
3. Place in the freezer for 2 hours and during this time you need to take it out 2 times to mix.
If you sprinkle the finished ice cream with grated chocolate and nuts, it will be indescribably delicious!
Recipe 3:
Well suited for those families who observe fasting.
2-3 bananas
some water (or juice)
1. Peel bananas and place in the freezer for 2-3 hours (or overnight);
2. put in a blender and grind for 2-3 minutes with a blade attachment, adding a little water.
Before serving, pour honey or sprinkle with grated chocolate and nuts.
Making ice cream from yogurt
Recipe 1:
2 tbsp. spoons of honey
150 ml orange juice
1 cup natural yogurt
1 tbsp. spoon (or to taste) sugar
1 handful of any fresh berries
1. Beat all ingredients with a blender;
2. Place in the freezer for 3 hours.
Recipe 2:
Half 1 banana
1 kiwi without peel
1 tbsp. spoon frozen pineapple pieces
4 tbsp. spoons of natural yogurt
1 teaspoon honey
1. Beat all ingredients thoroughly with a blender
2. Place in the freezer for 1 or 2 hours.
Making ice cream Fruit ice
Recipe 1:
To the delight of children, it turns out bright, two-color. Besides, very tasty. But what is most important for us, parents, is useful!
220 gr. raspberries or other berries
2-3 pcs. kiwi
2-3 tbsp. spoons of powdered sugar
½ cup filtered water
10 ml lemon juice
1. Place peeled kiwis in a blender and grind;
2. Grind the berries separately;
3. Pour powdered sugar with water and heat until the crystals dissolve;
4. pour lemon juice into it and cool the syrup; 
5. add half of the syrup to the kiwi, and the other half to the raspberries;
6. Pour the raspberry mixture into the molds halfway and place in the freezer for 1 hour;
7. when it freezes, stick a stick into the center of the mass and pour the kiwi mixture on top;
8. It remains to freeze the dessert for another 2-3 hours. Ready!
Recipe 2:
1 medium-sized apple or any berries, fruits (optional)
½ teaspoon gelatin
½ glass of water
4 teaspoons sugar
lemon juice (to taste)
1. Add gelatin to 2 tbsp. spoons of chilled boiled water and leave to swell for 30 minutes;
2. Pour boiling water over sugar and stir until dissolved;
3. mix gelatin with syrup and also dissolve in it, cool;
4. prepare applesauce (or carefully cut any fruit into slices, add berries);
5. mix cooled gelatin with puree (or with slices of fruit and berries), add lemon juice;
6. Pour the mixture into molds, filling only 3/4;
7. put the ice cream in the freezer.
Making Eskimo Ice Cream
Let's make ice cream covered with chocolate glaze - popsicle.
For ice cream:
take the recipe for ice cream sundae (see above).
For the glaze:
200 gr. chocolate
200 gr. butter
1. Pour ice cream mixture into prepared narrow popsicle molds and insert sticks;
2. place in the freezer for at least 3 hours;
3. shortly before taking out the ice cream, melt the chocolate and butter pieces in a water bath and stir. Let the glaze cool slightly;
4. Dip the frozen ice cream very quickly into the still warm glaze, wait until it hardens on the dessert and put it in the freezer to harden.
The glaze can be made without butter, but then pour the glaze over the ice cream and do not freeze, but serve immediately. If there is no chocolate, then the glaze can be made from cocoa.
Chocolate cocoa glaze:
Posted inTagged
The most delicious homemade ice cream is in our selection! Prepare what you like - ice cream, creamy, chocolate!
- cream from 33% - 200 ml;
- milk - 100 ml;
- egg yolks - 2 pcs.;
- sugar - 60 g;
- vanilla pod - 1 pc.

Mix milk with sugar in a small saucepan with a thick bottom. Using a knife blade, cut the vanilla pod along its entire length, remove the seeds and also add to the milk mixture. Thanks to vanilla, the ice cream will be filled with a delicious natural aroma, but in the absence of this ingredient, you can get by with a bag of vanilla sugar or a pinch of vanillin. Heat the mixture until hot, but do not bring it to a boil.

In another container, gently beat the egg yolks using a whisk. In this case, we just need to achieve homogeneity - we should not beat the mass, otherwise foam may form on the surface, which will complicate the process of preparing the ice cream.

Pour hot milk into the mashed yolks in a thin stream, continuously stirring the mixture.

Pour the resulting mixture into a saucepan, place on low heat and cook until slightly thickened. It is important not to overheat the milk, otherwise the yolks may curdle! To avoid this trouble, choose a thick-bottomed pan for cooking the cream and cook over low heat. Also, do not forget to continuously stir the cream, especially at the bottom (it is most convenient to use a silicone spatula for this).

We check readiness as follows: run your finger along the silicone spatula. If the mark remains clear and does not float with cream, immediately remove the pan from the heat.
Tip: if the yolks still curdle, you can grind the mixture through a fine sieve or puree with a submersible blender. However, unfortunately, it is no longer possible to avoid the eggy taste of the ice cream. In this case, it is better to remove the pan from the heat sooner rather than later.

Cool the freshly prepared cream to room temperature. At the same time, whip the cold cream until thick.

Add the cooled cream to the whipped cream mixture and mix. Chill the mixture in the freezer for 3 hours. During this time, it is necessary to remove the container 5-6 times and mix the mass thoroughly to avoid the formation of ice crystals and to obtain a smooth and uniform texture.

When the consistency of the mixture becomes similar to soft ice cream and is difficult to mix, transfer the mixture into a silicone mold, cover with a lid and put it in the freezer for another 3-4 hours (you can leave it overnight).

Before serving, let the frozen ice cream sit for a while at room temperature. Then scoop up the slightly melted mixture with an ice cream spoon and form into balls. If desired, complement the dessert with chocolate chips, mint leaves or berries.

Recipe 2: homemade ice cream - creamy ice cream
- 500-600 grams of whipping cream (fat content from 30%)
- 100 grams of powdered sugar (or fine sugar)
- a pinch of vanillin

Place chilled cream, powdered sugar and a little vanillin in a deep bowl. Beat until fluffy and stable foam is achieved, 4-5 minutes.

Place the whipped mixture in a plastic container.

Place in the freezer overnight.
We take out the ready-made ice cream, let it thaw a little and you can put it in bowls.

This ice cream can be made in different ways - with the addition of cocoa (carob), frozen berries - it is especially tasty with honeysuckle (only the berries must first be pureed with a blender, and then added to the whipped mixture and beat again).

Recipe 3: how to make homemade ice cream sundae?
The recipe for homemade ice cream sundae can be reproduced at home, it will turn out very tasty, natural and taste like the Soviet ice cream.
- egg yolks (4 pcs.);
- milk (300 ml);
- cream (33%, 300 ml);
- powdered sugar (180 g);
- vanillin (½ teaspoon).

So, first of all, bring the milk to a boil and then cool it to approximately 30 degrees.
Add powdered sugar and vanilla sugar to the yolks.

Whisk.

Pour in milk. Beat again.

Place on low heat and stir until the mixture thickens. As everyone around advises, you can check the thickness by running your finger along the spatula - if a clear mark remains, the mixture is ready.

Let cool to room temperature and then chill in the refrigerator.
Meanwhile, whip the cream.

Mix with cooled cream.

We transfer the entire mixture into a container in which it will be convenient for us to mix the future ice cream with a blender.

Then take it out and quickly (so that the ice cream does not have time to melt) mix with a blender.

Place it in the freezer again for 2 hours. We repeat the procedure 2-3 more times with an interval of 30-60 minutes. Thanks to the blender, the ice cream will have the desired structure. A blender allows you to crush ice crystals and form an airy mass.
When the ice cream is completely frozen, take it out and use a special spoon to make balls. You can first put the ice cream in the refrigerator for about 15 minutes so that it melts a little - this will make it much more convenient to make balls.

Place the ice cream in bowls and sprinkle or top with whatever you like. I - grated chocolate. Homemade ice cream tastes just as good as store-bought ice cream, and its content is guaranteed to contain no “extra” additives. Recipe tested.

Recipe 4: homemade ice cream and milk ice cream
- milk - 1 glass;
- butter - 25 grams;
- egg yolk - 1 piece;
- sugar - ½ cup;
- vanilla sugar - 5 grams;
- starch - ½ teaspoon.

In a deep, convenient container, mix sugar, starch and vanilla sugar.

Add one egg yolk.

Grind the mixture until smooth. Pour in a little milk.
Place the remaining milk on the fire. Add 25 grams of butter. The butter must be real, consisting of 100 percent cream from cow's milk. Bring the mixture to a boil.
Pour the egg mixture into the boiled milk. Stirring, bring to a boil. Remove from heat and place in cold water. Cool, stirring occasionally.
Pour the cold mixture into molds. It can be a large form or small portions. I have a large silicone mold and molds for small cars.

Place the molds in the freezer for a couple of hours.
Ice cream from small molds will be ready in 30-50 minutes. Taking it out of the silicone molds is very easy.
From a large mold, spoon ice cream onto serving plates. It is incredibly tasty, tender and aromatic.
Recipe 5: how to make ice cream at home
- 0.5 liters of cream (the higher the fat content, the tastier the ice cream will be)
- ¾ cup sugar
- 4 chicken eggs
- Chocolate chip cookies (or other flavors)

Break eggs into a bowl and add sugar.
Beat well with a fork and grind the sugar. Pour in the cream and mix well again.
Pour the resulting mixture into a small saucepan and place over very low heat. Stir constantly, do not bring to a boil, otherwise the eggs will curdle. Remove from heat when the mixture begins to thicken; the consistency should resemble liquid sour cream.
In total, the pan will spend 15 - 20 minutes on the fire. Well, you can also find out the readiness of the desired consistency by running your finger along the spoon. If the spoon is covered in cream and a fingerprint remains, the mixture for homemade ice cream is ready.
After removing from the stove, pour the mixture into any container convenient for freezing. In general, any food-safe plastic container can be used.
Add any filling (in this case, crushed cookies, or you can use berries, chocolate chips or pieces of fruit).
Let sit for about an hour until the mixture cools slightly (the mixture will cool faster if you place the container in a sink with cold water). Then transfer the container with the mixture to the freezer. Homemade ice cream will harden and gradually thicken. The thickening time can range from 5 to 6 hours, so it is better to do it at night or in the morning so that you can enjoy it by the evening.
Before serving, remove the container of homemade ice cream with cream from the freezer and place in the refrigerator for 20 minutes. Roll the prepared ice cream into small balls using a tablespoon (if you don’t have a special ice cream spoon) and place in tall glasses, bowls or plates. Ice cream can be decorated with grated chocolate or berries. Serve immediately. Bon appetit!
Recipe 6: how to make ice cream from milk? (step by step photos)
- milk - 2.5 cups
- sugar - 1 glass
- vanillin - to taste

Pour the milk into a homemade saucepan, bring the milk to a boil, then remove the saucepan from the stove and let the milk cool to a temperature of 36 degrees.

Add sugar and vanillin to the egg yolks (if you want to make vanilla ice cream and not a regular ice cream). Mix well and grind the mass. You can use a blender for this.

Stir the resulting mass constantly, pouring milk into it in a thin stream.
Heat the final mixture over low heat, while continuing to stir. The mixture should become thick.

Cool the resulting mixture and our cream first, then place it in the refrigerator.
Pour the cream into a separate bowl. Whip the cream until it becomes thick.
Add whipped cream to the cooled cream and mix the mixture.

Transfer the mixture into a plastic container, cover with a lid, and place in the freezer for one hour. Then we take out the slightly frozen mixture, beat it with a mixer and place it in the freezer again. We repeat the procedure again.

Then we leave the mass of future ice cream in the freezer for 3 hours. Now our ice cream is ready. To soften the ice cream slightly, place it in the refrigerator for 20 minutes before serving.


