Pies that never go stale! Four simple secrets. Why do homemade baked goods go stale quickly? Add your price to the database Comment Why the dough quickly becomes stale
1. Always add diluted potato starch to the dough - buns and pies will be fluffy and soft even the next day.
The main condition for delicious pies is a fluffy, well-risen dough: the flour for the dough must be sifted: foreign impurities are removed from it, and it is enriched with air oxygen
2. To any dough (except dumplings, puff pastry, choux, shortbread), that is, dough for pies, pancakes, bread, pancakes, always add semolina to half a liter of liquid (about a heaping tablespoon). The nuns taught: “Previously, the highest quality bread was made from semolina. It did not dry out for a long time and was lush. Now there is no grit. Now add some semolina and you will always have good baked goods.” This advice is so priceless.
3. Add half a glass of mineral water to the dough, in addition to milk. Dilute a teaspoon of baking soda in half a glass of water and lightly quench it with citric acid or vinegar.
The baked goods really turn out great. Even the leftovers the next day are fluffy.
4. There should be no draft in the room where the dough is cut: it contributes to the formation of a very dense crust on the pie.
5. When kneading yeast dough, all products should be warm or at room temperature; products from the refrigerator will slow down the rise of the dough
6. For yeast products, the liquid should always be heated to 30-35ºС, since yeast fungi in a liquid that has a lower or higher temperature lose their activity
7. When you knead the dough, your hands should be dry.
8. Before putting the product in the oven, let it rise for 15-20 minutes. Allow the dough to proof completely before baking. If the proofing is not complete, it does not rise well and the pies do not bake for a long time.
9. Bake pies on a baking sheet over medium heat so that the filling does not dry out.
10. It is best to add unmelted butter to the dough (yeast and unleavened butter), since melted butter worsens the structure of the dough.
11. Pies made with milk are more tasty and aromatic, the crust after baking is shiny with a beautiful color.
12. Yeast for dough should be fresh, with a pleasant alcoholic smell. Test the yeast in advance. To do this, prepare a small portion of the dough and sprinkle with a layer of flour. If no cracks appear after 30 minutes, then the quality of the yeast is poor.
13. If there is excess sugar in the dough, the pies quickly “brown” and even burn. Fermentation of yeast dough slows down, and the pies turn out less fluffy
14. Fats, softened to the thickness of sour cream, are added at the end of kneading the dough or when kneading it, this improves the fermentation of the dough
15. To make the finished pies more tender and crumbly, put only yolks in the dough
16. Tall pies are baked over low heat so that they bake evenly.
17. Fats, softened to the thickness of sour cream, are added at the end of kneading the dough or when kneading it, this improves the fermentation of the dough
18. To make the finished pies more tender and crumbly, add only yolks to the dough.
19. The dough for a pie baked on a baking sheet is rolled out as thin as possible so that the taste of the filling can be clearly felt.
20. To keep the bottom of the pie dry, lightly sprinkle the bottom layer of the pie with starch, and then add the filling.
21. Neither the dough nor the dough should be allowed to rest, as this causes a deterioration in the quality of the dough. 3 hours is enough, but be sure to keep it warm.
22. Yeast dough pies can be greased with milk and, if desired, sprinkled with salt, poppy seeds, and caraway seeds.
23. Covered pies are brushed with beaten egg, milk, and sugar water before baking. Thanks to this, an appetizing gloss appears on the finished cake. The best shine is obtained when lubricated with yolks.
24. Pies that are sprinkled with powdered sugar are also greased with butter - it gives them a pleasant aroma.
25. Pies brushed with egg white acquire a shiny golden brown crust during baking.
26. The more fat and less liquid in the dough, the more crumbly the products are.
27. If you add soda to the dough, the cake will turn out to be darker in color with an unpleasant odor.
28. It’s easy to roll out thin dough by wrapping the rolling pin in a clean linen rag.
29. If the dough is too wet, place a piece of parchment paper on it and roll it straight through the paper.
30. Shortcrust pastry pies should be removed from pans when cooled.
31. Before adding raisins to the dough, they need to be rolled in flour.
32. Salt is always added to flour only when the dough has already fermented
33. The more fat and less liquid in the dough, the more crumbly the products are.
34. If the dough has already risen and you don’t have time to put it in the oven, cover the dough with well-moistened paper, first shaking off the water.
35. The more fat and less liquid in the dough, the more crumbly the products are.
36. It’s better not to cut a hot pie. But if this is necessary, you need to heat the knife in hot water, quickly wipe it and cut it.
37. If the cake does not come off the baking sheet, separate it from the baking sheet with a thread.
For Easter cakes, rolls, buns and pies. This dough is prepared in an unusual way, which allows products made from it not to go stale for a long time; the cakes turn out airy and not “heavy”! Bepa recipe with Djazzed Coock, for which our family bows to her. I’ll also tell you a secret, at first I didn’t think about posting the recipe (or rather, at first I thought, and then changed my mind, due to a catastrophic lack of time, but when my mother (a woman with 30 years of experience in baking pies and Easter cakes), having tried a braided dough made from this dough, asked the recipe is a must... I decided that I needed to show it to you too.
Vegetable oil - 1/3-1/4 cup.
butter - 50 gr.
margarine - 50 gr.
sugar - 1.5 cups.
chicken egg - 3 pcs.
milk (2 glasses) - 0.5 l.
yeast (dry - 2 teaspoons with a slide) - 50 gr.
salt - 1/4 tsp.
flour (approximately, you need to focus on the appearance of the dough) - 7 cups.

So, take the eggs and beat until strong foam. 
Pour milk into a saucepan and heat until steam appears. Remove from heat and add a little milk to the beaten eggs, mix well. After this manipulation, put all the eggs into the milk and put them back on the fire, literally for 1 minute, so that the mass warms up to 50-60* C., stirring constantly. Further, I quote the author: “Do not overheat, otherwise the eggs will be cooked and the dough will not rise well, the baked goods will turn out heavy, not fluffy. It is better to underheat than to overheat the eggs! I always check the temperature with my hand, dip my finger in the milk - it’s very hot on my fingers, which means Stop heating. This moment scares many people, but in fact there is nothing complicated or “scary” here - the main thing is to be careful. But this heating procedure will allow you to get baked goods that do not go stale for a very long time, your eggs will be as fresh for a week.” Remove from heat and add margarine, butter, half the vegetable oil, vanillin, sugar and salt to the still hot mixture, stir until the butter and sugar dissolve. If the mass is not hot (take a handle and try), add yeast (pre-soak dry yeast in 2 tablespoons of milk), stir and add enough flour so that the dough has the consistency of pancakes. If the yeast is good and you didn't overcook the eggs or didn't put the yeast in the mixture too hot, then these wonderful bubbles will appear on the surface. Cover and put the whole thing in a warm place for 2 hours. This is our dough. 
After 2 hours we get a risen and bubbly dough like this. 
Then add a little flour and knead a very soft, not tight dough. I quote Vera: “Knead the dough well, adding little by little the remaining vegetable oil. When I knead the dough, I don’t add flour so that it doesn’t turn out stiff. I knead with vegetable oil - I grease the table with oil, lay out the dough and start kneading the dough, gradually adding oil I add the next portion of butter only after the previous one has been completely mixed into the dough. I pour the butter a little at a time - this way it is easier to mix in and the dough does not slide on the table. Gradually mixing in the butter will allow us to get a layered structure of the dough - if you pinch off a piece of the crumb from the finished bun. and pull it, you will have a thin piece of dough in your hand.
If you knead the dough poorly, the result will be simply a delicious, rich pastry, and a well-kneaded dough will give a fibrous, layered dough structure, the holes will be oblong, elongated upward. Knead for 10-15 minutes, the dough loves your hands. The finished dough will be soft, homogeneous, slightly sticky, but not leaving marks on your hands. Flour for Easter cakes must be of the highest quality! The flour must be sifted 2-3 times so that the flour is enriched with oxygen. Since flour is different everywhere, it is difficult to know the exact amount; you need to focus on the appearance of the dough. The dough should not be stiff and should not spread. It should be very soft, but not stretch your hands, then the baked goods will turn out airy and not very dense. I read somewhere that if you cut the finished dough with a knife and there are no marks left on the knife, then there is enough flour in the dough. The dough should be soft, elastic and pliable.
I will give an approximate amount of flour for the corresponding amount of milk, but I repeat once again - focus on the appearance of the dough!
2 l. - 4600-4800 gr.
1 l. - 2200-2400 gr.
0.5 l. - 1100-1200 gr.
0.25 l. - 550-600 gr. "

Place the dough in a warm place and knead it 2-3 times while it rises.
If you want to get richer baked goods, then the recipe will be like this
0.5 l. milk
1.5-2 cups sugar
2 eggs
2 yolks
75 gr. drain oils
75 gr. margarine
1/3 cup (~80 gr.) plant. oils
2.5-3 tsp. dry yeast
vanillin, spices, raisins, candied fruits to your taste
1/4 tsp. salt
approximately 7 cups flour (depend on the appearance of the dough)
For Easter cakes, the number of eggs needs to be doubled. 
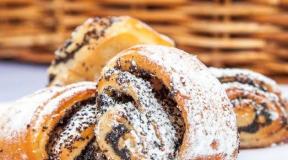
Well, then we do it with the test, who “thought out what”. I “thought” to make braids with poppy seeds and nuts. Thanks to SVETAnet for designing the braids
Let the product rise until the volume doubles. Grease with yolk and put into the oven.
Well, that's all, gentlemen! I want to thank the author of the recipe again. The dough is amazing. From half a liter of milk I got 3 healthy braids and 15 raisin buns.
And excuse me for the photo - it’s not very high quality, since my one and a half year old assistant actively participated in the process - he ate too much raw dough and didn’t let me take a photo. Just like that.
Bon appetit!
Today, many housewives prefer not to mess with yeast dough. They say they can't do it. They don’t even remember about the dough. But in vain! Pies prepared according to all the rules are not just food, they are a shared joy, a family holiday. So why deprive your loved ones of pleasant moments?
Today, making real dough is as easy as shelling pears. Trade offers all kinds of fresh yeast, and they are the key to the success of butter dough.
There are many recipes for yeast dough. Simple and complex. For sweet pies and pies with “serious” filling. But these recipes have one drawback: no matter how tasty fresh baked goods are, they quickly lose their aroma and fluffiness, and then become stale altogether.
However, there is a recipe in which the quality of the pies remains high for several days. And it's quite simple. Even a novice housewife can handle it. But to make good pies, you need to know a few tricks and not neglect them during the cooking process.
For such non-staling pies, a special choux yeast dough is prepared. Have you heard of this?
I got this recipe from my grandmother, and it has been my go-to recipe for over ten years now. All my friends cook up various curlicue buns based on it, everyone succeeds, and everyone just praises it.
So, let's begin. Let me remind you that if we want results, we do everything using technology.
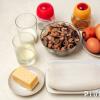
We will need:
- 3 eggs;
– 0.5 liters of milk + half a glass for pouring yeast;
– 200 g margarine;
– 50 g yeast;
- flour;
– salt, sugar, vegetable oil.
The flour must be sifted through a sieve. Remove the margarine from the refrigerator until it comes to room temperature. Mix the yeast with a pinch of sugar and pour in half a glass of warm milk. We leave it to rise.
Pour about half a glass of flour into an enamel pan and pour refined vegetable oil in small portions. Stir. The mass should be creamy, without lumps.
While we grind the flour and butter, the milk is heated on the stove. As soon as it boils, pour it into the mixture of flour and butter in portions. Pour in a portion and stir. Pour in again and stir.
Add salt. Generously. Scoop up the salt with your palm, about two phalanges of your fingers. Don't be afraid, it's not a lot, about a teaspoon. Then add sugar, you need about half a glass or 2/3 of it, no more. Stir.
Now pour the yeast into this mixture (not hot). Stir.
It's margarine's turn. It should be at room temperature, the softer the consistency, the better. Added and stirred.
Add the eggs into the mixture one at a time, stirring thoroughly.
Then add flour in small portions and stir with a spoon. As soon as the mass becomes slightly thicker than sour cream, the dough is ready.
Leave it for a couple of hours in a warm place. I'll have to check in about half an hour. If the dough has risen well, knead it down. After a while, when it rises again, knead it again. Done?
Now it's time to add more flour to make a real dough. Add little by little, no more than half a glass. Added more and stirred. And so on several times. There is no need to knead this dough by hand. Mix with a spoon. It will be hard to turn the spoon, but this is just the measure of the correct dough. As soon as the dough does not turn with a spoon and you want to start kneading with your hands, stop! No more flour needed. The dough should now be soft and may even stick to your hands a little.
Once again we put it in a warm place to rise. And after 20-30 minutes you have a great dough.
The fillings for pies made from this dough can be completely different: meat, fish, sweet, vegetable, curd. You can make both large closed pies, and open or covered with a lattice. Or small pies, cheesecakes, rolls.
And a couple more secrets: before putting the pies in the oven, you need to grease them with a whipped mixture of egg yolk and milk. And be sure to give them ten minutes of distance. Then - into a preheated oven. The pies bake quickly – 10-15 minutes.
They get eaten even faster. This versatile dough is delicious and everyone loves it. Many say that it is even tastier than the best filling. Maybe that’s why pies made from it don’t go stale?
By the way, the dough is perfectly stored on the top shelf of the refrigerator for 4-5 days. There is a reason to invite your friends!
“My mother loved to bake, and very often there were waffles, nuts, fluffy pancakes and brushwood on our table. She also baked cheesecakes with cottage cheese from butter dough. But she did everything “by eye”, and it was not easy to get a recipe for these products from her - my “eye” is different, and besides, there was always a desire to work according to instructions. I grew up, mastered many dough recipes, but I just couldn’t find good dough for pies.
I once came across a recipe in the newspaper - a quick dough “Fellow Traveler” from a flour mill technologist. Actually, I was interested in the phrase: “These pies don’t have time to get stale,” but there are a lot of them - 30 pieces. I cut out a recipe for pies that don't go stale from the newspaper and decided that someday I would try to bake these miracle pies.
On a spring evening, my husband went to another city to see his son, a cadet at a military school. All day I packed his bags for the trip with all kinds of goodies, my son was in his second year at the time, I missed him a lot. The fuss was over, my husband left, I felt sad, I remembered the recipe from the newspaper and decided to bake pies to lift my spirits. My daughter and son-in-law were at home, then Zhenya, her daughter’s school friend, came.
The filling for the pies was very thick apple jam. When the inexpressibly pleasant smell of baked dough floated through the apartment, all four of us gathered at the table. I did everything according to the instructions - I got exactly thirty pies. We ate them all at once, and then laughed at ourselves for a long time - indeed, these pies not only did not have time to get stale, they did not even manage to cool properly.
I am very grateful to the woman who sent this wonderful recipe to the newspaper, her name is Maria Kurchatova. The dough according to her recipe is light, airy, surprisingly aromatic and tender. To make the “Fellow Traveler” dough pies successful, pay special attention to the gluten content of the flour; number 28 is the best for them.
Pies from this dough can be fried and baked; I baked them in the oven. These pies filled with apple jam are good; you can bake them with cottage cheese and cabbage. The dough is quick, so before making it, prepare the filling for the pies.”
Ingredients:
For the dough:
- 50 g yeast (or 1.5 teaspoons dry yeast)
- 1.5 glasses of warm milk;
- 8 tbsp. tablespoons of sifted flour (heaped);
- 4 tbsp. spoons of sugar (without a slide).
For the test:
- 2 eggs;
- salt - 0.5 tsp.
- 2/3 cup sunflower oil;
- flour (about 500 grams).
I made these pies and will sing odes of praise to them at the end.
Preparation:
1. First of all, you need to make a dough, it’s not difficult and quick. You just need to mix: warm milk, yeast, sugar, flour (be sure to sift)
2. Mixed everything, covered with a towel and left for half an hour.
3. After half an hour, bubbles will begin to appear on the surface of the dough, which means that it is ready, you can add the rest of the flour and eggs.
4. Shaked two eggs in a mug, poured salt and poured them into the dough, mixed.
5. Then I begin to slowly pour in the sifted flour, about one glass at a time.
6. And add vegetable oil.
7. Flour and butter again. You need quite a lot of butter (2/3 cup), and I used about 500 grams of flour (plus what was already in the dough). I don’t know what kind of gluten I have, I never pay attention to it.
8. The finished dough should begin to come away from your hands, but do not make it hard, it should be light, soft, airy and lively. That is, the dough does not even hold the shape of a ball, but spreads.
9. Leave a little vegetable oil for last, it will be convenient to pour it on your hands and collect the dough.
That's all, now the dough needs to be covered and left alone for half an hour.
10. At this time I was filling. I decided to make pies with potatoes and fried onions. I boiled the potatoes, mashed them, cut the onions into long strips, fried them until golden brown, put them in the potatoes and stirred them.
11. Now the dough has come up, I grease my hands with oil and begin to pinch off pieces from it, approximately the size of a child’s fist. When your hands are in oil, it is very convenient to work with the dough, it does not tear too much, it is fluffy and pliable. I make a flat cake out of it with my hands.
12. That is, flour is no longer needed in this recipe, I just poured it in vain. We work only with oil.
13. Place potato filling in the center.
14. I secure the edge.
15. And place the pies on a greased baking sheet. Since there is no flour on them, I decided not to grease them with egg yolk, and the author of the recipe didn’t write anything about it either.
I didn’t get 30 pies, but smaller ones (not all on a baking sheet), about 25 pieces. But I’m the first to see how big I made it out of greed :)
16. Covered the pies with a towel and left them to rise a little, about 20 minutes.
17. Then I put the baking sheet with the pies in a preheated oven and bake at 180 degrees for about 25 minutes, looking at the browning.
Well, what can I say, this is the first time I’ve eaten these pies, the dough is unlike any other pie dough, it’s like filled buns. Airy, tender, very tasty! I really wanted to know what would happen to the pies the next day, so I saved a couple. I put them in the refrigerator, took a bite in the morning, baaah, and it’s really the same soft and tender dough as yesterday. That is, when cold they are just as tasty, not stale!
In general, thanks to Galina for sharing such a wonderful recipe for the Companion dough for pies that do not go stale for a long time, now I will bake such pies often!
Homemade baked goods will always be soft and tender. How is this possible? Housewives who often spoil loved ones with fresh pies know several important secrets of one recipe.
There are only 4 main secrets. They all relate to pies made from yeast dough - this is the kind of baked goods that go stale very quickly (in fact, the very next day). By day 3-4, pies, rolls, and buns may dry out completely. To prevent this, you need to think through all the features of baking.
Test secrets
For the “non-staling” test you will need:
- 3 eggs,
- 0.5 l plus 0.5 cups of milk (a larger volume for the dough, a smaller volume for dissolving the yeast),
- 200 g margarine,
- 50 g pressed yeast,
- 2/3 cup sugar,
- 1 teaspoon salt,
- 3-5 tablespoons of odorless vegetable oil.
You need to take as much flour as the dough itself will take. The filling can be anything.
The secret of work
For a non-staling cake, it is important to prepare the flour correctly. It should be sifted - this will make it more “airy”, saturate it with oxygen, which, in turn, will give work to the yeast.
In this case, margarine should not be added to the dough cold - it should be warmed to room temperature. This will also allow the dough to become more pliable and soft.
The secret of the dough
The yeast for the dough is kneaded and mixed with a pinch of sugar. Then they need to be poured with 0.5 cups of warm milk and the mixture left for 30-40 minutes in a warm place. The yeast should rise during this time. While they do this, it is important to prepare the bulk of the dough:
- Mix 0.5 cups of flour with vegetable oil - the substance should be free of lumps and have the consistency of thick sour cream.
- Bring 0.5 liters of milk to a boil, and then add it to the butter and flour, stirring the mixture constantly.
- Add salt and remaining sugar to the mixture and mix everything thoroughly.
When the yeast has risen and the bulk has cooled (but not completely), it should be added to the yeast soaked in milk. After this, the mixture is mixed again, and only then the following are introduced into it:
- softened margarine,
- eggs - poured out one at a time,
- the remaining flour is poured 1 tablespoon at a time.
Flour is added until the mass becomes thick - that is, thicker than sour cream. This completes the preparation of the dough. Now it needs to be left for 2 hours in a warm place, covered with a dry and clean cotton napkin. Every half hour the dough needs to be kneaded so that it does not rise too much.
The secret of kneading dough
When the dough rises (after 2 hours), you need to add flour to it. You can't pour it all at once. Flour is added 0.5 cups at a time, and the mass is carefully kneaded with a spoon. The substance should become very dense - kneading continues until the dough cannot be turned at all. At the same time, it should remain soft and stick to your hands quite a bit. But there is no need to knead it with your hands.
After kneading with a spoon, the dough remains in a warm place for another 20-30 minutes and finally rises. Only after this can it be considered ready.
This recipe allows you to create dough for any baked goods - pies, pies, buns, rolls... And thanks to step-by-step preparation, you can ensure that none of these products go stale for a long time.