Cottage cheese in a yogurt maker. Delicate homemade curd in a yogurt maker
Purchasing a yogurt maker with the function of making cottage cheese and sour cream will be an ideal option for a family with children. After all, who, if not a growing body, needs to eat sour cream with cottage cheese ?! The advantages of homemade products can hardly be overestimated: naturalness and safety are exactly what we value homemade dairy products of our own production or purchased from a supplier - proven by time and quality.
Yoghurt maker with the function of making cottage cheese and sour cream: what can you use a cottage cheese bowl for?
With the help of this convenient device, in addition to cottage cheese, you can cook: sour cream, kefir, yogurt. It doesn't matter if you use a jar or a bowl - the taste of the final product is the same. But when preparing dairy products in a bowl, you save time spent on sterilizing and processing yoghurt maker jars, and it is beneficial to use jars only for yoghurt, which is often served in portions.
Preparing the yogurt maker for use:
Depending on whether you have a bowl for making cottage cheese or just jars, rinse the bowl or sterilize the yogurt maker jars in the microwave. The lid of the yogurt maker can also be steamed. In such conditions, the finished "live" product will retain its freshness and pleasant taste longer.
What does it take to prepare dairy products?
- 1. Milk. It all depends on your preference. You can safely use whole cow or homemade goat (with the latter, the curd turns out to be more tender). Before adding any kind of sourdough to it, boil and cool it. So you get rid of all microorganisms that can harm your health and the health of family members.
Attention! It is from whole milk that a wonderful thick curdled milk is obtained.
If you don't have the opportunity to purchase fresh steamed milk, buy pasteurized milk. It is not necessary to boil it, but only to heat it up to a certain temperature.
2. Sourdough. Unlike yoghurt, there are many starter cultures for making curd. You can use a special product - bacterial starter culture, designed for this very purpose. But no less tasty cottage cheese is obtained from home-made sourdough. Thick sour cream (preferably rustic or yogurt) is great. As with making yoghurt, you can use natural yoghurt without additives from the store to make cottage cheese at home. In the absence of any of the listed products in the refrigerator, you can use calcium chloride purchased at the pharmacy.
Heat the prepared milk and cool to a temperature of 35-40 degrees. Lower (25 degrees) and higher (50 degrees) temperature indicators do not contribute to the fermentation of milk. Warning: lactic bacteria enter the active phase of reproduction only at a temperature of 36-40 degrees.
Mix the dairy product with the sourdough, and then follow the instructions for your yogurt maker.

Method of making sour cream in a yogurt maker
It all depends on your preferences: you can cook sour cream with store-bought cream that has undergone heat treatment, or you can also use milk (but in this case, the fat content of the finished product increases significantly). Heat the liquid and add half a liter of a special bacterial starter culture for sour cream or fermented baked milk into it.
Important! Take cream at least 18-20 percent fat. Otherwise, you will end up with a product that looks more like yogurt - a traditional product of Armenians, more liquid than sour cream.
Mix liquids, stir. Pour into jars for a yogurt maker and send to ferment in a yogurt maker for 7.5-8.5 hours. After the fermentation process is completed, send the jars of sour cream to the refrigerator for an hour.
Cottage cheese in a yogurt maker - recipe
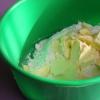
Heat the milk. Mix 100 g of homemade cottage cheese in a separate container with a small amount of milk and stir well. At the end, add an incomplete spoonful of lemon juice and mix everything well in a common bowl. Pour the liquid mass into clean yogurt cups, set the required mode in the functionality and set the required time. Depending on the model, cooking cottage cheese using this recipe will take 12 to 15 hours.
After the end of the process, hang the mass to drain (for example, tying it tightly with gauze). This is necessary to separate the milk whey, which, by the way, can be drunk or added to okroshka instead of kvass.
After - send the cottage cheese to the refrigerator for another 4 hours.
You can serve a healthy product with fruits, mixed with jam, nuts or dried fruits. If your household does not like cottage cheese in its original form, prepare a casserole or cheese cakes. For lovers of sweets, pancakes with cheese, poured with melted chocolate, are suitable.
Video instruction for making cottage cheese in a yogurt maker
Video instruction for making sour cream in a yogurt maker
Fermented milk products should be an obligatory part of the daily diet. It is especially important to observe this rule in families with small children. Kids themselves do not mind eating delicious yoghurts. And if the mother has at her disposal a special yogurt maker with the function of making cottage cheese and sour cream, then you can enjoy the products prepared using all the technology every day.
The unit with this name has a narrowly targeted action - it is intended for the preparation of yogurt. In more advanced models, you can get both cottage cheese and sour cream. How does this happen?
Even before the appearance of such a technique, housewives knew and used many recipes for obtaining a yoghurt mass. The whole essence of each of them boiled down to fermentation and the further development of lactic acid bacteria. The presented device does the same - it ferments the raw material with the help of bacteria - but at the same time it will maintain the set temperature for as long as necessary.
The usual temperature range usually ranges from 30 to 50 degrees.
In appearance, the device is somewhat reminiscent of an incubator - only there are jars instead of chicks. If this is a yogurt maker with the function of making cottage cheese and sour cream, then the complete set is supplemented with a bowl. In any case, you will need to prepare the starter, and then select the time and temperature in the settings. Uniform heating in the device leads to the fact that all this substance begins to ferment. As a result, at least ten hours must pass for the desired product to be obtained at the output.
The advantages and disadvantages of this technique
There are many advantages to using the device - each of them is a serious reason for buying.
- The end result is much more useful than what's on the shelves. No doubt about environmental friendliness dishes - it is a full-fledged analogue of the village sample.
- What happens inside does not have to be constantly monitored. The settings are set - and you can return to other cases. The only thing that needs to be done is to put the result in the refrigerator after cooking (to stop the multiplication of bacteria). All this can be consumed after two hours.
- The owner of such a yogurt maker receives savings not less than 20%, because the manufacturer includes in the price not only raw materials, but also other costs.
The extended functionality of the device allows you to get not only yoghurts, sour cream or cottage cheese - with the selected settings, you can even cook tiramisu. Others will let you enjoy ice cream. There are many recipes, and along with them, the chance to prove yourself a first-class cook increases.

However, there were some drawbacks.
- This device should be selected according to its power - if this indicator is insufficient, fermented milk products will be cooked much longer.
- The unit cannot be called compact - it will take up a lot of space on the table. And he does not pull the title of universal for the reason that it is aimed at preparing a certain type of dish.
- It is better not to interrupt the preparation, because the previously made leaven is a living substance that must be used every day.
How to cook sour cream and cottage cheese in a yogurt maker
Cooking fermented milk types of dishes in this way is classified as a healthy eating technique, because in the end result it is preserved the greatest amount of vitamins. Users note that over time, the condition of nails and hair improves significantly, and the very first "gratitude" will be the normalization of the gastrointestinal tract.
Models with this functionality can be called small dairies.
True, there are secrets here:
- You can make sour cream only on machines with temperature controlled... For this product, the degree must be set lower than for yoghurt.
- To prepare cottage cheese, the apparatus must be able to curl... Plus, there are special bowls in the kit.

Yoghurt maker with thermostat
Recipe sourdough
To prepare yoghurts, you need to prepare sourdough and milk. For the first ingredient, you can take any yogurt from the store. However, it would be more correct to use pharmacy enzymes:
- Narine (will improve the functioning of the gastrointestinal tract, useful for the prevention of digestive and respiratory diseases);
- Evitalia (restore the immune system and intestinal microflora);
- Bifidumbacterin (suitable for restoring digestion).
As far as milk is concerned, it is ideal if it comes from the farm. Otherwise, you will have to select the brand you like empirically.
It remains only to put milk and sourdough in glasses (jars). The dosage is followed according to the instructions. The device turns on and runs for at least four hours (depending on the model).

How is sour cream made
This product in the machine can be cooked both with cream from the store and with milk.
- In the first case, the cream must be at least 18% fat.
- If you take milk, then the sour cream at the exit will turn out to be not very greasy.
All these technological subtleties must be observed. The source is heated and mixed with special bacterial leaven, intended for fermented baked milk or sour cream. Then everything goes to the yogurt maker for seven and a half hours. Then the jars are sent to the refrigerator for an hour, after which the product can be consumed.

How to cook cottage cheese
To obtain this result, you can use different versions of starter cultures:
- a specially designed bacterial product;
- homemade sourdough;
- natural yogurt from the store;
- calcium chloride from a pharmacy;
- homemade cottage cheese.
Again, here you need milk, which is heated and cooled to 35-40 degrees (at lower and higher temperatures, it simply does not start to ferment). It remains to mix milk and sourdough, and then proceed according to the instructions.
At the end of the selected process, the resulting mass is placed in cheesecloth and suspended for draining. After that, the cottage cheese is sent to the refrigerator for at least 4 hours.
By the way, the separated whey is still useful as an ingredient for other dishes.

Review of interesting models
Not every yogurt maker is capable of making cottage cheese or sour cream. Among the models intended for this, the following units have received special praise from users.

A source of valuable material for the structure of bones of the skeleton and healthy teeth is calcium. It is found in large quantities in cottage cheese. This product serves as food for babies from six months, and is also recommended for the dietary diet of adults and the elderly.
The safest way is to cook this valuable fermented milk product at home, because this is the only way to fully control the manufacturing process and guarantee the quality and safety of products.
Yoghurt makers have joined the ranks of modern kitchen technology, making this process easy and convenient for mothers and busy people. Now everyone can make homemade curd.
Useful properties of homemade cottage cheese
What makes this product so healthy? The answer is simple - a composition rich in valuable substances. The dairy treat contains a high concentration of calcium and phosphorus, which are necessary for the heart and skeleton, the iron content normalizes the level of hemoglobin in the blood. Cottage cheese is useful for diseases of the respiratory system, liver and gastrointestinal tract, thanks to amino acids. It improves blood properties and metabolism. It has a beneficial effect on the growth and development of the child due to vitamin D, which is also useful for the elderly.
Vitamins and minerals in a fermented milk product:
A;
complex of B vitamins;
WITH;
H;
PP;
iron;
potassium and calcium;
magnesium and copper;
sodium;
selenium and sulfur;
phosphorus and fluorine;
chlorine and zinc.
Cottage cheese is unique in its rapid assimilation in the body, the protein contained in it is converted faster than that obtained from other sources. And the amino acids methionine and tryptophan improve the functioning of the nervous system.
Ingredients for curd
To prepare a natural dish at home, you will need a minimum set of products and a yogurt maker, which can be provided by a specialized online store of household appliances.
The two main ingredients for homemade curd are milk and sourdough. Depending on the age, you will need baby milk or the most ordinary pasteurized milk. The only exception is homemade milk, excessively fatty with unknown components. It is dangerous to use it for the preparation of yoghurts and curd products.
Before use, pasteurized milk must be boiled, UHT baby milk does not need to be subjected to additional heat treatment.
The curd is based on natural yoghurt prepared in a yoghurt maker from milk with the addition of a special bacterial starter culture.
The sourdough helps to convert milk with the help of beneficial bacteria into a fermented milk product, while retaining all the valuable properties. Dry bioconcentrates are sold in packages for 1-3 liters of milk in pharmacies and supermarkets.
If for a child the composition of cottage cheese should be as simple as possible, then for adults, sugar, salt or spices can be added to the yogurt mass. And season the finished dish with jam, fruits or candied fruits.
Cooking process in a yogurt maker
 The convenience of using a yogurt maker is that all the necessary utensils are included, and the fermentation process takes place in a household appliance, saving space in the kitchen.
First you need to prepare the dishes: pour boiling water over glass jars with lids for yogurt, a container for milk and a scoop. After that, pour the milk into a bowl and boil, in case of using a pasteurized form, or immediately add the leaven and stir thoroughly. The blank for yoghurt then needs to be poured into cans, the lids are closed and installed in the yoghurt maker for the time specified in the instructions for the device: from 5 to 7 hours. After this period, disconnect the device from the mains and, without opening the covers, leave it for several hours (from 3 hours).
When the yogurt is completely ready, the jars must be removed from the device, placed in a water bath and brought to a temperature of 60 ° C over low heat, then turn off the heat and leave the water bath on the stove for 30-40 minutes. Then remove the containers, cool and pour the contents into clean cheesecloth, squeeze out the whey and the natural curd is ready. Children are encouraged to eat a freshly prepared dish. Such cottage cheese can be stored for no more than 36 hours in the refrigerator.
My daughter categorically refuses to eat purchased cottage cheese, yogurt and kefir. Curls and turns away the face))) And I decided to try to cook all this at home, because the benefits of sour milk are undeniable. Cottage cheese and yogurt for children helps to improve the digestive tract, intestinal motor activity, eliminate cholesterol and saturate the baby's body with calcium. It is very useful to give the baby with constipation and dysbiosis. To prevent this condition, it is worth making yogurt at home, or homemade yogurt for children with sourdough culture. They have a probiotic effect, that is, they contain, in addition to the usual lactic acid bacteria, probiotics - live microorganisms (mainly bifidobacteria and lactobacilli).
And recently, to implement my idea, I bought a yogurt maker. I took an inexpensive one, for only 1100, for 4 cups, because the shelf life of ready-made yogurt for adults is 7 days, and for children up to a year, 1-2 days. Therefore, I don't need a big one, I will cook only for children.
I was pleased with the purchase! The yoghurt turns out to be very tasty. And most importantly, my daughter is eating it by both cheeks.
Making homemade yoghurt .
The first thing to consider is which milk to use. I use UHT baby. The second point is how we will ferment our milk. I tried children's yoghurts as a starter culture (by the way, it is very difficult to find them without additives and with a minimum fresh date), children's kefir, and biolact from Tyoma, and Vivo bifivit starter culture. Neither me nor my daughter liked it with kefir. Both taste and smell are sour. But with the rest of the ferments, you get a delicious and pleasant smell - creamy vanilla.
Homemade yogurt recipe :
I take out milk from the refrigerator in advance, use 500 ml baby milk from Tyoma, so that it becomes room temperature. And if I use baby yogurt or biolact as a starter culture, then I get them too. Cold product must not be poured into the yurt maker, only at room temperature!
 If I use a pharmacy starter culture, I take out 1 bottle from the package. While I take vivo bifidum, because it can be used by very young children, unlike narine and evitalia. There are 4 bottles in the package, it costs 286 rubles. I order from an online pharmacy.

I pre-sterilize jars from a yogurt maker and a tablespoon in a double boiler for 10 minutes. You can also sterilize in a microwave oven, after pouring water into jars, also 5-10 minutes.
Pour 500 ml of milk. into the dishes in which you will mix our ingredients, after pouring boiling water over it. And we introduce the leaven. If it is yogurt or biolact, then pour half a pack, this is about 100 ml. If this is a pharmacy starter culture, then we take a bottle, pour a little milk into it, somewhere up to 2/3, close with a lid, and carefully loosen it until it is completely dissolved. Add the dissolved starter culture to the milk, and mix everything thoroughly. Now it remains to pour everything into jars.
Well, the final stage. We put our jars in a yogurt maker, cover it with a lid, and turn it on. We timed out the time from 8 to 12 hours. It depends on the leaven. I turn it on at 8.

After the specified time has elapsed, we take our jars out of the yogurt maker, close them with lids, which were also previously doused with boiling water. And we put it in the refrigerator for two hours, you can put the date of manufacture on the lids. We put it in the refrigerator to stop the growth of bacteria. Well, our homemade yogurt is ready. It turns out to be pretty thick. If you get liquid homemade yogurt, it means you did not keep it in the yogurt maker, and if the separated whey is slightly visible, then you overexposed it.
 Before giving the jar to the child, just take it out of the refrigerator and put it in lukewarm water for about five minutes, just not hot. Better if the water cools down, change it back to warm.
So, as you can see from 500 ml. milk turns out 4 jars of homemade yogurt. Now, about the shelf life of yogurt. For children under one year old, it can be given for two days. Children from one year can be given up to three days. I give Yulia 2 days from 80-100 ml. I use the remaining 2 jars to make homemade cottage cheese.
Making healthy homemade curd.
I'll make a reservation right away that delicious cottage cheese is obtained from only cooked yogurt.
1. The cooking process will be in a water bath. We take two pans of such a size that one goes into the other without touching the bottom. Pour water into a large saucepan and bring to a boil. Pour our yogurt into a smaller one (from those remaining 2 jars).
2. Making a water bath. In a large pot of boiling water, place a pot of yogurt, with a medium heat.
3. In a few minutes you will see how the serum begins to drain. With gentle movements from the sides of the pan, as if stirring, move it a little to the middle, so that the heating occurs evenly, but do not make circular movements, do not interfere. We are waiting for our milk mixture to heat up to 60 degrees. In time it is about 10 minutes. You can first check the temperature with a thermometer, I don’t do this, I can already see when you can take pictures. You can, of course, still heat it up, but at a higher temperature we will kill our beneficial bacteria, and we have another goal - to preserve them. As soon as it has warmed up to this temperature, remove both pots from the heat. We do not disassemble the water bath, but leave it in this state for 30-40 minutes.
4. Now remove the top pan. Pour water from the bottom and pour cold water. We put the pan again, in which there is still liquid cottage cheese, only now in a cold bath. We are waiting for 20 minutes.
5. Pour all the contents from the top pan into a strainer, leave the whey to drain. You can pour it into cheesecloth, but this is not necessary, I always use a strainer for convenience and the whey is very clean without any cottage cheese impurity (pre-pour the strainer with boiling water).
I painted everything for a very long time, but again, your participation in preparing cottage cheese for the baby takes only almost 10 minutes while the water bath is heated.
From two 150 ml jars of homemade yogurt. I get 90 gr. curd.

We eat it for an afternoon snack, I give 40 grams, from 9 months. I'll start giving 50. Our pediatrician said that it is not recommended for a baby to be given more than 50 grams until one year old. I add fruit puree to it.
Well, and actually a photo of a satisfied Julia, eating homemade yogurt.

500 gr. excellent cottage cheese from 1 liter. milk is a reality!
Today I want to tell you about one promised experience: how to get very tasty and delicate cottage cheese at home using an ordinary yogurt maker. But these will be more reflections and descriptions of my actions and process than a specific recipe. It still needs to be finalized and optimized, at least in time.
Inspired by the success in making yoghurts and the thirst for experimentation, I decided to go further and make cottage cheese comparable to what my grandmother did in the oven. Its taste and consistency are unforgettable.


Ingredients
- 1 l. milk (from 4.5%);
- 1 pack of baby curd without additives;
- 1 jar of homemade yogurt .
Sequencing:
Naively believing that with cottage cheese everything is exactly the same as with yogurt, I decided to buy a pack of baby cottage cheese. Stir it in milk and leave to ferment in a yogurt maker for 8 hours.
Yeah, no matter how it is. After 8 hours I was disappointed, of course I did not receive cottage cheese. And I received warm, slightly sweet milk.
It was late at night, and I, completely upset, decided to make yogurt, because there is nothing good to waste. I poured a little milk from the jars so that the yogurt would fit. She took out a jar of yogurt, prepared the day before, from the refrigerator. Since I really wanted to sleep, I just added a couple of tablespoons of yogurt to each jar and interfered a little, already counting on yogurt. I put it in a yogurt maker for another 8 hours, and in the morning something incredible was waiting for me.
In each jar, the contents were divided into 2 equal parts: there was whey at the bottom, and a decently thick curd at the top. I pushed the curd through a small sieve, draining the whey. And put it in a jar. I didn't weigh it, because I like the cottage cheese just like that, a little wet. Ah, these memories, how tight they hold us. Apparently, the milk soured a little during the first visit (all the main recipes for cottage cheese are based on this), and yogurt served as a catalyst.