Hello kitty style cake. Amazing cake "Hello Kitty" for a children's party
Hi all! Today we bake a cake for 1.5 kilograms, based on the famous cartoon (which neither I nor my daughter have ever watched :)
I make a biscuit from what was found in the refrigerator:
3 eggs
90 g butter
1 can of condensed milk
100 g. 10% sour cream
100 g yogurt
150 g sugar
0.5 tsp. soda
400 g flour
I mix the eggs with sugar and lightly beat with a mixer.

While continuing to beat, gradually add the rest of the ingredients. For convenience, I melted the butter in the microwave, and the other products were straight from the refrigerator, it is not necessary to bring everything to the same temperature.

The last thing I add to the dough is flour mixed with soda. Mix everything thoroughly.

I pour the dough into a detachable form, you can use non-detachable or silicone. This biscuit does not swell with a mound in the middle during baking, but it is still better to level the dough in shape at least a little.

I have a mold with a diameter of 26 cm, I do not recommend taking a smaller one for the number of products indicated by me, since the biscuit rises well.

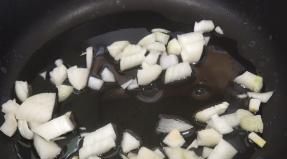
While the biscuit is baking (about 40 minutes at 180 degrees), I prepare the cream. I also have a very impromptu recipe for him - in fact, sour cream with the addition of berry jelly.
๑ 140 g sugar
๑ 350 g. 25% sour cream
๑ 50 g jelly (dry, strawberry)
๑ 50 ml. milk
I soak the jelly in warm milk for ten minutes.

I mix sour cream with sugar. I have never defended sour cream, as many recommend, in gauze, so that the glass is excess liquid and the cream is thicker, but you can do it.

Beat well the sour cream mass at high speed until the sugar dissolves.

I warm the swollen jelly slightly in a microwave oven (50% power) stirring every 10 seconds. It needs to be liquid, but not boiled.
In jelly, I add a couple of tablespoons of whipped sour cream.

Then this mass must be mixed well.
And only after that, introduce into the bulk of the sour cream, constantly whisking it.

Actually, this is the technology for making my homemade bird's milk, but here I didn’t need a frozen cream, so I didn’t add gelatin to other proportions of the products.
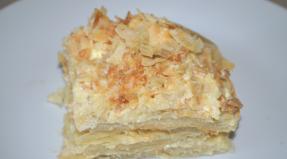
I remove the finished cream in the refrigerator and return to the biscuit. You need to take it out of the mold, cool it down and admire how smooth and pretty it came out;)

To transform an ordinary round biscuit into a "kysu", I printed and cut out a picture found on the Internet.
I cut off all the excess. From below, I decided not to frame the "muzzle".

I cut the biscuit into four cakes. It is very soft and can be easily cut with a special string without the help of a knife.

I collect the cake, layering it with cream. On top, I'm going to use another cream, so I put all the sour cream inside.

I fix the cake with skewers so that it does not float away, and send it to the refrigerator to soak overnight. But, I think, three or four hours will be enough, since the cakes are soft, and the cream is quite liquid and is well absorbed.

When it came to decorating, I got lazy and prepared a cream from a store-bought dry mix.
The cat's bow was cut out, put in place and circled with cream. I also "planted" "eyes" and "nose" on the cream, for which I used patches of chocolate icing.

Then, with the help of the “grass” nozzle, I began to deposit the cream on the sides of the cake.

The cream did not convey the texture of the wool that I wanted to achieve, but it turned out not too bad.

So I filled the whole “muzzle” with cream.

Now you need to color the bow. For it, I colored the rest of the cream in a brighter color and took the "open star" nozzle.

As a result, it turned out like this:

My daughter insisted on using a waffle rose)
The antennae and mouth (without it, the cake seemed unfinished, although it was not visible in the original) was laid out from cut marshmallow sticks.

That's all;) Have a nice tea party.
Cooking time: PT04H00M 4 hours
Now children's cakes made in the form of characters of famous fairy tales and cartoons or with their image are very popular. Any child will be happy to receive such a piece of culinary art on their birthday. Unusual cake "Hello Kitty" will make a splash on the festive table and become its true decoration.
How to cook
At first glance, it may seem that the process of preparing this dessert is long and complicated. This is not true. After all, the whole point here is not so much in the ingredients, but in the original decoration. You can generally take a simpler path and assemble a Hello Kitty children's cake from ready-made biscuit cakes. That is exactly what we will do.
For the cake, you will need 3 cake layers, from which you will need to cut out Kitty's muzzle. You can print an image of a cat on a printer, make a stencil out of paper, put it on a biscuit and cut it out along the contour. These manipulations should be done with all three cakes.
The cream for this wonderful delicacy can be anything. It is interesting to use not one type of filling, but several. For example, the first cake can be smeared with cherry curds. Cover with a second biscuit and grease it with a mashed banana. Put the remaining cake on top and cover with the most delicate cream made from any cream cheese and powdered sugar. You can take 0.5 kg of cold mascarpone, add a pinch of salt and mix. Then gradually add 100 grams of powdered sugar and beat thoroughly. We cover the top and sides with a thin layer of cream, put the Hello Kitty cake in the refrigerator so that it is well saturated.
How to decorate
We take out the dessert and start decorating. Fill with cream and decorate the top with "stars" from the edges to the middle. By the same principle, we work with the sides. For decoration, we need mastic made from milk powder, condensed milk and powdered sugar. We take all the ingredients in equal proportions and mix. In a particular case, a little mastic is required, so we take one tablespoon of products.

Since the image of the cat will be additionally decorated with a bow, and antennae are added, you will need to take a few drops of cherry syrup and a little bit of cocoa powder. We divide our mastic into two parts. Add cocoa to one, syrup to the other. Mix thoroughly separately. We roll out the pink mastic into a 2-4 mm ribbon and fold it in the form of a bow. We place it on the cat's ear. From dark mastic we form antennae, nose and eyes. Wonderful cake "Hello Kitty" made by hand!
Mastic Cake: Ingredients
You can cook dessert a little differently. For this recipe, you will need to use not ready-made cakes, but homemade ones. Let's assemble a cake from Hello Kitty mastic.
What is required for cakes:
- Form with a diameter of 26 cm.
- 4 eggs.
- 4 heaping tablespoons of sugar.
- So much pain.
- Two tablespoons of potato or corn starch.
- Vanillin on the tip of a knife.
- Two handfuls of walnuts.
Roll Ingredients:
- 5 eggs.
- Sugar - 5 tablespoons with a slide.
- 4 heaping tablespoons of flour.
- Tablespoon of starch.

- Mascarpone - 400 g.
- Fatty cream - 500 ml.
- Powdered sugar.
- 10 grams of gelatin.
- Fresh raspberries.
- Frozen raspberries.
- Gelatin - 10 g.
- Tablespoon with the top of starch.
- 100 grams of sugar.
- Mastic.
- A pack of butter.
- 3 tablespoons boiled condensed milk.
We bake a biscuit
Let's start baking biscuits. We put eggs in a deep bowl and add vanillin, start beating until fluffy foam, pouring sugar. You need to work with a mixer for at least 7 minutes. Then pour the sifted flour and starch here, mix with a spatula in one direction, add the walnuts. We cover the detachable form with baking paper, pour the dough into it and bake in an oven heated to 180 degrees until cooked.
We prepare the roll in the same way, but without nuts. We check readiness with a match. From this biscuit you need to cut off exactly half, and roll the second part loosely with a roll. We cut the first part into strips according to the height of the dessert. We begin to collect the Hello Kitty cake.
Assembling the cake
We unroll the roll and apply raspberry jelly, which should be prepared in advance. To do this, we fill the frozen berry with sugar and put it on the fire, let it boil for 10 minutes. After we remove from the stove, wipe from the bones, pour into the puree diluted in 0.5 tbsp. starch water. Pour gelatin with water, let it swell, dissolve in a water bath and add to the berry mixture. So, the jelly is applied to the biscuit, now you need to add 200 milliliters of whipped cream. Roll up again and cut into slices about two centimeters wide. Cut the round biscuit into two parts. We put one cake again in the form, cover with jelly, form the sides from the strips.

Cooking cream. Beat cheese and 300 milliliters of cream, add three tablespoons of powder. Pour in the gelatin soaked and dissolved on the stove. Whisk again. We spread this cream in a form with a biscuit on jelly. Place 3 rolls on top. We lay out fresh raspberries in the resulting voids. Lubricate with cream and sprinkle with berries. Then cover with cake and put in the refrigerator.
We take out the Hello Kitty cake and grease it with cream (whisk the butter with condensed milk), put it in the freezer for an hour. We cover our dessert with pink fondant. We form the image of a cat according to a paper template. We make all the details of the muzzle from mastic of different colors. You can decorate the Hello Kitty cake as you wish. Photos of the design of the dessert are presented in this article. Bon Appetit!
We need to bake 2 biscuits in detachable forms with a diameter of 17-18 cm. To prepare one biscuit, break 2 eggs into a bowl, add a pinch of salt.
Beat the eggs with a mixer until fluffy foam. Next, pour 0.5 cups of sugar in parts, continuing to beat, and add 0.5 sachets of vanilla sugar. Beat eggs with sugar for about 10 minutes until a dense, light and fluffy mass is formed. Sugar must be dissolved, grains should not be "heard".
 Add in three doses 0.5 cups of sifted flour and 1 teaspoon of baking powder. Flour should be gently mixed in with a plastic or wooden spoon (shovel).


 In the same way, knead the dough for the second biscuit. If you have 2 forms - great! Bake biscuits in an oven preheated to 180 degrees for 25-35 minutes. Do not open the oven! Biscuits are smooth, without a "cap".


 Lubricate the parts of the biscuit layered with jam with cream (make the layer not too thick). Put the parts of the biscuit, smeared with cream, on top of each other, forming a cake. Smooth the top and sides of the cake with the same cream. Send the cake to the refrigerator for a couple of hours.
 Now print a picture of Kitty on a white paper printer or draw on a piece of white paper so that it fits on the cake. Cut out the picture and place it on top of the cake. Outline with a toothpick.
 Remove paper. Melt the chocolate in a water bath, place it in a pastry bag. Allow the chocolate to cool to room temperature, then snip off the small end of the bag. Carefully circle the outlines of the picture with chocolate, draw eyes, nose, antennae, bow, arms, legs and immediately place the cake in the refrigerator for 20-30 minutes.
 Now you can start decorating the cake, for this I always use protein custard. Color the cream in the desired colors with food coloring, place it in pastry bags without nozzles. Cut off the small tips and then, squeezing the cream with neat dots, cover the picture with it. It will take a lot of time to do this, but you need to try!
  All free parts of the top of the Hello Kitty cake around the picture are also dotted with white or pink cream. I decorated the sides with pink cream using the star nozzle.

 Give a very tasty, bright, tender "Hello Kitty" cake for a girl to soak in the refrigerator for 5-6 hours and you can surprise and delight your child!
 Bon Appetit!
1. First, prepare the base of the dough. I need to bake two biscuits. Separate the yolks from the proteins, divide the sazar in half and add to the yolks and proteins. Beat separately with a mixer. Then mix both mixtures with a spoon in a large bowl. Sift flour, mix with baking powder. While stirring the egg mass with a spoon, gradually add the flour. Grease two forms with oil, sprinkle with breadcrumbs and pour the dough. Bake the biscuits in an oven preheated to 180 degrees for 30 minutes. Check readiness with a match. Pull out and cool. From one biscuit, cut out the head of Hello Kitty.

2. To make it easier to cut and decorate the cake, print a large format Hello Kitty head (the size of your biscuit), put the picture on the biscuit and cut it with a sharp knife. Cream for the cake can be used ready-made, or you can cook it. To do this, beat the butter with a mixer, add the powder, continuing to beat. Then add salt, vanilla, pour in the cream and beat well. If necessary, add cream. Color the third part of the cream with confectionery coloring pink.

3. Lubricate the base with a thin layer of cream, decorate the edges of the cat's head. To do this, use a pastry syringe and an open star (or closed star) nozzle.

4. Cut the bow out of paper, put it on the side, also decorate the remaining surface of the head with cream "stars" from the syringe.

5. We use the third part of the pink cream for the bow and the second biscuit, on which the head lies.

For the cat's torso, roll a pink ball, then shape it into a teardrop shape with a wide base and the least narrow top.
Roll out a tourniquet 0.8-10 mm thick from white mastic. Divide into 4 identical segments: the legs and arms of the cat. 
Flatten the two parts intended for the legs at one end, forming a foot. 
Glue the resulting parts to the main figure - to the body. 
Form paws from the remaining segments of the tourniquet: roll out the details a little to thin them. Press down one edge and cut a small corner with small scissors to form a thumb. Smooth and round - the palm should be neat. 
In order for the resulting parts to fit snugly against the body, flatten them at the junction (on the opposite side of the palm) to thin them out a little. Glue to the base and give a bend at the elbow. 
Next, you need to form a fluffy skirt - the bottom of the dress is made of flounces. To do this, roll out a piece of pink shade into a thin layer. Cut out a circle with a punch, then cut a smaller circle in the center of the part. You should get a flat "donut". For convenience, make an incision so that the workpiece resembles a braid. 
Using a tool with a ball (or a toothpick), thin the edge of the resulting part - the shuttlecock. As a result, it will become even thinner and will fall in waves. The whole process must be carried out on a clean kitchen sponge. 
Glue the resulting flounce along the bottom of the dress. Similarly, make a lot of flounces to make the skirt look fluffy. In some places, substitute pieces of cling film under the shuttlecocks to secure their position. What shape you give, in this form they will “freeze”, this will be the final result. In the central part of the body, stick a toothpick, leaving one edge about 1 cm free. This design will allow you to fasten the head to the body. 
For the head, roll the ball, not forgetting the proportions. 
Attach the head to the body by lubricating the junction with water. Roll up three small peas for the eyes and nose: two black and one yellow. Flatten a little and glue. 
For the kitten's ears, roll up two peas, then use your fingers to shape them into a triangular shape. 
Glue the resulting parts to the main figure. 
Make a bow out of pink sugar mastic: roll it into a tourniquet and assemble it into a bow. Push the grooves with a toothpick, simulating bends. Glue on Kitty's left ear. 
Draw a mustache with black food coloring. Place a gift in the cat's paws: a mastic cube wrapped in a sugar ribbon. Leave the figure made in a dry room until the parts are completely fixed, then remove the cling film. 
To make the cake look more interesting, prepare roses from mastic, which will later surround the main figure - Kitty the cat.
The rose will consist of 7 petals. Roll small peas out of small pieces. So that they do not dry out, do not roll out a larger amount. 
Flatten the resulting peas with your fingers into thin cakes - petals, not necessarily a perfect round shape. 
Roll one petal into a tube - this is the central part of the rose. 
Then “wrap” the middle with the next petal, trying to position it in such a way that the petals are connected tightly only at the bottom. 
Assemble the flower from the rest of the petals. Press the lower part of the rose well and scroll between your fingers, cut off the excess mastic with scissors. Adjust the rose petals, giving the greatest naturalness. Do the same for the rest of the flowers. 
When the figure of a cat and roses dry out a little, it will be possible to decorate a birthday cake with them. 
Read also...
- Cake "Smetannik" with custard: the easiest homemade inexpensive recipe Cake with sour cream with poppy nuts recipe
- Preservation of cucumbers for the winter - classic cooking recipes How to preserve cucumbers
- How to cook a honey ginger cake according to the classic step-by-step recipe Recipe for ginger honey cake at home
- Salads from canned fish, tasty and fast