How to bake in paper cupcake tins. Muffins (cupcakes) in silicone molds: recipes with photos
Do you want to please your favorite sweet tooth with cute little cupcakes for tea (coffee, cocoa, cappuccino?) But at the same time, there is absolutely no desire after tea drinking to peel off iron molds for baking these same cupcakes with a washcloth? You can be perfectly understood: after all, it is one thing to wash a large mold from under a cake, and quite another to clean two dozen molds from sticky dough. And it also happens that cupcakes don’t want to get at all - at least eat them right with the molds!
What to do, really forget the taste of homemade cupcakes and buy pastries in the store? 😀 Let's buy something else there that will help solve all the above problems. Namely - paper forms for baking!
Paper forms for baking are successfully used by professional confectioners. Please note: all store-bought cupcakes and muffins are sold in paper cups!
Such molds are designed for one-time use, but, unlike silicone molds, sold in 5-6 pieces per set, there are a lot of them! Forms are sold in sets of several dozen pieces, while they are absolutely inexpensive.
Looking ahead, I will say that of the whole variety of baking dishes, I prefer silicone ones - because they come in a wide variety of shapes, it is very easy to get pastries. However, a high-quality silicone mold still needs to be found! And paper ones are definitely environmentally friendly :)
The advantages of paper forms are obvious.
First, they are easy to use. No more digging out stuck pastries with a knife and then cleaning iron molds until you drop! Just carefully remove the paper from the bottom and walls of the cupcake - and eat to your health!
It is very convenient to take pastries in paper forms to nature, for a walk. Take a piece of paper and eat, even if there is no place to wash your hands: very hygienic!
Secondly (or is it the third?), paper molds do not need to be lubricated. Imagine how much vegetable oil you will save, for example, in a year!
Paper forms are made, as I wrote above, from environmentally friendly materials, and this is another advantage of them.
Among the shortcomings, it is desirable to have a special stand for baking in paper forms, but I don’t know what it is called - the fact is that the paper does not hold its shape well, and the cupcakes are deformed during baking, they are not as smooth as in iron or silicone molds. Therefore, paper molds must be placed in metal "nests", I will write about this in more detail below. And the fact that you can use the paper form only once.
Recipe for cupcakes in paper forms
I offer a simple recipe for homemade cupcakes in paper molds.
Take 2-3 eggs, a little half a glass of sugar, grind. Add 3 - 4 tablespoons of mayonnaise or sour cream (or you can equally of both, but with sour cream, of course, it's more useful!), 1 teaspoon of baking powder (or mix soda with flour, and pour a spoonful of lemon juice or apple cider vinegar into the dough). Stir, pour 100 g of melted butter into the mixture. After mixing again, add flour (to make a thin dough - like sour cream), and pour in the washed raisins (the more - the tastier!).
Fill paper forms - attention! - half, you can 2/3, but not more, as the cupcakes will rise.

Update! Over time, I realized how to do it so that cupcakes in thin paper molds do not deform during baking. I put a paper mold in silicone and metal, and then I fill it with dough. This method is full of advantages: firstly, cupcakes retain their shape; secondly, the dough does not come into contact with silicone; thirdly, cupcakes are easy to get; fourthly, reusable forms are much easier to clean. Another way from readers is to put paper forms one into the other, then the design turns out to be tougher and the cupcakes keep their shape better.

Paper forms are very thin compared to iron ones, so baking will be ready very quickly! But thin paper walls also have a drawback: in the process of baking, the cupcakes can become not quite round in shape ... To make the baking neat, mold manufacturers advise placing the molds in a tall iron mold, and only then fill them with dough.
Then place the mold or baking sheet in the preheated oven.
After 20-25 minutes, try it: the wooden stick remains dry during the test, and the tops of the cupcakes have become ruddy? Time to get it!

The paper can be easily removed from the cooled cupcakes. Bon appetit!
You can try a variety of recipes: muffins with raisins and nuts, vanilla, chocolate, biscuit. With such wonderful molds, even the most delicate dough will succeed!
Cute, beautiful and delicious cupcakes will certainly surprise your household and guests! They will be interested in where you bought such yummy ... and you will smile mysteriously. Then, after tea, reveal your secret! Let your friends be convinced of the benefits of paper baking molds by trying to bake something extraordinary.
If you are going to serve self-made cupcakes to the festive table, please note that it is recommended to do this in paper forms. The original packaging not only looks very unusual, especially when picked up in the style of a party, but also allows you not to get your hands dirty while eating. The cost of forms for cupcakes is low, such packaging does not affect the duration of baking in the oven, so you can safely buy a paper wrapper and start baking products. It remains only to clarify a few points: is it necessary to grease the mold before baking and how much dough to pour into it? You will find answers to these questions in our article.
What are the forms for cupcakes, and whether they need to be lubricated
Paper baking pans have numerous advantages. Firstly, their use allows you to keep the dishes clean - you do not have to spend your free time cleaning the metal mold. Secondly, while eating, the hands remain clean. Thirdly, they are inexpensive, every housewife can afford to buy them. But such forms have a significant drawback. The fact is that thin parchment does not withstand the weight of the dough and begins to deform. As a result of this, the products become similar to cakes. To avoid it? cupcakes should be baked in metal forms, having previously put paper ones in them.
On sale you can find different types of forms for cupcakes:
- from parchment for baking;
- from laminated paper;
- corrugated paper;
- from thick cardboard;
- with a side;
- with reinforced edge
- with lace and others.
The choice of a specific form depends on the solemnity of the event for which baking is being prepared. Lace will look gentle and elegant on the wedding table, and ordinary parchment is also suitable for home tea drinking. Often, housewives have a question: do I need to grease paper forms for cupcakes or not? Additionally, such forms do not need to be lubricated with anything, since they are made of special oiled paper. Thanks to this, the finished product does not stick to it.
How to make your own cupcake molds
If you forgot to buy paper forms, and the dough for cupcakes is already ready, in just 5 minutes you can make them yourself. To do this, you will need baking parchment, compasses, a simple pencil, metal cupcake molds and an ordinary glass.
First of all, you need to measure the diameter of the metal cupcake mold with a compass. To the result you need to add 2 cm (bottom diameter). Then, using a compass, draw a circle on the parchment. To make several shapes at once, you need to fold the paper in three, and then cut out several circles according to the template.
To get a real paper cupcake pan, you need to soak each circle in water and put it between two metal molds. Wait a few minutes for the paper to dry before starting the baking process.
Paper Cupcake Molds: How to Use
So, you have ready-made paper molds, but you don’t know how much dough to pour into them to make delicious cupcakes? Everything is much simpler than it seems at first glance. How to bake cupcakes in paper forms, you can learn from the following step-by-step instructions:

- Buy cupcake liners that match the theme of your party, or make your own out of parchment paper.
- Put each mold in special recesses in a baking sheet or in metal cupcakes.
- Fill in the forms with the test. If you want the products to turn out high, pour ¾ of the dough volume, if lower - no more than half.
- Bake the cupcakes according to the recipe in a preheated oven.
If you do not have a special baking tray with indentations, you can use only molds.
Cupcakes in paper form in the oven
There are a large number of recipes for cupcakes: from simple to complex, with raisins, dried apricots, prunes, chocolate and others. We offer to cook the simplest, inexpensive, but no less tasty of all.

According to the recipe, it is necessary to beat two eggs with sugar (100 g) until a fluffy foam is obtained. Then sour cream (3 tablespoons) or the same amount of mayonnaise, a pinch of salt, soda (½ teaspoon), a few drops of lemon juice, softened margarine (one hundred grams) and flour (one glass) are added to the dough. The consistency of the dough should resemble thick sour cream.
To cook in the oven, you will need a paper baking dish for cupcakes. To do this, it is distributed on a baking sheet, and the required amount of dough is laid inside. Cupcakes are baked at a temperature of 210 ° for twenty minutes.
chocolate cupcakes
According to this recipe, in a short time and without much hassle, you can cook delicious and fragrant cupcakes.

The cooking sequence will be as follows:
- Sift flour and sugar (2 tablespoons each), cocoa powder (1 tablespoon), soda (2 teaspoons), baking powder and salt (1 teaspoon each) into a deep bowl.
- Add 2 eggs to the dry ingredients, as well as a glass of water and kefir, vegetable or melted butter (½ tbsp.).
- Preheat the oven to 180°.
- Place paper cupcake tins in metal cupcake tins. Pour batter inside.
- Place cupcakes in hot oven for 25 minutes.
If desired, you can decorate the cooled products with cream cheese-based cream or Swiss meringue.
Cupcakes in a slow cooker
Not everyone has an oven in their kitchen. Many people prefer to use a slow cooker for cooking main dishes and baking. To bake muffins in this kitchen helper, it is recommended to use a paper cupcake pan. To prepare the dough, you can use one of the recipes above.

Put cupcake molds into the multicooker bowl (fold several pieces of paper into one so that the mold becomes denser and does not deform). Spoon out the dough - no more than ¾ of the volume of the form. Close the multicooker lid and set the "Baking" mode for 45 minutes. Let the cupcakes stand in the bowl for another 10 minutes after the end of cooking. Open the lid of the multicooker and put the cupcakes on a plate.
microwave cupcake recipe
Do you want to cook delicious and fragrant cupcakes for breakfast? This can be done in just 5 minutes if you have a microwave in your house. Cupcakes are prepared in ceramic cups or glasses, and to make it easier to get them, it is recommended to use paper forms.

To prepare the dough for 4 servings, you will need: flour (4 tablespoons), condensed milk, cocoa powder, vegetable oil (2 tablespoons each), milk (3 tablespoons), vanillin and 1 egg. All ingredients are mixed with a fork until a homogeneous consistency is obtained and laid out in paper cupcake molds. In the 800 W microwave, products are cooked in just 4 minutes. After that, they can be served for breakfast. Regular muffins without cocoa are prepared in a similar way. To do this, replace the amount of cocoa powder indicated in the recipe with flour.
For 12 small (6 large) muffins
For test:
Wheat flour 180-190 gr
Sugar 150 gr
Butter 115 gr
Sour cream 10% (or yogurt) 80 gr
Egg white 2 pcs
Dough baking powder ½ tsp
Baking soda ¼ tsp
Salt ½ tsp
For cream:

Butter 230 gr
Cream 33-35% 60 gr
Powdered sugar 200-250 gr (to taste)
Vanilla essence (or dry vanillin 10 gr)
Additionally:
confectionery sprinkles for decoration
Paper capsules for cupcakes
Cooking:
- Dough. In one deep bowl, mix all dry ingredients: flour, baking powder, salt and soda - mix well with a whisk until all ingredients are combined.

- Melt the butter in a saucepan/microwave. Pour the oil into another deep bowl, where we will knead the dough. Add sugar to butter and stir.

- Mix yogurt, proteins and vanillin into the butter-sugar mixture (I took about 3-4 grams of vanilla essence)

- Mix all the ingredients until they are completely combined, you get such a light airy mixture.

- Gradually add the flour mixture to the liquid and mix well. You will get a homogeneous, not very liquid, but not thick dough, as in the photo.

- Divide the dough between the molds, filling them ⅔ full. Here I always use disposable paper capsules, they are quite dense and hold their shape well, so you can bake in them without additional metal molds. These capsules are available in both standard and larger sizes. I had large capsules, it turned out that this amount of dough was enough for exactly 6 such capsules. If the capsules are standard, then enough for 12 pieces.

- Bake cupcakes in an oven preheated to 180 C for 20-22 minutes. A sign of readiness will be the risen caps of cupcakes and a slight blush. You can also check the readiness with a toothpick - it should come out dry. And keep in mind that you can't overcook the cupcakes in the oven, otherwise they will become hard on the outside. This is what the finished cupcakes look like.

- While the cupcakes are cooking, make the cream. To do this, beat the butter at room temperature until creamy. You need to beat with a mixer at a speed above average for about 2-3 minutes.

- Then add powdered sugar, vanilla and whipping cream to the butter. Beat the mixture again at a high mixer speed for at least 5 minutes.
- Cool the finished cupcakes. You can immediately decorate them with cream, or first fill them with some kind of jam, cream, fruit curd, and so on, and then make cream caps. For hats, I use a piping bag with a star tip. It is most convenient to fill the bag with cream by inserting the bag into a tall glass.

- Hats were planted, decorated with any sprinkles, you can use berries. This time I made cupcakes as a gift for my friend's kids - a boy and a girl. I made 3 cupcakes in pink and blue packaging, I chose the decor to match the color of the capsules, there is no limit to your imagination!

27.03.2018
Today, many housewives prefer to use paper cupcake pans. The following arguments speak in favor of this method of preparation:
- low price;
- ease of use (no need to wash dishes after baking);
- after cooling, cupcakes can be taken for a picnic or a walk without wrapping them in bags;
- the possibility of cooking in a microwave oven;
- made from environmentally friendly materials;
- resistance to temperature factors, you can not only bake cupcakes in paper wrappers, but also use freezer containers (T range can be from -35 ° C to + 220 ° C);
- the dough in them is baked evenly, faster and does not burn;
- they have an original look.
How to bake in paper blanks
Paper blanks are intended for single use. Unlike silicone or metal cells, they do not have high strength. Therefore, for baking, it is recommended to prepare dough with a higher density or use special metal coasters.
Many people, when learning how to make cupcakes in paper forms, ask the following questions:
- Do molds need to be greased? Due to the material from which they are made, the molds do not require lubrication with oil. Products do not burn in them. But if the recipe requires it, you can additionally grease the paper with vegetable oil with a brush.
- What forms exist? Paper inserts are made from various types of materials: from parchment; corrugated or laminated paper. There are solutions for baking different types of cupcakes - cupcakes, tartlets, muffins, etc.
- Do I need to take the cake out of the mold? If cupcakes are baked in paper forms, they will stay fresh longer. The paper prevents the product from staling and protects it from damage.

How to make your own cupcake molds
By learning how to use paper cupcake liners, you can learn how to make your own. This knowledge may be needed in situations where you decide to bake a dessert, but find there is a shortage or absence of store liners.
What do you need for this:
- A jar, a glass or a cup with a bottom of the configuration that suits you, parchment paper, a ruler, a pencil, scissors.
- Find a small container with a bottom diameter that fits well into the suggested hole in the baking sheet for placing the paper cupcake liners.
- Measure out a piece of parchment that is suitable for the area and cut the required number of blanks for future molds. When preparing patterns, take allowances into account. It is advisable to leave a margin of 2-3 cm above the edge of the baking tray in paper forms.
- Crimp the resulting squares around the mold to form "cups". Carefully fix the folds, bend the extra corners, run it over the formed mold several times.
How to bake cupcakes in paper forms of this type? The main thing when making molds for cupcakes on your own is to give the product a rigid shape and avoid the formation of deep wrinkles on the inside. The dough will flow into such areas and subsequently, you will not be able to get the cake out of it without damaging it. Otherwise, the process of baking in homemade liners does not differ from the standard one. Thus, you can try to bake not only cupcakes, but also make portioned casseroles, tartlets. When creating such dishes, it is recommended to fold the parchment paper in several layers.
How to use paper cupcake molds: step by step instructions
Learn how to make paper cupcakes:
- There are liners that match the theme, color and decor of the party, event, occasion. There are many shops that offer original cake liners for almost any shade and size.
- When ordering molds, always order a few more pieces. Although the products are made from thick paper during operation, when the container is inserted into the nest, it may break and you will need a new insert.
- Set cupcakes in a special baking tray. You will need to place a liner in each indentation or "cup" before you start pouring the batter into the pan.
- Applying the test. Depending on how much you pour the mixture, the appearance of the cake will depend. If you want to get a "crown" (or make your cupcake look more like a mushroom), you will need to fill out the mold three-quarters. If a flat or recessed crust is needed, fill the cavity to half its capacity or less.
- Baking product. A baking sheet with forms is placed in a preheated oven for the time specified in the recipe. To prevent your cakes from settling after cooking, do not remove the paper molds until they are completely cool.
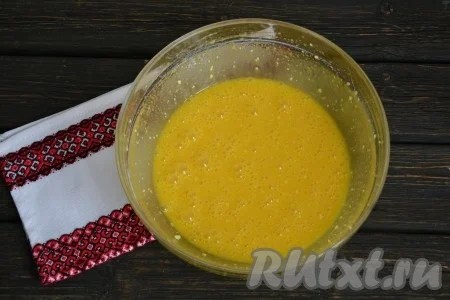
Prepare the necessary products.
In a deep bowl, combine the melted butter and 4 chicken eggs. If you use homemade eggs - as a result, the cupcakes will be a rich yellow color.


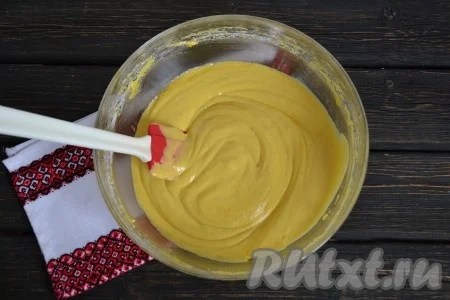
 Stir the mass so that all the flour disperses, there should be no lumps. The dough is ready to use. It should resemble thick sour cream in consistency, if you run a spatula over it, you will get a pattern that will not go away right away, but only after a few minutes.
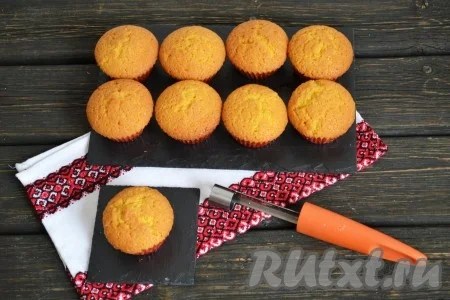
 Fill the molds with dough (silicone molds can not be lubricated with oil), filling them 2/3 of the volume, and send to a preheated oven. Bake cupcakes at 180 degrees for 20-25 minutes.

 And to make the taste of ready-made cupcakes even more interesting, you can make a hole in them and put the filling in. In order to make a hole, it is very convenient to use an apple corer. You can, of course, use a small sharp knife.
 Slightly pressing and scrolling left and right this knife, remove the middle of the cake.

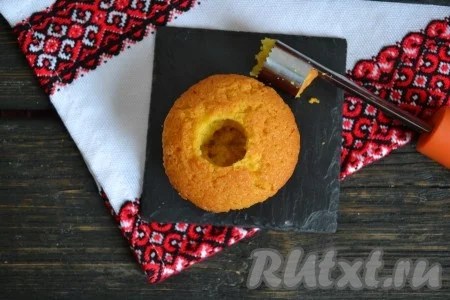
Put your favorite jam, thick jam or boiled condensed milk as a filling inside the cupcake (in the hole).

 Do this work with all the other cupcakes, and from this amount of ingredients, you get 16.

 Bon appetit! Cook with love!


