Cake with banana and kiwi on kefir. Kiwi and banana cake - sweet, aromatic and fresh! Recipes for curd, biscuit, yoghurt, lazy cakes with kiwi and bananas
First of all, we knead our hands, since we need to properly grind the cookies into small crumbs.

Add softened butter to the chopped liver and mix. I melted it in a water bath.

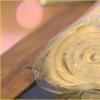
Now cover the cake pan (I used a simple pan) with parchment and spread the mass of cookie crumbs on the bottom. We make the so-called cake. And we put this blank in the refrigerator for 30 minutes.

Now fill the gelatin with water, mix and leave to swell for about 30 minutes.

While the cake and gelatin are infused, it's time to start filling. To do this, peel and cut 4 kiwi into cubes.

Add lemon juice and sugar to the kiwi.


Heat this mixture over medium heat for about 2-3 minutes, so that the kiwi will give juice and cool.

Now add the present gelatin to the cooled kiwi.

Pour in yogurt there and mix.

Cut the banana into petals like this.

And put it on the cake.

Pour the yoghurt mass on top and put it in the refrigerator for at least 6 hours. I prepared this cake on the eve of the holiday and left it for the whole night.

The next morning, I took the cake out of the fridge. Everything froze. At first I was afraid to get it out of the pan, I thought I would break it. But everything went well, bending the edges of the parchment, I carefully took it out of the mold. It remains only to decorate it with banana, kiwi and almond petals. Bon Appetit!

How to make a kiwi cake
Kiwi cake is made from shortcrust pastry or biscuit cakes. For the filling, you can use yogurt or sour cream cream.
Kiwi yoghurt cake
Light summer dessert has a rich taste and aroma. In the photo, a yogurt and kiwi cake is decorated with berries, but instead of them you can take any fruit or nuts.
Source: Depositphotos
Kiwi cake can be garnished with protein cream and fruit slices.
Ingredients:
- natural yogurt - 500 g;
- shortbread cookies - 200 g;
- kiwi - 6 pcs.;
- bananas - 3 pcs.;
- water - 100 ml;
- butter - 80 g;
- sugar - 70 g;
- gelatin - 60 g;
- almond petals - 30 g;
- lemon juice - 30 g.
- Chop the cookies, mix the crumb with soft butter. To make the dough plastic, defrost the butter at room temperature.
- Put the resulting mass in a parchment-lined form with a diameter of 22-26 cm. Form the bottom and sides 2-3 cm high, level the surface. Place the workpiece in the refrigerator for 30 minutes.
- Pour hot water over the gelatin and leave it at room temperature for half an hour.
- Cut 4 kiwis into small cubes, mix with sugar and lemon juice. Place the food on medium heat and bring the filling to a boil. Cook the fruit for at least 5 minutes to keep it from being bitter.
- Cool the filling, combine it with the swollen gelatin and yogurt.
- Cut the bananas into slices and place them on the crust. Pour in the yoghurt mass and send the workpiece to the freezer for 30 minutes.
- Transfer the cake to the refrigerator for 2 hours.
- Remove the parchment, place the dessert on a flat dish. Garnish with almond petals and fresh fruit slices.
Serve chilled.
Kiwi and banana cake
Delicious dessert looks spectacular and turns out to be juicy
Ingredients:
- sour cream - 70 g;
- wheat flour - 500 g;
- icing sugar - 150 g;
- sugar - 150 g;
- kiwi - 2 pcs.;
- banana - 1 pc.;
- walnuts - 50 g;
- poppy - 30 g;
- soda - 7 g;
- vinegar - 7 g.
- Mix 300 g sour cream with sugar and slaked soda. Add the sifted flour and knead the dough.
- Divide the workpiece into 8 pieces, roll out layers 5 mm thick. Cut out circles with a diameter of 20-25 cm.
- Bake the cakes and trimmings in the oven at 180 ° C until tender.
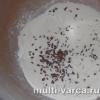
- Whisk sour cream with powdered sugar, add poppy seeds to the cream.
- Cut the banana and 1 kiwi into slices.
- Lubricate the cakes with cream, put fruits and chopped nuts on them. Fold the blanks in a stack.
- Sprinkle the sides of the cake with crumbs made from dough scraps. Send the dessert to the refrigerator for 5-6 hours. Place the kiwi slices on the surface before serving.
You can also garnish the treat with melted chocolate, chopped almonds, or walnuts.
Kiwi Honey Cake Recipe
A beautiful layered dessert can be prepared for a holiday or meeting guests. The treat has a sweet and sour taste, it turns out juicy and bright.
Ingredients:
- sour cream - 400 g;
- butter - 240 g;
- wheat flour - 200 g;
- kiwi - 4 pcs.;
- sugar - 100 g;
- honey - 90 g;
- eggs - 3 pcs.;
- soda - 6 g.
- Beat eggs, honey and 100 g sugar with a mixer. Add baking soda and sifted flour, stir again.
- Cover a mold with a diameter of 22-24 cm with parchment, pour the dough into it. Bake the biscuit in the oven at 170 ° C for 40 minutes.
- Cut the kiwi into slices 5-7 mm thick.
- Whisk the butter at room temperature with the remaining sugar and sour cream. Place the cream in the refrigerator for 30 minutes.
- Cut the cooled biscuit lengthwise into 3 pieces.
- Lubricate the cakes with cream and lay the fruit on top of them. Fold the blanks in a pile, brush the sides of the cake with the remaining cream. Send the treat to the refrigerator for 3-4 hours.
Garnish with fruit slices, grated chocolate and nuts.
A delicious fruit dessert can be served with a festive table with tea, milkshake or lemonade.
Cottage cheese dessert with banana and kiwi Is a delicate, airy and surprisingly tasty dietary delicacy for children and adults. Our family calls this dish, because it turns out to be not only tasty, but also festively beautiful, which, no doubt, increases its popularity among children, because our kids first eat with their eyes.
Let me remind you that most of the success in preparing a delicious dish lies in the freshness and good taste of the ingredients that make it up. Therefore, we need to buy tasty, fresh, non-acidic cottage cheese, always fresh, ripe, fragrant bananas and ripe kiwi fruits without bitterness.
Cooking with gelatin without baking
First, pour two tablespoons of gelatin with ½ cup of cold milk and leave for 30 minutes to swell.
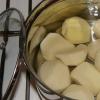
Kiwi preparation
While the gelatin swells, prepare the fruit for pouring. To do this, wash them, peel them and cut them into circles about 5 millimeters thick.
Curd processing
Place in a bowl and beat for 2-3 minutes. Then pour the milk with gelatin into a small saucepan, add ½ cup sugar, vanillin and heat the milk, stirring constantly, until the gelatin and sugar dissolve.
You do not need to bring this mixture to a boil!

Whisking with a blender
Add heated milk with gelatin, sugar and vanilla to the curd and beat the curd well again. We will beat for 3 - 5 minutes.

Final processing
Put the chopped fruits on the bottom and sides of the cake mold, put the remaining fruits in the curd cheese and gently mix with a spoon. Then carefully pour the curd mass with fruit into the cake pan and put it in the refrigerator for 8 hours.
Before serving, put the dish with dessert in hot water for 30 seconds, then cover with a plate and turn over.
A beautiful and delicious curd cake will be on our plate and can be served at the table.

It is better to eat the resulting dessert chilled so that it does not "float". This rule must be followed for. Bon Appetit!
Ingredients for the recipe
- Cottage cheese 6 - 9% fat - 0.5 kilograms;
- Milk - ½ cup;
- Sugar - ½ cup;
- Gelatin - 2 tablespoons;
- Banana - 3 pieces;
- Kiwi - 3 pieces.
1. Turn on the oven for heating at 150-180 degrees.
2. Separate the whites from the yolks so that in no case a drop of the yolk gets into the whites. In order for the whites to whisk well, add a pinch of small salt or a teaspoon of lemon juice, I do this and that. Try it with salt. Beat until firm peaks with a whisk of a blender or mixer.
3. Beat the yolks with a mixer or blender with sugar until light color.
4. Add the whites to the yolks (NOT THE VERSATILE, because the whites are lighter than the yolks, otherwise the whites will settle).
5. Beat at least 2-3 yolks with whites with a blender. Remove the mixer (blender), we won't need it anymore!))
6. Sift the flour 2 times (it is better to do this in advance), add to the bowl with whites and yolks in a thin stream, do not whisk !!! Only with a silicone spatula, as if saturating the flour with oxygen neatly in one direction, lifting and stirring with a spatula). Add 1 bag of vanillin or 2 bags of vanilla sugar. The dough will turn out like thick sour cream with many pimples. It is very good. Immediately pour the dough into a mold (I have a form with a diameter of 24), parchment is cut out in shape and laid on it, grease the whole form a little with sunflower oil (do not be afraid that the dough will settle, if everything is done correctly, then the biscuit turns out to be lush and tall). The oven must be preheated !!!
7. Bake at 180-200 degrees. For the first 20 minutes, in no case open the oven, otherwise the biscuit will settle. Bake the biscuit from 25 minutes to 40 minutes (you can check the readiness with a toothpick).
8. After baking, cut the biscuit into 3 biscuits (or 4, as it turns out). It is advisable that the biscuit lasts overnight. Or cut it in the morning (it's even better), the main thing is not to leave it in the air so that it doesn't dry out.
9. Cream. Beat homemade sour cream with 200 gr. powdered sugar. Add a can of condensed milk, add a bag of vanilla sugar. Put in the refrigerator. I don’t add gelatin and don’t advise, it’s better to buy fat cream, but I still do it with thick sour cream, it’s tastier))) I also make this cake with chocolate cream (black chocolate, plum, butter and condensed milk, but about that next))
10. Cut the bananas and kiwi into slices.
11. Make an impregnation, boil water and sugar in a plate (5 tablespoons each), let the syrup boil a little and cool down. Warm sour cream will flow.
11. Pour the impregnation on the biscuit, then spread with cream (more))), then the fruit is completely over the cake, alternate bananas with kiwi). Do this with all the biscuits, the last cake can be decorated with mastic or glaze. I don't focus on decoration in this recipe!
12. Last))) The cake turns out to be 2 -2.5 kg))) Even if a small family is not scary, eat it in a few days and still want to))) Eat the cake the next day so that it is soaked. I will not talk about its amazing taste, try it and you yourself will understand))) I have been baking cakes for a long time, so the recipe has been tested by me with time and experience. Bon Appetit!!!))
Hello our dear readers!
Today we will make a sponge cake with bananas and kiwi.
The recipe is so simple that it is guaranteed that not just a beginner, but even a child will cope with it. Everyone is guaranteed to succeed!
All ingredients are simple. The fruits in the cake go very well together. The recipe with butter cream assumes the presence of condensed milk and butter, but we will have it sour cream.
Be sure to try making this simple delicious cake that everyone, without exception, will like.
So, let's get down to a step-by-step recipe.
Ingredients:
- For biscuit:
- Chicken eggs - 3 pcs.
- Sugar - 1 glass
- Flour - 1 glass
- For the cream:
- Sour cream (any, but the fatter, the thicker the cream will be) - 250 g
- Sugar - 50 g
- For the layer:
- Bananas - 1-2 pcs. Only use the less ripe ones, as overripe ones are harder to cut for layers.
- Kiwi - 1-2 pcs.
- Chocolate - 90 g
Cooking method:

By the way, you can decorate the top of the cake in your own way, if you just become boring with the option drenched in chocolate.
For the embodiment of your ideas, it may be perfect THIS cream injector. Experiment and you will definitely get something original and beautiful!
If you liked the recipe with the photo, be sure to share it with your friends! And also subscribe to updates to cook other different dishes with us!
I do not say goodbye, I hope see you soon!