Sponge cake with pears in the oven. Sponge cake with pears
I line the parchment at the bottom of the detachable form, fix it with a side and cut off all unnecessary. I grease the bottom with very little butter so that it only slightly covers the bottom - there should be no clear creamy streaks. If you add too much oil, it will combine with the dough and grease it during cooking. From this, the biscuit may not rise. There is no need to lubricate the side, as in the oven the oil will begin to melt, drain to the bottom and "pull" the biscuit behind it. Sprinkle the bottom with flour, semolina, breadcrumbs, etc. is also not recommended.
So that the butter in the form does not melt ahead of time, I send it to the refrigerator.

I clean my pear, core it and cut it into thin quarters. Roll in a little starch. This is done so that the starch absorbs the juice, which will begin to be released from the pears during the cooking process. If this is not done, the juice will combine with the dough and dilute it. As a result, we can get a finished cake at the bottom and too wet at the top. I usually do the same with other fruits.
All the starch in the cooking process will dissolve thanks to the juice from the pear and will not taste, so do not be confused by this point. You can use either potato starch or corn starch. It will take about 1 tsp.

I put the plate with the pear aside and start making the dough. Here, too, there is a certain trick: it is better to use those eggs that have lay for at least a week. Why? Because fresh eggs have a high moisture content, and as you know: the drier the protein, the better it whips.
Separate the whites from the yolks. To do this, you can use an ordinary plastic bottle, special accessories, or, in the old fashioned way, transfer the yolk from one half of the egg to the other. I found another way for myself: I pour the egg onto my hand, the yolk remains on the palm, and the protein flows through my fingers into the container. Maybe someone will say that this is not hygienic, etc., but my husband does not disdain, and even so, I am sure that I will not catch the yolk with the sharp edge of the shell and it will not get into the whites.
It is best to use glassware. However, it must be clean and dry. Plastic is also acceptable, as in my case, but by no means aluminum, since the yolks will not be of a beautiful yellow color, but will turn gray. Accordingly, the final version of the cake will be the same color.
I send the squirrels to the refrigerator, as they will beat better if they are chilled.
I add sugar to the yolks (3 tsp or 1.5 tablespoons) and begin to beat with a mixer.

The yolks can be beaten in two ways: cold and hot. Everyone knows how to whip in a cold way. The hot method involves whipping in a steam bath (a saucepan with slightly boiling water / water should not reach the bottom of the container with yolks). The second method allows you to do this faster and the sugar dissolves much better.
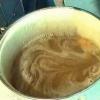
We beat until the yolks change color and the sugar dissolves.

Now I need to sift the flour and combine it with 1 tsp. baking powder and starch. It is very important that the flour is of really high quality. Firstly, the highest grade, and secondly, not wet. Determining the moisture content of flour is simple: pour it into the palm of your hand, squeeze it and look. If the flour clumps, it is damp and will not be suitable for baking.
Add the dry mixture to the yolks and beat at a low mixer speed until smooth. I put it aside.

I take out the proteins from the refrigerator, add half a glass of sugar + a little citric acid (about 1/4 tsp) or lemon juice (1 tsp) and begin to beat with a mixer, gradually increase the speed, clockwise.

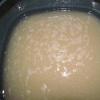
Beat the whites until they turn into a fluffy foam and hold their shape.

I combine proteins with yolks and flour. I do this gradually, adding 3 tbsp. l. I stir with a spatula from bottom to top. It is very important to adhere to this rule, as sharp, chaotic movements can plant squirrels and the cake will not be as tender and fluffy. Accordingly, the whisk and mixer are prohibited.


I pour the finished dough into a mold, put a pear on top and send it to a preheated oven. Ideally, this is 180 degrees, but since I have a problem with determining the temperature, I adhere to the rule of baking on the lowest heat. Of course, in the end it takes longer, but it certainly won't burn or fall off.

It is strictly forbidden to open the oven for the first 20 minutes. The readiness of the biscuit is determined not by a puncture with a toothpick, skewer or a match (this can precipitate the biscuit), but with the help of a spatula. If, with light pressure on the surface of the biscuit, it springs, then you can get it out of the oven. It will take about 40 minutes to bake. In my case, it turned out 15 minutes longer. I determine the readiness by smell and appearance: if it is well gilded and smells like a ready-made biscuit, you can get it out! =))
To easily separate the cake from the mold, I put it on a damp towel until it cools slightly. It is important not to allow it to cool completely, otherwise it will stick to the parchment and sides.
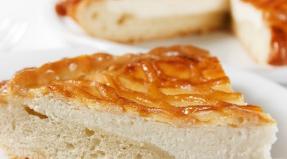
The result is a very tender, tall and crumbly cake. The sweetness is exactly at the level at which it should be. If you remove the pear and bake it just like a biscuit, you can use it to make cakes and various pastries.


I would be glad if you unsubscribe in the comments on the topic of whether you know these tricks in preparing a biscuit, which ones you use, and which ones you ignore ... =))
If you wish, you can familiarize yourself with the recipe for a biscuit on pancake flour and a recipe for a biscuit cake with grapes. In the comments, I'll attach a link to another biscuit cake recipe.
Bon appetit and success in your work! =))
Cooking time: PT01H30M 1 h. 30 min.
The pear biscuit recipe is very easy and does not take much time.... In addition, the ready-made biscuit will delight all your loved ones or guests you are waiting for. Bon Appetit!
If you want to make it even easier to make a biscuit, you can cook it in a multicooker. To do this, you also need to beat eggs with sugar, then add vanilla sugar and flour. Grease the multicooker bowl with butter, then put the pears cut into pieces in advance. Pour the dough on top. Bake the biscuit on the "Bake" mode, and after the beep, turn off, but do not open the lid for another 20 minutes. The finished biscuit can be garnished with powdered sugar or cinnamon. You can serve dessert with pear slices on a plate.
Speaking about the biscuit, which contains pears, one cannot but mention the benefits of the pears themselves. This fruit strengthens the body and lowers cholesterol levels. Also, pear helps to increase immunity and burn fat. It is great for people with diabetes. Pregnant women also need to eat pears due to their rich vitamin composition and minerals. Fruit has a beneficial effect on the work of the heart. It is very useful to eat pears fresh, as well as drink pear juices, fruit drinks and compotes, or eat any dishes that contain pears.
Just 100 grams of pears can saturate your body by providing it with cobalt. It is important for the gallbladder, helps to remove excess water, and also takes part in the formation of hemoglobin. Pears should be consumed if you are experiencing pain in the heart, have a weakened immune system. The conference pear is especially helpful here. It contains a large amount of nutrient fibers and organic acids.
Pears are also beneficial for obesity. They are included in the diet and those who adhere to proper nutrition and monitor the condition of the figure.
If you have a cough for a long time, or you have a lung disease, then you need to use a decoction of golden pears.
It is also useful for children to use pears, as they will strengthen the immune system, increase the protective functions of the child's body, especially during the period of viral infections.
The pear is a fruit that contains nutrients. Fiber removes toxins and toxins, and also helps the intestines. In the pear season, it is necessary to eat at least 1.5-2 kg of this fruit within 2 days.
Hard varieties are best baked in the oven. It turns out very tasty.
Pregnant women are also advised to include pears in their diet. Useful properties will help the child develop better, helping to strengthen his nervous system. Pears will protect the weakened body of a pregnant woman, saturating it with energy.
The benefits of pears cannot be underestimated, but apples are often substituted. It is when the season of pears comes that you should try to eat them as much and often as possible. You should also make preparations for the winter from pears. It is especially good if you grow your own natural pears, for the quality of which you do not even have to worry, because you yourself have grown them.
As you could already understand, pears can and should be eaten, no matter in what form - the main thing is that they are present in your diet.
Details Created: Saturday, 17 December 2011 20:48A very light and tasty biscuit can be made with pear pieces sprinkled with cinnamon sugar. Light - because it does not contain any fats, and the pear filling makes it low in calories, and therefore healthy. Many people bake this cake in the summer, we offer this recipe for those who have not yet learned how to cook it:
Ingredients:
premium flour 1 glass
eggs 4 pcs.
sugar 1 cup
soda 0.3 tsp
pears 3 - 4 pcs.
cinnamon 3 \ 4 tsp + 1 tbsp Sahara
vegetable oil for lubricating the mold
1 glass = 250 ml
split form with a diameter of 22-24 cm
Cooking method:
1. Prepare the filling, for this we wash and clean the pears and cut them into small slices. Mix cinnamon with sugar.
2. Combine eggs with sugar and beat with a mixer for 8 - 10 minutes until a thick air mass.
3. Sift the flour through a sieve, and then pour it into the beaten eggs in a trickle, stir the dough clockwise and from bottom to top. Pour in baking soda and stir the dough. You don't need to add soda, but somehow I added it and the dough turned out to be more fluffy, I liked it.
4. Sprinkle the chopped pears with sugar and cinnamon, mix and put in the dough, slightly mix the dough and put in a greased form with vegetable oil. We level it.
5. Bake in an oven preheated to 180C for 40 - 45 minutes until golden brown.
Do not open the oven during baking to prevent the dough from falling. Cut the cooled pie into portions. You can sprinkle it with powdered sugar on top.
Enjoy your tea!