Baking in the silicone mold in the oven. How to use silicone baking dish
Every day, the hostess must thank her fate every day for being lucky to live in the 21st century. About 50 years ago, our mothers and grandmothers conducted households in much less comfortable conditions. And they could not even imagine how to bake without oil or how to bake in silicone molds. Speaking of forms. They appeared recently in relation to other kitchen utensils, but many managed to appreciate them. Although those who are accustomed to more traditional materials, they still seem unworthy of trust. In their opinion, the same material cannot be used in medicine, and in construction, and in everyday life, and at the same time be harmless. Let's figure out how things really are.
To begin with, silicone alone in its name completely scares many hostesses in vain. In fact, this modern material is harmless when properly handled and has a lot of advantages that are at hand for us. It is soft and supple, but at the same time very durable. It can take any form, therefore it is suitable as a material for the manufacture of not only forms, but also tacks, brushes - almost any kitchen utensil. Finally, silicone products are simply beautiful! They decorate the kitchen and delight the hostess with their color.
Advantages of silicone:
- The silicone from which your baking dish is made does not contain substances that could “stand out” when heated and poison your dishes. It is so harmless that it is used in surgery. Implants for breast augmentation are made from it.
- For the same reason, products with strong odors are not afraid of the silicone form. Silicone does not absorb them, because it does not interact with food at the chemical level.
- This material withstands large temperature extremes, so your silicone mold is a universal dish. You can use it in the oven and in the freezer.
- Silicone molds save space in your kitchen - no other utensils can fold, curl, fold or be stored compactly.
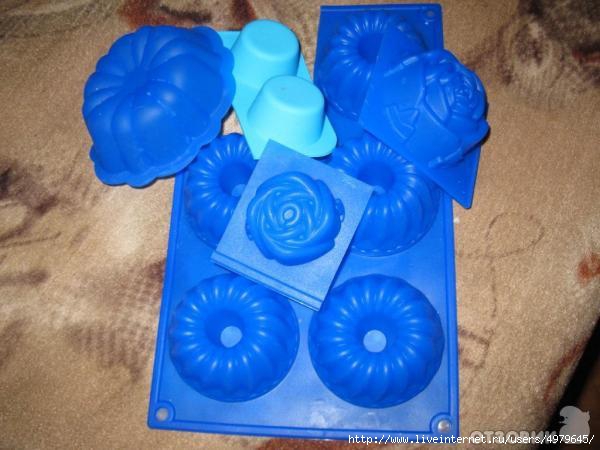
- Such flexibility and flexibility of the material allows manufacturers of dishes to show endless imagination. It is likely that any pattern, figure, fairy-tale character, architectural form has already been embodied in the form of a silicone model. So, your cake can have any of these styles.
- Despite the intricate configurations of many baking dishes, you can not be afraid that you will not be able to later scratch out the finished cake. You are saved a priori from this problem, because nothing sticks to silicone.
- Silicone has outstanding heat transfer properties. In practice, this means that it quickly heats up in the oven and thereby reduces the cooking time. This form cools too very quickly, so you do not risk burning your hands.
- It is practically impossible to use silicone molds for other purposes, because they are perfectly suitable not only for sweet pastries, but also for cooking all kinds of casseroles, stews and omelets. Dough, jelly, chocolate, vegetables, meat, fish - silicone has no "contraindications." Even with your own hands you can make it in a mold made of silicone.
The disadvantages of silicone:
- The silicone mold always bends, and not just when it's convenient for you. Fragile and delicate pastries can suffer during transportation of the mold from the oven to the table. Just make sure that the cake does not bend too much and does not break.
- Fans of a crispy crust may not wait for its appearance. Silicone prevents sticking, frying and often gives the sides of the baking smoothness and shine.
- Static electricity can build up in silicone. As a result, your cake may become super dusty.
- Not all manufacturers use 100% pure silicone as raw materials. Saving on the purchase, you risk getting dishes with impurities. Such a form can smell unpleasantly of rubber, transmit this smell to products and, in the end, will last less than high-quality.
- Silicone is afraid of knives and other piercing objects in your kitchen.
Rules for using silicone molds
- Do not use metal, but wooden tools when cooking in silicone dishes. And it’s best to use silicone tools.
- To wash such dishes, choose gels and avoid hard washcloths and abrasive cleaners.
- First put the form in the oven, and then fill it with dough. So you prevent bending, and, therefore, splashing and spilling.
- Do not allow the edges of the mold to touch hot surfaces or grids. Do not bring to an open fire.
Soft and at the same time strong enough material, silicone is excellent for creating dishes and other kitchen utensils that housewives can use every day.
Silicone baking dishes have become especially popular. But the problem is that not everyone knows how to use silicone mold.Silicone baking dishes are very simple and easy to use.. Yes, they have their drawbacks to traditional hard forms. But a lot of pluses in silicone forms are also available. But first, let's talk about the material itself, silicone, and why it has become so popular.
Many people do not want to use silicone baking dishes because they think they are dangerous to their health. But in fact, this is not so, because for the manufacture of kitchen utensils use silicone that does not contain harmful substances. A similar silicone is used in medicine for the production of implants. But still, it’s better to buy products from good companies that use platinum as a catalyst in the manufacture of silicone, and not other chemicals. Basically, silicone is an inert material, therefore, when heated, it does not emit various harmful substances.
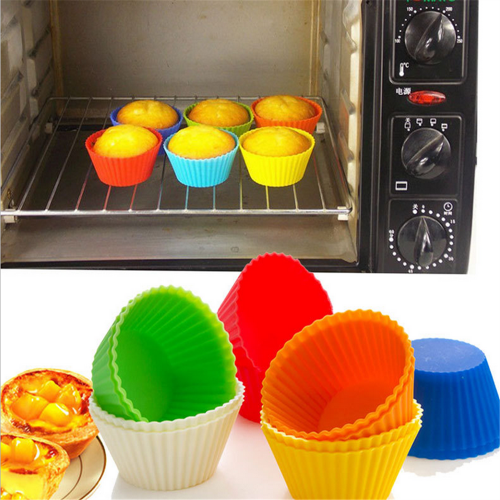
Silicone is used not only for the manufacture of baking dishes, but also for other kitchen utensils. From it make blades, brushes, pickups and coasters for dishes. Silicone molds withstand temperatures from -40 ° C to + 240 ° C. Therefore, they are ideal not only for baking cakes or muffins, but also for freezing ice in them.
We will tell in more detail, how to use silicone baking dish. Soft silicone molds will last you for 5 years, provided that you use them correctly. Since silicone is a very soft material, you can fold your shape so that it does not take up much space in the cabinet. Do not worry, the form will not deform, but will immediately take its original form the next time you remove it.
Many housewives are interested in the question of whether to lubricate the silicone mold with butter before baking the dough? The baking dish needs to be lubricated only once. before the very first preparation of the dough in it. Do not forget to wash your mold with a mild detergent in order to remove technological dust from it. You will no longer need to grease the baking dish.
Silicone molds can be used both in electric and gas ovens. In both cases, do not let the edges of the mold come into contact with the walls of the oven. If you bake your dish in a gas oven, do not place the mold close to the flame so as not to damage it. Silicone molds cannot be used for cooking gas or electric burners.
There are also some secrets on how to bake in silicone form. Dough in silicone molds bakes much fasterthan in classic metal. Therefore, you will need to reduce the baking time. When your pastry is ready, remove it from the oven and let it cool a little right in the mold. After 5 minutes, you can remove your finished bakery from the mold.
It is very easy to take out the pastries, for this it is enough tilt the shape on its side. The finished dough itself will fall out of the mold without any effort on your part. If the baking cannot be removed, it can be picked up on the side with a special silicone or wooden spatula. Never use a knife or other metal objects unless you want to ruin your silicone mold. Washing a soft silicone mold is very easy, because nothing burns in it. Wash the silicone mold only with mild detergents. The use of any abrasive products is unacceptable.
As you can see, there are a lot of advantages to using silicone molds. But it is also worth remembering that forms also have their drawbacks. Silicone forms are very soft, so raw dough is poured into them when the form is already standing on a baking sheet. The filled baking dish is moved on a baking sheet, wire rack or microwave stand.
Soft and at the same time strong enough material, silicone is excellent for creating dishes and other kitchen utensils that housewives can use every day. Silicone baking dishes have become especially popular. But the problem is that not everyone knows how to use silicone mold.
Silicone baking dishes are very simple and easy to use.. Yes, they have their drawbacks to traditional hard forms. But a lot of pluses in silicone forms are also available. But first, let's talk about the material itself, silicone, and why it has become so popular.
Many people do not want to use silicone baking dishes because they think they are dangerous to their health. But in fact, this is not so, because for the manufacture of kitchen utensils use silicone that does not contain harmful substances. A similar silicone is used in medicine for the production of implants. But still, it’s better to buy products from good companies that use platinum as a catalyst in the manufacture of silicone, and not other chemicals. Basically, silicone is an inert material, therefore, when heated, it does not emit various harmful substances.
Silicone is used not only for the manufacture of baking dishes, but also for other kitchen utensils. From it make blades, brushes, pickups and coasters for dishes. Silicone molds withstand temperatures from -40 ° C to + 240 ° C. Therefore, they are ideal not only for baking cakes or muffins, but also for freezing ice in them.
We will tell in more detail, how to use silicone baking dish. Soft silicone molds will last you for 5 years, provided that you use them correctly. Since silicone is a very soft material, you can fold your shape so that it does not take up much space in the cabinet. Do not worry, the form will not deform, but will immediately take its original form the next time you remove it.
Many housewives are interested in the question of whether to lubricate the silicone mold with butter before baking the dough? The baking dish needs to be lubricated only once. before the very first preparation of the dough in it. Do not forget to wash your mold with a mild detergent in order to remove technological dust from it. You will no longer need to grease the baking dish.
Silicone molds can be used both in electric and gas ovens. In both cases, do not let the edges of the mold come into contact with the walls of the oven. If you bake your dish in a gas oven, do not place the mold close to the flame so as not to damage it. Silicone molds cannot be used for cooking gas or electric burners.
There are also some secrets on how to bake in silicone form. Dough in silicone molds bakes much fasterthan in classic metal. Therefore, you will need to reduce the baking time. When your pastry is ready, remove it from the oven and let it cool a little right in the mold. After 5 minutes, you can remove your finished bakery from the mold.
It is very easy to take out the pastries, for this it is enough tilt the shape on its side. The finished dough itself will fall out of the mold without any effort on your part. If the baking cannot be removed, it can be picked up on the side with a special silicone or wooden spatula. Never use a knife or other metal objects unless you want to ruin your silicone mold. Washing a soft silicone mold is very easy, because nothing burns in it. Wash the silicone mold only with mild detergents. The use of any abrasive products is unacceptable.
As you can see, there are a lot of advantages to using silicone molds. But it is also worth remembering that forms also have their drawbacks. Silicone forms are very soft, so raw dough is poured into them when the form is already standing on a baking sheet. The filled baking dish is moved on a baking sheet, wire rack or microwave stand.
How to choose and use silicone baking dishes?
How to choose silicone baking dish
The silicone-based mold will serve you for many years and will please you with its convenience if you choose it correctly. Pay attention to important details:
- the presence on the packaging of the manufacturer’s name, recommendations for care, information on permissible temperatures;
- smell - a quality product should not have a specific "aroma";
- color - it should be as natural as possible. In the molds of flashy colors contain harmful chemical elements. The product must be free from stains and streaks. Such defects indicate poor quality silicone;
- thickness - refuse to buy too thin options.
When choosing a model, conduct an express test. Bend the container and press for a couple of seconds. High-quality material will not change color, low-grade - will turn white.
If you are just learning how to use silicone baking dishes correctly, check the manufacturer's instructions. Choose the best options for different culinary products. For example, for making muffins, round molds with a conical core are suitable. In them, baking rises well and quickly reaches readiness.
How to use silicone baking dish
To make the culinary creation in silicone utensils perfect, follow simple guidelines:
- wash the container thoroughly with a non-abrasive product before first use;
- pour the dough into the bowl only when it is on a hard surface (baking sheet). Otherwise, you may accidentally spill everything;
- do not lubricate the container with oil: you can easily remove the pie from the vessel without it;
- set in the oven the same time as when using metal or glassware;
- before removing the finished cake from the mold, let it stand for 5-7 minutes.
- to take out the pastries, simply tilt the bowl to one side: the finished cupcake or pie will fall out without any problems.
If you know how to use silicone baking dishes, you have great opportunities for culinary experiments. Households will certainly appreciate the muffins, muffins and pies cooked in this modern dish.
THE WHOLE TRUTH ABOUT SILICONE BAKING FORMS - + LOTS OF RECIPESHow to use silicone baking dishes: nine important rules and interesting recipes for baking and jelly, in large and small forms and tablets. Good luck !!!
Many housewives have already appreciated the convenience of using silicone forms. Such forms are made of chemically inert silicone, which does not emit harmful substances when heated - it is from this material that medical implants are made.
Of course, if you want to not only use silicone baking dishes, but also be absolutely sure of their safety, buy products from well-known, well-established companies.

All kinds of kitchen utensils are made of silicone - shovels, brushes, potholders, hot coasters and even knives. However, of course, silicone baking dishes of all kinds, sometimes of the most bizarre forms, occupy the palm.
If you are still not among their lucky owners, you probably just don’t know how to use silicone baking dishes. Then read the article and fill the knowledge gap!

. Rule 1
Silicone molds, unlike glass and metal ones, are characterized by increased flexibility, so you need to pour dough into them when they are already standing on a baking sheet or wire rack. Otherwise, acrobatic manipulations are inevitable in an attempt not to spill the batter and, as a result, a spoiled mood and dissatisfaction with the form.
. Rule 2
Feel free to use silicone molds in any oven - gas, electric, in the microwave. Put them in the freezer too. Such forms can easily withstand temperatures ranging from -40 ° C to + 240 ° C, so they are excellent not only for baking, but also for freezing.
. Rule 3
Lubricate the silicone mold before starting to use, manufacturers recommend only once, the very first. I personally did not lubricate, and there were never difficulties with taking out the finished baking. If in doubt and it’s so calmer for you, lubricate the mold before each baking - there will definitely be no harm from this. Do not forget to wash it with a mild detergent just before you start using the silicone mold.
. Rule 4
Please note that the baking time in silicone molds is almost the same as in conventional ones. At least I didn’t feel any difference. Note also that the crust is formed only on top, the bottom of the baking is moist.
. Rule 5
Remove the baked goods from the mold, allowing it to pre-stand for five to seven minutes. Then just tilt the shape to the side - the finished baking itself will fall out of the mold without any efforts on your part. If the baking is still sticking and cannot be taken out - bend the edge of the mold outward, since silicone allows you to do this without any problems. First, pick up the adhered cupcake or cake from the side with a silicone or wooden spatula. Do not use metal knives or forks to extract the baked goods - pierce the “one at a time” shape.
. Rule 6
Feel free to use silicone molds not only for baking pies and muffins, but also for cooking dishes of meat, fish, vegetables. Naturally, in this case, choose a round, rectangular or square shape.
. Rule 7
When buying, choose silicone molds with a minimum of decor, with smooth, even edges without small “threads”. Otherwise, problems may arise both with removing the finished baking from the mold, and with the subsequent washing of this “thread”.
. Rule 8
Although baking in a silicone mold does not burn, anyway, after removing it, a thin layer of dough remains on the walls of the mold. To wash this layer, pre-soak the mold for five to ten minutes in cool (this is important!) Water. Then carefully turn the mold inside out and rub it lightly with a soft sponge - the rest of the dough will leave even the smallest grooves without problems. Do not use hard abrasives.
. Rule 9

When storing, bend the silicone molds as you like, turn them into a tube, put them in narrow cabinets and in the far corners of the shelves - they will not hesitate, do not deform, and will take their original form instantly.
These are the basic rules that you need to know before you start using a silicone baking dish - as you can see, there are not very many of them and they are all quite simple.
Recipes for small silicone molds
Recipe1
CHOCOLATE BISCUIT IN MICROWAVE IN 5 MINUTES
"Little bear." In general, cooking takes no more than 5 minutes: 2 minutes to prepare the dough and exactly 3 minutes in the microwave.
5 minutes chocolate biscuit in the microwave
1 small egg
4 tablespoons of milk
3 tablespoons of vegetable oil
2 tablespoons (without top) cocoa or instant chocolate
2 tablespoons (without top) sugar
4 tablespoons (without top) flour
1 coffee spoon of baking powder
Cooking:
Mix all the dry ingredients, add the egg, vegetable oil, milk until a batter is obtained,
put the mold with the test in the microwave for exactly 3 minutes at maximum power
IMPORTANT: fill out the form no more than 1/2, the dough rises strongly
Chocolate Lemon Muffin in Silicone Mold
Ingredients: 4 eggs;
half a pack of margarine;
1 cup of sugar;
1 cup sour cream (or yogurt)
2 cups of flour;
2.5 teaspoons of baking powder for dough;
1 bar of dark chocolate.
First you need to put the chocolate in a water bath to melt. Sift flour with baking powder. Separately, grind margarine with sugar, until smooth. Add eggs, beat a little with a mixer, then carefully add sour cream, mix with a spoon. Add melted chocolate and mix immediately until it is liquid. And then add the sifted flour with baking powder. Stir with a mixer, but not for long. Put in silicone molds, flatten. Bake for about 20-25 minutes at a temperature of 250 degrees. PS: It's just magical they come out with grated chocolate and almonds. Grind almonds in a blender. But grated dry ingredients must be added flour! You can make lemon. To do this, add the zest of one lemon to the dry components, and the juice of half a lemon - with "wet".
summer cake option
Juicy Blueberry Cupcake
200 g butter
200 g sugar
200 g flour
~ 200 g blueberries
4 eggs
1 tsp baking powder
2 tbsp powdered sugar (for decoration)
Mixer Beat butter with sugar and eggs. Sift flour, baking powder and kneading dough. Grease a cake pan with a thick layer of butter and sprinkle with breadcrumbs. Mix blueberries with a small amount of flour (so that the berries are evenly distributed in the dough). Add to the dough. Knead, put in a silicone mold, smooth and bake for ~ 40 minutes at 180-200 C. Remove the cake from the oven and leave it in the mold for 10 minutes. Then topple over onto the cake rack and cool completely. Sprinkle with sifted icing sugar.
Ginger - Lemon Cupcake
Required Products:
- 1.5 cups flour;
- 1 cup of sugar;
- 1 cup sour cream;
- 3 eggs;
- 0.5 packs of margarine;
- 0.5 packs of baking powder;
- lemon (zest and juice of half a lemon);
- 2 teaspoons of grated ginger.
Beat eggs with sugar until sugar is completely dissolved. Melt margarine, ginger and lemon zest. Mix eggs with sour cream, margarine, ginger and lemon zest. Add the juice of half a lemon. Introduce flour and baking powder, mix with a spoon. Sprinkle the cake pan with flour. Put in the oven, heated to 220-250 degrees for 45 minutes. Pour icing (1 tbsp.spoon of lemon juice, 1 tbsp.spoon of water, 4 tbsp.spoons of powdered sugar)
Silicone Almond Cupcake
Ingredients: 4 eggs, 1 tbsp. Sahara,
3 \\ 4 cups of starch,
3 \\ 4 cups flour, 1 \\ 2 p. Margarines,
3 tbsp. l oils
1 1 \\ 2 Art. l vinegar
1 tsp powder before cookies,
almond butter, icing sugar.
Preparation: Mix flour, starch and biscuit powder. Separate the yolks from the proteins. Margarine with 3 \\ 4 glasses of sugar (1 \\ 4 leave for proteins) and beat with yolks. We gradually add to the mass, constantly stirring, vinegar and oil, a mixture of flour and starch, oil. Beat the whites into the foam, add sugar at the end, and combine with the dough. We grease the mold, sprinkle with flour, and set to bake until the heated oven (180) for 50 minutes. Sprinkle chilled cake with powdered sugar.
Delicious Silicone Cupcake
Recipe
Flour - 150 g
Starch - 50 g
Oil - 200 g
Sugar - 200 g
Egg - 5 pcs.
We need eggs and room temperature butter. Beat butter for 5 minutes. by the mixer.
Pour all the sugar, continuing to beat for another 10 minutes.
Break all the eggs into a separate container and (IMPORTANT) pour literally a spoon into the butter-sugar mixture, continuing to beat. This process of killing eggs takes 15 minutes, we need all the sugar to dissolve. The butter-egg mixture should be silky, smooth, very tender.
Sift flour and starch (several times). Pour the sifted mixture into our mass and mix thoroughly, not for long.
Pour the dough into silicone baking dishes.
Preheat the oven to 180 degrees and set the cake for baking for 50 minutes.
We get the cupcakes and leave in the form until completely cooled, transfer to a plate, sprinkle with powdered sugar.
Cupcake Recipe
Melt 200 g of margarine on a fire, add 1.5 cups of sugar, 4 tablespoons of cocoa and 100 ml of milk. All this should boil and cool.
Beat 4 eggs separately. Add to the cooled mass, plus 1 powder for cookies and 2 cups flour.
Mix all this well and pour into a silicone mold. Oven 45 minutes. You can give nuts, raisins, candied fruits to the cake. Bon Appetit!
Cake
For the test: 2 tbsp. flour;
250 gr. / 1p. margarine
1.5 tbsp. powdered sugar
6 eggs
4 tbsp. tablespoons of oil
2 tsp powder to the liver,
0.5 tbsp. poppy and 0.5 tbsp. (25 gr.) Coconut flakes,
2 tbsp cocoa.
Rub with a mixer margarine with powder, adding one yolk. Next - add flour and powder to cookies, butter and grind. At the end, mix the dough with whipped whites in a thick foam. Divide into three parts. Add poppy to one, cocoa to the second, coconut to the third. We grease the form with margarine, sprinkle with flour, and evenly spread the dough: to the bottom - with coconut, then - with cocoa, on top with poppy seeds. Bake for 45-50 minutes at medium temperature. Readiness can be checked with a toothpick
Cupcake 2
Ingredients:
2 eggs
200g sugar
200ml sour cream 20%
300g flour
1/2 sachet of powder for cookies
2 tbsp cocoa
100g dark chocolate
1 tbsp. l brandy
100g butter
Cooking:
Beat eggs, add sugar and mix. Then add sour cream and stir until sugar is completely dissolved. Add butter, flour, powder for cookies and knead soft dough. We divide the dough into two equal parts, add cocoa to one and mix. Lubricate the baking dish with any fat. On a tablespoon, spread in the middle alternately white and dark dough. We bake it for 50 min 170 C. The prepared cake will cool completely, pour it with chocolate: melt dark chocolate over a small fire, adding 1 teaspoon of cognac and 1 teaspoon of water. It turns striped like a zebra
Stuffed cupcake
Required: - flour 1 cup - sugar 3/4 cup - vanilla a little bit - soda 0.5 tsp - baking powder 0.5 tsp - melted butter 40 g. - 1 pc. egg. - 1/3 cup milk Take all the ingredients at once, put in a bowl and mix with a mixer or blender for 2-3 minutes, until smooth. These cupcakes can be baked with or without filling. Frozen blueberries and currants. Put the filling on the bottom of the pan, fill with dough, and then mix with a spoon so that the berries are not at the bottom. Bake at 180 degrees, 25-30 minutes.
Chocolate Muffins
First mix: 250g - flour 100g - cocoa 1 tsp. - Powder for cookies 1/2 tsp - Soda 1/2 tsp - Salt Mix separately: 250g - sugar 100g - I melted the butter in the microwave and slightly cooled 2 - eggs 200g - kefir 1p. - Vanilla sugar Then I combine everything and add 200g of chocolate
We spread the dough into a mold and bake for 25 minutes in an oven preheated to 200C.
Raisin Cupcakeicon form
cake recipe: 1 tbsp.kefira 1 tbsp.sahara 2 eggs Grind it all. Extavit 100 g margarine, 1 tsp. slaked vinegar, 1.5 tbsp. flour. Mix everything, add raisins, pour into a mold and bake at 180 degrees for about an hour. When it cools down a little, Sprinkle with powdered sugar.
Muffin Cupcake
Eggs - 3 pcs.
Oil (melt) - 70 g
Salt - a pinch
sugar - 200 g
Flour - 320 g
Juice 1 Lemon
Raisins - up to 100 g (as there is no raisins, dried apricots, dates are used)
Cognac - 2 tbsp.
1 tsp soda, quenched with vinegar (or 2 tsp baking powder) Beat yatsya with sugar and salt well, add melted butter, cognac, lemon juice, flour, raisins and soda, quenched with vinegar. As a rule, this cake is baked in a bread machine in the “Baking” mode for about 1 h 20 min (approximately, the “Baking” program has 1 hour, and when it’s finished, it’s turned on again and it’s already looked at the cake, as a rule, add another 15 -20 minutes.). However, it bakes well in the oven at t 180.
Muffins in silicone molds 3 minutes in the microwave
Quickly and deliciously prepare a cupcake in silicone molds! It will take 3 minutes.
4 tablespoons (tbsp) flour, 6 tbsp sugar, 2 tbsp. cocoa, a pinch of vanilla - mix in a plate. 1 beat the egg and add to the plate, mix. 3 tbsp. milk, 3 tbsp. pour oil into a plate and mix. The consistency of the dough is similar to sour cream. Add 1/3 teaspoon of soda extinguished with vinegar. Pour into silicone molds (half the mold!) And put in the microwave for 3 minutes, then for a minute you can leave to cool. In the process of baking, the cupcake rises well, and when it cools down, it may settle somewhat. With silicone molds it is quite easy to remove. We get 6 small cupcakes.
Enjoy your cooking and appetite!
Recipes for large silicone molds
Cupcake Bear Barney
Cupcake Bear Barney: 1 pack of margarine (grate),
0.5 l kefir
3 eggs, 1 cup sugar, 1 pack vanilla sugar, baking powder for dough, 2 cups flour. Beat with a mixer until smooth. We lay the mold on a baking sheet, pour the dough on 2/3, put the oven, bake, try the readiness with a toothpick.
Large Silicone Molds Quick Recipe
2 eggs + 1 tbsp. sugar \u003d beat
0.5 cup sour cream
1 tsp extinguish soda with vinegar
0.5 packs (100 g) melt margarine
2.5 tbsp. flour
50-70 g raisins
Mix together. Put in a large silicone mold and bake for 20 minutes.
Recipe for any big silicone mold
175 g sugar
175 g butter
175 g raisins
140 g eggs
240 g flour
1/2 tsp baking powder for dough
a pinch of salt
Vanilla sugar
For this recipe, it is very important to adhere to the exact amount of ingredients. It’s easy with eggs - 140 g are three medium eggs and I take a little protein. (But I weigh it by weight anyway) Keep the butter at room temperature for half an hour, grind it with sugar with a blender or mixer until it is full, add one egg each, beat well, the next egg, etc. Wash raisins and dried on a paper towel. Add them to the mixture of oil, add a pinch of salt and mix everything well. Separately, sift the flour, baking powder, add vanilla sugar. Then carefully add the flour to the mixture with butter and mix well at low speeds (I just do this with a spoon). I grease the form well with oil, spread the dough and smooth the surface with a wet spoon. I urinate than in water and make a longitudinal, deep cut into a cupcake. He then allegedly drags on, but when the cupcake begins to grow, it will appear and will not allow the cupcake to burst where necessary. The oven is preheated to 160 degrees, bake approximately 80-100 minutes. Gently pull out of the mold, set to cool on a wire rack (so as not to be wet with sweat), hot sprinkle with powdered sugar.
Lemon Cake Recipe Flavored Baking
10 eggs
1.5 cups sugar
250g oil
2 tsp powder in cookies
2 lemons
400g flour
Boil one lemon for 15 minutes. cool and grind. Add 1, 5 cups of sugar and whisk; add soft butter - whisk. Gradually add one yolk and whisk. Add juice from another lemon. Mix flour with powder and mix with this mass. Separately knock down 10 proteins and mix gently with the mass. Grease the form and sprinkle with breadcrumbs. Oven 50min at a temperature of 160g. Top with chocolate.
Silicone Vanilla Cupcake
kefir-0.5 tbsp.
sugar-1 tbsp.
margarine-100 gr.
2 eggs
vanilla sugar-1 p.
baking soda, extinguished with vinegar - 1 tsp.
flour-2.5 tbsp.
raisins, dried apricots,
powdered sugar
Kefir mixed with sugar and vanilla sugar. Add eggs and beat. Then add melted and chilled margarine + soda, flour and mix thoroughly. The dough should not be too thick (as for pancakes, but a little thicker). Cut dried apricots into cubes and roll together with raisins in a small amount of flour (so that when baking they do not sink to the bottom). Add dried apricots and raisins to the dough, mix and put in a mold greased with oil and sprinkled with semolina (on top, oil). Bake for about 30-40 minutes. Sprinkle the finished cake with powdered sugar.
Chocolate Cake Valentine
Dough:
½ cup unsweetened cocoa powder
½ cup hot water
¾ cup flour
¾ teaspoon baking soda
½ teaspoon of salt
4 large eggs
1 ¼ cup sugar
¼ cup vegetable oil
¼ teaspoon tartar
White Chocolate Frosting:
1 2/3 cups (11 ounces bag) white chocolate chips
1/3 cup milk
1 ½ cup unsalted butter, room temperature
1 teaspoon of pure vanilla extract
2 ½ cups (powdered) sugar
2 tablespoons unsweetened cocoa powder
Tip: Use standard measuring circles and spoons or scales for accurate measurement.
Process:
- Preheat the oven to 200 degrees Celsius. Prepare a silicone heart shape or round cake pan: lightly grease the bottom of the pan
Tip: If you do not have a silicone heart shape, pan, chop the heart shape out of paper to use as a template. Bake the cake in a round, silicone mold. After that, the cake is baked and cooled, use a sharp knife to cut the cake in the shape of a heart.
Dough:
- In a small bowl, mix cocoa and hot water; by movement, until they are completely connected, smooth; set aside to cool.
- In a small bowl, mix the flour, baking soda and salt, sift or whisk together. Set aside.
- In a large bowl with an electric mixer, add egg yolks and beat 3 to 5 minutes at medium-high speed until foam until the egg yolk becomes thick and lemon-colored. With a mixer at medium speed, gradually add 1 cup of sugar, either one tablespoon at a time, or in a very slow steady flow, taking 4 to 5 minutes to add all the sugar, and beatings so that the eggs and sugar are fully taken into account . Clean down the walls and bottom of the bowl with a rubber spatula so the mixture evenly. the mixture will be thick and pale yellow.
- With a mixer at medium speed, gradually pour the butter into the dough in a slow steady stream. Add vanilla and continue stirring for another 1 minute, until everything is well mixed.
- With the mixer at low speed, gradually add about ½ of the flour mixture, mix only until mixed, and then add the remaining half, mix until completely mixed, cleaning the sides of the bowl down as necessary.
- Use a whisk or a large rubber spatula, carefully fold the chocolate mixture into the dough.
- In another large bowl and using clean beaters, beat the egg whites with an electric mixer until foam. Gradually add the remaining ¼ cup of sugar, continue to beat until hard. Mix protein with dough. Bake:
- Pour the dough into prepared silicone molds with a spoon and smooth the surface with the back of a large spoon. Bake for 20 to 25 minutes or until the toothpick comes out clean. Remove from the oven and pans in place of the rack with cooling wire to cool for 10 minutes, then remove the cake from the mold and place the cake on the cooling rack to complete the cooling. White glaze:
- At the top of the double boiler, combine white chocolate chips and milk. Place the pot of boiling water (the top pot should not touch the water.) Until the chips melt and the mixture becomes homogeneous. Remove from heat, add butter, vanilla and icing sugar. Stir manually or beat with a hand mixer for 2 to 3 minutes until the glaze becomes thick and smooth.
- Divide the icing in half, place ½ in a separate bowl. Add cocoa at ½ of the glaze.
- Spread the white chocolate icing between 2 layers and on top of the cake. Apply cocoa to the sides of the cake.
- Use a pastry bag to decorate the cake.
- Enjoy the work done
Jelly and ice cream recipes in silicone molds
Ingredients:
600 gr Curd.
300 ml of milk.
36 gr gelatin
180 ml of water
150 gr. Sahara,
50 gr cocoa.
Combine the cottage cheese with sugar and mix well.
Divide the mixture into 3 parts.
Heat 2 tsp on a stove cocoa and 2 tablespoons milk, boil a little until the cocoa dissolves. Cool and add in the first part of the cottage cheese and sugar.
Next, heat the milk (3 tbsp) with the rest of the cocoa (3 tsp), dissolve well and also add sugar to the second part of the cottage cheese.
Then mix 300 ml of milk and 180 ml of water.
12 gr. gelatin pour 160 ml of a mixture of water and milk and put in a water bath until completely dissolved, but do not boil.
Add dissolved gelatin to the first part of the cottage cheese and cocoa (light chocolate). Put this mass for 5 minutes in the freezer.
Next, dissolve 12 g. gelatin also in 160 ml of a mixture of water and milk and add to the white mass (without cocoa), crushed walnuts can also be added there.
Get the first part from the freezer, top up the other and put in the freezer again for 5 minutes.
Then again 12 gr. Dissolve gelatin in the remaining milk and water (160 ml), add to the 3rd part (dark chocolate) and pour jelly in those parts.
Now just refrigerate for 4-5 hours. Take out of the mold.
You can pour melted chocolate on top and sprinkle a little nuts
Recipes for silicone molds
Barn Bear Bear Recipe
Any biscuit - on kefir, cottage cheese, jam, etc. - Ideal for baking in silicone molds.
Everything that you used to cook in traditional baking dishes can be prepared in silicone forms.
In addition, silicone molds give us new opportunities. They make jelly, chocolate, make ice, which would be impossible to cook in metal forms. Many of the baking recipes that you read in this article, we tried ourselves.
Barney Bears Recipe
Composition (recipe ingredients):
1 pack of plums. oil, 1 tbsp. kefir, 3 eggs, 1.5 cups of sugar, 1 bag of baking powder, vanillin (you can without it), 2 cups flour, cocoa
Cream: melted chocolate or boiled condensed milk or chocolate peanut butter
Recipe:
Step 1: Beat eggs with sugar, add melted butter, kefir.
Step 2: Sift the flour. Combine, knead the dough. Take 1/6 of the dough and add cocoa there.
Step 3: Stir everything to a homogeneous mass and pour two-thirds of the tins of bears. Paws of bears pour dough with cocoa.
Step 4: Bake Barney Bears at 180 g for about 30-40 minutes. Cool, remove from the mold.
Step 5: Chocolate melted in a water bath, or boiled condensed milk or chocolate-peanut butter should be injected with a culinary syringe into already baked bears.
Recipe2
Cupcakes
3 eggs;
200 gr. margarine;
2 tbsp.sahara;
2 tbsp. kefir;
1 tsp soda;
4 tbsp. flour.
raisins.
Grind eggs with sugar, add margarine (melted, but warm), kefir, pour in soda and flour, raisins. We stir the dough with a spoon, it should be like thick sour cream.
We fill the molds in half
Canelé Recipe # 4 Silicone
For flavor, add vanilla essence to the dough.
Cooking time 1 hour + 24 hours, 8 servings, 100 g - 380 kcal
500 ml of milk
135 g flour