How to use silicone mold. How to use silicone baking dish
How many housewives - there are so many opinions on how, where and what to use for cooking various dishes. Someone prefers baking ceramic, glass refractory dishes, someone cast iron or even disposable. But the popularity of silicone dishes is gaining momentum. A large selection of size, shape provides the opportunity to use your imagination. For those who are new to this wonderful invention - our selection of information on the properties, varieties and rules for using silicone forms.
Are silicone molds harmful to health?
Some hostesses are still afraid to use silicone dishes, and yet it is very convenient and practical to use. In order to confirm or dispel some myths about whether silicone forms are safe, we propose to dwell in more detail on the properties of the material from which such products are made. The pungent smell and very bright color of the product indicates poor quality raw materials, which should not be used for contact with food.
Unreliable manufacturers sometimes, chasing cheap raw materials and big profits, copy successful competitors, not thinking about the health of people who will use this ware. If you have at least the slightest doubt about the quality of silicone molds or other items of kitchen utensils, it is better not to risk your health. Food silicone cannot be harmful, when heated, the product does not emit toxic substances, does not react with acids and is completely hypoallergenic.

How to choose high-quality silicone utensils? If the molds are made without disturbances in technological processes, all the rules are followed, only high-quality materials (often medical silicone) are taken as raw materials, then you can not be afraid of your health. Well-known manufacturers of TVS, Ballarini, Tescoma, Vinzer, Moneta, Ikea, Lurch guarantee and confirm with quality certificates that their products are safe.
Varieties of silicone molds
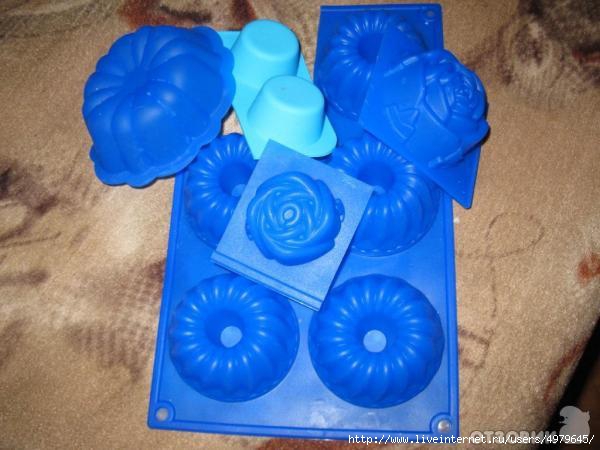
Silicone baking dishes come in different shapes and sizes: round, oval, square, in the form of a cup, heart, crescent. Some are suitable for baking small cupcakes - muffins, then from 4 to 12 cells can be on one general form. Pies, hot dogs, bread, waffles and muffins, which are larger in size, are baked in individual forms, which can be with smooth or ribbed sides. For baking, which will be intended for children, forms in the form of animals, flowers are provided. Among all the children's forms, Bear Barney and Little Dragon are very popular.

How to use silicone baking dishes
In order for silicone baking dishes to serve you for a long time and be reliable helpers in the kitchen, you need to follow some simple, but mandatory rules for caring for such a specific dish. Step-by-step recommendations on how to clean, how to store - will help to obtain the necessary information.
What to do before first use
Having made a purchase of a new silicone mold, be sure to rinse it under running water using detergents, while washing away any dust. Dry thoroughly so that no moisture remains. Lubricate the entire surface with vegetable oil and leave for a while so that it absorbs in the right amount.
Do I need to lubricate the mold before baking
When the first stage before use is completely completed, then in the future there is no more need to think than to lubricate the form, the need for this disappears. When baking a large cake is planned, you can slightly moisten the mold with water.

It is impossible to allow the form to come into contact with an open fire, this can cause it to melt. Too high temperatures are also contraindicated, optimal from 180 to 210 degrees, which often corresponds to the recipe of the culinary product. Sometimes on the form itself the numbers of use temperature are indicated - up to 260 degrees.
How to take out pastries
After the baking process is over, carefully remove the molds from the oven, allow to cool slightly, for 5-7 minutes. Edges easily fall behind if you separate them a little manually. Turning over or tilting the shape to the side, get the pastries without problems and breaks. You can not use cutting, sharp objects that you can damage, pierce the shape. The best helpers will be wooden, plastic, silicone spatulas.

How to wash after baking
After baking, wash the forms immediately or immerse in water for a while. Residues from the dough are easily removed from the smooth surface of the silicone with a sponge using detergents.
How to store silicone molds
More convenient to store dishes have not yet been invented. Silicone products easily fold, fit into each other, when deployed, immediately take their initial shape, are not afraid of temperature changes.
What to cook in silicone forms - recipes with photos
Cooking in silicone forms is a pleasure. Such dishes are useful for the oven, and for the microwave with a slow cooker. Original forms of utensils (a cup and saucer in the form of fruits) diversify the kitchen life. Make your own delicious pastries in a convenient silicone dish according to our recipes, which we have selected specifically for you.
In the oven
Recipe No. 1 - Chocolate Muffins
Ingredients:
- Flour.
- Cocoa Powder
- Baking powder.
- Butter.
- Sugar.
- The eggs.
- Vanilla sugar.
- Kefir.

Cooking:
- Mix the dry ingredients - 100 grams of cocoa, 250 grams of wheat flour, 1 teaspoon of baking powder, salt and soda, vanilla sugar in half a teaspoon.
- Melt 100 grams of butter in a separate bowl, add 250 grams of sugar, 2 eggs and 200 grams of kefir to it.
- After mixing all the products, add 200 grams of chocolate and mix again.
- Pour the dough into the prepared silicone molds and bake for 25 minutes in the oven, which is heated to 200 degrees.
Recipe No. 2 - Marble Cupcake
Ingredients:
- Flour.
- Butter.
- Sugar.
- Milk.
- The eggs.
- Baking powder.
- Cocoa.

Cooking:
- Soften 250 grams of butter and beat well with 1 cup sugar and vanilla.
- Gradually introduce 4 eggs and half a glass of warm milk.
- Add one bag of baking powder and 2.5 cups of flour and mix well.
- Divide the dough into two parts, in one add three tablespoons of cocoa.
- In a silicone mold, alternately 1 spoon spread the liquid white and chocolate dough without stirring.
- Put in the oven when the temperature reaches 200 degrees. Baking lasts 40-45 minutes.
In the microwave
Recipe number 1 - Cupcake "Curd Tale"
Ingredients:
- Semolina.
- Cottage cheese.
- Sugar.
- Sour cream.
- The eggs.
- Soda.
- Aromatic alcohol

Cooking:
- Mix 200 grams of cottage cheese and semolina and leave for 10-15 minutes for the cereal to swell.
- In the resulting mass add 2 eggs and 2-3 tablespoons of sour cream. Stir thoroughly, whisking, add 80 grams of sugar.
- Separately mix half a spoonful of soda and one tablespoon of alcohol, add everything to the dough. Beat with a mixer at high speed.
- Silicone molds fill a little more than half the volume. Small cupcakes will be ready in 4-5 minutes, large ones are baked in 8-12 minutes.
Recipe number 2 - Cake "Five minutes"
Ingredients:
- Flour.
- Starch.
- Egg.
- Vegetable oil.
- Sugar.
- Baking powder.
- Milk.
- Cocoa.
- Sour cream 10%
- Powdered sugar.

Cooking:
- Beat one egg with four tablespoons of sugar, add two tablespoons of cocoa. Pour a mixture of flour (4 tablespoons), baking powder (0.5 teaspoon) and starch (1 spoon), stirring.
- Pour 5 tablespoons of milk and 3 tablespoons of butter.
- Bake at maximum power of 1000 W for 3-5 minutes.
- Lubricate with cream sour cream with powdered sugar.
In a slow cooker
Recipe number 1 - Cupcake with jam
Ingredients:
- Sugar.
- Sour cream.
- Baking powder.
- Sour cream.
- The eggs.
- Butter.
- Flour.
- Jam or jam.

Cooking:
- Fatty sour cream (25-30%) 200 grams mixed with one chicken egg and two tablespoons of sugar.
- Add 50 grams of softened oil to the mass. When whipping with a mixer, the cupcake will be more tender.
- Mix one teaspoon of baking powder and a glass of flour. Mix with a liquid mass.
- Choose the right silicone mold so that it fits in the slow cooker, fill it with half the dough.
- We spread jam or jam on top, then the remaining dough.
- Baking mode, after 1 hour, the muffin with jam is ready.
Recipe No. 2 - Cottage Cheese Casserole
Ingredients:
- Cottage cheese.
- Sugar.
- The eggs.
- Vanillin.
- Starch.
- Citrus zest, nuts.
- Milk.

Cooking:
- Beat the whites from two eggs into a dense foam.
- Mix 600 grams of cottage cheese, 100 grams of sugar, 250 ml of milk, two chicken yolks, 50 grams of starch and half a bag of vanilla sugar.
- Add chopped nuts, candied fruits to the mixture.
- Gently stirring to introduce proteins.
- Set the “Baking” mode for 50 minutes.
Where to buy and how much is silicone baking dishes
Having received so much useful and necessary information about silicone molds, you will definitely want to purchase them if you have not done so before. Estimated prices and commonly used brands can be found in the tables below. Purchasing to order with delivery through the online store will save your time in buying useful, modern kitchenware.
For those who like to hold a thing in their hands and consider it before buying, we offer several addresses where you can find a wide selection of silicone dishes.
Video: a review of dishes and accessories made of silicone for baking and freezing
Living in the modern world is not allowed to lag behind the new technologies that manufacturers offer. The new direction of kitchen utensils, auxiliary devices brought a lot of positive moments for the housewives. Having an elastic diverse form, silicone products are easy to wash, do not break, they are compact and convenient for storage. Brief, but very useful information that you can find out by watching the proposed video will come in handy when choosing a new modern dish.
Silicone baking dishes are a new word in cooking. Some housewives successfully use them every day. Others are just eyeing and peering for this unusual innovation. Both categories of consumers are interested in how safe silicone baking dishes are, how reliable and how to use them correctly.
Silicone molds for the oven: advantages and features of use
Silicone molds for baking and freezing foods have appeared relatively recently. Of all the dishes that exist for these purposes, they are the latest and most interesting innovation. Prior to this, housewives with more or less success used only glass, ceramic and metal dishes in the kitchen. At the intersection of modern science and past culinary experience, a new, silicone dish was obtained for use in ovens.
Benefits of Silicone Bakeware
- Silicone molds are made from chemically inert silicone, which does not react with heated oil, hot metal and the dough itself. The surface of such a material does not emit toxic substances when heated and therefore is absolutely safe to use.
- The main advantage of silicone molds is flexibility and elasticity. They are very convenient to use. You can get the cake from the recess in one simple movement, slightly bending the shape itself. The dough does not crumble, the product does not break and does not fall apart.
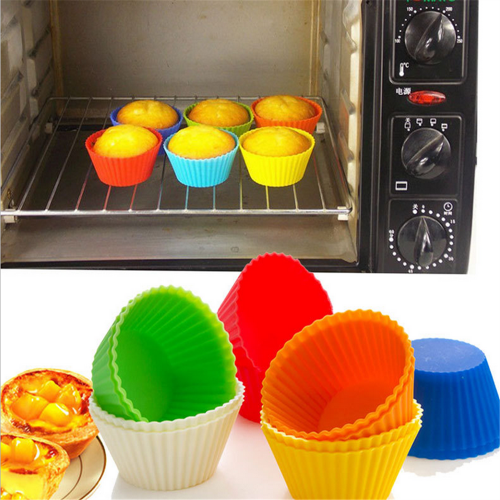
- The maximum permissible temperature of use is + 250 ° C. This gives great freedom of action, allows you to bake cakes and cakes in the microwave, gas or electric oven, air grill.
- Silicone molds have a non-stick coating. The dough in them never sticks tightly to the walls, which often happens with metal dishes. It is enough once - before the first baking - to grease the silicone molds from the inside with oil, so that in the future it can do without any fats at all. Due to this property of dishes, you can create low-calorie dishes.
- Silicone molds are great for both baking and freezing. The minimum temperature for such utensils is a threshold of -60 ° C. In silicone molds you can make jellied meat, ice cream, souffle, jelly, ice for cocktails.
- Silicone dishes are produced in such a variety of colors and shapes that allows any housewife to create true masterpieces. In addition, it is easy and convenient to store. Silicone bends and takes any position even on the smallest area in the cabinet. Forms can be washed with ordinary warm water and a soft sponge.
The disadvantages of silicone molds
The disadvantages of silicone baking dishes are few. The first is that it cannot be used at temperatures above + 250 ° C. This is just the case when the silicone can just melt and ruin the baking. We do not recommend to leave / forget such dishes in the oven for a long time.
In silicone molds, the dough is baked faster than in ordinary dishes made of metal or ceramic. Thin walls of silicone heat up faster than these materials. The cooking process begins almost immediately. In view of this feature, we advise you to monitor the baking, so as not to miss the moment of its readiness.
Another disadvantage is that silicone is very soft. It is easy to cut with a knife or pierce it with a fork. To prevent this from happening, you do not need to use metal and sharp cutlery to extract baking from the mold.
This minus has the opposite, positive side. If the silicone mold turned out to be too big for your oven, and there is no desire to return or change the purchase, you can give it any convenient size and configuration. To do this, just cut off the excess.
How to use a silicone baking dish
The proper use of the silicone mold for the oven includes several principles that it is advisable to strictly follow:
- Such dishes are usually not sold in sealed and sterile packaging. Immediately after the purchase, it must be washed well from dust and dirt, which could fill the recesses of the molds during transportation and storage. After washing, dishes made of silicone must be thoroughly dried so that not a single drop of water remains.
- Before first use, be sure to lubricate the silicone mold with oil. The hostess needs to make sure that all the notches are carefully smeared and there are no dry places left. Excess oil can simply be drained. Then it is recommended to leave the form for 15-20 minutes so that the fat is absorbed a little.
- To ensure that the dough is evenly distributed inside the cavities, and the form itself does not bend, place it on a hard surface. To do this, use a baking sheet. Now you can fill the dough and put the future dish in the oven. Remember to monitor temperature and availability.
- When the cakes or cake are ready, the pan must be removed from the oven and put on a wooden substrate. Allow the baking to cool slightly. Then you can take out the dough, easily bending the edges of the form.
These are the main rules for working with silicone molds. This cookware is very simple and easy to use. It will not cause you trouble if you observe the basic principles of treatment.
Comment on the article "How to use silicone baking dish"
Have a look at other discussions: Silicone baking dish: which company to choose? I choose silicone molds for mom and mother in law as a gift. Benefits of Silicone Bakeware. The disadvantages of silicone molds.
Discussion
About to put higher and an additional baking sheet already written. Cupcakes are put in a hot oven. Also, try to place a container with water down. Somehow it’s better baking with her.
in cold or hot set, it does not depend on the form, but on the type of dough.
1. no need to lubricate silicone molds with oil, it’s even written in the instructions for them!
2. since silicone is thinner than ceramic, etc., then put it higher than others and put an empty metal pan on the lower level of the oven
i want everything to burn, because my magic oven warms only from below, with a baking sheet it burns much less
Need silicone bakeware. Find a friend in Moscow, give him pictures of the forms you want. Benefits of Silicone Bakeware. Molds are made from chemically inert silicone, which does not enter. Silicone mold ...
Discussion
I have probably got Tescoma for about 7 years, though I do not use it often, but I'm quite happy.
I have several REGENTs bought for the occasion in Auchan. Nothing sticks; there is no foreign smell during cooking. And what does dense mean? I have small forms for cupcakes thin, but still everything turns out as it should. Here’s a big round one for a cupcake - that one is denser.
It seems to me that I use the silicone baking dish incorrectly, because the finished product is pulled out poorly, pieces remain inside. Advantages of Silicone Bakeware Disadvantages of Silicone Molds How to use silicone molds properly.
Silicone forms. Tableware. Cooking Culinary recipes, help and cooking tips, a festive menu and the reception of guests Silicone grease is not necessary before baking. I always lubricate the metal, or spread the parchment.
Discussion
it doesn’t differ in taste;) the baking time is slightly reduced and it is easier to remove from the mold. I really like it :)
It is necessary to lubricate it with white fat for the first time, and then it is not necessary ... well, in general, if you are interested: read the instructions from two manufacturers (I somehow laid it out for someone)
Form for cooking?. Bakery products. Cooking Culinary recipes, cooking tips and help, a festive menu and reception Silicone baking dishes and freezing products Silicone mats, IKEA glass dishes, cooking dishes ...
Silicone baking dish. Tableware. Cooking Recipes, help and tips on cooking, a festive menu and reception, a selection of products.
Silicone baking dish. Tableware. The economy. Housekeeping: housekeeping tips There I scored a lot of silicone. Show links to images in a baking dish. I’m not from Moscow, but in our city silicone molds are stacked ...
Today, the hostesses have a lot of interesting kitchen appliances. There are several dozens of molds for baking meat, fish and baking confectionery. The most recent novelty is silicone molds. What are these products? How to use them correctly? Cooks with experience will tell about all the nuances.
Terms of use
The silicone molds that we see in the photo are convenient and practical. They can be stored, folded, unfolded, in any convenient for the hostess. Wash products after use is also very simple. Food does not adhere to the silicone surface; it is not necessary to scrape the remains from the mold after baking. Chef reviews say that in silicone dishes, any food cooks faster than in metal.
But for the forms to last for a long time, it is necessary to observe the rules of use:
- After acquiring, the silicone mold must be thoroughly washed before first use.
- After each use, the containers are rinsed with warm water.
- Do not clean the silicone surface with hard brushes. This will damage the integrity of the product.
- It is easy to remove the pastries; you need to turn the dish over and slightly press the containers on them. Large pies are removed using silicone or wooden spatulas.
- Any containers made of silicone can not be installed on fire.
- Such dishes cannot be stored near sharp, metallic items.

Do you use fats?
Every housewife knows that before laying the dough in the usual tin form, it is greased with fat. The advantage of silicone is its non-stick property. Due to this, the silicone surface can not be lubricated with oil. Experienced chefs are advised to do this once, before the first use.

Further, a non-stick film is stored on the silicone, which does not allow the test to stick to the surface. However, if the material is cheap, the mold will have to be lubricated regularly before each use. Chefs are advised to lubricate silicone molds with vegetable oil, without using butter.
We use a substrate
To bake cupcakes in silicone molds in a gas or electric oven, you need to know a few recipes and secrets. The first difficulty arises when loading molds filled with dough into the oven. Since silicone is a soft material, substrates must be placed under the molds. It can be a ceramic or glass tray. Baking in soft ovens is not placed on the wire rack in the oven.

In addition, there are a few more secrets:
- If you plan to bake a large cupcake or pudding according to a special recipe in silicone form, it is better to install the container in a deep frying pan or pan. This will prevent the soft container from tipping over and accidentally spilling the dough.
- It is better to fill the forms with dough after installing them on the stand.
- To avoid melting silicone in a gas oven, contact between the soft surface and the red-hot walls of the oven should be avoided.

The nuances of baking
Baking waffles or cupcakes in silicone molds is no more difficult than in familiar metal containers. Having chosen a suitable recipe, you should prepare the dough, pour into a silicone bowl and send to the oven. And it can be a gas, electric oven, microwave oven, slow cooker. To prevent the baking from burning out, remember that any confectionery products in soft tins are prepared faster than in metal ones. This is due to the high thermal conductivity of silicone.

It is recommended to read the instructions for use from the manufacturer before use. As a rule, this document indicates the time and temperature recommended for a particular dish. Before removing the finished dish from a silicone dish, it must be cooled.
About security
Today, there is much debate about the safety of silicone utensils. Many believe that this chemical compound, when heated, releases substances hazardous to human health. However, experts in the chemical industry argue that harm from silicone utensils is possible only if used improperly.
Do not get cheap forms. In pursuit of making big profits, manufacturers save on raw materials, using low-quality, technical silicone and synthetic dyes for the production of molds. To avoid poisoning, it is better to purchase dishes made of food or medical silicone. This is a safe product that is used to make children's dishes shown in the photo.

In order not to miscalculate with the choice of silicone molds, it is enough to smell the products. Quality material should not exude harsh, unpleasant odors of rubber. If the containers are made from safe raw materials, muffins, waffles according to any recipes will turn out tasty and healthy.
The secrets of using soft containers and cupcake recipes in silicone forms can be found in the video.
Eventually
Can I bake cupcakes and waffles in silicone molds? Certainly possible. According to the cooks, this is a safe material that allows you to create tasty and healthy pastries. Having learned to use this dishware once, the hostess will no longer want to return to metal molds. High-quality silicone is characterized by high thermal conductivity, non-stick property and ease of use.

Silicone molds can be used in both electric and gas ovens. View images related to silicone baking dish how to put in the oven. The price difference is small, but with such a stand it is very convenient to fill the dough into a mold, put it in the oven, it has handles and remove the finished baked goods from the oven. The form can be used for cooking in the microwave, oven as
Usually, silicone baking dishes can withstand heating up to 230 ° C and cooling to 40 ° C. After the forms have dried, you can start baking a dessert. How to Cook Ciabatta Lenten Meals from 1001 FOOD. Will the form burn out or deformed? How to put the silicone mold in the oven? Buy a book by Oleg Ko

You don’t need to do this for every silicone dish you need a mandatory stand, a similar form of glass or ceramic, either. Since the form is not afraid of freezing, please your relatives with an ice cream cake, lay the ice cream with berries, chocolate chips, biscuit. In which oven is it better to put the silicone mold with the dough? Now, this problem has become solved, since silicone molds for Viennese waffles are sold everywhere, which can and should even be cooked in the oven. Unlike metal or glass cookware, silicone molds can be used in the oven, microwave and hot air grill

One of the important points that must be taken into account when using a silicone mold is to carefully place it in the oven. The main advantage of silicone molds is flexibility and elasticity. The form can be used for cooking in a microwave, oven, both gas and electric, but without using the grill mode View the full version. In what type of ovens can silicone baking dishes be used? You should know that in most cases, baking in silicone mold will cook a little faster than in steel molds

Place a baking tray with silicone molds in the oven. As soon as the time comes to bake something, a mountain of molds, molds and jars falls out of the oven, which is piled on the table while the oven is busy. Baking can be placed in a cold or preheated oven, as the recipe for your dish requires. At least the one I had about ten years ago spied like crazy!
Many housewives have already appreciated the convenience of using silicone forms. Such forms are made of chemically inert silicone, which does not emit harmful substances when heated - it is from this material that medical implants are made.
Of course, if you want to not only use silicone baking dishes, but also be absolutely sure of their safety, buy products from well-known, well-established companies.

All kinds of kitchen utensils are made of silicone - shovels, brushes, potholders, hot coasters and even knives. However, of course, silicone baking dishes of all kinds, sometimes of the most bizarre forms, occupy the palm.
If you are still not among their lucky owners, you probably just don’t know how to use silicone baking dishes. Then read the article and fill the knowledge gap!

. Rule 1
Silicone molds, unlike glass and metal ones, are characterized by increased flexibility, so you need to pour dough into them when they are already standing on a baking sheet or wire rack. Otherwise, acrobatic manipulations are inevitable in an attempt not to spill the batter and, as a result, a spoiled mood and dissatisfaction with the form.
. Rule 2
Feel free to use silicone molds in any oven - gas, electric, in the microwave. Put them in the freezer too. Such forms can easily withstand temperatures ranging from -40 ° C to + 240 ° C, so they are excellent not only for baking, but also for freezing.
. Rule 3
Lubricate the silicone mold before starting to use, manufacturers recommend only once, the very first. I personally did not lubricate, and there were never difficulties with taking out the finished baking. If in doubt and it’s so calmer for you, lubricate the mold before each baking - there will definitely be no harm from this. Do not forget to wash it with a mild detergent just before you start using the silicone mold.
. Rule 4
Please note that the baking time in silicone molds is almost the same as in conventional ones. At least I didn’t feel any difference. Note also that the crust is formed only on top, the bottom of the baking is moist.
. Rule 5
Remove the baked goods from the mold, allowing it to pre-stand for five to seven minutes. Then just tilt the shape to the side - the finished baking itself will fall out of the mold without any efforts on your part. If the baking is still sticking and cannot be taken out - bend the edge of the mold outward, since silicone allows you to do this without any problems. First, pick up the adhered cupcake or cake from the side with a silicone or wooden spatula. Do not use metal knives or forks to extract the baked goods - pierce the “one at a time” shape.
. Rule 6
Feel free to use silicone molds not only for baking pies and muffins, but also for cooking dishes of meat, fish, vegetables. Naturally, in this case, choose a round, rectangular or square shape.
. Rule 7
When buying, choose silicone molds with a minimum of decor, with smooth, even edges without small “threads”. Otherwise, problems may arise both with removing the finished baking from the mold, and with the subsequent washing of this “thread”.
. Rule 8
Although baking in a silicone mold does not burn, anyway, after removing it, a thin layer of dough remains on the walls of the mold. To wash this layer, pre-soak the mold for five to ten minutes in cool (this is important!) Water. Then carefully turn the mold inside out and rub it lightly with a soft sponge - the rest of the dough will leave even the smallest grooves without problems. Do not use hard abrasives.
. Rule 9

When storing, bend the silicone molds as you like, turn them into a tube, put them in narrow cabinets and in the far corners of the shelves - they will not hesitate, do not deform, and will take their original form instantly.
These are the basic rules that you need to know before you start using a silicone baking dish - as you can see, there are not very many of them and they are all quite simple.
Recipes for small silicone molds
Recipe1
CHOCOLATE BISCUIT IN MICROWAVE IN 5 MINUTES
"Little bear." In general, cooking takes no more than 5 minutes: 2 minutes to prepare the dough and exactly 3 minutes in the microwave.
5 minutes chocolate biscuit in the microwave
1 small egg
4 tablespoons of milk
3 tablespoons of vegetable oil
2 tablespoons (without top) cocoa or instant chocolate
2 tablespoons (without top) sugar
4 tablespoons (without top) flour
1 coffee spoon of baking powder
Cooking:
Mix all the dry ingredients, add the egg, vegetable oil, milk until a batter is obtained,
put the mold with the test in the microwave for exactly 3 minutes at maximum power
IMPORTANT: fill out the form no more than 1/2, the dough rises strongly
Chocolate Lemon Muffin in Silicone Mold
Ingredients: 4 eggs;
half a pack of margarine;
1 cup of sugar;
1 cup sour cream (or yogurt)
2 cups of flour;
2.5 teaspoons of baking powder for dough;
1 bar of dark chocolate.
First you need to put the chocolate in a water bath to melt. Sift flour with baking powder. Separately, grind margarine with sugar, until smooth. Add eggs, beat a little with a mixer, then carefully add sour cream, mix with a spoon. Add melted chocolate and mix immediately until it is liquid. And then add the sifted flour with baking powder. Stir with a mixer, but not for long. Put in silicone molds, flatten. Bake for about 20-25 minutes at a temperature of 250 degrees. PS: It's just magical they come out with grated chocolate and almonds. Grind almonds in a blender. But grated dry ingredients must be added flour! You can make lemon. To do this, add the zest of one lemon to the dry components, and the juice of half a lemon - with "wet".
summer cake option
Juicy Blueberry Cupcake
200 g butter
200 g sugar
200 g flour
~ 200 g blueberries
4 eggs
1 tsp baking powder
2 tbsp powdered sugar (for decoration)
Mixer Beat butter with sugar and eggs. Sift flour, baking powder and kneading dough. Grease a cake pan with a thick layer of butter and sprinkle with breadcrumbs. Mix blueberries with a small amount of flour (so that the berries are evenly distributed in the dough). Add to the dough. Knead, put in a silicone mold, smooth and bake for ~ 40 minutes at 180-200 C. Remove the pie from the oven and leave it in the mold for 10 minutes. Then topple over onto the cake rack and cool completely. Sprinkle with sifted icing sugar.
Ginger - Lemon Cupcake
Required Products:
- 1.5 cups flour;
- 1 cup of sugar;
- 1 cup sour cream;
- 3 eggs;
- 0.5 packs of margarine;
- 0.5 packs of baking powder;
- lemon (zest and juice of half a lemon);
- 2 teaspoons of grated ginger.
Beat eggs with sugar until sugar is completely dissolved. Melt margarine, ginger and lemon zest. Mix eggs with sour cream, margarine, ginger and lemon zest. Add the juice of half a lemon. Introduce flour and baking powder, mix with a spoon. Sprinkle the cake pan with flour. Put in the oven, heated to 220-250 degrees for 45 minutes. Pour icing (1 tbsp.spoon of lemon juice, 1 tbsp.spoon of water, 4 tbsp.spoons of powdered sugar)
Silicone Almond Cupcake
Ingredients: 4 eggs, 1 tbsp. Sahara,
3 \\ 4 cups of starch,
3 \\ 4 cups flour, 1 \\ 2 p. Margarines,
3 tbsp. l oils
1 1 \\ 2 Art. l vinegar
1 tsp powder before cookies,
almond butter, icing sugar.
Preparation: Mix flour, starch and biscuit powder. Separate the yolks from the proteins. Margarine with 3 \\ 4 glasses of sugar (1 \\ 4 leave for proteins) and beat with yolks. We gradually add to the mass, constantly stirring, vinegar and oil, a mixture of flour and starch, oil. Beat the whites into the foam, add sugar at the end, and combine with the dough. We grease the mold, sprinkle with flour, and set to bake until the heated oven (180) for 50 minutes. Sprinkle chilled cake with powdered sugar.
Delicious Silicone Cupcake
Recipe
Flour - 150 g
Starch - 50 g
Oil - 200 g
Sugar - 200 g
Egg - 5 pcs.
We need eggs and room temperature butter. Beat butter for 5 minutes. by the mixer.
Pour all the sugar, continuing to beat for another 10 minutes.
Break all the eggs into a separate container and (IMPORTANT) pour literally a spoon into the butter-sugar mixture, continuing to beat. This process of killing eggs takes 15 minutes, we need all the sugar to dissolve. The butter-egg mixture should be silky, smooth, very tender.
Sift flour and starch (several times). Pour the sifted mixture into our mass and mix thoroughly, not for long.
Pour the dough into silicone baking dishes.
Preheat the oven to 180 degrees and set the cake for baking for 50 minutes.
We get the cupcakes and leave in the form until completely cooled, transfer to a plate, sprinkle with powdered sugar.
Cupcake Recipe
Melt 200 g of margarine on a fire, add 1.5 cups of sugar, 4 tablespoons of cocoa and 100 ml of milk. All this should boil and cool.
Beat 4 eggs separately. Add to the cooled mass, plus 1 powder for cookies and 2 cups flour.
Mix all this well and pour into a silicone mold. Oven 45 minutes. You can give nuts, raisins, candied fruits to the cake. Bon Appetit!
Cake
For the test: 2 tbsp. flour;
250 gr. / 1p. margarine
1.5 tbsp. powdered sugar
6 eggs
4 tbsp. tablespoons of oil
2 tsp powder to the liver,
0.5 tbsp. poppy and 0.5 tbsp. (25 gr.) Coconut flakes,
2 tbsp cocoa.
Rub with a mixer margarine with powder, adding one yolk. Next - add flour and powder to cookies, butter and grind. At the end, mix the dough with whipped whites in a thick foam. Divide into three parts. Add poppy to one, cocoa to the second, coconut to the third. We grease the form with margarine, sprinkle with flour, and evenly spread the dough: to the bottom - with coconut, then - with cocoa, on top with poppy seeds. Bake for 45-50 minutes at medium temperature. Readiness can be checked with a toothpick
Cupcake 2
Ingredients:
2 eggs
200g sugar
200ml sour cream 20%
300g flour
1/2 sachet of powder for cookies
2 tbsp cocoa
100g dark chocolate
1 tbsp. l brandy
100g butter
Cooking:
Beat eggs, add sugar and mix. Then add sour cream and stir until sugar is completely dissolved. Add butter, flour, powder for cookies and knead soft dough. We divide the dough into two equal parts, add cocoa to one and mix. Lubricate the baking dish with any fat. On a tablespoon, spread in the middle alternately white and dark dough. We bake it for 50 min 170 C. The prepared cake will cool completely, pour it with chocolate: melt dark chocolate over a small fire, adding 1 teaspoon of cognac and 1 teaspoon of water. It turns striped like a zebra
Stuffed cupcake
Required: - flour 1 cup - sugar 3/4 cup - vanilla a little bit - soda 0.5 tsp - baking powder 0.5 tsp - melted butter 40 g. - 1 pc. egg. - 1/3 cup milk Take all the ingredients at once, put in a bowl and mix with a mixer or blender for 2-3 minutes, until smooth. These cupcakes can be baked with or without filling. Frozen blueberries and currants. Put the filling on the bottom of the pan, fill with dough, and then mix with a spoon so that the berries are not at the bottom. Bake at 180 degrees, 25-30 minutes.
Chocolate Muffins
First mix: 250g - flour 100g - cocoa 1 tsp. - Powder for cookies 1/2 tsp - Soda 1/2 tsp - Salt Mix separately: 250g - sugar 100g - I melted the butter in the microwave and slightly cooled 2 - eggs 200g - kefir 1p. - Vanilla sugar Then I combine everything and add 200g of chocolate
We spread the dough into a mold and bake for 25 minutes in an oven preheated to 200C.
Raisin Cupcakeicon form
cake recipe: 1 tbsp.kefira 1 tbsp.sahara 2 eggs Grind it all. Extavit 100 g margarine, 1 tsp. slaked vinegar, 1.5 tbsp. flour. Mix everything, add raisins, pour into a mold and bake at 180 degrees for about an hour. When it cools down a little, Sprinkle with powdered sugar.
Muffin Cupcake
Eggs - 3 pcs.
Oil (melt) - 70 g
Salt - a pinch
sugar - 200 g
Flour - 320 g
Juice 1 Lemon
Raisins - up to 100 g (as there is no raisins, dried apricots, dates are used)
Cognac - 2 tbsp.
1 tsp soda, quenched with vinegar (or 2 tsp baking powder) Beat yatsya with sugar and salt well, add melted butter, cognac, lemon juice, flour, raisins and soda, quenched with vinegar. As a rule, this cake is baked in a bread machine in the “Baking” mode for about 1 h 20 min (approximately, the “Baking” program has 1 hour, and when it’s finished, it’s turned on again and it’s already looked at the cake, as a rule, add another 15 -20 minutes.). However, it bakes well in the oven at t 180.
Muffins in silicone molds 3 minutes in the microwave
Quickly and deliciously prepare a cupcake in silicone molds! It will take 3 minutes.
4 tablespoons (tbsp) flour, 6 tbsp sugar, 2 tbsp. cocoa, a pinch of vanilla - mix in a plate. 1 beat the egg and add to the plate, mix. 3 tbsp. milk, 3 tbsp. pour oil into a plate and mix. The consistency of the dough is similar to sour cream. Add 1/3 teaspoon of soda extinguished with vinegar. Pour into silicone molds (half the mold!) And put in the microwave for 3 minutes, then for a minute you can leave to cool. In the process of baking, the cupcake rises well, and when it cools down, it may settle somewhat. With silicone molds it is quite easy to remove. We get 6 small cupcakes.
Enjoy your cooking and appetite!
Recipes for large silicone molds
Cupcake Bear Barney
Cupcake Bear Barney: 1 pack of margarine (grate),
0.5 l kefir
3 eggs, 1 cup sugar, 1 pack vanilla sugar, baking powder for dough, 2 cups flour. Beat with a mixer until smooth. We lay the mold on a baking sheet, pour the dough on 2/3, put the oven, bake, try the readiness with a toothpick.
Large Silicone Molds Quick Recipe
2 eggs + 1 tbsp. sugar \u003d beat
0.5 cup sour cream
1 tsp extinguish soda with vinegar
0.5 packs (100 g) melt margarine
2.5 tbsp. flour
50-70 g raisins
Mix together. Put in a large silicone mold and bake for 20 minutes.
Recipe for any big silicone mold
175 g sugar
175 g butter
175 g raisins
140 g eggs
240 g flour
1/2 tsp baking powder for dough
a pinch of salt
Vanilla sugar
For this recipe, it is very important to adhere to the exact amount of ingredients. It’s easy with eggs - 140 g are three medium eggs and I take a little protein. (But I weigh it by weight anyway) Keep the butter at room temperature for half an hour, grind it with sugar with a blender or mixer until it is full, add one egg each, beat well, the next egg, etc. Wash raisins and dried on a paper towel. Add them to the mixture of oil, add a pinch of salt and mix everything well. Separately, sift the flour, baking powder, add vanilla sugar. Then carefully add the flour to the mixture with butter and mix well at low speeds (I just do this with a spoon). I grease the form well with oil, spread the dough and smooth the surface with a wet spoon. I urinate than in water and make a longitudinal, deep cut into a cupcake. He then allegedly drags on, but when the cupcake begins to grow, it will appear and will not allow the cupcake to burst where necessary. The oven is preheated to 160 degrees, bake approximately 80-100 minutes. Gently pull out of the mold, set to cool on a wire rack (so as not to be wet with sweat), hot sprinkle with powdered sugar.
Lemon Cake Recipe Flavored Baking
10 eggs
1.5 cups sugar
250g oil
2 tsp powder in cookies
2 lemons
400g flour
Boil one lemon for 15 minutes. cool and grind. Add 1, 5 cups of sugar and whisk; add soft butter - whisk. Gradually add one yolk and whisk. Add juice from another lemon. Mix flour with powder and mix with this mass. Separately knock down 10 proteins and mix gently with the mass. Grease the form and sprinkle with breadcrumbs. Oven 50min at a temperature of 160g. Top with chocolate.
Silicone Vanilla Cupcake
kefir-0.5 tbsp.
sugar-1 tbsp.
margarine-100 gr.
2 eggs
vanilla sugar-1 p.
baking soda, extinguished with vinegar - 1 tsp.
flour-2.5 tbsp.
raisins, dried apricots,
powdered sugar
Kefir mixed with sugar and vanilla sugar. Add eggs and beat. Then add melted and chilled margarine + soda, flour and mix thoroughly. The dough should not be too thick (as for pancakes, but a little thicker). Cut dried apricots into cubes and roll together with raisins in a small amount of flour (so that when baking they do not sink to the bottom). Add dried apricots and raisins to the dough, mix and put in a mold greased with oil and sprinkled with semolina (on top, oil). Bake for about 30-40 minutes. Sprinkle the finished cake with powdered sugar.
Chocolate Cake Valentine
Dough:
½ cup unsweetened cocoa powder
½ cup hot water
¾ cup flour
¾ teaspoon baking soda
½ teaspoon of salt
4 large eggs
1 ¼ cup sugar
¼ cup vegetable oil
¼ teaspoon tartar
White Chocolate Frosting:
1 2/3 cups (11 ounces bag) white chocolate chips
1/3 cup milk
1 ½ cup unsalted butter, room temperature
1 teaspoon of pure vanilla extract
2 ½ cups (powdered) sugar
2 tablespoons unsweetened cocoa powder
Tip: Use standard measuring circles and spoons or scales for accurate measurement.
Process:
- Preheat the oven to 200 degrees Celsius. Prepare a silicone heart shape or round cake pan: lightly grease the bottom of the pan
Tip: If you do not have a silicone heart shape, pan, chop the heart shape out of paper to use as a template. Bake the cake in a round, silicone mold. After that, the cake is baked and cooled, use a sharp knife to cut the cake in the shape of a heart.
Dough:
- In a small bowl, mix cocoa and hot water; by movement, until they are completely connected, smooth; set aside to cool.
- In a small bowl, mix the flour, baking soda and salt, sift or whisk together. Set aside.
- In a large bowl with an electric mixer, add egg yolks and beat 3 to 5 minutes at medium-high speed until foam until the egg yolk becomes thick and lemon-colored. With a mixer at medium speed, gradually add 1 cup of sugar, either one tablespoon at a time, or in a very slow steady flow, taking 4 to 5 minutes to add all the sugar, and beatings so that the eggs and sugar are fully taken into account . Clean down the walls and bottom of the bowl with a rubber spatula so the mixture evenly. the mixture will be thick and pale yellow.
- With a mixer at medium speed, gradually pour the butter into the dough in a slow steady stream. Add vanilla and continue stirring for another 1 minute, until everything is well mixed.
- With the mixer at low speed, gradually add about ½ of the flour mixture, mix only until mixed, and then add the remaining half, mix until completely mixed, cleaning the sides of the bowl down as necessary.
- Use a whisk or a large rubber spatula, carefully fold the chocolate mixture into the dough.
- In another large bowl and using clean beaters, beat the egg whites with an electric mixer until foam. Gradually add the remaining ¼ cup of sugar, continue to beat until hard. Mix protein with dough. Bake:
- Pour the dough into prepared silicone molds with a spoon and smooth the surface with the back of a large spoon. Bake for 20 to 25 minutes or until the toothpick comes out clean. Remove from the oven and pans in place of the rack with cooling wire to cool for 10 minutes, then remove the cake from the mold and place the cake on the cooling rack to finish cooling. White glaze:
- At the top of the double boiler, combine white chocolate chips and milk. Place the pot of boiling water (the top pot should not touch the water.) Until the chips melt and the mixture becomes homogeneous. Remove from heat, add butter, vanilla and icing sugar. Stir manually or beat with a hand mixer for 2 to 3 minutes until the glaze becomes thick and smooth.
- Divide the icing in half, place ½ in a separate bowl. Add cocoa at ½ of the glaze.
- Spread the white chocolate icing between 2 layers and on top of the cake. Apply cocoa to the sides of the cake.
- Use a pastry bag to decorate the cake.
- Enjoy the work done
Jelly and ice cream recipes in silicone molds
Ingredients:
600 gr Curd.
300 ml of milk.
36 gr gelatin
180 ml of water
150 gr. Sahara,
50 gr cocoa.
Combine the cottage cheese with sugar and mix well.
Divide the mixture into 3 parts.
Heat 2 tsp on a stove cocoa and 2 tablespoons milk, boil a little until the cocoa dissolves. Cool and add in the first part of the cottage cheese and sugar.
Next, heat the milk (3 tbsp) with the rest of the cocoa (3 tsp), dissolve it well and also add sugar to the second part of the cottage cheese.
Then mix 300 ml of milk and 180 ml of water.
12 gr. gelatin pour 160 ml of a mixture of water and milk and put in a water bath until completely dissolved, but do not boil.
Add dissolved gelatin to the first part of the cottage cheese and cocoa (light chocolate). Put this mass for 5 minutes in the freezer.
Next, dissolve 12 g. gelatin also in 160 ml of a mixture of water and milk and add to the white mass (without cocoa), crushed walnuts can also be added there.
Get the first part from the freezer, top up the other and put in the freezer again for 5 minutes.
Then again 12 gr. Dissolve gelatin in the remaining milk and water (160 ml), add to the 3rd part (dark chocolate) and pour jelly in those parts.
Now just refrigerate for 4-5 hours. Take out of the mold.
You can pour melted chocolate on top and sprinkle a little nuts
Recipes for silicone molds
Barn Bear Bear Recipe
Any biscuit - on kefir, cottage cheese, jam, etc. - Ideal for baking in silicone molds.
Everything that you used to cook in traditional baking dishes can be prepared in silicone forms.
In addition, silicone molds give us new opportunities. They make jelly, chocolate, make ice, which would be impossible to cook in metal forms. Many of the baking recipes that you read in this article, we tried ourselves.
Barney Bears Recipe
Composition (recipe ingredients):
1 pack of plums. oil, 1 tbsp. kefir, 3 eggs, 1.5 cups of sugar, 1 bag of baking powder, vanillin (you can without it), 2 cups flour, cocoa
Cream: melted chocolate or boiled condensed milk or chocolate peanut butter
Recipe:
Step 1: Beat eggs with sugar, add melted butter, kefir.
Step 2: Sift the flour. Combine, knead the dough. Take 1/6 of the dough and add cocoa there.
Step 3: Stir everything to a homogeneous mass and pour two-thirds of the tins of bears. Paws of bears pour dough with cocoa.
Step 4: Bake Barney Bears at 180 g for about 30-40 minutes. Cool, remove from the mold.
Step 5: Chocolate melted in a water bath, or boiled condensed milk or chocolate-peanut butter should be injected with a culinary syringe into already baked bears.
Recipe2
Cupcakes
3 eggs;
200 gr. margarine;
2 tbsp.sahara;
2 tbsp. kefir;
1 tsp soda;
4 tbsp. flour.
raisins.
Grind eggs with sugar, add margarine (melted, but warm), kefir, pour in soda and flour, raisins. We stir the dough with a spoon, it should be like thick sour cream.
We fill the molds in half
Canelé Recipe # 4 Silicone
For flavor, add vanilla essence to the dough.
Cooking time 1 hour + 24 hours, 8 servings, 100 g - 380 kcal
500 ml of milk
135 g flour
2 yolks
| Categories: | |
Liked: 1 user