“Recipe for salted play dough. The perfect salt dough recipe
Evgenia Smirnova
To send light into the depths of the human heart - this is the purpose of the artist
Mar 30 2016
Content
Have you heard of mucosol or bioceramics? These are synonymous words for a type of needlework that is gaining momentum - testoplasty. Beautiful crafts are a great way to spend time with your child, an opportunity to take a break from the hustle and bustle and lose yourself in creativity. How to make salt dough? There are several simple options for creating pliable material. Choose the method that suits you based on cooking time and available ingredients.
Features of making salt dough with your own hands
Making your own play dough is easy. This is a safe material, even children are allowed to work with it. Before learning how to make salt dough at home, learn about its main positive features:
- Economy. You don't need a lot of money to make salt dough. All the components are already in your home.
- Neatness. It is very easy to wash off such material, and you just need to shake off the clothes or table and wipe with a damp cloth.
- Consistency. Excellent elasticity and thickness do not allow the dough to stick to your hands, so it is easy to work with.
- Keeps its shape. Finished crafts dry not only in the oven, but also in the air.
- Natural design. Natural dyes that are not harmful to health are suitable for working with the material.
- Long-term storage of finished products. Varnishing is a chance to preserve a beautiful craft for a long period of time.

What and how to make salt dough at home? List of tools you will need for this activity:
- wide bowl (for kneading dough);
- oven for drying (an alternative is a battery, drying in the sun);
- board, baking sheet or special form;
- a plastic bag (for storing the dough so that a dry crust does not form on it);
- measuring containers: spoons, glasses or cups;
- spatulas and molds for modeling;
- brushes and paints (for designing finished products);
- objects, materials for processing products: buttons, coffee beans, cereals, comb, mesh, screws, nails, tubes.
The best salt dough recipes for making crafts
If you're wondering how to make play dough, remember what ingredients you need:
- Regular wheat flour only. Pancake, almond, and with additional additives will not work.
- Extra salt is fine. Large grains of salt and inclusions will give the product an untidy appearance.
- Use cold water: it is better if it is completely ice-cold.
- Potato starch will provide plasticity to the dough.
- The strength of the finished material is higher if it is prepared using PVA glue diluted in water.
The quality of the material will be better if it is kneaded intensively by hand. The uniformity of the structure prevents the dough from crumbling or falling apart. If dyes were added, the color should be distributed evenly throughout the entire piece of dough, without inclusions or spots. The paint is added when mixing the material into water or the finished salted craft is painted. When the dough is ready, wrap it in a plastic bag and store it in the refrigerator for a couple of hours. The finished product can be used within a month if stored refrigerated.

From coarse salt
A classic way to make salt dough. You will get a lot of this material, enough for large and small crafts, and there will be some left over. If you don't need a lot of dough, reduce the proportions of the ingredients. You will need:
- coarse salt – 300 g;
- wheat flour – 300 g;
- water – 1 faceted glass (200 ml).
How to knead salt dough:
- Salt spills out. Most of the water, but not all at once, is poured into a large container.
- After the salt has completely dissolved, the sifted flour is poured into the liquid in portions, and a lump of dough is kneaded. Continue working with the finished lump on the work surface.
- If the material is not too pliable, add water; if it is too soft, add salt and flour in proportions according to the recipe.

How to knead from flour, water and salt
This recipe is suitable for creating three-dimensional figures. The material is very strong, holds the shape of the finished products, making them durable, despite their large size. To prepare play dough from flour and salt you need:
- plain flour (without additives) – 200 g;
- salt – 400 g;
- water – 1.5 faceted glasses.
Recipe step by step:
- Dissolve salt in ice water. There should be no grains left.
- Little by little add flour previously sifted through a strainer.
- Knead elastic dough. The work intensity is very high, the material is rough, and mixing takes a long time.
- Cover the bowl with the dough with a towel and refrigerate for several hours. After a while, take it out and sculpt the figures.

How to make from PVA glue
There is an option with the introduction of PVA glue. To prepare the dough use:
- flour – 2 cups;
- fine salt “Extra” – 1 glass;
- warm water – 125 ml;
- PVA glue – 50 ml.
Instructions:
- Mix flour and salt, pour in warm water.
- Using a blender or mixer, mix the ingredients.
- Add glue to the finished mixture and knead well with your hands.
- Roll into a smooth ball, place in a bag and place in the refrigerator.

How to make from starch
To prepare salt dough you need the following ingredients:
- potato starch - 1 tbsp. l.;
- water – 1 glass;
- flour – 1 glass;
- salt – 1 glass.
Step by step process:
- Prepare starch jelly: a tablespoon of starch is dissolved in half a glass of cold liquid. Avoid forming lumps.
- Bring another half a glass of water to a boil in a saucepan, pour starch jelly into the boiling water in a thin stream.
- Stir constantly until thick consistency.
- In a deep bowl, mix salt and plain flour.
- Pour the jelly into the dry mixture in portions, knead, avoiding excessive softness of the dough.

How to dry salt dough at home
Have you prepared the dough and sculpted the figures? It's time to dry them well! There are a couple of ways:
- Open air. Drying outside or in a room where fresh air flows regularly is the most economical option. It would be better to dry it in the sun. The duration of the procedure depends on the thickness of the product. The color of the craft will not change after it hardens.
- Oven. Immediately dry the crafts in the fresh air for a couple of days, then heat the oven to 50 degrees. Place the figures on a baking sheet covered with paper and dry, increasing the temperature (maximum 140 degrees). Drying lasts about 3 hours at 50 degrees, and half an hour at 140. Do not try to set the temperature to maximum right away, otherwise the products will crack.
If there are cracks on the figures, you can paint them with a mixture of PVA glue and regular flour using a thin brush, filling the space. You can easily find out how dry the product is by tapping it. A dull sound comes from a damp figurine after knocking, but a ringing sound indicates the readiness of work. If the craft is damp, extend drying in the oven.
Video recipes for salt dough for crafts and figurines made from it
Learn to make beautiful crafts using salt dough at home. The task is simple and exciting for children and adults. Original figures, decorations for the Christmas tree, in a vase, for educational games will not leave anyone indifferent. Watch the videos below for a simple yet fun activity. Prepare white or colored dough for fun modeling in minutes!
Play dough recipe for kids
Master class on making colored dough
What can be made from salt dough
When the salty material is ready, we begin to sculpt various figures:
- Flowers. Making a rose, sunflower, or forget-me-not is very simple. Select the required colors and, using a toothpick, long needle, knife or mold, cut out the necessary parts to create the desired flower.
- Toys. Dolls are in great demand, so if you want to surprise your loved ones, give them little people in beautifully decorated shirts, with rosy cheeks and cute eyes as a souvenir.
- Paintings. On a rolled out layer, using various tools, you can depict a whole story or just a landscape. It all depends on your imagination: a cozy house or an interesting ornament, a bouquet of flowers or a silhouette of a person and many other variations.
- Animal figurines. Make a cute and kind hedgehog or a funny pig with your children, learn where they live and what sounds they say. The guys will be delighted!
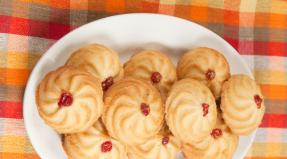
- I'm going. Ruddy apples, generous still lifes, Christmas cookies - simple and bright.
- Other products. Do you want to make elaborate earrings, a vase decoration, or an interesting pendant, but don’t know how? Try to make all sorts of crafts using salted material, give them a colorful mood using gouache.

Discuss
Salt dough - a recipe for making material for sculpting crafts. How to make salt dough - photo, video
Modeling from salt dough is very popular among needlewomen. With its help, you can create both three-dimensional figures and paintings on a plane, and even a novice craftswoman can handle the work. However, preparing a mass of flour and salt requires observing some subtleties. What should be the ideal recipe for ready-made salted dough, which is ideal for modeling? Let's consider several cooking options. At the end of the article you will find a detailed master class on making an interior decoration - a funny fish.
We study a step-by-step recipe for salt dough for modeling products
Let's do p tall dough for modeling large parts
For the basic recipe you will need:
- 200 g flour;
- 400 g fine salt;
- 125 ml water.
Mix the dry ingredients, then add water in small portions and mix thoroughly until completely homogeneous.
Let's sort it out universal recipe for high quality dough
The dough prepared according to this recipe is suitable for sculpting large parts and small thin elements. It can be used for professional purposes and for making crafts with children. Required:
- 1.5 cups flour;
- 0.5 cups potato starch;
- 1 cup fine salt;
- 180 g water;
- 2 tablespoons of PVA glue.
The dough will be even better and more elastic if you replace the water with starch jelly. To prepare it, you need to dissolve 1 tablespoon of starch in 100-120 ml of cold water. While the starch is dissolving, you need to boil another glass of water and pour the starch solution into the container, continuously stirring the resulting mixture over low heat. After the starch has completely dissolved (the solution should become transparent), turn off the heat and let it cool to room temperature.
We will prepare high-quality hundred for fine work
This recipe is more suitable for professionals, but can also be used for beginner needlewomen. Includes:
- 300 g flour;
- 200 g fine salt;
- 4 tablespoons of pharmaceutical glycerin;
- 2 tablespoons of wallpaper glue;
- 125-150 ml of water.
To prepare the dough, you need to mix the wallpaper glue with water and let it swell a little. Then add the remaining components and knead thoroughly, it is preferable to use a mixer turned on at low speed.

How to make t Is there a place for sculpting relief figures?
In order to increase the elasticity of the dough and reduce its fragility, you must add one of the following components to choose from in the mass prepared according to the basic recipe:
- 1 tablespoon PVA glue;
- 1 tablespoon potato or corn starch;
- a small amount of wallpaper glue mixed with a little water.
Let's try to knead our t rye flour food
This dough is perfect for folk-style crafts; rye flour gives the products an unusually warm brownish tint of homemade baking. Required:
- 300 g wheat flour;
- 100 g rye flour;
- 400 g fine salt;
- 250 ml water.
As a rule, to make crafts of the same volume, more rye dough is required than classic dough. This must be taken into account when preparing it and keep a small reserve.
We analyze recommendations about coloring the finished salt dough
You can color ready-made dry figures, but it is best to add dyes to the raw dough. Products will be painted more uniformly, and high color intensity can be achieved. You can use watercolors, gouache, ready-made food coloring or natural coloring products (cocoa powder, beet or spinach juice) as pigments. You can add glitter, soot, and ocher to the modeling mixture.
It should be remembered that after final drying, the color of the salt dough noticeably fades. However, it is not recommended to add a large amount of paint to it, as this may increase the fragility of the dough products. It is advisable to coat the finished products with 1-2 layers of varnish. You can use artistic, construction or any acrylic varnish.
Helpful Tips:- You cannot use rock or iodized salt to prepare the dough, as they contain insoluble foreign matter;
- All components of the dough must be kneaded for a long time and thoroughly, lightly beating it on the surface of a dish or cutting board;
- It is best to use a mixer for mixing;
- during cooking, first mix salt with flour, and then add liquid ingredients, preferably using cold water;
- The dough must be stored wrapped in several layers of cling film;
- It is best to air dry the finished figures, but in this case the drying process can take several days;
- It is allowed to dry dough crafts in the oven with the door open at a gradual increase in temperature.
Let's sculpt decorative fish made from salt dough according to recipe
Let's try to make a funny fish to decorate the interior, as in the photo below.

You will need a small amount of salted color, prepared according to the basic or improved universal recipe. Let's look at the sculpting procedure step by step.
It is most convenient to sculpt on a board or cardboard wrapped in foil. Using a rolling pin, roll out the dough into a layer approximately 5 mm thick. It is necessary to ensure that the thickness over the entire surface of the formation is the same. Using a paper template, we cut out a fish figurine; it is most convenient to use a plastic knife or a modeling stick.
We apply an image to the template and pass it with a needle along the contour, piercing through the paper and dough. We remove the paper and draw the outline with a stack or a knife, moving the edges of the slots a little apart.
We sculpt bulging eyes and folded fins and a tail, and draw a smile for the fish. We arrange small details. We make a round hole in the top of the figurine so that it can be hung on a string. Air dry the figurine for several days without removing it from the board.

Paint the dried figurine brown. We go through all the slots and contours with a foam sponge and a small amount of white paint. We paint the eyes white, applying the paint in several layers. If necessary, add a little glitter or tint the figure with an additional color.

Salt dough fish is ready!
Video on the topic of the article
The video lessons below discuss basic recipes for creating salt dough and some options for possible crafts made from it.
I have already written several times about how important a baby is. Yes, I think you know this very well even without me. Therefore, today, without further ado, I want to talk about another exciting and very useful activity - about modeling with kids and how you can play if you have a piece of dough on hand. All these games are useful not only for the development of fine motor skills, but also for the development of the child’s imagination, thinking, and perseverance.
Often mothers ask the question: “What is better to choose for activities with the baby: dough or plasticine?” In my opinion, it would be better if you give your child the opportunity to get acquainted with different substances and sensations, and conduct classes with both dough and plasticine. But here for little ones (from 1 year old) it is better to use dough in modeling classes and that's why:
The dough is much softer and more pliable than plasticine, and for babies who still find it difficult to knead plasticine, this is important.
Considering the fact that many kids will want to taste the modeling mass, dough (homemade) is much safer from this point of view, since its main components are flour, salt and water, and plasticine is still a combination of chemical components.
You can make the dough yourself, or you can buy it at the store (for example, Play Doh). But if you even once knead the dough at home, then, for sure, you will no longer want to deal with store-bought dough. Homemade dough is more flexible, softer, more pleasant, and there is also a lot of it! In addition, the process of preparing the dough is quite simple and does not take much time.
So how do you make play dough? I will give two dough recipes that I have tested several times and I really like. The first recipe can be called a classic salt dough recipe. The dough is prepared very quickly and easily; it is often used to create durable crafts; after drying, it can be painted.
Salted play dough - classic recipe
1 cup flour
½ cup salt (preferably “extra”)
½ glass of water
1 tbsp. vegetable oil
Mix all ingredients and knead thoroughly until smooth.
Recipe for very flexible dough
And another recipe for a very, very soft, plastic, homogeneous and, I would even say, ideal dough! :) It is not suitable for drying and painting, but for fun games with dough it is perfect.

1 cup flour
1 glass of water
¼ cup salt
1 tbsp. vegetable oil
2 tsp citric acid
Combine all ingredients in a saucepan, stir, then place over medium heat. After this, we begin to actively stir the dough with a spoon until it forms a ball and stops sticking to your hands. You will need to stir for no more than 3 minutes. After the dough has cooled, you can start playing with it.
Don't neglect such a seemingly insignificant ingredient as citric acid! If you do not add it, then after storing in the refrigerator the dough will begin to stick to your hands.
You can add food coloring to any version of the dough. If you don’t have a dye to tint the dough, you can use beet or carrot juice, turmeric, brilliant green, and gouache. Well, if you divide the dough into several parts and paint them in different colors, it will be even more interesting!
Both doughs can be stored in the refrigerator in a closed container for quite a long time (several weeks).
Games with dough
So, you have the dough, what to do with it next? First of all, of course, you need to introduce the baby to the test. Give him the opportunity to touch and knead him. You can make some kind of bun or bunny to show what the dough is capable of. If the acquaintance went well, you can move on to games.
Remember that the entire lesson should not last longer than 5-10 minutes. Do not try to include all the games in one lesson, watch your baby and always stop before he gets tired of the activity. If your baby is losing interest in a particular game, it may be too easy or too difficult for him. Try to simplify or make the task easier.
1. Roll out the dough with a rolling pin
The baby will most likely be happy to start rolling out the dough, because he has seen his mother do it more than once. If your baby is having trouble using a rolling pin, help him by clasping his hands with yours.
Both a toy and a real kitchen rolling pin are suitable for the game. My daughter likes rolling with a large rolling pin even more.

2. Press various objects into the dough
Next, you can announce that the resulting flatbread is not just a flatbread, but a pizza or a cake that now needs to be decorated. And for this purpose you can use a variety of objects: matches, pasta, beans, counting sticks, small toys, lids, etc. Try to use objects of different shapes and sizes to diversify the child’s tactile sensations.

3. Create simple crafts based on pressing objects into dough
Let me give you a few examples:
- Hedgehog
 For the little ones, toothpicks can be replaced with matches or counting sticks.

- little man

Be sure to involve your child in rolling out the torso and head. If your baby is not doing well yet, take his hands in yours and make rotational movements together.
4. Pinch off small pieces of dough and place them in a jar/bowl
This activity is very useful for the development of fine motor skills, as it trains the “pinch” grip. It’s quite simple to play around with the activity: invite your child to feed his favorite bear with candy. The game will most likely appeal to the youngest children - children about one year old. At this age, kids really like to tinker with small objects, fold and rearrange them.

5. Prick the dough with a fork.
Try sticking the same candies that you made for the bear onto a fork. You can tell your child that the bear prefers to eat only with a fork, but refuses to eat otherwise. So in the game we will quietly practice a very useful skill.

6. Cut with a knife
The main thing in this lesson is to teach the child to hold the knife correctly and, importantly, to independently hold the dough with his left hand (if the child is right-handed). A toy plastic knife, a special plastic dough knife, or a butter knife work well for the game. The activity will be interesting for babies from about 1 year 3 months.

7. Leave fingerprints on the dough
We press the toy into the dough, carefully remove it and ale-op, you get a beautiful pattern on the dough! Taisiya was simply delighted with this activity, and could get carried away for a long time, imprinting pasta on the dough.
Good for printing sorter figures, pasta tubes, small toys, construction set parts, fork, comb . Well, if according to the test, a car passes by, leaving marks (preferably with large wheels and treads on them), then the baby will most likely appreciate it.

And, of course, it’s worth mentioning the cookie cutters separately. With their help you can not only make beautiful prints. With older kids, you can try removing the “extra” dough around the molds so that you get “cookies”.

Prints can also be made simply with your finger. After which it will be very interesting to “sow” seeds into the resulting holes. This will be another great exercise for developing a “pincer” grip.

8. Pass the dough through a garlic press

9. Put the dough into a mold - make a pie
You can use either muffin tins or clean tins from the shortbread set for this game. When putting the dough into the mold, we try to compact each piece thoroughly. Most likely, you will have to get the cake out of the mold with your mother’s help, because... this is not an easy task.

10. Hide surprises in the dough and find them
This is our favorite game. I think all children love it when there is a surprise moment in the game. They are ready to open intricate locks, unscrew stubborn lids, just to see what is hidden behind them. Children are happy to find surprises, even if they hid them themselves!
Therefore, in this lesson, first, together with the baby, we hide the toy in the dough, placing it on one half of the cake and covering the other. Older kids can be asked to pinch the edges, as when sculpting a pie. Mom can do this for younger children. Well, then we ask ourselves the question “Where is our hedgehog?” or “Oh, who’s hiding here?” Perhaps during the first games the baby will have to be shown how to “get to” the toy. Most likely, the baby will catch everything very quickly and will subsequently eagerly pick apart the dough himself.

Even such a seemingly simple activity is incredibly useful for children’s fingers.
11. With mom’s help, sculpt sausages, koloboks and simple figures.

That's all for me, I wish you pleasant games together and more happy smiles on your baby's face! I would be very grateful if you share this article with your friends on social networks (there are special buttons for this at the bottom of the article). Well, in order not to miss new articles, subscribe to updates in Instagram,
You can make a huge number of crafts from salt dough, for example: flowers, animals, various figures, inscriptions, numbers, toys, paintings and whatever you want! Modeling from salt dough is called bioceramics. The advantage of salt dough is that it is convenient to work with, this material is absolutely harmless and crafts made from it will delight you for several years. In this article we will look at how to make crafts from salt dough with your own hands.
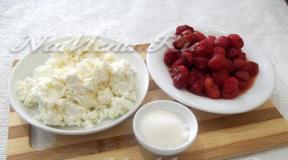
You will need: a glass of wheat flour, a glass of extra salt, half a glass of cold water, a bowl.
Recipe
The finished salted dough should not stick to your hands or crumble. It should be cool and easy to sculpt. I recommend watching the video master class!
There are two most common ways to dry salt dough. The first method: the finished craft will dry on its own. The main thing is that it should not be exposed to direct sunlight, otherwise it will crack. The craft can be placed on a flat surface and wait a few days. Second method: dry the finished craft in the oven for 3 to 6 hours (depending on the size of the craft). Drying occurs in batches with breaks. One approach is 1-2 hours. For quick drying in one go, set the oven to 75-100 degrees, and then the craft will dry in an hour. At a temperature of 120 degrees, the craft will dry in 30 minutes, but it is better to dry it naturally.
There are two most common ways to color salt dough. The first method: after drying, paint the finished craft with acrylic paints or gouache using a brush. Second method: food coloring is diluted in water, then added while preparing the dough. When the craft is completely painted and dried, it must be coated with transparent manicure or furniture varnish in 2-3 layers. Each layer must dry before applying the next. This way the craft will last for a long time.
You will need: colored salt dough, stack, clear manicure polish, toothpick.
Master Class

The salt dough star is ready!
Salt dough caterpillar
You will need: colored dough, knife, pva glue, toothpick, pendant, clear manicure polish.
Master Class
- Roll out the sausage.
- Cut it into 6 equal parts.
- Roll into balls.
- Glue 5 balls together.
- Glue the head.
- Make a nose and eyes, then glue them on.
- Poke a toothpick into the hanging area.
- Dry the craft.
- Attach the pendant.
The salt dough caterpillar is ready!
Salt dough apple
You will need:
Master Class
- Make half an apple, make the inside flat, pressing it onto a flat surface.
- Make a thin flat center and glue it to the main part.
- Roll 6 seeds and a stick, then glue to the apple.
- Blind the leaves, then glue them.
- Dry the craft.
- Apply varnish and wait until completely dry.
The salted dough apple is ready!
Salt dough elephant
You will need: colored salt dough, pva glue, clear manicure polish.
Master Class
- Make the elephant's body by rolling an elongated ball.
- Make 4 legs in the shape of plump sausages.
- Make a proboscis.
- Make the elephant's ears in this way: roll out 2 flat cakes, glue flat cakes of the same shape of a smaller size and a different color to them.
- Make a small ponytail.
- Blind your eyes.
- Assemble the elephant in the following sequence: glue the legs to the body, then glue the proboscis, then the ears, eyes and tail.
- Dry the craft.
- Apply varnish and wait until completely dry.
The salt dough elephant is ready!
You will need: salt dough, foil, a candy bowl or similar plastic container, gouache, a brush, clear manicure polish, a modeling board, a knife or a stack.
Master Class

You will need: salt dough, nail scissors, PVA glue, acrylic paints or gouache, manicure brush.
Master Class
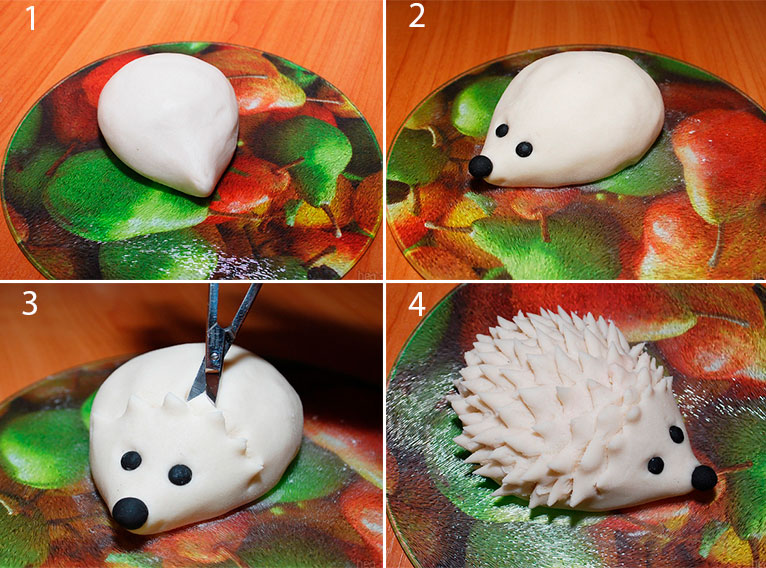
Salt dough hedgehog is ready!
Owl (eagle owl) made from salt dough
You will need: salt dough, pva glue, nail file, manicure scissors, acrylic paints or gouache, brush, wooden board with a pendant, clear manicure varnish.
Master Class

The salt dough owl is ready!
You will need: salted dough, the base on which the craft will be attached, for example, a board or plate, a glass or a knife, a sheet of paper, a simple pencil, a garlic press, a rolling pin, pva glue, acrylic paints or gouache, a brush, clear manicure polish, cloves.
Master Class

Salted dough fruit basket is ready! I recommend watching the video master class!
You will need: salt dough, knife, rolling pin, simple pencil, sheet of paper, sandpaper, acrylic paints or gouache, brush, transparent manicure varnish, glue gun or pva, base for crafts, for example: a board with a frame, transparent manicure varnish.
Master Class
- Draw a cat or print a template.

- Roll out the dough into a thin layer.
- Attach the template and cut out the cat.

- Dry the craft.
- Sand the craft with sandpaper, removing any unevenness.
- Using a simple pencil, transfer the desired design onto the cat’s body.
- Paint with paints and wait until completely dry.

- Glue the cat onto the base with the frame.
Salt dough pencil
You will need: water, flour, extra salt, cardboard jar for the frame, PVA glue, scissors, a piece of decorative rope or corrugated paper, gouache, brush, button, stacks, acrylic varnish for crafts, toothbrush.
Master Class
- Knead the salted dough in this way: add a glass of flour, a glass of salt, add water, then knead until the desired consistency of the dough. Separate part of the dough, add beige gouache, then knead.
- Roll out the cake to a thickness of 10-15 mm.

- Apply PVA glue to the outer rim of the jar and wrap it with dough. Cut off the excess with a stack and smooth the joints with a damp brush.
- Create a small dotted texture with a toothbrush on the surface of the dough.
- Knead the brown dough, roll it into a flat cake 10-15mm thick.

- Cut a 5cm wide strip of brown pastry and glue it to the bottom of the jar.
- Make 2 large owl eye bases from white dough, then glue them on.
- Make a beak out of brown dough and glue it on.
- Make eyes from turquoise dough and glue them on.
- Roll out 8 strips of pink dough, twist them into 4 flagella and make a bow, then leave it to dry for 2 hours.
- Make droplet-shaped owl wings using brown dough, then glue them on.

- Weave ropes of beige dough and glue them onto the neck of the jar.
- Roll out a sausage from white dough, draw the texture of the lace with a stack and glue it as a collar under the beak.
- Place the craft in a warm place for a day.
- Paint the bottom and wings with brown gouache and decorate with white dots.

- Draw the pupils and eyelashes with black gouache, wait until the paint dries, then paint white highlights on the eyes.
- Glue a pink bow above the wing.
- Glue a button with a bow from a corrugated strip onto the lace.
- Cover the craft with varnish and wait until it dries completely.
The salt dough pencil is ready!
Salt dough dachshund
You will need: salt dough, simple pencil, scissors, cardboard, paints, brush, rope, toothpick, foam sponge, clear varnish, PVA glue.
Master Class
- Draw a dachshund on the cardboard as shown in the image.
- Cut out the template.

- Roll out the dough to a thickness of 5 mm and cut out the dachshund according to the template.
- Roll out the oblong eyes, then glue them on.
- Blind the eyelids and glue them onto the eyes.
- Use a toothpick to outline the paws, nose, mouth, ear and body contours.

- Roll out an oval, then glue it onto the ear and smooth the seam with a wet finger. Use the same method to add volume to the dachshund's back and tail.
- Mark stripes in different directions around the entire perimeter of the dachshund, so that the stripes resemble wool.
- Dry the figurine.

- Glue a piece of rope to the back of the craft for further hanging.
The salt dough dachshund is ready!
Boletus mushroom made from salt dough
You will need: salt dough, light bulb, paints, brush, foil, cardboard, masking tape, superglue, PVA glue, paper napkins, clear varnish, stack.
Master Class
- Cover the light bulb with tape, then cover it with dough and dry the workpiece.
- Cut a ring out of cardboard and place it on the light bulb as a base for the hat.
- Form a hat from crumpled napkins, then secure with tape.

- Wrap the hat with foil.
- Roll out the dough to a thickness of 5 mm and stick around the cap.
- Remove the cap from the stem, cover the bottom with dough and make stripes in a stack.
- Glue the hat onto the leg.

- Mold the mushroom's arms, legs and nose, then glue them on PVA.
- Make a caterpillar and glue it to the hat.
- Dry the figurine.

- Paint the figurine, then leave to dry.
- Cover the craft with varnish and wait until it dries.
Boletus mushroom made from salt dough is ready! I recommend watching this video!
Funny salt dough pigs
You will need: salt dough, paints, brush, foam sponge, stack, thin rope, toothpick, black gel pen, PVA glue.
Master Class
- Roll 2 balls for the snout and use a toothpick to make the nostrils.
- Make a muzzle, glue a snout and eyes above it.
- Make triangular ears, glue them, then mark stripes with a stack at the junction of the ears and head.

- Make a heart and glue it to the bottom side.
- Make indentations along the edge of the entire circle.
- Using a toothpick, make 2 holes on the top for attaching the rope and 2 holes on the bottom for the legs.

- Roll up the arms and glue them in such a way that they hold the heart.
- Make the hooves and make holes in them for the rope.
- Dry the workpieces.
- Paint the blanks with black paint and let them dry.
- Wash off the paint from the convex parts of the workpiece under running water with a sponge and wait until it dries.

- Prime the figures with a sponge and white paint.
- Color the piglets.
- Draw small details with a black gel pen.
- Cover the craft with varnish and wait until it dries.

- Glue wool threads as hair.
- Make a pendant out of rope.
Funny salt dough pigs are ready! I recommend watching this video!
A very popular creative material for parents and children is play dough. In stores today you can easily purchase entire sets for dough, consisting of dough of various colors. Purchasing such a creative item will require significant financial expenses, and since the dough quickly loses its properties, such expenses will have to be made periodically. Play dough is very easy to make at home, and there are many recipes for making it.
In contact with
Why is dough used?
The dough is a very plastic mass from which you can make a wide variety of dough. Compared to plasticine, this material has a number of undoubted advantages:
- it is much more flexible and softer;
- the material does not have a specific odor;
- it is impossible for them to spoil clothes, since it is easily washed;
- the material does not cause allergic reactions;
- the material is safe for children of all ages, even if the baby tastes it, this will not lead to negative consequences;
- All the necessary ingredients for the composition are usually on hand, and if they are not available at home, purchasing them will not require significant financial costs.
Dough can be considered an ideal material that can be effectively used in educational activities with children. It is not without reason that they say that the mind of a small child develops through his fingertips. Modeling classes develop a child’s fine motor skills, allowing them to activate points in the brain responsible for the development of coordination, precision of movements and speech skills. promotes the comprehensive development of the child:

You can start modeling with plasticine for children at the age of 8-9 months. From the age of one and a half years, you can conduct full-fledged classes, giving the child knowledge about the world around him, developing skills in working with materials in the manufacture of simple figures.
Kinds
Today there are a huge number of different recipes for making dough with your own hands at home. Since its production does not take much time and effort, it is worth trying to experiment and make plastic material according to different recipes. Thus, everyone will be able to choose their own recipe for the “ideal” dough.
The most popular types are:
- salty classic;
- brewed over fire;
- with starch;
- microwaved;
- with the addition of glycerin, baby cream, vegetable oil.
At home, you can prepare not only the usual classic dough, but also colorful or glow in the dark. Food coloring or spices may be added to add color.
If, when purchased in a store, the product turns out to be of unsatisfactory quality, then the money will be wasted. When making it yourself, even if using the recipe it was not possible to achieve the desired end result and the material did not turn out to be the desired consistency, you can always correct the situation by adding the required ingredient.
Most DIY dough recipes use a limited number of ingredients. Typically, the main components include flour, salt and water. All other components are added in order to improve the external qualities, plasticity of the material, and give a pleasant smell.

How to make salted play dough at home
Today there are many recipes for making dough at home with your own hands. It is recommended to make your first attempts at creating a material for modeling using classic salt dough recipes, and after mastering the basics of creation, you can make the material using more complex recipes. In this case, it is worth taking into account the age characteristics of the child who will work with such material. For kids, it is recommended to choose the simplest recipes with a minimum number of ingredients.
Classic recipe
The most common option is a recipe for regular salt dough. Professional craftsmen were the first to prepare salt dough and used it to make panels, funny figures, and original accessories. The dough according to this recipe is considered safe for working with children, A the simplest recipe for making modeling material.
- white flour - 200 grams;
- fine salt - 200 grams;
- 125 ml water.
The salt must be poured into a container with flour and mixed thoroughly. Pour cold water into the dry mixture in small portions, stirring thoroughly after adding each portion. The finished material should be smooth and homogeneous in composition.
The dough according to this recipe turns out to be plastic, but may crumble due to the presence of a large amount of salt. A wide variety of crafts can be made from this material. Long-term storage and use items, such as Christmas tree decorations, can be made from this material.
Colored dough with cream of tartar
Making dough according to this recipe allows you to prepare colored salt dough with a longer shelf life compared to classic salt dough. The shelf life is increased due to the properties of cream of tartar, which prevents crystallization.
To make it you will need the following ingredients:
- a cup of cold water;
- half a cup of finely ground salt;
- a cup of coarse flour;
- 2 teaspoons cream of tartar;
- food coloring;
- 1 tablespoon of vegetable oil.
The dough making process is as follows:

Choux pastry with glycerin
Glycerin, when added as a component, adds to the dough craft pleasant shine and does not require subsequent varnish treatment.
For production you will need:
- 2 cups boiling water;
- 2 cups plain flour;
- 0.5 teaspoon glycerin;
- 2 tablespoons sunflower oil;
- 2 tablespoons cream of tartar;
- 0.5 cups fine salt;
- food coloring to add color if desired.
It is necessary to prepare a flour base by mixing flour, salt, butter and cream of tartar. Place the resulting mass in water heated to boiling water. Add glycerin and food coloring and cook briefly over low heat until smooth. Cool the resulting mass and mix thoroughly until the stickiness disappears.
The microwave allows you to prepare play dough in a short period of time. For production you will need ingredients in the following proportions:

All ingredients must be mixed thoroughly. The resulting mass is poured into a mold, placed in the microwave at medium power and kept in this mode for 5 minutes. After the dough has cooled, you need to thoroughly mix the resulting mass again.
Dough recipe without water
To make the modeling mixture according to the recipe, you will need the following ingredients:
- 300 grams of white flour;
- 2 tablespoons vegetable oil;
- 2 tablespoons cream of tartar;
- food coloring.
All ingredients are mixed in a saucepan. After this, the resulting mass should simmer for some time over low heat with constant stirring until a homogeneous thick mass is achieved. After cooling, the dough can be used to make crafts.
Dough recipe without flour
To make it you will need the following ingredients:
- 1 cup potato starch;
- 0.5 glasses of water;
- 2 cups baking soda;
- food coloring.
All ingredients, except water, are mixed in a saucepan. Then water is poured in and the mass is thoroughly mixed. The resulting composition is placed on low heat until a plastic ball forms. After cooling, the dough can be used for creativity.
 For crafts with children, it is recommended to use colored dough, which can be easily created by adding various food colorings. Special dyes can be purchased at the store, or you can use home remedies and food as ingredients.
The following ingredients can be used as natural dyes to create a specific color:
- powder cocoa to create brown color;
- brilliant green to create turquoise shades;
- to create red colors cherry or currant juice.
After adding the dye, it often starts to stick to your hands. To correct the situation it is enough add a small amount of flour to the modeling mixture.
The lifespan of homemade play dough can be quite long. Tight enough for longer storage wrap the mixture in plastic or place in a tightly closed container. It is necessary to store materials for crafts in the refrigerator or cool room.
An important stage in creating crafts from plastic material is the drying process. Depending on the time available, drying may be natural or accelerated. Accelerated drying in most cases is carried out in the oven, but the heating temperature should not exceed 100 0 C.