How to marinate chicken to get juicy and fragrant meat. How to make meat tender, juicy and tasty Marinade for chicken
Often the meat turns out to be tough, the housewives blame the seller and their poor choice for everything. However, in reality the situation is different. The steak can turn out soft and juicy if you first carry out certain manipulations. Culinary experts advise you to look for products that will make the meat juicy without additional difficulties.
Method number 1. Tenderizing meat with alcohol
- Shashlik based on pork, lamb or beef is often treated with alcoholic beverages before roasting. We recommend giving preference to beer or wine.
- In such a simple way, you will make the meat not only appetizing and soft, but also juicy. This is what everyone expects from a barbecue.
- You don't have to worry about the alcohol ruining the dish. In the process of roasting, it will soak, you can safely drive or go on important business.
- To tenderize the meat and give it juiciness, prepare a saucepan or a plastic bag. Chop the pork into pieces, soak in beer, leave to marinate for 1-1.5 hours. Do not rinse, immediately prick on a skewer.
Method number 2. Softening meat with mustard
- Mustard is often used as the main ingredient in meat dishes. It gives pork certain flavor notes and gives the meat flavor. However, not all people are aware that mustard acts as a good softener.
- For such purposes, we recommend applying the composition in a different way than you are used to. Take table mustard, chop the meat into pieces and grease with seasoning. Send in a plastic bag and wait 45 minutes.
- Before cooking pork, rinse the meat with purified water and dry. In addition to the fact that the steak will turn out tasty and soft, it will also acquire the desired juiciness.
- Very often, mustard is used in the process of cooking chops. In this case, you first need to chop the pork into slices, then beat off, coat and insist. It is not necessary to wash the meat before frying.
Method number 3. Tenderizing meat with onions
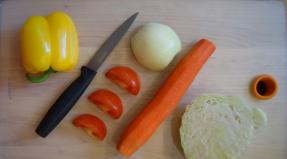
- Onions are often added to barbecue marinade, and this is not surprising. A juicy vegetable tenderizes pork or beef meat without any problems.
- If you don't know how to give the steak the desired juiciness, chop the onions into circles. Onion juice works the same way. It can be obtained with a combine, grater or blender, then wrapped in gauze and squeezed.
- For manipulation, wash and dry the meat in advance, rid it of veins and all parts that are not useful in cooking. Place in a saucepan, add juice or onion rings here, wait 1.5 hours.
Method number 4. Tenderizing meat with lemon juice
- Many people mistakenly marinate kebabs in vinegar, causing them to lose all the juice and become tough. If you are still using this method, discard it.
- Replace the vinegar solution with a cheaper and more effective natural analogue - lemon juice. Mix it with mineral sparkling water (100 ml of fresh citrus per 1 liter of mineral water).
- Soak the pieces of meat in this mass for several hours. It is not necessary to rinse the product before cooking. Tomato juice from fresh tomatoes acts in a similar way.
Soft pieces of pork baked in the oven
- pork pulp - 1 kg.
- onion - 3 pcs.
- mustard - 30 gr.
- garlic - 3 cloves
- pepper, favorite spices and salt - to taste
- Cut the pork into large pieces. Prepare the meat as described above to obtain the desired tenderness and juiciness. Make cuts with a knife.
- Chop the garlic, and chop the onion into rings or half rings. Coat the meat with mustard combined with spices, salt and seasonings. You can add mayonnaise to this mixture (optional).
- Leave the pork in the marinating bowl for 3.5 hours. After this period, line a baking sheet with foil, spread the pieces, cover from above. Send to the oven for baking until cooked.
Roast in sweet and sour sauce
- pork tenderloin - 500 gr.
- canned pineapple - 0.3 kg.
- chicken egg yolk - 1 pc.
- pure water - 50 ml.
- potato starch - 35 gr.
- bell pepper - 100 gr.
- soy sauce - 35 ml.
- ketchup - 60 ml.
- vinegar - 25 ml.
- granulated sugar - 65 gr.
- Prepare a marinating bowl. Send the pork meat chopped into pieces into it. Pour in soy sauce, add raw yolk, water, starch. Salt, mix everything and wait 3.5 hours.
- Chop the pepper into bars, chop the canned pineapple. Pour oil into the pan, heat it up, send the pickled pork inside. Fry until crusty, transfer to a clean bowl.
- Fry the pepper in the same way, after 3 minutes add the pineapple pieces. Simmer the ingredients under the lid for 5 minutes. Start making extra sauce.
- To do this, mix ketchup with sugar and vinegar, add this mixture to peppers with pineapples. Simmer under the lid until the sand dissolves, then add the pork and simmer until tender.

- low-fat kefir - 500 ml.
- garlic - 6 teeth
- pork pulp - 950 gr.
- onion - 1 pc.
- spices - to taste
- To achieve the desired result, you must first marinate the meat. As a result, you will get a juicy and soft steak. Take a container of a suitable size, pour kefir into it, place pieces of pork meat in the fermented milk product.
- At the same time, peel and chop the garlic and onion into half rings. Send the vegetable to a common pan, season the meat with spices and salt to taste. Keep in mind that in order to achieve maximum softness and juiciness from the steak, it must first be beaten off.
- Place prepared foods in the refrigerator for 4-5 hours. After the allotted time, heat the vegetable oil in a pan, put the pieces of meat in a bowl. Fry the pork on both sides until golden brown. The procedure is best done on medium heat.
- After you have achieved a crust, reduce the flame to a minimum, cook the dish. A fried piece of meat will be able to retain juiciness and softness. Serve steak with garnish and garlic sauce. Don't forget fresh herbs and vegetables.
Soft pork with apples
- onion - 1 pc.
- flour - 45 gr.
- fat - 55 gr.
- cumin - 5 gr.
- pork - 670 gr.
- apples - 2 pcs.
- salt - to taste
- Before cooking meat, it must be thoroughly rinsed with running water. Salt the pork, roll in spices and flour. Preheat the pan, heat the vegetable fat in it.
- Put the whole piece of meat in a fireproof container. Fry the pork on all sides until browned. After that, transfer the steak, along with the fat, to the roaster. After that, pour cumin into the dishes and pour in hot water about 3/4 of the container.
- Set the roaster on the stove, turn on the slow flame. Simmer the pork, add water if necessary. At the same time, peel and chop the apples into slices. Before the end of cooking meat, add fruit.
- Once the pork is ready, take it out of the roaster. Add flour diluted with water to the remaining broth. Boil applesauce for about 8 minutes over medium heat. After the meat has cooled, cut it into pieces. Pour in the prepared sauce, sprinkle with fresh herbs.
French juicy pork
- cheese - 240 gr.
- onion - 1 pc.
- oil - in fact
- mayonnaise - 220 gr.
- pork - 530 gr.
- salt - to taste
- Prepare the pork properly, cut the meat into small pieces. Thoroughly beat the meat, treat with salt and pepper on both sides. Next, grate the cheese on a fine grater. Peel and chop the onion into rings.
- Choose a suitable refractory dish, grease it with vegetable oil. Lay the pieces of pork on the bottom of the container. Put the prepared onion on top of the meat, pour the products with mayonnaise. Sprinkle the dish with cheese.
- Send the meat to bake in a preheated oven. Simmer the pork until fully cooked. Before serving, it is recommended to decorate the dish with olives and fresh herbs. Eat hot meat.
To cook juicy and tender pork, you need to take the tenderloin of the animal. This meat is the softest. If cooked correctly, the dish will literally melt in your mouth. It is also important to properly marinate the pork, it should brew for some time in the sauce. Mineral water with gas, mustard mixture, lemon juice or onions will do for the marinade.
Video: how to soften meat
Chicken has taken a firm place in the household and food habits of our citizens for an unknown long time. She carries eggs (sometimes dietary ones), and her meat is easily digestible, and feathers, and fluff, and, in general, decorates the estate. And he sings like (this is already a male) awakening! Let's cook, perhaps, something tasty and dietary at the same time from chicken meat.
In the biography of every Russian citizen, there is sure to be a page with some kind of overseas, accompanied by a high temperature and a subsequent week-long disgust for any food and a complete lack of appetite. And the first food that the exhausted body took would be chicken broth cooked by caring relatives.
Indeed, chicken is not in vain considered a dietary product. Its meat is very well absorbed, and the chicken broth, into which all useful substances pass, has truly healing properties. But such a broth must be properly cooked, especially from modern chicken, which was raised in an unknown place and fed with unknown what.
First, for the broth, it is advisable to purchase soup chicken. Its meat is tougher, and requires long cooking, but it is then that the broth will acquire its taste, aroma and the desired benefits. In the forgotten Soviet times, one could buy thin "running" chicken for soup, then cook it for a long time, but the broth turned out to be healing. Today, if you try hard, you can also find free-range soup chicken raised on grass and worms.
Secondly, be sure before cooking soak the chicken, at least for a couple of hours. First, cut it into large pieces, thaw the frozen carcass first. It is best to soak the chicken in water for several hours, changing the water every hour.
Thirdly, once again rinse the chicken meat well in running water and put it to boil in a saucepan, half with water. Leave the white meat (breast), other parts of the carcass are preferable for the broth, and we use the breast for diet cutlets. As soon as it boils, reduce the heat and simmer for 10-15 minutes. Then take the pot off the heat, Drain the first broth, rinse the meat in running cold water, wash the pan from scale. Place the meat in a saucepan and cover with water again. When it boils (scum will no longer form), add spices, salt, put peeled carrots and onions (with skin), reduce heat and cook until tender. After cooking, discard the onion, rub the carrots on a coarse grater and return to the pan. The resulting broth will, for sure, be devoid of unwanted impurities, and will retain its dietary properties intact.
In the summer, in the heat in chicken broth(instead of kvass) a hearty meal works well diet okroshka. Boil potatoes, carrots, eggs, add chicken meat, green onions and radishes. Finely chop everything, mix and pour cold chicken broth. Pre-cool the broth in the refrigerator, and carefully remove the frozen fat from it, with which eating cold okroshka is not tasty and not healthy. Add sour cream, and okroshka will be super! If you add boiled beets grated on a coarse grater to okroshka and dilute the broth with yogurt (1: 1), then it is completely impossible to break away from such a dietary dish.
And now let's give up diet cutlets. Blot the left chicken breast with a napkin and turn the meat through a meat grinder. Also turn the pre-soaked and squeezed crust of white stale bread and onions (2-3 pieces). Add 1-2 eggs, finely chop a bunch of dill and mix everything. Minced meat can turn out to be watery due to onion juice, so you can add a little wheat flour. Do not be too lazy to thinly cut white bread into strips in advance, after cutting off the crusts. Salt and dry the straws in the oven. Blind the patties and roll them in breadcrumbs or breadcrumbs. And fry in sunflower oil over medium heat.
Diet lunch is ready! Eat with gusto and stay healthy!
You come from the market, unfold the bundle carefully packed by the butcher or take out the chicken fillet from the bag, and then the thought comes to mind: why not rinse the purchased product under running water before cooking? It seems that this hygienic procedure is as necessary as washing hands before dinner. Suddenly the butcher is unscrupulous, and there are a lot of flies in the market. But washing the meat not only doesn't help get rid of possible bacteria, it spreads them throughout the kitchen.
So do you need to wash the meat? We will explain why freshly bought meat should never be subjected to such a test! No matter how your hands itch, you shouldn't.
Meat processing
Every housewife knows that all products must be thoroughly washed before cooking. Fruits, vegetables, eggs - everything unconditionally in the sink. And how great is the temptation to do the same with meat brought from the market. It is not clear where it lay, it is not clear who touched it and what flies were sitting on it! But experts in culinary affairs unanimously argue that, no matter what meat you buy, it is absolutely impossible to wash it.
In vain attempts to wash off harmful bacteria from meat, you only aggravate the situation. Imagine how all these microscopic bacteria, along with water molecules, go straight into your mouth, settle on the skin, around the sink, on other products and even on clothes.
Considering that you are going to cook the meat, and not eat it raw, there is no point in washing it - all bacteria will die safely when exposed to heat. What can not be said about the bacteria that have settled on kitchen utensils, and so densely that their destruction will require more than one painstaking cleaning. It is these contaminated kitchen utensils that can subsequently serve as a source of serious food poisoning.

This is especially true of chicken meat, because it is it that most often causes salmonella infection. When washing chicken meat, water drops containing harmful bacteria fly up to a distance of 1 meter. If you are still in doubt, look at the cooking style of famous chefs who never wash meat, but always wash their hands after contact with it.

There is another argument that will convince you not to wash meat in the future: with a jet of water, especially hot water, you break the molecular composition on the surface of the meat, thereby violating its palatability. In other words, such meat will not brown at all, it will lose its taste and aroma. That is, the meat will simply be stewed, and until all the moisture has evaporated, the juicy steak will completely lose all the juices.
Soaking the meat in brine before cooking helps increase the juiciness and enhance the tender flavor before roasting. This is especially important for chicken, which tends to dry out in the oven. Soaking meat in salt water will allow the cells to absorb some of the liquid through osmosis, making the meat more juicy as it cooks. You can also make a dry marinade, which will keep the chicken crispy, keep the natural juiciness of the meat, and save you the hassle of thin brine.
- Preparation time (in brine): 30 minutes
- Cooking time: 8-12 hours (active cooking will take about 10 minutes)
- Total time: 8-12 hours
Steps
Liquid brine preparation
- Never marinate chicken at room temperature as this can lead to bacterial growth.
-
Remove chicken from brine. Remove it from the brine and blot off excess liquid before cooking. Drain the brine into the sink.
Preparation of dry marinade
-
Know that dry marinade will make your chicken flavorful, with a very crispy crust. Liquid brines and marinades are the traditional way to marinate chicken before roasting, but many chefs have begun experimenting with dry marinades, which result in a firmer texture. Salt draws out moisture, moisture dissolves salt, turning it into a liquid, natural brine that the chicken absorbs.
- For a dry marinade, use coarse salt. Finely ground table salt will cover too much of the chicken, dissolve too quickly, and the baked chicken will be too salty.
-
Dry the chicken by blotting it. Take a paper towel and remove as much moisture as possible from the surface of the chicken. No need to rub the chicken, no need to squeeze it - just pat it dry with a towel.
Mix the dry marinade in a small bowl before applying. Dry marinade is simply rubbed into the chicken and is almost salt. However, you can add spices there as well. Start with 1 teaspoon of salt for every pound of chicken (two kilograms of chicken = 4 teaspoons of salt), then add any spices you want from the following:
- 2 teaspoons crushed black pepper;
- 1 teaspoon paprika, chili powder, or cayenne pepper
- 1 teaspoon rosemary or thyme;
- 1-2 teaspoons of garlic powder.
-
Rub the salt evenly on each side of the chicken. Rub the dry marinade over the top, bottom, inside, and outside of the chicken. Rub a little more salt into thicker areas such as breasts and thighs.
- Cover the chicken with an even, generous layer of salt. The chicken should not be completely covered in salt, but grains of salt should be visible everywhere.
- You may need an additional 1/2 teaspoon of salt to complete the marinade.
-
Cover the chicken and let it rest in the refrigerator for 2 to 24 hours. The longer the chicken marinates, the better the end result will be. But if you are in a hurry, two hours will be enough.
- Try to leave the chicken to marinate overnight. Of course, two hours will be enough, but it will not be as effective. The longer the chicken marinates, the better. But don't marinate the chicken for more than 24 hours.
-
Take out the chicken and dry it. There should be excess moisture on the chicken, and all the salt should be dissolved. Take a paper towel and pat the surface of the chicken dry to remove any moisture. When you're done, it's time to put the chicken in the oven and add flavorings as needed.
- Try stuffing the chicken with lemon slices, garlic cloves, sprigs of herbs, putting the ingredients into the cavity of the chicken, by the legs and under the wings.
Roast chicken
-
Butcher the chicken so that the skin becomes crispy, and the meat inside is juicy. It is known that it is very difficult to keep the baked chicken juicy, especially the breast. Thanks to this cut of the chicken, when it is cut and flattened, the meat cooks more evenly, and the surface becomes optimally crispy. It would be ideal to carve the chicken before marinating, but at this stage it is not too late to do it. To Butterfly a whole chicken, you need:
Preheat the oven to 260°C and place a rack in the middle of the oven. Make sure that there are no more gratings at the bottom or at the top. Take a roasting or baking pan and place the chicken in the center of the pan.
Add any flavors. Flavors such as herbs and lemon will add flavor while baking. Squeeze the juice of a large lemon over the chicken, add sprigs of rosemary or thyme under the wings and legs, and sprinkle the breast with crushed black pepper.
- If you're cooking a whole chicken, if desired, stuff it with lemon wedges, garlic cloves, and herbs in the center of the chicken's cavity.
-
Put the chicken in the oven and baste it every 10-12 minutes. Take the olive oil and juice from the pan and spread it over the surface of the chicken. Thanks to this, the meat will be juicy, and the skin will become crispy. Use a long-handled spoon or brush to spread the liquid over the surface of the chicken. Do not leave the oven open for a long time as the oven will cool down and the chicken will take longer to cook.
Cook the chicken for 45 minutes or until a food thermometer reads 65°C. This is the optimal temperature for breast meat, for complete safety, the legs must reach 76 ° C. If the outside of the chicken begins to darken faster than the inside is ready, reduce the heat in the oven to 230 ° C.
-
Pour some cold water into a large bowl. The bowl should be large enough to fit the whole chicken in it, but still fit in the refrigerator. Pour in enough water to cover the chicken. Use warm water to completely dissolve the salt.
ADVICE OF THE SPECIALIST
Chef
Alex Hohn is the chef and co-owner of Sorrel, a New American Cuisine restaurant in San Francisco. Has been working in restaurants for over 10 years. He graduated from the American Culinary Institute and worked in the kitchen of Michelin-starred restaurants Jean-Georges and Quince.
Chef
Soaking allows you to make the meat more juicy and aromatic. Alex Hohn, chef and co-owner of Sorrel, agrees: “I don't like to beat chicken with a hammer, because that destroys the texture of the meat. But when soaked, the chicken really becomes much juicier and more aromatic. ”
Add 3/4 cup (195 grams) of salt for every 3.8 liters of water. All brine options include salt - it is necessary for water to penetrate into the cells of the meat. The amount of salt can vary, but it's best to start with 50 grams of salt per liter of water. Stir well to completely dissolve the salt.
Add sugar to water. Sugar is optional in the brine, but very helpful - it increases the caramelization of the chicken with any kind of heat treatment. It is best to add as much sugar as salt. You can use any kind of sugar - white, brown, raw sugar or even molasses or honey. Stir the water until the sugar dissolves.
Add any seasonings you like to the brine. Other ingredients can be added to the brine - black peppercorns, fresh herbs or fruit juices will perfectly complement the brine. Ingredients you can combine and add may include:
If you are adding spices to the brine, bring it to a boil before putting the chicken in it. Otherwise, the flavors will not penetrate the chicken meat. Combine all ingredients (salt, sugar, water, spices), bring to a boil and simmer for about 1 minute. Let the brine cool completely before continuing.
Put the chicken in the brine. Make sure the brine covers it completely. You can take both whole chicken and small pieces - the technology of the process will remain the same.
Put the chicken in brine in the refrigerator and let it stand. Place the bowl in the refrigerator, covered with a lid or cling film. Leave the chicken in the brine for a few hours. Small pieces may take an hour or two, and a whole chicken will take 8-12 hours. If you have little time, then even in a shorter time, at least 1-2 hours, the brine will have time to give the meat a different taste and improve its quality.