Aising, or Edible lace. DIY icing for lace
Today it is very difficult to find a person who does not like sweet desserts, such as cakes. In cooking, there are a lot of such recipes; they can be decorated with various patterns, inscriptions or icing. Probably not everyone knows what it is. Let's try to figure this out. So, translated from English, this term means "ice pattern". And this is not surprising, since products made from it are similar to ice ones (in color and consistency). Aising, the recipe of which we will definitely find out today, makes it possible to create extraordinary decorations not only for desserts, but also for various dishes. Properly made, it has a matte finish and great durability. So, let's try to understand this issue in more detail.
What is "icing"?
Aising is a plastic, thick mass of sugar and proteins for creating confectionery decorations that have volume. Usually this mass is white, but with the help of food coloring it can be given any shades. Icing, the recipe of which will be given below, is made by grinding powdered sugar with fresh egg white. Lemon juice or acid, glucose syrup, glycerin and so on are added to this mixture.
Working with icing
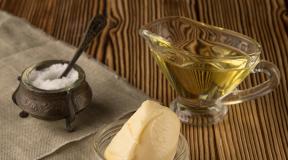
To work with a flexible mass, pre-prepared templates are required, for example, drawings on paper or ready-made contours. A cling film is placed on such a drawing or it is placed in a file. In this case, it is not recommended to use parchment or tracing paper, since the icing sticks to them very strongly and then does not separate. So, the film is smeared with a layer of olive (this is important!) Oil. Fresh protein mass is placed in a confectionery envelope or syringe. However, it should not be liquid, so as not to blur along the contours of the picture. A thick mixture, on the contrary, will be difficult to squeeze out of the envelope. However, in this case, it can be molded from it in the same way as plasticine.

All elements of the picture should not be thick. If there is a desire to get multi-colored icing, the recipe of which is very simple, food colors are added to the mass. You can also apply the mixture to the finished cooled confectionery product, for example, cookies or gingerbread, chocolate icing. Do not apply it to biscuits and other non-dry surfaces. Only ready-made icing decorations are placed on them before serving. So, a film with a pattern is dried for about three days. Then the jewelry is carefully removed.

Openwork jewelry from icing
In this case, a mass of protein and sugar, that is, icing, the recipe of which is attached, is applied to small balloons, they must first be inflated and lubricated with oil. After the pattern dries, the ball is simply blown off and removed from the product. This must be done carefully, as the resulting products are very fragile. It is recommended to make them with a small margin. A broken part can be glued with egg white mixed with powdered sugar. Store such jewelry at room temperature in a box. Consider in more detail the recipe for icing at home.
Icing heart
Ingredients: twenty grams of egg white, one hundred and fifty grams of powdered sugar, fifteen drops of lemon juice, red food coloring, vegetable oil, a file and a heart template.

Cooking icing
The protein is gently mixed, but not whipped. Powder is added gradually, without ceasing to interfere, put lemon juice with red food coloring dissolved in it. Mix everything well until the color becomes uniform. The mass is transferred to a confectionery envelope or bag with a nozzle and left for a while, covering the hole with a wet napkin so that it does not dry out.
Template preparation
After we looked at the recipe for icing for decorating cakes, you need to make a template. To do this, cut out a heart of the desired size from cardboard. With the help of plasticine, they give it shape and volume. To do this, plasticine is applied over cardboard. Next, the template is placed in a file and pressed tightly so that all the air comes out. Under the cardboard, the file is assembled into a knot so that it lies evenly and tightly on the plasticine. The file is smeared with vegetable oil.
Pattern formation
Further along the contour, a thick line is drawn, and then any pattern is made at their discretion. It can be intertwined lines, squares, ovals, and so on. Ready icing is left for one night - to dry. Then they begin to carefully remove it so as not to break or crush it. Having made two such hearts, they are glued together, for this the same icing is used, and the decorations are left to dry again.

Icing lace in fifteen minutes
Ingredients: one protein, two hundred grams of powdered sugar, half a spoonful of citric acid. Equipment: olive oil, scraper, patterned silicone mat, sponge.
Cooking
The icing recipe for lace is no different from the one we discussed above. To do this, the egg white is mixed (but not whipped) with sugar and citric acid. Mix until a thick mass is obtained.
Lace preparation
The egg mass is distributed over the entire surface of the rug, removing excess. Then everything is put in a preheated oven and baked for three or five minutes, depending on the type of oven. After the lapse of time, the finished lace is carefully removed and patterns are already made from it as desired. You can decorate the cake with them by attaching them to the sides. And you can make all sorts of figures - it all depends on the imagination of the cook.
As you can see, this cake icing recipe is very post. The lace is ready in fifteen minutes, so you can save time for preparing other festive dishes.

Beautiful icing figures
Ingredients: one egg, two hundred grams of powdered sugar, one teaspoon of citric acid.
Making icing (recipe): master class
Beat the egg white with a fork until a light foam appears. Then powdered sugar is added in portions, rubbing the mixture until smooth, and then citric acid, continuing to stir. You should get a homogeneous, stable protein mass of a thick consistency. Add food coloring if desired. Here is the ready icing! As it turned out, everything is quite simple. It must be transferred to a pastry bag.
Making jewelry
Balls of the required size are inflated, lubricated with vegetable oil with a brush, olive oil is best in this case. From above begin to apply an ornament. When the patterns are applied, the ball is hung up to dry. So it should hang for about a day.
After a while, the ball is pierced with a needle and taken out of the sugar figure. With such sweet balls that are cooked, you can decorate cakes or Christmas compositions.
Finally...

Thus, it is not difficult to make flexible icing, the recipe of which we already know. With the help of sugar mass, you can create not only lace and balls, but also make candlesticks, butterflies, snowflakes and more. This requires only stencils, which can be easily found in children's coloring books. Working with stencils is quite simple, you just need to apply ready-made icing on them, and then dry them. Large parts can be glued together using the same icing.
"Royal icing" is the most popular decoration of various confectionery products. With its help, real masterpieces are created. Patterns that seem to be woven from thin lace look appetizing on cakes, gingerbread, pastries and cookies. Decorating confectionery with icing is an interesting activity. This requires only a pastry bag, blanks with drawings, a plastic bag, olive oil, egg mass, as well as the desire and imagination of the cook. Undoubtedly, every culinary specialist will be able to create his own masterpiece, which will appeal to everyone.
Aising (Royal Icing) - protein drawing mass, it is not used as a cream, but only for the manufacture of voluminous jewelry. Templates are made, patterns are drawn, sweet and edible lace is obtained :), then dried and stored in candy boxes or plastic in a dry place. Aising is afraid of moisture and cannot be stored in the refrigerator. It is also not friendly with sour cream, butter cream. Such decorations can only be planted on protein cream or chocolate icing, mastics.
You can also buy ready-made icing.
1. To make icing, take one protein (separate the protein from the yolk very carefully) and beat it with a fork until a light foam forms.
2. Be sure to sift the powder. Then gradually add the powdered sugar while continuing to stir. Mix until a stable mass is formed. Thick enough, but so that it can be squeezed out through a syringe or bag.
3. Now add lemon juice. Add juice not at the beginning of whipping, but almost at the end, then the products are less fragile.
4. You can’t beat the protein, because. when whipping, bubbles form, which should not be in icing. The protein is simply stirred with powdered sugar with a fork or whisk, but not with a mixer. And then cover it with a wet napkin and let it stand for 30 minutes. to get all the bubbles out of it.
5. To make jewelry, you need to make a drawing of the desired product or take a template. It is convenient to use children's coloring pages. Put a piece of polyethylene on this drawing or put the drawing in a transparent folder so that the drawing is clearly visible. I am using file.
6. Now we take a pastry bag or a syringe, you can just take a small plastic bag. We fill it with icing and start drawing, that is, on the polyethylene that lies in the figure, we squeeze out the icing, clearly following the lines of the picture.
7. After we have finished the drawing, we leave the icing on the polyethylene to dry. Since icing products are very fragile, you need to make more of them.
8. If you need to give the product some form, then make some kind of fixture that will correspond to the required shape. For example, butterflies are dried on a slightly open book, then they will not be flat, but with raised wings. To make a crown, as in the main photo, you need to dry the icing on a liter jar.
When working with icing, you need to remember to prepare a slightly damp cloth in order to cover the nozzle, which is left idle for a while, since then the nozzle becomes clogged with dried icing.
It’s better to shoot at the edge of the table, start from the corner, hold the corner and pull down from the edge of the table, as if through the edge at the table ...
Icing dries in different ways ... depending on the size of the part (flower) and your humidity. My thin products dried up the next morning, and so 2 days is enough for an ordinary flower. Large parts can dry for 5-6 days. You can put in the oven, but not more than 40 ° C.
Also with icing you can make different figures of animals, fungi, trees ...
Aising ("Royal Icing") is a sugar-protein drawing mass, which is used for the manufacture of volumetric decorations for confectionery. This mass can be white or colored when food coloring is added to it.
Aising is a fairly thick plastic mass obtained by rubbing fresh egg white with sifted icing sugar with the addition of some acidifier for plasticity - lemon juice, dry citric acid, cream tartar, etc.
Sometimes glucose syrup or a little glycerin is added to the mass for greater plasticity, but the addition of glycerin can make the mass too sticky, which makes it difficult to peel it off from the polyethylene substrate. When depositing the mass directly on the surface of the decorated gingerbread, i.e. when subsequent detachment of the icing lace is not expected, the addition of glycerin can greatly facilitate the work.

The correct consistency of icing for jigging with a cornet.
To create icing jewelry, there are drawing masses with a different composition - for example, based on albumin (1 kg of albumin replaces 316 chicken egg proteins) and some others that are more convenient not at home, but in industrial conditions.
NOTE: Kremortartar - tartaric salt of potassium acid С4Н5О6К (name from lat. cremor - thick juice and lat. tartarum - cream of tartar).
It is formed naturally from long-term storage of wine on the walls of barrels in the form of hard crystalline crusts that are deposited as a result of fermentation of grape juice; in mass quantities obtained by chemical synthesis.
When combined with water, milk or vegetable juices, that is, with any liquid mixed into the dough, kremortartar turns into a solution of tartaric acid and thereby contributes to the germination of the dough. Therefore, cremortartar is an important component of baking powder (bakpulver), and can also be used independently, regardless of other lifting agents (yeast or soda), in those types of dough where it is necessary to achieve particularly strong germination, for example, in puff pastry. Cremortartar can be replaced by other types of food acids: citric, malic, acetic. How to work with icing:
1) Draw future patterns on paper or print ready-made templates. It is very convenient to use children's coloring pages as templates.
2) Put the drawn paper template under the plastic film or put it in the plastic "file" (thin transparent bag for documents). It uses the property of polyethylene that it does not stick to anything. Products can stick “tightly” to tracing paper, parchment or waxed paper, especially if the icing mass is too liquid.
For better subsequent peeling off of icing products, a thin layer of olive oil is applied to the plastic film (it is non-drying, i.e. non-polymerizing). Sunflower oil is highly undesirable (!), because. upon contact with air, it polymerizes by combining with oxygen and hardens (like oil paint), therefore it can additionally glue the product, especially during long-term drying of large parts. USEFUL NOTE. It is the property of the applied layer of sunflower oil to polymerize by combining with atmospheric oxygen and harden into an impermeable insoluble film that is used when impregnating new wooden kitchen boards with sunflower oil, which makes the impregnated boards non-hygroscopic, easy to clean and practically eternal. For impregnation with oil, new boards are allowed to dry additionally in a dry room, then they are generously lubricated on all sides with sunflower oil, which can be heated, the oil is allowed to soak for 1 hour, then it is abundantly lubricated again and left for 3-4 days for final drying. 3) Freshly prepared protein drawing mass (icing) is placed in a cornet with a suitable nozzle or in a plastic bag with a cut corner (for example, in a document file). The mass should be prepared every time in the amount needed now for work. Storing the mass may cause undesirable changes in its plasticity, which will have to be corrected by adding either powdered sugar or a few drops of water and carefully grinding again.
The icing mass should not be too liquid - so that it does not blur and lose its shape during jigging, and not too thick - so that it can be squeezed out of the cornet without undue effort and not torn during jigging.
If you prepare a thicker icing mass, you can sculpt jewelry from it with your hands, like from plasticine. You should not sculpt too thick decorations, because. they take too long to dry.
4) Squeeze out the icing onto the plastic film along the pattern placed under it. If you have sufficient artistic skills, you can do without templates, freely drawing in mass according to your imagination.
When drawing, you can consistently use icings dyed with food coloring in different colors, which will allow you to get multi-colored decorations.
Aising can be deposited directly on the surface of a ready-made (baked and cooled down) sufficiently dry pastry confectionery (gingerbread, including glazed, shortbread cookies), as well as on chocolate and other things that can be stored outside the refrigerator.
In no case should icing be deposited on confectionery cream, on biscuit and on other wet surfaces, as well as on products for which storage is required only in the refrigerator. On such products, icing decorations are installed immediately before serving.
5) A film with a deposited pattern (or a decorated confectionery product) is left to dry at room temperature (but not higher than +40 ° C) for 1-2-3 days until the mass is completely dry.
Icing dries differently depending on the size of the part and the humidity in the room. 1-2 days of drying is enough for an ordinary small flower. Large parts can dry up to 5-6 days. To speed up drying, the products can be placed in a warm, dry place with a temperature not exceeding +40°C.
If you want to get a three-dimensional decoration, a film with a deposited pattern is placed for drying on some curved surface - for example, on the side surface of a cylindrical pan, in the spread of an open book, etc.
Properly prepared icing mass (not too liquid) does not flow down on inclined surfaces. If the deposited mass is liquidish, you should first let it dry a little to the desired thickening (but not to brittleness) in a horizontal position and only then place it on a curved surface.
To obtain openwork spherical products, the protein mass is applied to small inflated balloons lubricated with vegetable oil. After the icing has dried, the balloons are pierced and the deflated shells are carefully removed from the resulting decorations.
6) Dried icing jewelry is carefully removed from the substrate.
It is better to remove products from the substrate at the edge of the table, starting from the corner of the substrate, which is gently pulled down, bending the substrate over the edge of the table edge.
Since icing products are very fragile, they must be prepared with a certain margin in quantity.
Icing decorations can be glued together with egg white, loosened with powdered sugar, and then allowed to dry.
For the manufacture of large volumetric icing decorations, individual parts are made for them according to the drawings, which, after complete drying, are glued into a single product (for example, into the Eiffel Tower - see below).
Broken products are tasty on their own and can be successfully served with tea. It often happens that icing decorations are eaten by family members, especially children, much before they dry out. So a solid supply of prepared icing jewelry never hurts.
The resulting sweet edible lace is used to decorate various confectionery products. Ice jewelry can be stored in boxes for a long time at room temperature, provided there is no high humidity.
Ice jewelry should not be stored in the refrigerator, because. after being in the cold, they liquefy. Therefore, pre-prepared icing decorations are placed on cakes only immediately before serving. Cooking icing
Royal Icing
Ingredients:
- 1 fresh egg white, carefully separated from the yolk;
- about 250 g of powdered sugar until the desired density is obtained; the powder must first be sifted to loosen it;
- about 0.5 tsp. lemon juice or dry citric acid on the tip of a knife, a little more if you want to get a sour taste of icing; add lemon juice towards the end of cooking, otherwise the finished products will turn out to be too fragile;
- for greater plasticity, you can add 1 teaspoon of a strong (saturated) glucose solution to the mass.
NOTE. In the absence of powdered sugar, it can be obtained by sifting granulated sugar through a fine sieve, because. there is always some fine powdered sugar in granulated sugar.
Cooking
The egg white is carefully separated from the yolk.
Even traces of yolk are unacceptable. 
Beat the protein with a fork until a light foam forms.
The task of this procedure is not to beat the protein, but only enough to destroy its structure before liquefaction.
Air bubbles in the finished icing mass are not needed. 
Then we begin to gradually add powdered sugar to the protein in portions, each time thoroughly rubbing until smooth. 
In the middle of cooking, add dry citric acid or almost at the very end - lemon juice.
By the end of cooking, you can add the desired food coloring. 
Adding powdered sugar in portions, grind and knead until a homogeneous stable viscous plastic mass of the desired consistency is formed.
Our icing is ready for making cornet jigging jewelry.
NOTE. For jigging with a cornet, the mass is made more liquid, and for sculpting with hands, it is thicker, easily kneaded by fingers.
When sculpting with your hands, icing can be dusted with powdered sugar.
Ice snowflake 
1. The beginning of icing jigging from the cornet on a plastic film lightly greased with olive (not sunflower! - see above) oil according to a stencil from a children's coloring book placed below. 
2. Finishing the icing for the snowflake. 
3. Shift of the placed stencil and jigging of one more snowflake. 
4. Drying of deposited icing products at room temperature for 1-2 days. 
5. The finished dried snowflake becomes quite hard. 
Drawing a multi-colored product by successive jigging of icing cornet of different colors.
First, the contours were stenciled with white icing, then they are filled with colored icing. 
Drying a multi-colored icing product on a plane. 
Drying multi-colored icing butterflies on the curved surface of a book spread to obtain bulky products. 
Drying deposited products on cylindrical surfaces. 
Dried pink icing jewelry.
The crown is dried on a film laid on a cylindrical jar lying on its side. Decorating sugar beads are placed on the icing immediately after it has been deposited. After drying the crown, shortly before serving it on the table, “diamonds” can be deposited on it from droplets of thickly boiled transparent colorless jelly. 
Multi-colored jewelry from icing to dry. 
A voluminous butterfly and patterns of white icing on a layered gingerbread with layers of jam, covered with confectionery mastic. 
Volumetric butterflies and openwork white icing decorations on a cake covered with confectionery mastic. 
White icing decorations on a cake covered with chocolate icing. 
Jewelry from colored and white icing.
The carriage is glued together from prepared and dried flat parts. 
Glazed gingerbread or cake icing decorations. 
Decoration with icing wine glasses for newlyweds.
The icing is applied with beautiful lace on a number of washed glass goblets.
Glasses are set on a gift cake and served to the newlyweds, who immediately drink champagne from them.
After using the glasses, the icing is washed off with water. 
Icing products can be served as an independent dessert. 


Small colored icing crafts to decorate confectionery. 
Miniature icing decorations turn even sugar cubes into attractive sweets.
Christmas trees from icing 
We plant such details of different diameters from the cornet. We dry them for about a day. 
Then we glue the parts into a Christmas tree with icing. After assembly, dry the Christmas tree for another day. 
The result is such a Christmas tree for decorating a New Year's composition with a gingerbread house or for a New Year's cake. 
Christmas trees from green icing. 
New Year's composition.
Herringbone made of green icing, deposited from a cornet on a vertically installed conical gingerbread base, glued together with thick jam from two half-cones baked from gingerbread dough.
Snowman - stucco made of thick icing of different colors, dusted with powdered sugar during modeling so that it does not stick to hands.
The star on the Christmas tree is stucco made from icing.
Rectangular candies with red bows - chocolate candies covered with multi-colored icing and dried for a day.
icing balls 
 We take:
- icing, pounded to the consistency of peaks,
- small balloons
- a dash of olive oil
- threads for tying balls,
- a confectionery syringe with a nozzle number 1 or 2.
And in advance we prepare a place where we will hang the balls for drying.  We inflate the balloons to the desired size and tie them with longer threads, so that later we can hang them for drying.
  Lightly grease each ball with olive oil so that after drying, the icing will more easily come off the rubber surface.
To do this, use a brush to drip oil on an inflated ball, and then rub it with your hands over the entire surface. 
We take the ball by the tied tip and start from the confectionery bag, through the nozzle (preferably the 1st number for greater grace) we deposit a pattern with icing, while scrolling the ball.
Then we hang it to dry for 10-24 hours, and we take the next ball to work. 
We take the dried icing ball carefully in the palm of our hand and gently poke something blunt (for example, a blunt brush handle) into the holes of the pattern to completely unstick the icing from the walls of the ball. To make the ball easier to separate from the icing, it is advisable not to inflate it too much.
Then we pierce the balloon.
ATTENTION! If you pierce an inflated balloon immediately, without separating its walls, then there is a very high probability that our icing balloon may break. 
Carefully by the thread, we remove the shell of the bursting balloon from the product. 
Our ball is ready to be used for decorations. 
By applying icing mass to a large balloon, we can make just such a decoration.
The whole procedure is the same as described above.
Volumetric icing jewelry,
glued from flat parts.
1. CARRIAGE  We use a CD as a circle template.
DETAILS (see photo below, make spare parts in case of breakages):
2 sidewalls of the stroller (sectors of 3/4 of a circle) - we deposit a contour, and inside it - a rectangular mesh; 1 strip, 3/4 of the circumference (as the length of the perimeter of the sidewall) and the width of the future stroller - a detail of the stroller body connecting the two sidewalls; after jigging, this part must be bent along a radius equal to the radius of the sidewall, and dried in this position; those. dry on a template folded from a CD; 4 wheels (the pattern inside the wheels is any according to the home artist’s plan); 1 rectangle, approximately 4x6 cm (it is attached under the bottom of the stroller, and the wheels will be attached to it); 2 beautiful decorative curls on the sides of the stroller; 2 handles for the stroller; you can also make a “tulle” curtain; 1 lace circle with a diameter of about 8 cm as the base of the entire structure - we will install our stroller on it. 
The essence of the manufacture of parts is clear from the photo. We dry all the parts thoroughly on a flat surface, and after jigging dry the rounded body part connecting the two sidewalls on a round template.
STROLLER ASSEMBLY:
We glue the bent part of the body with icing or simply powdered sugar with protein to one of the sidewalls of the stroller, lubricating both surfaces to be glued with a thin layer, and let it dry.

Then glue the second sidewall.
When everything is dry, glue a curl on one side of the stroller, and a small rectangle on the bottom of the stroller outside. leave to dry. 
We turn the stroller over, glue the curl on the other side. The stroller lies on its side, glue the wheels to the rectangle and to the stroller. We put everything we can to hold the parts in place until the glue sets. When it dries well (you have to wait 20-30 minutes), we try to put the stroller vertically on the wheels. Glue the wheels to the patterned circle. We dry.

Then we glue the handles of the stroller, install the tyulinka (if it was made).
That's all and ready! Store carefully in a suitable box until the hour of donation. The main thing is not to break the product ahead of time. 
2. EIFFEL TOWER 


We prepare flat parts, as shown in the photo, dry them thoroughly for 1-2 days, then slowly glue them into an integral structure. Products glued from bulk parts 

icing drawings
The icing technique is clear from the above on this page.
When drawing with icing, you can use cornets with multi-colored icing, fingers, various stacks, as well as brushes slightly moistened with water. 


Angel. 
A miniature that can become an original gift.Icing moldings
Aising for sculpting by hand is prepared thicker than for jigging from a cornet.
So that the icing does not stick to the hands during modeling, the hands are smeared with a thin layer of vegetable oil, and the icing is dusted with powdered sugar. 


Aising moldings of different colors with a butterfly sitting on them. 
Decor products with icing + Photo
Aising is essentially a sugar-protein drawing mass, which is used to make various three-dimensional decorations for decorating confectionery.
Cooking icing
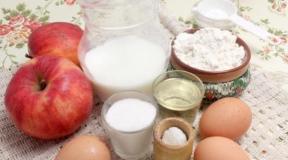
To prepare icing you will need:
One egg white;
- powdered sugar - 250 g;
- dry citric acid on the tip of a knife or half a teaspoon of lemon juice;
1 teaspoon of a strong glucose solution for greater plasticity (if desired).
The process of making icing
First of all, carefully separate the egg white from the yolk, avoiding the slightest hit (Figure 1).

After that, the protein must be beaten with a fork until a light foam appears (Fig. 2). The task of this action is not to beat the protein, but only to bring its structure to liquefaction. We do not need air bubbles in the finished icing.
In the middle of the process, add dry citric acid (it is important not to add immediately, as then the finished products may turn out to be too fragile).
When adding powdered sugar, knead and grind until a stable homogeneous viscous mass of suitable consistency comes out.

Note: for drawing, the mass needs to be made more liquid, and for modeling - thicker. Aising, when sculpting with your hands, it is advisable to sprinkle with powdered sugar.
This mass can be white or colored when food coloring is added to it.


Ice snowflake
1. You can either come up with a drawing yourself, print it out, or use a children's coloring book. Start painting with icing on a stencil covered with plastic wrap lightly oiled with olive (not sunflower!) oil (Figure 5).

2. The finished icing snowflake will look like in Figure 6.
3. Move the underlay stencil and draw another snowflake (Figure 7).
4. It is not necessary to dry icing products for a couple of days at room temperature.
5. The dried icing product becomes quite hard (Fig. 8).

Decorate the cake with icing
1. Draw the desired pattern on the tracing paper (Figure 9).

2. Draw the icing into the syringe (Figure 10).
3. Outline the drawing along the contour (Fig. 11).
4. Using a stick or match, continue to draw the pattern, as in Figure 12.
5. Let the pattern dry (1-2 days) (Figure 13).

6. Detach the icing from the tracing paper (Figure 14).
icing balls
To create icing balls you will need:
The icing is of a rather thick consistency;
- small balloons and threads for tying;
- a little olive oil;
- confectionery syringe with nozzle No. 1 or No. 2.
1. Here you need to think in advance about the place where you will hang the finished balls for the drying time.
2. Then inflate the balloons to the desired size and tie with long threads so that the length is sufficient for hanging them (Fig. 18).

3. Each ball should be lightly greased with olive oil, so that later it would be easier to remove them from the finished product (Fig. 19).
4. After that, take the ball by the tied tip and start drawing a pattern with icing with a pastry syringe, while scrolling the ball.
5. Hang the balls to dry for 24 hours (Figure 20).
6. When the icing is completely dry, take the balloon in your hands and carefully remove the balloon, for which its walls must first be separated. Otherwise, the icing ball may break (Figure 21-23).

Other icing decor options:

Photo used: dimasharif .com , madbaker .net , bowloforranges .org , beeinourbonnet .com , bakedbree .com
The mass is made from egg white with powdered sugar and lemon juice.Egg white - 1 pc.
Powdered sugar - 200 g
Lemon juice - 0.5-1 tsp
Beat the egg white, adding powdered sugar (it is recommended to sift the powder, and take the white cold). In the process of whipping, add lemon juice (then you may need a little more powder) or citric acid. Depending on the size of the powder egg, a different amount can also go - 200-250 g. I recommend taking a small egg, especially for the first time. We add the powder in portions, until stable peaks, the mass should be very thick, I would even say - cool;).
We put the icing in an envelope, a ziplock bag, i.e. with a clasp, then it is better to store; can be in a dense file.
We put the image of the future "masterpiece" in a file, which is lightly greased with sunflower oil. Lubricated with cotton wool, so that it was just a little greasy.
Squeeze out the cream, following the lines of the stencil. Too thin lines should not be done - everything will crumble in the first second.
If the stencil has already been outlined, but the mass is still there, it can be stored in the refrigerator for more than one day.
I think that it is easier to draw with cooled icing, it lies more evenly, more pliable.
The icing dries for 4 hours, it all depends on the ambient temperature.
Or like this:
How to prepare a drawing sugar-protein mass.
For cooking you will need:
fresh egg white - 1 pc.
powdered sugar until the desired density is obtained - about 250 g
lemon juice or dry citric acid on the tip of a knife - about 0.5 teaspoon
Cooking method:
The egg white is carefully separated from the yolk. Even traces of yolk are unacceptable.
Beat the protein with a fork until a light foam forms. The task of this procedure is not to beat the protein, but only enough to destroy its structure until it liquefies. Air bubbles in the finished icing mass are not needed.
Then we begin to gradually add powdered sugar to the protein in portions, each time thoroughly rubbing until smooth.
In the middle of cooking, add dry citric acid or almost at the very end - lemon juice. Add lemon juice towards the end of cooking, otherwise the finished products will turn out to be too fragile.
By the end of cooking, you can add the desired food coloring.
Adding powdered sugar in portions, grind and knead until a homogeneous stable viscous plastic mass of the desired consistency is formed.
Our icing is ready for making cornet jigging jewelry.
For jigging with a cornet, the mass is made more liquid, and for sculpting with hands, it is thicker, easily kneaded by fingers.
When sculpting with your hands, icing can be dusted with powdered sugar.
How to work with icing:
1. Draw future patterns on paper or print ready-made templates. It is very convenient to use children's coloring pages as templates.
2. Place a hand-drawn paper template under plastic wrap or place it in a plastic "file" (thin transparent document bag). It uses the property of polyethylene that it does not stick to anything. Products can stick “tightly” to tracing paper, parchment or waxed paper, especially if the icing mass is too liquid.
For better subsequent peeling off of icing products, a thin layer of olive oil is applied to the plastic film (it is non-drying, i.e. non-polymerizing). Sunflower oil is highly undesirable (!), because. upon contact with air, it polymerizes by combining with oxygen and hardens (like oil paint), therefore it can additionally glue the product, especially during long-term drying of large parts.
3. Freshly prepared protein drawing mass (icing) is placed in a cornet with a suitable nozzle or in a plastic bag with a cut corner (for example, in a document file). The mass should be prepared every time in the amount needed now for work. Storing the mass may cause undesirable changes in its plasticity, which will have to be corrected by adding either powdered sugar or a few drops of water and carefully grinding again.
The icing mass should not be too liquid - so that it does not blur and lose its shape during jigging, and not too thick - so that it is squeezed out of the cornet without undue effort and does not tear during jigging.
If you prepare a thicker icing mass, you can sculpt jewelry from it with your hands, like from plasticine. You should not sculpt too thick decorations, because. they take too long to dry.
4. Squeeze out the icing onto the plastic film along the pattern placed under it. If you have sufficient artistic skills, you can do without templates, freely drawing in mass according to your imagination.
When drawing, you can consistently use icings dyed with food coloring in different colors, which will allow you to get multi-colored decorations.
Aising can be deposited directly on the surface of a finished (baked and cooled) sufficiently dry confectionery product made from dough (gingerbread, including glazed, shortbread), as well as on chocolate and other things that can be stored outside the refrigerator.
In no case should icing be deposited on confectionery cream, on biscuit and on other wet surfaces, as well as on products for which storage is required only in the refrigerator. On such products, icing decorations are installed immediately before serving.
5. A film with a deposited pattern (or a decorated confectionery product) is left to dry at room temperature (but not higher than +40 ° C) for 1-2-3 days until the mass is completely dry.
Icing dries differently depending on the size of the part and the humidity in the room. 1-2 days of drying is enough for an ordinary small flower. Large parts can dry up to 5-6 days. To speed up drying, the products can be placed in a warm, dry place with a temperature not exceeding +40°C.
If you want to get a three-dimensional decoration, a film with a deposited pattern is placed for drying on some curved surface - for example, on the side surface of a cylindrical pan, in the spread of an open book, etc.
Properly prepared icing mass (not too liquid) does not flow down on inclined surfaces. If the deposited mass is liquidish, you should first let it dry a little to the desired thickening (but not to brittleness) in a horizontal position and only then place it on a curved surface.
To obtain openwork spherical products, the protein mass is applied to small inflated balloons lubricated with vegetable oil. After the icing has dried, the balloons are pierced and the deflated shells are carefully removed from the resulting decorations.
6. Dried icing jewelry is carefully removed from the substrate.
It is better to remove products from the substrate at the edge of the table, starting from the corner of the substrate, which is gently pulled down, bending the substrate over the edge of the table edge.
Since icing products are very fragile, they must be prepared with a certain margin in quantity.
Icing decorations can be glued together with egg white, loosened with powdered sugar, and then allowed to dry.
For the manufacture of large volumetric icing jewelry, individual parts are made for them according to the drawings, which, after complete drying, are glued into a single product.
uy046
Broken products are tasty on their own and can be successfully served with tea. It often happens that icing decorations are eaten by family members, especially children, much before they dry out. So a solid supply of prepared icing jewelry never hurts.
The resulting sweet edible lace is used to decorate various confectionery products. Ice jewelry can be stored in boxes for a long time at room temperature, provided there is no high humidity.
Ice jewelry should not be stored in the refrigerator, because. after being in the cold, they liquefy. Therefore, pre-prepared icing decorations are placed on cakes only immediately before serving.