How to make patterns on a cake. Cutting dough for pastries
Many do not even suspect that with the help of improvised materials you can decorate and decorate your pastries - pies, cakes - very beautifully and in an original way. We share this useful information with you.
How beautiful to arrange and decorate pies and cakes?!!!
one . Often a mesh (lattice) of dough is laid out on top of pies, thanks to which you can see a beautiful filling and at the same time prevent the filling from escaping from the pie. Laying out such a grid is not difficult, the main thing is to catch the meaning -

The dough must be divided into two parts (large and smaller), most roll out and lay out the base for the pie. The smaller part is also rolled out and cut into strips (you can use a special knife with a wavy cutting part), and then lay out the strips vertically at a distance from each other, then after one lift the strips to the middle (put them on top of each other). Lay one strip horizontally and cover with those strips that you raised, now lift the vertical strips again through one, but those that you didn’t touch the first time, lay out one horizontal strip again and cover with the raised vertical ones. In the same way, continue to lay out on the other side (on the second half). Secure the edges of the strip with the base of the dough.

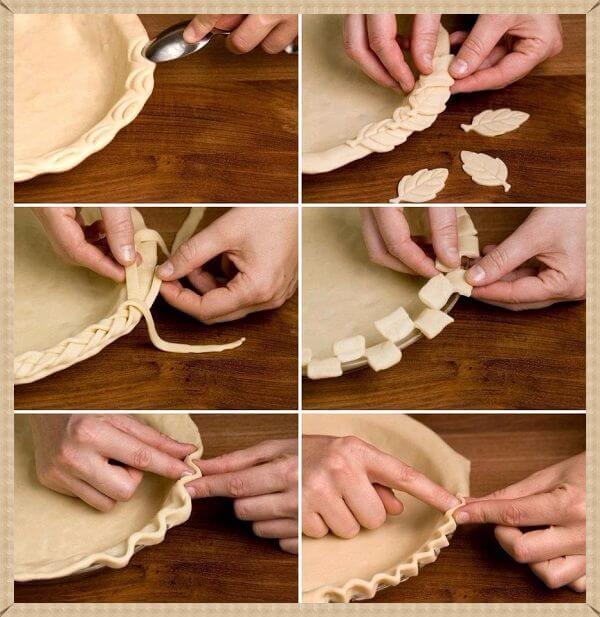
2. The edges of the base of the pie can be decorated in different ways - these can be various cut out figures laid out along the edges in the original sequence. You can also make various patterns with a spoon or fork, pressing down the edges of the dough with appliances.
The dough can be cut and wrapped to your choice in any direction. By pressing with your fingers, you can make wavy or triangular edges.


3 . With the help of cookie cutters or possibly carved figures, it is possible to lay out entire flower meadows, starry skies, etc. on your cake.

4 . Originally weave a braid from the dough and also place it along the edges of the pie, or cover the entire pie with it. To do this, roll out the dough evenly and cut into strips (the thinner the strips, the thinner the braid).

5 . Beautifully, also using two parts of the dough, lay out the first as a base, and cut out various figures on the rolled out second (stepping back from the edges) and cover the pie filling with it. Fasten the edges accordingly.

6. And in the end, we want to add that after complete registration, the dough must be smeared with egg, whipped whisk, yolk. Thanks to this, the color of the cake during baking will be a beautiful golden color. A slightly noticeable crispy crust is also formed.
Have fun experimenting in your kitchen!
It is known that they are greeted by clothes. So why not experiment with clothes for your homemade pies?
With the help of jewelry, you can give an attractive personality to each product.
The main thing is that the decorations should be spectacular, but their production is not too laborious and does not distract unnecessary forces from ensuring the high culinary qualities of the created culinary products.

The cake can be made curly edges.
You can weave a pigtail around the rim. 
You can cut flowers or other figures from a layer of dough and decorate the cake with a composition of them. 
For half-open pies, you can cut out frequent round or figured holes in the upper layer of the dough to make a lacy “colander” through which the filling will look appetizingly. 
To cover the pie, you can cut strips from the dough layer and make a braid out of them.
If desired, before weaving, the dough strips can be twisted along the axis to make beautiful spirals. Decorating the edges of the pie  Fork edge
Trim the edges of the dough flush with the edge of the pie pan. Press the dough against the edge of the pan with a four-pronged fork.
Walk all over the curb.  grooved edge
Place the index finger of one hand on the outside of the curb. Gently grab it with the index finger and thumb of the other hand - you will get a frill.
Repeat the same around the entire edge.
There should be 5 mm between each frill.  Sharp grooved edge
Place the index finger of one hand on the inside of the curb. Grasp it tightly with the index and thumb of the other hand - you will get a groove.
Repeat the same around the edge of the pie.
There should be 5 mm between the grooves.  "Twisted Rope"
Place your thumb at an angle to the edge of the dough. Then grab the dough between your thumb and forefinger knuckle. Place your thumb in the groove left by your index finger. Pinch.
Repeat the same steps around the entire pie.  leaf border
Prepare the dough for the closed pie. Roll out a large ball of dough into a layer and place it in a mold. Trim the dough flush with the edge of the mold.
Roll out the second ball into a layer to a thickness of 2 mm.
Cut the leaves out of this dough with a knife. With the blunt side of the knife, push the "veins" on the leaves.
Lightly brush the edges of the dough with water. Press the leaves to the edge of the dough. The nuances of simple decorations of the edges of the pie 
We lay out a pigtail woven from strips of dough along the edge of the pie, moistened with water or a loose egg, or yolk.
If there is a special roller cutter for dough, the strips can be cut with curly edges.
NOTE.
Dough braids cut out from a thin layer of dough with stripes and various figures can decorate the entire upper surface of closed pies (see below).
To obtain a color of the decorating overlays that is different from the color of the base (lighter), protein dough can be used for the overlays.Protein dough for baking decorations
(during baking, it almost does not brown and after baking it will be lighter than the base dough):
Compound:
3.5 cups (500 grams) whole wheat flour
1 cup (250 grams) fresh egg whites
(i.e. the ratio of flour and protein by volume is 3.5:1, by weight - 2:1)
Preparation of protein dough
Pass the flour through a sieve into the mixing bowl and add the whites there.
Turn on mixer at low speed until dough is elastic.
Then we wrap the dough in a p / film so that it does not dry out if it does not immediately go to work.
To store this dough or decorations from it for several hours, place the dough (decorations) wrapped in a film in the refrigerator.
From this plastic dough, you can cut or mold various decorations for pies and holiday loaves.
For more information about protein dough and modeling decorations, see page Holiday loaves.
NOTE.
Because protein dough is almost white, coloring it with various food colors or lubricating decorations from it with yolk (see below) or water with food coloring, you can make especially bright multi-colored decorations for baking. 
We cut the edge of the pie with scissors and bend it in and out in a checkerboard pattern. 
With your fingers, make a zigzag edge with sharp tips.
By pressing with your fingers, you can make a wavy edge with rounded edges. 
Decorating the edge of the pie by pressing with a spoon.
By pressing with a fork along the edge of the cake, you can make a corrugated surface. With pressure, the tines of the fork can be held in the direction of the radii or at an angle, or rotated left and right for a herringbone pattern. 
Edge decoration with false leaves or other figures.
We cut out the leaves with the help of a mold and lay them out along the edge of the pie, moistened with water or a loose egg, or an egg loose with 1 tbsp. l. milk, or yolk.
Lubrication of the surface with an egg or yolk allows you to get different shades of the base and leaves after baking.
Also, to obtain "colorfulness", you can lubricate the base with water, and the overhead leaves with an egg or yolk.
NOTE.
Adding 1/4 to 1 incomplete teaspoon of sugar to a broken egg or yolk for greasing pastries (stir until dissolved) allows you to get a particularly beautiful bright color of the fried surface.
The more sugar dissolved, the brighter the color after baking (due to caramelization of sugar), but there should be no undissolved crystals in the mixture. If the sugar is not completely dissolved, you can add a little water or milk and mix thoroughly. Multi-colored decoration of the edge of the cake
"Autumn leaves" 
Using a cookie cutter, cut out leaves from a thin layer of dough. 
Put the yolk and drops of various food colorings on a plate.
Mix the yolk with food coloring. 
With a brush, apply a mixture of yolk and dyes to the leaves.
We spread the colored leaves along the edge of the pie moistened with water.
"Pigtail" - a way to cut a beautiful pie  Puff "Fried fish"
Ingredients:
yeast-free puff pastry (unleavened puff), rolled into square layers - 3 layers
egg yolk for lubrication - 1 pc.
sesame - 1 tsp
black peppercorns (for the "eye") - 3 pcs.
For filling:
hard cheese, cut into slices - 3 slices.
minced meat (pork beef) - 200 g
onion - 1 pc.
dried apricots - 1-2 pcs.
pitted prunes - 3-4 pcs.
breadcrumbs - 2-3 tbsp. l.
ground black pepper - to taste
salt - to taste
loose egg for deboning the filling - 1 pc.
NOTE. For detailed recipes for various doughs, see the HOME PASTRY SCHOOL section.
Cooking  Add finely chopped onions, dried apricots, prunes, salt, pepper to taste and mix well until a plastic mass is obtained.
  If the finished puff pastry is frozen, defrost it, then roll it into frame layers 4-5 mm thick and cut it, as shown in the photo.
  We form a cutlet from minced meat, roll it abundantly in a loose egg, then in breadcrumbs.
We put cheese on the dough, put a cutlet on it and braid the strips of dough with a “pigtail”, as shown in the photo.  Lubricate the "fish" with yolk, sprinkle with sesame seeds and insert the "eye" from peppercorns. Bake in the oven at 180-200 gr. From about 30-40 minutes until ready (until the dough is golden brown).
See the instructions for baking puff pastry products on the packaging of the purchased ready-made puff pastry or on the unleavened puff pastry page if you are making the dough yourself.
Serve pies hot or cold. Pie "Salmon with spinach in puff pastry"  Ingredients:
salmon (or trout) fillet - 600 g (4 pieces, 150 g each)
spinach (fresh or frozen) - 300-400 g
puff pastry - 4 rectangular layers or 2 square ones
salt to taste
for serving the pie: slices of lime and lemon Preparation Cut the salmon fillet into portions of 150 g each, rub them with salt and set aside.
Boil spinach in salted water for 3-4 minutes. Drain the water and squeeze the spinach.
Roll out puff pastry to a thickness of 2-3 mm.
We put the fish in the middle of the dough layer, distribute the boiled spinach on top.
Then, to the left and right of the filling, cut the dough into oblique strips (see photo in the previous recipe).
On each side you should get 4-7 strips.
Then we twist the strips with a pigtail, closing the cake from above.
We bake in the oven at a temperature of 190-200 gr. With about 20-25 minutes.
Serve hot.
NOTE.
If you chop the boiled spinach with a blender and add a little heavy cream to this paste, the filling will become more tender and tastier. 

Decorating the pie with cuts on the top layer of dough, followed by stretching the layer
and decorative test overlays: 
Lean fish pie
"Crocodile"
Recipe of St. Danilov stauropegial monastery, Moscow 
In Russia, pies have been baked since time immemorial. As early as 1193, there is a mention of "pirozi", but the kulebyaki appeared much later - only in the 17th century.
Kulebyaka differs from a pie in a large amount of filling. If the fillings are less than the dough, this is a pie, and if the fillings are more than half of the total weight, then this is a kulebyaka.
In a traditional kulebyak, there is a little more filling than dough, so it is given an oblong elongated shape so that the filling bakes well.
The dough for kulebyaki is made steeper, able to hold a high layer of filling. Such a dough requires special efforts - it had to be thoroughly kneaded, rubbed, kneaded - as they used to say, "kulebyachit". Perhaps that's where the name comes from.
The tough dough retains its shape well during baking, and therefore the kulebyaks were often given a different shape, depending on the type of filling.
Special attention was paid to kulebyaks in Russian monasteries, which always had a wide variety of products. Ingredients:
For lean yeast dough:
- 250 ml of water
- 600 g flour
- 1.5 teaspoons dry yeast
- 1 tbsp. spoonful of potato starch
- 4 tablespoons of olive oil
- 2 tablespoons of sugar
- 1 teaspoon of salt.
For the lean filling:
- 600 g fish fillet
- 0.5 cup rice
- 2 boiled potatoes in their skins (or 1 boiled potato and 1 avocado)
- 1 onion
- a bunch of green onions
- 50 g olive oil
- salt PREPARATION of lean fish pies according to the recipe of St. Danilov Monastery: After mixing all the ingredients, knead the yeast dough steeper than for pies.
Cover the container with the dough with a lid or film and leave warm until doubled in volume.
Then punch down the risen dough well and let it rise again.
For the filling, put the fish in a small amount of water and chop finely.
Boil rice until tender. Boil the potatoes in their skins, peel and cut into cubes.
Sauté onions in olive oil until translucent, add finely chopped green onions and fry for another 2-3 minutes, add fish, rice and potatoes.
Salt, stir and let cool completely.
NOTE. As the monks said, they often replace half of the potatoes with raw diced avocados - this makes it tastier. If the avocado is not very ripe, the monks sprinkle it with flour and leave it to ripen at room temperature for 2-4 days. The flesh of a ripe avocado is tender, like butter.
Roll out the risen dough into a rectangular layer, leaving a little dough for decoration.
Put the filling in the middle and lightly compact with your hands.
On the right and left, cut the dough into strips 3-4 cm wide, and then fold the overlap with a pigtail, as shown in the photo. 
From the top, fold the head of the "crocodile", and twist the bottom into a tail. From the left dough make eyebrows, eyes and paws. Cutting the dough with scissors, make teeth and bumps on the skin. 
Brush the pie with olive oil. For a more appetizing browning of the crust, add a pinch of powdered sugar to the butter - the toasted sugar will give the pie the desired color. 
Bake at 180-190 gr. From to a beautiful golden color.
After baking, cover the kulebyaka with a double-folded cotton towel and let cool for 10 minutes.
Serve hot. Already on the table, cut the kulebyaka into portioned slices as needed so that it does not cool too quickly. 
Making monastic bread pastries for dinner: 
Monastery interiors

For wonderful Lenten monastic recipes, see page DISHES OF RUSSIAN MONASTERIES
Kulebyaka "Red-faced pig"  Ingredients:
0.5 kg yeast dough
1/2 small cabbage
2 eggs
300 g minced meat
4 champignons
vegetable oil
salt, pepper to taste
NOTE. You can take a different dough to taste - for detailed recipes for different dough, see the HOME PASTRY SCHOOL section.
See HERE and HERE for recipes for various toppings.
From the history
The difference between pie and pie is the ratio of filling and dough. In kulebyak, there are more fillings by weight than dough, and in pies, fillings are less than half of the total weight (more dough).
Kulebyaka is a traditional Russian dish, one of the types of a closed pie with a complex filling. It is distinguished by a magnificent oval convex shape, similar to a loaf.
Kulebyaka is a versatile dish. Depending on the type of dough and filling, it can be served both as an appetizer, and as a main course, and as an addition to it (for example, instead of bread for soup or stew).
The filling in kulebyak usually consists of several types of minced meat, laid in series and separated from each other by thin, usually unleavened pancakes to prevent mixing. Thus, with a vertical cut, each portion of the kulebyaki contains all types of filling.
Vladimir Gilyarovsky, a journalist and well-known researcher of Moscow city life in the late 19th and early 20th centuries, mentions a huge 12-tier kulebyak with different types of minced meat, which was served at the Merchants' Club.
Those wishing to taste this culinary miracle had to order it a day in advance. Cooking  We cut the mushrooms into cubes and fry together with the onion in a pan with oil until lightly browned.
Finely chopped cabbage and minced meat are fried in oil separately.
Boil eggs and cut into cubes.  Mix all toppings, salt and pepper.
We separate 3 small pieces from the dough to decorate the pie (for the patch, for the tail and a piece for the ears, which we will divide in half).  Roll out the rest of the dough into a circle and spread the filling on it.
We pinch the seam carefully.
We got the body of the "pig".
Lay it seam side down on a greased baking sheet.  From the first piece of dough we make a sausage-tail, from the second - a flat cake, and from the third piece - a flat cake, which we cut in half and form 2 ears.
We fasten the decorations to the “pig”, insert the raisin eyes.
We pierce the kulebyaka in several places with a fork, let it stand for 12-15 minutes and bake in the oven at a temperature of 180-190 gr. With about 40-50 minutes.
Serve the kulebyaka on the table hot, hot, hot! 
Making pies and rolls according to the principle:
“We put the oiled layers in a pile, make cuts and, according to our imagination, turn, twist, twist”
Some of the methods below were developed by Valentina Zurkan. 

Kefir dough ingredients:
250 ml kefir
250 g milk
25 g fresh yeast (or 1 tsp dry)
125 g melted butter
2 eggs
6 art. spoons of sugar
1 st. a spoonful of vegetable oil
1 teaspoon salt
about 1.3 kg of flour (until a plastic dough is obtained) Preparation of the dough Let the yeast rise in 0.5 cups of water with the addition of a small amount of flour and sugar.
Then pour into a warm mixture of milk and kefir, add everything else (add fats last).
Put in heat for 1 hour.
After the second rise, you can cut.
The temperature in the oven for baking products is 180 gr. C. Example of cutting 1 


Cut example 2

Cut example 3 
Lubricate 4 dough cakes with vegetable or melted butter, sprinkle the layers with sugar or a mixture to taste (in this case, a mixture of 2 tablespoons of cocoa with 4 tablespoons of sugar), stack and cut, as shown in the photo. 
Make additional cuts between the cuts (as shown in the photo).
Press with a stick, as shown in the photo. 
Correct the turns with your hands. 
Ready bun.
Cross-sectional bun. Example of cutting 4 
Almost from the center we make radial cuts to the edge, between them we make additional radial cuts without reaching the edge and through them we turn out the folded layers. 
We press with chopsticks, as shown in the photo, for additional deployment of layers. 
Cut example 5
Lubricate 4 identical dough cakes with vegetable or melted butter (you don’t need to grease and sprinkle the upper surface) and, sprinkling with sugar and poppy seeds, stack them on a sheet of cooking paper, cut into 8 sectors almost from the center to the edge of the cakes.
In each sector, we make a radial incision, turn it through it (like brushwood) and fold it with a flower, as shown in the photo. 
Cut example 6

Design option
Making small buns.
Ingredients for dough for 2 "flowers":
about 5 cups flour (until the dough has a plastic consistency)
1 sachet of yeast
1 glass of milk
200 g softened butter
2 eggs
0.5 cup sugar
2 sachets of vanilla sugar. Knead the dough and refrigerate overnight (or at least 3 hours).
The dough will rise in the refrigerator.
The dough from the refrigerator is very easy to work with.
Roll out the dough into a rectangle, grease with vegetable oil, sprinkle with poppy seeds and sugar, roll up, pinch, fold into a ring.
Make cuts with a knife and turn through them like brushwood.
Fold according to the principle of "grandmother's napkin": 2 outside, 1 inside and press with a rolling pin between the cuts - both on those inside and on those outside, so that the layers turn out a little.
Then put it in order: press on 2 and leave it outside, put the 3rd in the middle of the ring and also press, etc. 
Design option (we leave everything outside the ring). Example of cutting 7 - small curly buns 

Before baking, brush the buns with a beaten egg and sugar. Example of cutting 8 

Cut example 9

Cut example 10

Cut example 11


Cut example 12


Cut example 13


Cut example 14 


Cutting example 15 


Cut example 16


Cut example 17


Cut example 18


Cut example 19


Sweet dough with condensed milk
(see below for examples of cutting sweet pies 20 and 21)
Ingredients for sweet dough (for 3 pies):
300 ml hot water (boiling water)
100-150 g condensed milk
500 ml yogurt 1.5% or non-acidic kefir (straight from the refrigerator)
2 tbsp. l. Sahara
1 tsp salt
2 eggs
7 g dry yeast
about 1250 g flour (until a plastic dough consistency is obtained)
NOTE. For the examples of cutting 20 and 21 below, you can take another dough to taste - for detailed recipes for different dough, see the HOME PASTRY SCHOOL section.
See HERE and HERE for recipes for various toppings.
Pour boiling water into the condensed milk, stir until smooth and let cool to a warm temperature.
Pour cold yogurt (or kefir), stir, then add sugar, eggs, salt, yeast.
We mix everything thoroughly.
Add flour to the mixture in portions and knead the dough.
At the end of the batch, pour in 2 tbsp. vegetable oil and mix well again.
Roll the dough into a ball, place in a plastic bag and put in the refrigerator.
After 3.5 hours the dough will rise.
We do not grease cut pies with an egg, because. There is a lot of sugar in the dough and it will brown well when baking.
We bake at a temperature of 180-200 gr. From about 25 minutes.
Hot pastries can be smeared on top with hot sugar syrup.
Syrup for greasing sweet pies: 3 full tbsp. l. sugar and 6 tbsp. l. water (or strong tea leaves) while stirring, bring to a boil.
Slightly cooled syrup can be flavored with 1 teaspoon of good cognac or rum.
For lubrication, you can use warmed clear syrup from cherry or other jam.
Syrup for lubrication from Cahors: 3 full tbsp. l. sugar and 6 tbsp. l. Heat Cahors to a boil and boil for 20-40 seconds (but not more than 1 minute).
Grease sweet pies immediately after removing from the oven with hot syrup. Example of cutting 20 (from sweet dough) 


Sample cut 21 (from sweet dough) 


We also cut and twist, but not a stack of layers of dough, but dough rolled into a roll 

NOTE. The essence of cutting is clear from the photo, the dough and the filling of the roll are chosen to taste.
In this case, after twisting the cut halves of the roll, the pigtail is connected into a ring.
You can grease the pie before baking with yolk or yolk, loosened with 1 tbsp. a spoonful of milk or cream, or sour cream.
The addition of 1/4-1/2 teaspoon of sugar to the grease allows you to get a more saturated color of the baked product. A wreath of puff pastry rolled into a roll
with boiled condensed milk and nuts  Ingredients
ready-made puff pastry yeast - 500 g
1/2 can boiled condensed milk
200 g walnuts
1 fresh egg  Grind the nuts in a blender Roll out the dough into a rectangular layer 8 mm thick
  We spread the rolled layer with boiled condensed milk. Put a layer of ground nuts on top.
  We roll into a roll.
Cut the roll lengthwise, leaving uncut a small tip 3-4 cm long.

We twist the halves of the roll together, fold it into a ring, carefully pinch the seam, put it on a greased baking sheet and grease the wreath with a beaten egg.

We place in a preheated to 150-160 gr. From the oven for 30-40 minutes. Serve hot or cold.

Serve hot or cold.
Based on the techniques above for cutting buns, pies and pies, you can invent many different ways to decorate your homemade products. Spectacular apple tart
Decoration, it's easier not to think of  Ingredients
1 pack of ready-made puff pastry
4 large apples
1 cup brown sugar (regular sugar can be used; some of the sugar can be replaced with honey)
1/2 teaspoon cinnamon (this is to taste, as not everyone likes cinnamon) or a little finely grated citrus zest
1/4 teaspoon salt
juice of 1/2 lemon Preparation We take out the puff pastry from the freezer and let it stand at room temperature for about 10 minutes.
Preheat the oven to 200 gr. WITH.
Lightly dust the dough with flour and roll out into long rectangles 8 mm thick.
Lubricate a baking sheet with vegetable oil and spread the rolled out dough on it.
Wash apples and cut into thin slices. Sprinkle lightly with lemon juice to keep them from browning.
Mix sugar, cinnamon, salt and lemon juice, add apple slices there and mix well.
Beautifully lay out the apple slices on the dough.
Bake for about 20 minutes (until the dough acquires a beautiful ruddy shade and increases in volume).
After baking, immediately remove the tart from the pan.
Serve sprinkled with powdered sugar.
You can add whipped cream on top.
Snack cake from curlicue buns  Ingredients:
250 g ready-made yeast puff pastry
200 g soft feta (or cheese),
1 egg
1 egg yolk for greasing the pie
2 tablespoons heavy sour cream or cream for topping
fresh herbs (dill, parsley, tarragon, cilantro)
2 garlic cloves
2 tablespoons butter
1 tablespoon cream or sour cream for brushing the pie
salt, pepper, dry marjoram
Finely chop the greens.
Pass the garlic through a press.
Feta (or cheese) knead with a fork.
Mix everything and add marjoram and ground pepper.
Beat the egg and, gently mixing, add to the filling along with sour cream (or cream).
The filling is ready.
Roll out the defrosted dough into a 3 mm thick layer.
Spread the filling evenly over the dough.
We roll up the layer of dough with the filling into a tight roll.
Cut the roll across into 9 pieces.
Grease a round baking dish (diameter 20-23 cm) with butter.
We lay out the pieces of the roll vertically, like hemp, and not too close to each other, so that the dough has room to expand when baking.
We put one piece of the roll in the middle, and lay out 8 pieces around it.
Beat the yolk with a fork with a small amount (1 tablespoon each) of butter and cream.
Brush the surface of the pie with the egg mixture.
We bake at a temperature of 170-180 gr. From about 35 minutes.
The pie is served hot.
We serve drinks to the pie according to taste and availability. Easy to prepare
sweet cake "Festive wreath"
for a cozy home family feast 
Cooking  yeast dough ingredients
1 egg
0.5 cup milk
50 g butter
0.5 teaspoon salt
2 tablespoons of sugar
10 g dry yeast or 30 g fresh
vanilla sugar
350-400 g of wheat flour - until the plastic consistency of the dough  We heat the milk to 36-38 gr. WITH.
We breed yeast in it. Melt the butter in a water bath.  Grind the egg with sugar, salt and vanilla sugar. Add butter to the pounded egg.
  Then we add milk with yeast and flour to the mixture. Gradually adding flour and stirring, we close the dough.
The dough should not be tight - it should be soft and elastic and at the same time not stick to your hands.
Cover the dough with a towel and leave to rise in a warm place.
With good yeast, you can continue working with the dough after 30-40 minutes.
For now, let's get on with the filling.  Filling Ingredients
200 g dried apricots
200 g raisins
2 large apples
200 g nuts
50 g cognac  You can take any nuts: walnuts, almonds, hazelnuts, pistachios. Perfect for peanuts too.
In this case, walnuts are taken.
We clean the nuts, fry in a dry frying pan and lightly chop in a blender.
If we use pistachios, then they do not need to be fried, because. they have already been fried before being sold.  In this case, we use raisins and dried apricots for the filling.
Instead of dried apricots, you can take prunes.
Wash raisins and dried apricots thoroughly and scald with boiling water.
Cut dried apricots into strips.  Finely chop the apples. Add good cognac or rum and mix.
Let the filling infuse for 5-10 minutes.
For now, back to the test.  Roll out the dough thinly and sprinkle with nuts.
Of course, you could immediately add nuts to the fruit in the filling.  On top of the nuts we lay out the already infused fruit filling. Roll the dough layer with the filling laid out on it into a roll.
From the roll we form a ring.
You can cut the edges of the roll a little so that they fit together more evenly, and form one or two buns from the scraps (so that the dough does not disappear) and bake them together with the pie as a gift to the chef.  We cover the formed ring with a napkin and let it stand in a warm place for another 20 minutes, so that the dough comes up again.
After proofing, with a very sharp knife (so as not to crush the dough), carefully cut the outer edge of the ring, as shown in the photo.
Leave the inner edge of the ring uncut.  We carefully unfold each resulting piece around the radial line by 45-60 degrees, as shown in the photo.
Lubricate the pie with a beaten egg or yolk and place in a preheated oven.
We bake for about 30 minutes at a temperature of 210-220 gr. WITH.  While our wreath is baking, let's prepare the icing.
To do this, mix the juice of one lemon with 50 grams of powdered sugar. The ratio is approximate, because The glaze should be of a consistency that can be spread on the cake, but not too runny or it will dry out and run off in sticky streams.
It is useful to add to the glaze and 1 teaspoon of cognac.
For details on the preparation of sugar fondants, gluzury and syrups, see page Sugar blanks.  When our "wreath" is browned enough, take it out of the oven and pour hot glaze over it. Then let the cake cool, and the glaze dry and harden.
DECORATION OPTION. You can not cover the "wreath" with glaze, but let it cool under a towel folded in half, then sprinkle with powdered sugar through a strainer.
Making kundums and pies
in the form of an envelope  Cut the rolled dough into squares, put the filling in the middle, raise the corners and pinch the edges beautifully.
This is how Kundums and various types of Pies and pies are decorated. Delicious puffs with cottage cheese and cheese  Ingredients:
ready-made puff yeast-free dough (unleavened puff) - 500 g
cottage cheese - 250 g
cheese - 250 g (by availability - cheese, feta, suluguni, Adyghe, hard, homemade, etc.)
eggs - 1 beaten egg for greasing
salt Preparation Defrost the puff pastry, roll it out to a thickness of 4 mm and cut it into 8 identical squares.
Preheat the oven to 180 gr. WITH.
Grate the cheese on a coarse grater.
In a bowl, mix cottage cheese, cheese, egg and salt (salt to taste, depending on the salinity of the cheese). If the cottage cheese is sour, you can add 1/2 teaspoon of sugar.
If we mix with a mixer, we interfere for a short time so that the mass does not become liquid.
Spread the filling on the prepared squares.
We wrap the squares with envelopes, as shown in the photo, pinch the edges well.

Line a baking sheet with parchment paper or grease with oil.
We shift the puffs on a baking sheet, grease with a beaten egg. Or you can grease with yolk, or yolk, loosened with a tablespoon of milk. You can not lubricate at all, but the products will be less beautiful. When lubricating, make sure that the egg does not fall on the side edges of the dough, otherwise it will not rise well during baking.
After greasing with an egg, you can sprinkle with sesame seeds (this is to taste).
Place in the oven for approximately 35-40 minutes.
Cool the finished puffs a little (5-10 minutes) under a towel folded in half and serve warm.  Ingredients:
packaging of ready-made puff pastry
300-400 g chicken fillet
1 carrot
2-3 bulbs
1 st. a spoonful of apple cider vinegar
spices for chicken - to taste
salt and pepper - to taste Preparation Prepare the filling: cut the chicken fillet into cubes, finely chop the onion, grate the carrots and mix everything with spices, salt, pepper and apple cider vinegar.
We roll out the puff pastry until we get a long rectangular strip 4-5 mm thick, which we then cut into 8 squares.
Put the filling on the dough squares and pinch in the form of an envelope.
Put the finished envelopes on a greased frying pan or baking sheet and bake in the oven at a temperature of 180 gr. WITH.
After 25-30 minutes, the pies are ready.
Serve hot or cold. Puff pastries  Ingredients:
500 g ready-made puff pastry
200 g processed cheese (Yantar type)
1 fresh egg
200 g sausage, ham or boiled pork (or a mixture of boiled sausage and ham 1:1)
3-4 green onions
0.5 teaspoon ground red pepper
2 tbsp. spoons of white sesame seeds Mix the cheese with raw yolk (save the protein for lubrication).
We cut the sausage with ham into small cubes, finely chop the onion, mix everything with the cheese mass and add pepper.
The filling is ready.
Roll out the dough to a thickness of 5 mm, cut into squares 10x10 cm or small rectangles 10x12 cm.
We lay out the filling on each square, grease the edges with slightly whipped protein, fold either diagonally or in half and gently stick together.
Press the edges of the pies with a fork to make them ribbed.
We spread the pies on a baking sheet, lightly sprinkled with flour, grease with protein, sprinkle with sesame seeds and bake at 180 gr. From about 20 minutes to browning. Shaped pastries "Sunflowers" 
The dough can be customized according to your taste. For example, you can take "Khrushchev" dough or something else - see HOME PASTRY SCHOOL.
The filling can also be any. In this example, the filling is apples, sugar, cinnamon and plum pieces.
Always keep in mind that not everyone loves cinnamon.
After cutting, the pie is smeared with yolk, loosened with 1 tbsp. a spoonful of milk and 1/2 teaspoon of sugar. Sugar caramelizes when toasted and gives a beautiful color. 

Decoration of the pie with curly pastry overlays

Cut out figures from thinly rolled dough, roll up flagella, etc., lightly grease the contact surfaces of the dough with water, put decorations on the cake. After proofing, brush the pie with the beaten egg and bake.
Before serving, the cake can be decorated with apple slices.  The pie can be closed with a mesh of dough bands or strips with decorations placed on it.
TIP: if you want to make the cake brighter and more ruddy, add a little sugar to the egg or yolk to grease the cake (about 1/2 full teaspoon for 1 egg or 2 yolks) and stir until the grains are completely dissolved.
Caramelizing sugar during baking will give the surface a beautiful bright color.
If the product is lubricated somewhere with a smaller mixture, and somewhere more, after baking we get bright colors.
For example, a congratulatory inscription can be made on the cake with a sugar-yolk mixture.
Suitable food coloring can also be added to the lubrication mixture.  Pie with potatoes and cheese.
A pie with cabbage.  Pie with mushrooms and potatoes.
Pie with meat.  Pie with fish.
Pie with apples.  Cottage cheese pie.
“Appetizing” is far from the only characteristic that is required from a culinary test. In addition to flavor details, many dishes need a spectacular presentation. The pie just belongs to the list of pastries, unthinkable without elegant design. If earlier simple additions were made using finger clamps, then modern versions have a wider range. Now every housewife can provide a hearty filling with a truly beautiful and equally edible hat.
How to decorate an open yeast cake
In this case, the dough must be used the same as for the entire base: dense, fairly tight and elastic. High-quality modeling should look appropriate and at the same time not completely cover the inside. Therefore, it is best to use the "mesh" method, leaving free areas. To do this, cut strips (the number depends on the width of each piece and the overall size of the cake) and carefully lay out a horizontal row first, and then overlap it with a vertical row.
Instead of classic lines, try something unusual - corrugated leaves or waves. To do this, it is worth correcting the sides of the dough, leaving notches on them. The tips that rest against the sides must be hidden under a solid scythe. Weaving it is easy: use the remaining strips (2-3 will be enough) and follow the same technique as when creating a typical girl's hairstyle. By correctly calculating the length of the impromptu frame, you will be able to easily decorate the top.

A mesh for a pie can also be made using a dough roller. To do this, it is enough to roll out the dough and roll over it with a roller. It turns out a very neat pattern in the form of a mesh for a pie. With this roller, you can also make different puffs with filling.

If you don’t have a dough roller, don’t worry, you can try to make a mesh with round holes in the form of a honeycomb using a round stamp.

How to decorate a closed cake
When the main surprise is hidden from view, it remains to intrigue only with dough figures. One of the easiest ways is to place miniature roses along the edges. Pre-roll the thin dough and cut it into strips of 3x15 cm. Without haste, roll each blank into a roll and squeeze on one side so that it is convenient to cling to the pie. Such buds can be placed anywhere, even recreate a whole bouquet in the center of the composition. Don't forget the previously mentioned test foliage.

If volumetric solutions are not for you, limit yourself to flat paintings. An ordinary knife (or special molds that are used for cookies) can recreate any idea. It is only important to avoid uneven “seams” and gradually consider the actions, because it will be problematic to fix something or move it - the sticky structure will begin to tear and reach for each other.

Drawing on the dough can be applied using embossed rolling pins, which are now on sale. Such interesting patterns will make the cake a real work of art.

How to decorate up a pie
When trying to transfer some kind of abstraction to the surface of the cake, remember that it is not at all necessary to focus on a particular style. Try to use several approaches at the same time, alternately interfering with the curly decor with other additives. For example, the image of grapes includes flattened fragments (stem and leaves) paired with mini-spheres (grapes made from dough in the form of balls).

Such diversity noticeably enlivens banal schemes. Moreover, it is appropriate to provide any picture from the dough with other tasty inserts: chocolate powder, powdered sugar, poppy seeds, chopped nuts. Do not write off all kinds of creams - in contrast to the ruddy crust, they will also come in handy. If the filling is planned to be sweet, you can intentionally leave small holes. Against the background of a continuous coating of dough, windows in the shape of a heart, circles or rhombus will look very simple and original at the same time.
How to decorate the edges of a pie
The edges of the cake can be decorated with various elements, for example: you can weave a pigtail, cut out different leaves or flowers. The cake will look beautiful if you cut the edges of the cake with scissors and bend them in different directions in a checkerboard pattern.
But, omitting any molding, a stylish frame is also achieved by ordinary cutlery. A spoon or fork is a great substitute for an edge clip. Covering the slots in the dough, they leave a discreet imprint in parallel. Depending on the strength or angle of inclination, these drawings can be modified at your own discretion.
Try to create a wavy border with your fingers - you can do without any kitchen tools at all. Fantasy with the rest of the dough, cooperate with a small pattern from only one side.
Such an alternative to solid decoration has the right to life. And the impression of “torn” ends is achieved thanks to scissors. Snip off the loose pieces of the cake at a distance of 1-2 cm from the borders. When feigned negligence seems unsympathetic to you, you always have time to tweak the raw workpiece a little or hide the error under a new layer.

How to decorate a fruit pie
When decorating a pie with fruit, you can use the tips: Also, a universal way out will be to spread slices of canned or fresh fruit along the baking surface. The only thing to consider is the compatibility of such a design with the general recipe, otherwise the sweet top will be superfluous. So that a juicy mosaic of pieces does not spoil the color or the entire structure of the cake with its juices, first make a jelly lining. Then take on the drawing, trying, if possible, to diversify it with shades or an unusual presentation: as in the case of modeling dough, here you need to have a sense of taste. Try to achieve 100% compatibility with every detail of the pie. Fruits should not be grouped separately, but should interact beautifully with dough frills. Therefore, do not be afraid to place them side by side: sometimes after the oven, such neighbors are in perfect harmony with each other.

Little tricks
Hostesses are used to sharing cooking secrets and often suggest quite practical ways to their colleagues in the kitchen. The following recommendations will surely help you out during the time-consuming and exciting grinding of the cake:
- sometimes it is worth moistening dough crafts with water so that they are stronger and do not fall off during baking;
- watch the width of the figures used: excessively thick sections run the risk of remaining raw, and too thin - to burn;
- by smearing the final version of the decorations with egg yolk, you can achieve a perfectly golden crust and guarantee a uniform “tan” for the entire pie;
- do not get carried away with inserts: the final taste can be drowned out by an abundance of dough;
- in some cases, we advise you to prepare the parts on a separate baking sheet, and then spread them on the cake (if you want to use different dough).
- Feel free to repeat culinary master classes from the Internet. Then each cake will be accompanied by a mass of generous reviews, compliments and requests for more!

I want to cook something special for the holidays. And offer a new reading of already known and beloved dishes. So it's time to check out some new culinary design ideas!
Our today's review is devoted to the creative cutting of dough - from the simplest to real masterpieces of flour production.
We put ideas in a piggy bank!
Buns from strips and layers of dough without filling
From the "sausages" of yeast dough, you can make beautiful buns. To prevent the strips from sticking together, the sausage must first be greased with an egg. And then wrap it with an ornate line according to the pattern you like.


From a small rolled strip, you can make a flower bun, a bow bun, a leaf bun.


For children, we definitely make pastries in the form of animals.


From a layer of puff pastry, you can make a stylish bun with a large bow.

Roll based baking
Original spikelets, buns and bread can be made on the basis of rolls. Here, various schemes for cutting dough with scissors are used.
We perform the spikelet as follows: sprinkle the “sausage” from the dough with poppy seeds. Then we make cuts in the roll at an angle of 45 degrees, and lay them out with a “pigtail”.

Similarly, we perform spikelets stuffed with poppy seeds or cinnamon with sugar.


You can make a ruddy wreath from a roll with sugar and cinnamon.

If you cut the roll into pieces and spread on a baking sheet, you can make cinnamon buns. When ready, fill the buns with chocolate icing, concentrated syrup, nuts with sugar or other delicious decoration.


Decorating the edge of the pie
Open pies and pizzas can be decorated in a special way by shaping the edge in advance and filling with toppings.


Original pies with filling
Pies are loved by adults and children. You can surprise and please your loved ones by making them in the form of roses, animals, curls, apples and other fruits and vegetables. Thus, you can make themed pies for a specific event or for a specific person.


stuffed pies
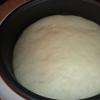
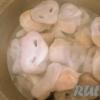
Large stuffed pies can be decorated in the form of a funny turtle. The relief on the shell can be made using prints of cups or dumplings.

Stuffed flower pie can be made with any sufficiently thick filling or with a combination of two fillings. We spread the filling on the lower layer - we form the center and the ring. Then cover with a second layer of dough and fix the center with a plate. We fasten the ring along the edge and make cuts, unfold the dough like flower petals.

We make a stuffed ring pie with a peeking out filling using special cuts in the center of the dough layer and bend it to the edge.

A stuffed pie in the form of a fish is made from puff pastry or yeast dough.

A country pie with minced meat and eggs is also quite beautiful and colorful. This dish is sure to impress your guests!

From small round pies with filling we form a bunch of grapes, decorate with carved leaves and a vine. Here is the finished culinary masterpiece!

Stuffed pie can be perforated. For such a pie, a thick filling of pieces of meat, cabbage, apples is suitable.

bicolor pies
Pies and buns made from two-color dough are very original. We make them according to the principle of the well-known Zebra pie, coloring half the dough with cocoa powder. And then it all depends on your imagination. You can put snow-white dough balls in a baking dish and pour the dark part of the dough, you can bake multi-colored cakes and make a cake out of them, or you can combine two layers of light and dark dough, make two rolls and colored butterflies from them.


decorative bread
It is our custom to greet guests with bread and salt. But where to get beautiful decorative bread? It turns out that it is quite possible to bake it yourself. There are a lot of decent options. Let's get to know them:


Open pies and pies
Open pies and pies can be decorated not only with the original edge.
We make puff pastry pies with the effect of an opening flower from two square layers, cutting the top one.

Charlotte with apples is now made in a new format. We spread the curd filling of the consistency of thick sour cream on shortbread dough, decorate with roses from apples on top.


We decorate pies with berries and jam filling with decorative pieces of dough.


We make open puff pastry pies with meat filling.


We decorate pies and pies with an edge of dough and sausages. To do this, we put a sausage between the two layers, fix it, make cuts and unfold it.


With pieces of boiled sausage, you can make rose pies.


An open pie with pear and cottage cheese is very useful. We fill the base of shortcrust pastry with pears, cut into rings, without separating them. We spread them in the shape of a flower and fill them with a liquid curd filling. We bake.


We make a pear pie from a puff layer and half a pear. Original and simple!

Pie "Santa Claus"
For the New Year holiday, it is worth baking a cake with one of its symbols. We propose to make a cake with the image of Santa Claus.


Now, fully armed, let's start experimenting with original pastries!
Photos used: hlebopechka.ru, www.liveinternet.ru,
They brought the dough for buns, pies and pretzels, but you don’t know how to cut the dough so that the fancy products turn out beautiful - see the step-by-step photo.
beautiful buns
Section "Orchid": roll out, cut out a square, fold in a triangle, make cuts along the sides, leave a section of dough without a cut, unfold the square, connect the cut ribbons in the center.
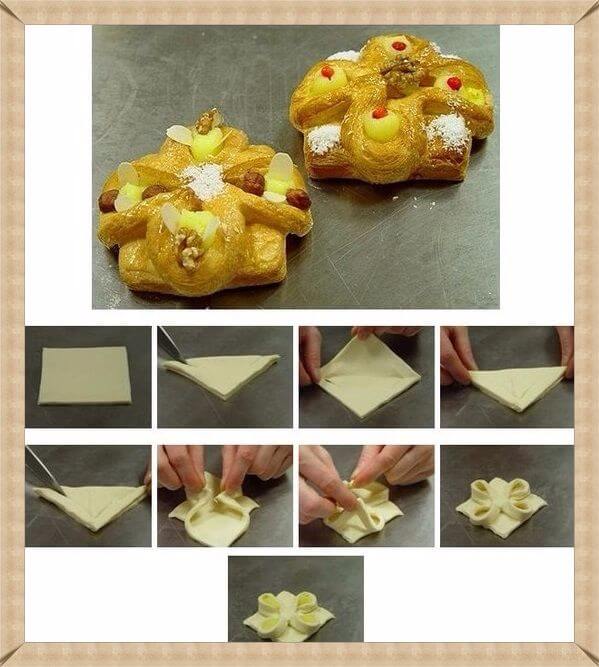
Section "Peony": roll out, cut out a square, fold in a triangle, make cuts along the sides, leave a section of dough without a cut, expand the square, fold the triangle with other corners, make cuts. Expand the square, connect the cut ribbons in the center. Put the stuffing into the flower petals.

Section "Curls": roll out the layer, flavor with stuffing, roll into rolls on both sides, cut across.
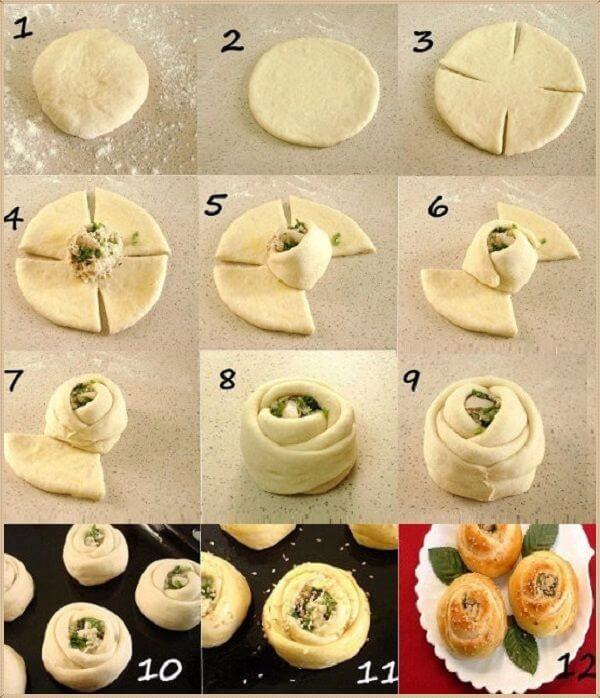
Cutting for muffin "Rose": roll up a bun, roll out a circle, make 4 cuts at equal intervals, put the filling in the middle, fold the rose petals in turn.

Sweet "Bows": roll up koloboks, roll out mugs, fold the circle in half, make cuts 4 external and 3 internal.

A simple flower made from sweet yeast dough: roll the sausages, connect them into rings, put the filling to the two walls inside the ring, connect in the center, as shown in the photo.
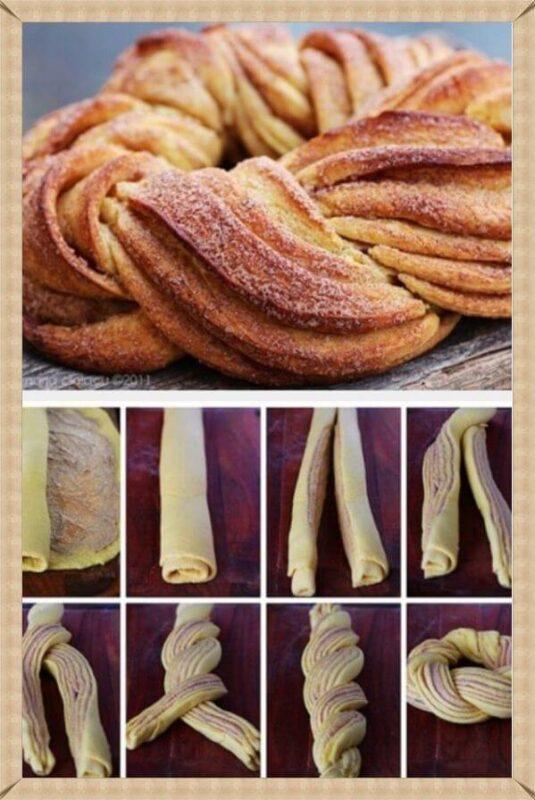
Beautiful puff Kalach: roll a bun out of it, roll out a circle, grease with filling, roll into a roll, cut the roll lengthwise, twist two puff ribbons together, connect the ends to make a roll.
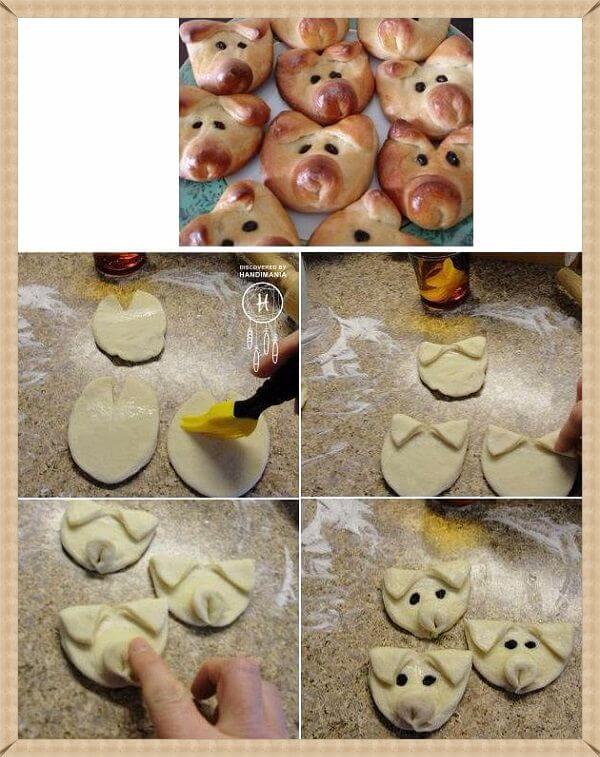
How to make "Piglets" from rich yeast dough. Roll out a circle, make a small incision on top, bend the corners - the ears. We sculpt a piglet for a pig in the lower part, bending the edge and flattening it a little. The piglets' eyes are made of raisins.

Sweet "Mushrooms": a circle is rolled out, which is then cut into pieces (see photo) and laid out in the form of mushrooms.
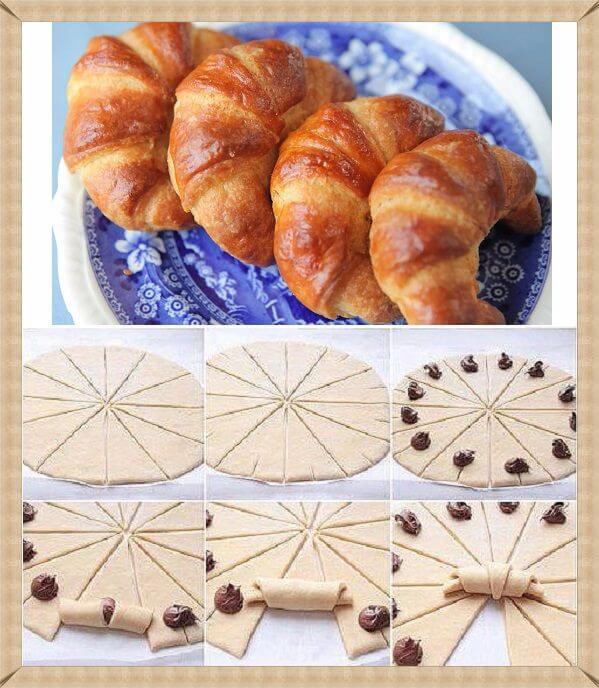
"Croissants". Roll out the circle and cut it into triangles, cutting from the center to the outer edge. An incision is made on the outer side of the triangle in the middle and the filling is laid out at its end. The croissant is rolled from the outer edge to the center.
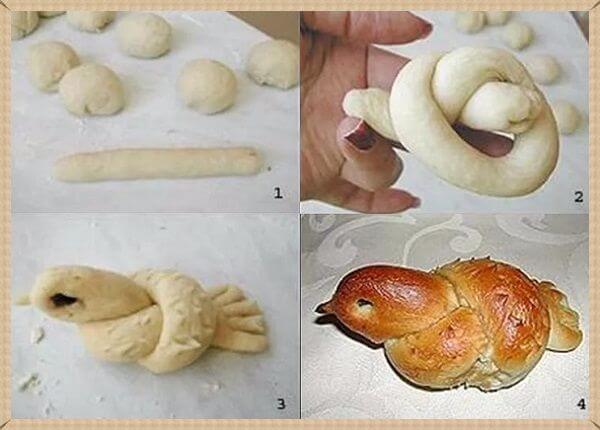
Bun "Bird": roll up the sausage, wrap one end around the index finger and thread it into the resulting ring. With a small pinch, shape the dough into a beak shape. The tail needs to be flattened and cuts made, giving the appearance of feathers. Eyes are highlights.
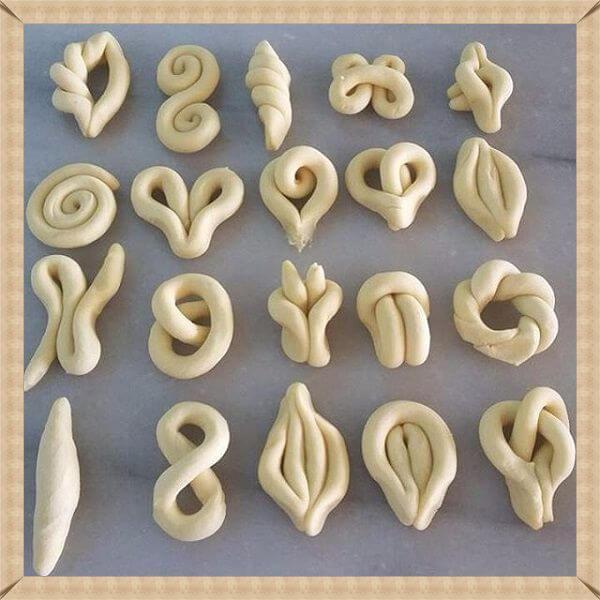
And here are simple options for beautiful buns made from sausages. By the way, even a child can make such forms. Involve the little ones in this entertaining baking process. At the same time, develop fine motor skills and imagination.
How to decorate pies

Cake decoration "Flower": roll out a round-shaped layer, put a bun of filling in the center. Carefully distribute the rest of the filling in a circle, leaving space from the edges and the central bun. Cover everything on top with another layer of dough. With a small bowl or tea cup, press the edges around the center filling. Cut the outer edges with an openwork knife. Then evenly cut the dough with the filling, which you have goes along the outer ring. Slightly turn each "petal" stuffing up.
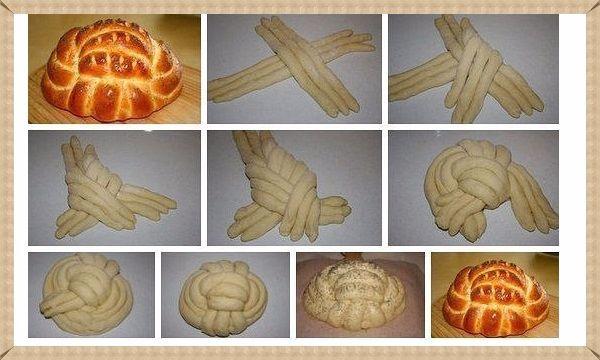
Cutting Butter Loaf. Roll up the flagella - sausages and weave a loaf of them, as shown in the step-by-step instructions in the photo.
And here are the options for decorating the edge of the pie.
Cutting the dough "Pigtail" or "Spikelet"
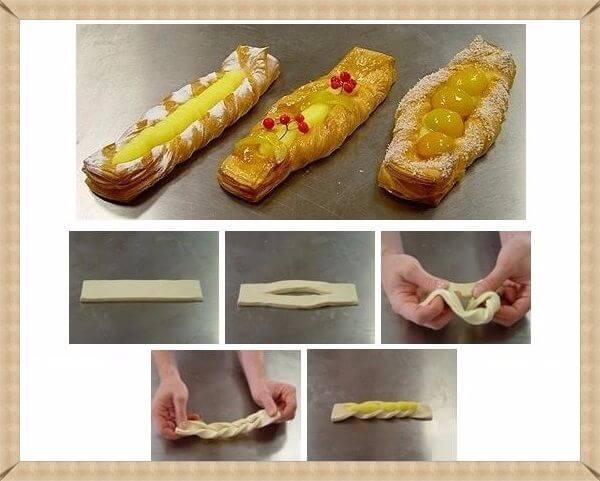
The simplest version of "Pigtails". A rectangle is cut out of the rolled out layer of dough, a longitudinal incision is made in the center. Then, one edge is threaded several times through the resulting hole. Thus, the edges are twisted into a spiral. The filling is laid out in the center.

"Pigtail with sausage". Three sausages are connected by the upper edges. Then a slice of sausage is laid out between them. Weaves like a braid. The right harness is placed between the left and center, then the left is placed between the right (which is now on the left) and the center (which is on the right). Again, a slice of sausage is placed and the weaving of the pigtail continues.
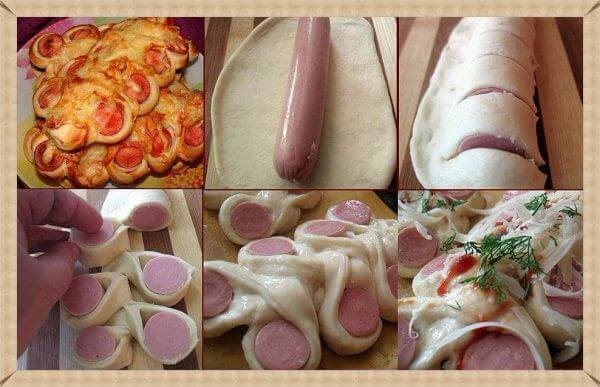
Sausage in the dough "Pigtail". This delicacy is sometimes called "Obzhorka" in culinary shops. The sausage is laid out in the center of the dough cake. Then the edges stick to each other, and the sausage wrapped with dough is cut into equal parts. Each polka is turned inside out with the sausage side up and placed through one on opposite sides of the middle. Sent to the oven when half cooked. Sprinkle with cheese, herbs on top, grease with mayonnaise or ketchup (for an amateur). And bring the pastry to readiness.

Beautiful bun "Spikelet". This baking option is done simply, but it looks very beautiful. We roll out a thin layer, grease with vegetable oil or an egg, sprinkle with sugar and cinnamon (poppy seeds). We turn the roll, which we then cut with scissors a little obliquely, as shown in the photo. We spread the resulting "spikelets" into one large beautiful bun.

And this is a simple pigtail with a poppy. The sausage is covered with poppy seeds and cut with scissors, spreading the petals on different sides.