How to make a horse out of salted dough. How to make a horse from salt dough with your own hands with a mane and tail
To make a plastic salty dough, you need to take flour, salt and water, in weight proportions of 200: 200: 125. But it should be borne in mind that salt is twice as dense as flour, so if you measure it by volume, then the proportion will be 200: 100: 125. 
Water should be taken cold and poured in portions into a mixture of flour and salt. It is best to use a mixer when mixing. 
Then the dough is kneaded by hand in the same way as for baking.

If it is decided to sculpt a horse figurine, then this can be done in three steps, starting with sculpting the body. The rest of the mass is best placed in a plastic bag for a while so that it does not become covered with a hard crust.

Having fashioned the head and neck, this detail is fastened to the body. For stickiness, you can slightly moisten the place of bonding, and gently smooth the "seam" itself, hiding it.

At the very end, we form the tail of the mare. You can make it to the very ground - this will increase the support of the figure by one more point.

The finished product must be dried well. You can use the oven and "bake" the sculpture at 80 degrees. Or you can use the "microwave" - it's safer and faster. Only in a microwave oven is it better to first use the defrosting mode and keep the figurine for a minute.
Then you need to check whether cracks have appeared, whether the product has lost its shape. In case of surface violations, you can "make a small repair" with the dough, first immersing it in water. In this way, it is easy to hide any irregularities and cracks that may appear.
Then you can already switch to the warming up mode. The figurine should be removed periodically and checked for strength. When it becomes hard and dry, you can proceed to the last step of making the toy figurine.

This will be coloring. You can use any paints: from acrylic and oil paints to food and watercolors. Some may even leave the figurine pure white, some will limit themselves only to coloring the mane and tail. Or you can joke a little and remember the famous colorful Dymkovo toys.
Can you say now that the horse is made of salt dough? Rather, she rode from a fairy tale or a cartoon ...

It is so easy to become a real sculptor, sculptor, artist - in a word, a creator.

Therefore, rather take flour and salt and - get down to business, gentlemen! Create your masterpieces!
We sculpt from the dough. The horse made of salted dough, the master class of which was provided by a master of modern hande-made works, was made in the style of a Dymkovo toy. Maybe that's why this craft is so beautiful and eye-catching.
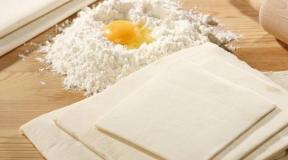
It turns out that feeling like a real sculptor is not so difficult at all! And you don't need marble, granite, bronze, or even clay. After all, you can sculpt a sculpture ... from dough! Of course, this should not be ordinary dough, but special - salty. Then it will not crack when dried and will acquire sufficient strength comparable to clay. Pancake flour is not suitable for creating a plastic mass, as it will necessarily rise, forming cracks and deforming the figure.
How to make a horse out of salt dough

To make a plastic salty dough, you need to take flour, salt and water, in weight proportions of 200: 200: 125. But it should be borne in mind that salt is twice as dense as flour, so if you measure it by volume, then the proportion will be 200: 100: 125. 
Water should be taken cold and poured in portions into a mixture of flour and salt. It is best to use a mixer when mixing. 
Then the dough is kneaded by hand in the same way as for baking.

If it is decided to sculpt a horse figurine, then this can be done in three steps, starting with sculpting the body. The rest of the mass is best placed in a plastic bag for a while so that it does not become covered with a hard crust.

Having fashioned the head and neck, this detail is fastened to the body. For stickiness, you can slightly moisten the place of bonding, and gently smooth the "seam" itself, hiding it.

At the very end, we form the tail of the mare. You can make it to the very ground - this will increase the support of the figure by one more point.

The finished product must be dried well. You can use the oven and "bake" the sculpture at 80 degrees. Or you can use the "microwave" - it's safer and faster. Only in a microwave oven is it better to first use the defrosting mode and keep the figurine for a minute.
Then you need to check whether cracks have appeared, whether the product has lost its shape. In case of surface violations, you can "make a small repair" with the dough, first immersing it in water. In this way, it is easy to hide any irregularities and cracks that may appear.
Then you can already switch to the warming up mode. The figurine should be removed periodically and checked for strength. When it becomes hard and dry, you can proceed to the last step of making the toy figurine.

This will be coloring. You can use any paints: from acrylic and oil paints to food and watercolors. Some may even leave the figurine pure white, some will limit themselves to coloring the mane and tail. Or you can joke a little and remember the famous colorful Dymkovo toys.
Can you say now that the horse is made of salt dough? Rather, she rode from a fairy tale or a cartoon ...

It is so easy to become a real sculptor, sculptor, artist - in a word, a creator.
Therefore, take the flour and salt quickly and get down to business, gentlemen! Create your masterpieces!
Workshop on making a funny horse from salt dough ...
If you like to make a variety of crafts from salt dough, then with the help of this master class your collection can be replenished with a new specimen - a fun horse.
Moreover, the HORSE is a symbol of the coming New Year.
Thank you for the master class masterclassy.ru.
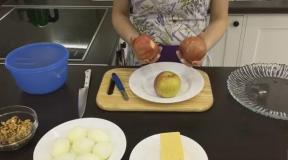
Necessary materials:
- salty dough
- horse drawing
- food oilcloth
- rolling pin
- needle
- brush
- paints
- acrylic lacquer
- Super glue
- coffee beans
In order to get started, you need to draw a horse, or, to make it faster, you can print a ready-made drawing.
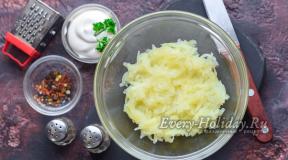
Cooking salted dough: take water, salt, flour in a 1: 1: 2 ratio, knead the dough. Then we wrap the dough with food oilcloth and hide it in the refrigerator for 60 minutes. The finished dough should be similar in consistency to plasticine.
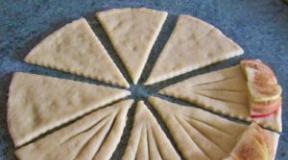
We take the drawing and cut out the horse.
We take a part of the dough and roll out a circle, after which we take a drawing of a horse and put it on top of the dough.
We circle the outline of the horse with a knife.
We make a blank for the eyes from the dough - two balls.
We moisten the dough with water and attach the eyes.
We take a brush from the back and make holes, these will be the pupils. We dry the horse for at least 5 days.
After the horse has dried, we take acrylic paints or gouache, paint the face and eyes.
Give the paint time to dry.
Then we paint the horse itself beige.
Paint the horse's mane with yellow. Let the paint dry.
Then we turn the horse over and paint the back side in beige.
We paint the ears of the horse pink, the eyelashes and pupils - black. With a light brown paint with a brush, we make the effect of specks on the horse.
To add flavor to our creation, we take coffee beans and glue them to the horse.
A cheerful horse made of salt dough is ready.
How to make a horse out of salt dough
 To make a plastic salty dough, you need to take flour, salt and water, in weight proportions of 200: 200: 125. But it should be borne in mind that salt is twice as dense as flour, so if you measure it by volume, then the proportion will be 200: 100: 125.
 https://pandia.ru/text/80/409/images/image005_54.jpg "alt =" (! LANG: horse" align="left" width="567 height=416" height="416">поместить в полиэтиленовый пакет с тем, чтобы она не покрывалась жёсткой корочкой.!}
 Having fashioned the head and neck, this detail is fastened to the body. For stickiness, you can slightly moisten the place of bonding, and gently smooth the "seam" itself, hiding it.
 At the very end, we form the tail of the mare. You can make it to the very ground - this will increase the support of the figure by one more point.
 The finished product must be dried well. You can use the oven and "bake" the sculpture at 80 degrees. Or you can use the "microwave" - it's safer and faster. Only in a microwave oven is it better to first use the defrosting mode and keep the figurine for a minute.
Then you need to check whether cracks have appeared, whether the product has lost its shape. In case of surface violations, you can "make a small repair" with the dough, first immersing it in water. In this way, it is easy to hide any irregularities and cracks that may appear.
Then you can already go to the warming up mode. The figurine should be removed periodically and checked for strength. When it becomes hard and dry, you can proceed to the last step of making the toy -  Watercolors "href =" / text / category / akvarelmz / "rel =" bookmark "> watercolors. Some may even leave the figurine pure white, some will limit themselves only to coloring the mane and tail. Or you can joke a little and remember the famous colorful Dymkovo toys ...
Can you say now that the horse is made of salt dough? Rather, she rode from a fairy tale or a cartoon ...
It is so easy to become a real sculptor, sculptor, artist - in a word, a creator.
Therefore, take the flour and salt quickly and get down to business, gentlemen! Create your masterpieces!