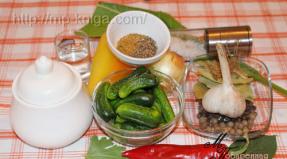
Chocolate smudges with vegetable oil. White chocolate frosting. Ingredients for making cream
Today, in a blog, I give not only a cake recipe, but also paint in great detail with photos and video all the steps, ranging from kneading dough and preparing molds and ovens, to the final decoration of the finished cake. Finally, you will learn how to make a cake naked or, on the contrary, cover it with different creams and make patterns. Let's talk about the forms, modes of the oven. You will learn the secrets of how to make the cake juicy, and the cake perfectly smooth. I’ll show you how to make a French shirt and what to do in order not to wash the molds after each baking of the cake. There you will also be able to see links to my previous notes and recipes that will also help you learn how to make cakes like real professionals.
By and large, this is a great training workshop online. After him, acquaintances will no longer believe that you made the cakes yourself, and did not order it at the pastry shop. Your self-conceit will deservedly increase and you will start making cakes more often, and you will spend much less time. Perhaps for some it will be a small start in the future career growth.
We all love desserts and beautiful delicious cakes. My blog has many recipes for chocolate and vanilla cakes, there is also the famous Red Velvet. And I decided to talk about the basic recipe for biscuit cakes (although I’m telling you about its variations in the same place). They are so perfect and keep the geometry that you do not even need to cut off the side walls, and naked, it looks like a work of art. The big bonus is that there are no baking powder and soda (for some it will be important). Only flour, sugar, butter and eggs are used. For each cake takes 20-25 minutes. That is, following all the stages of the lesson, you can cook a cake in just an hour and a half, from the moment of the idea to cutting it into pieces.
The sponge cake itself is so neutral that it will be happy with any color: lemon soaking, berry jam in layers, pieces of berries inside the dough or between the layers. Love nuts, candied fruits or cinnamon - please add at your discretion. You can cover it with one of several recipes of my creams (by the way, there will soon be two more creams for cakes), pour ganache, chocolate or caramel on top (links are also in the recipe), and decorate on top ... hmm, popcorn!
Interestingly: birthdays have always been celebrated differently, but once they brought a cake as a gift. Since then, the tradition of arranging tea after cake entered our lives, it was about 1785.
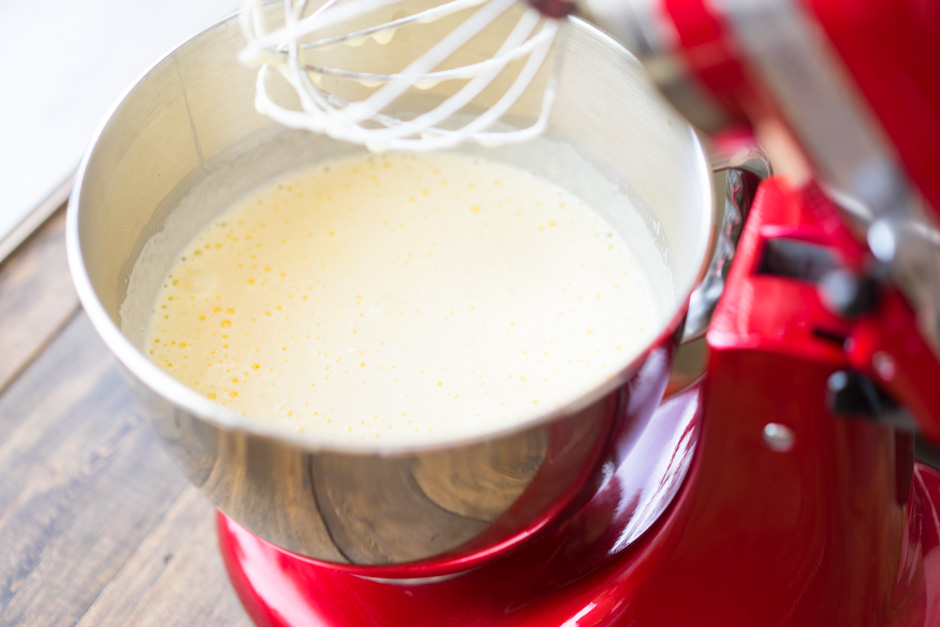
Break eight eggs into the mixer bowl. Do not be intimidated by such a large number. Taste and smell will not, especially if we use the cream and impregnation. But there is no baking powder, soda and other agents. 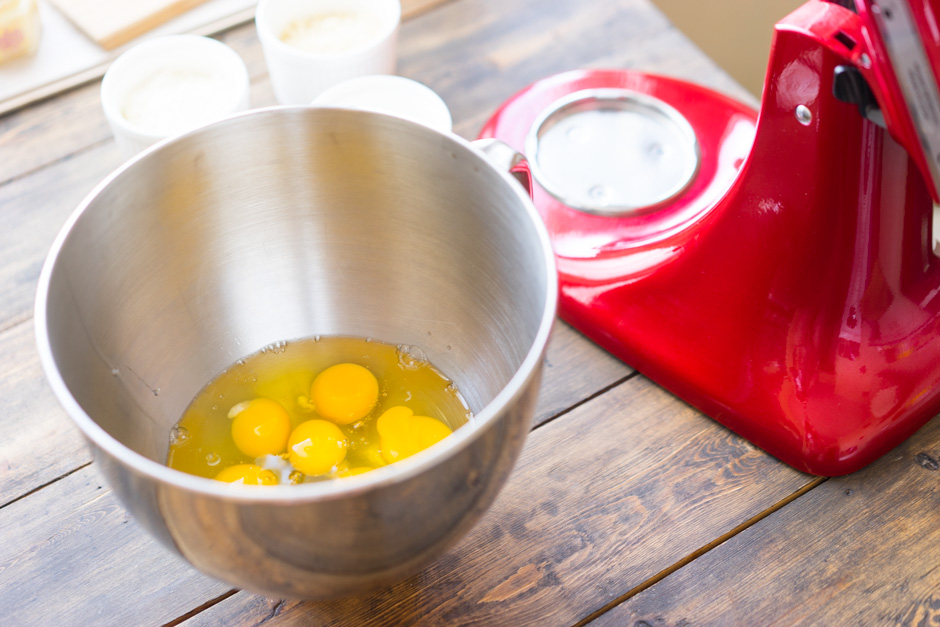
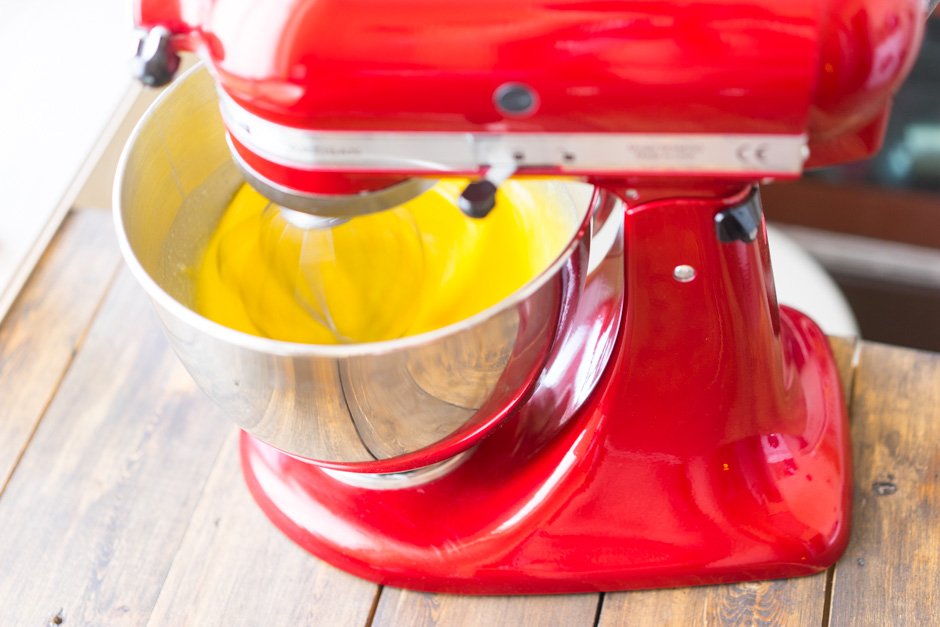
Beat at medium speed until the weight increases three times. At the same time, it will become almost white.
Add nut flour (50 g). If not, replace with regular flour (also 50 grams). Stir with a whisk. Nut flour makes cakes more interesting on the palate and a bit more moist. 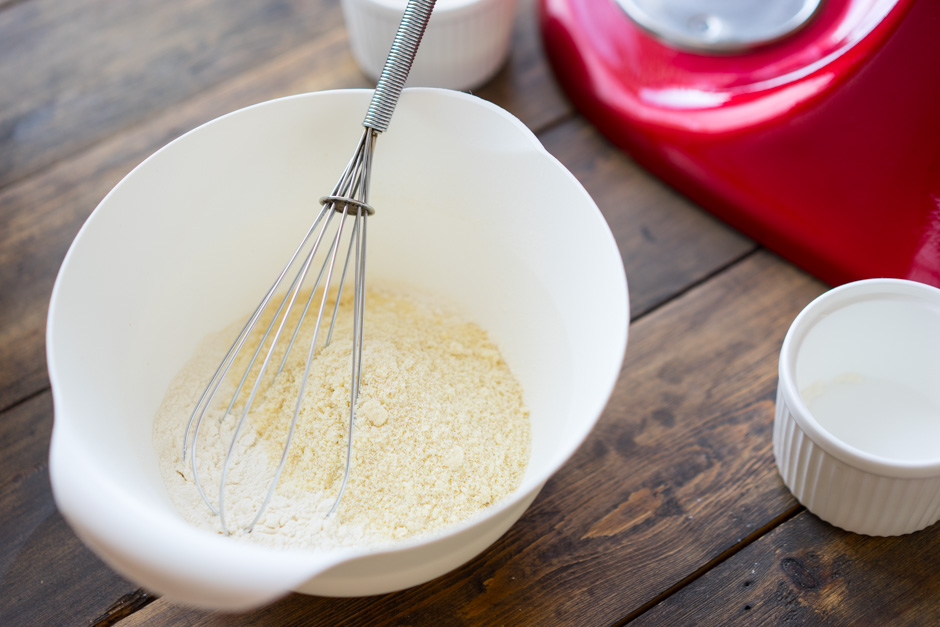
Melt the butter (80 g). For this I put a cup of butter in the microwave for 30 seconds. Take out, stir and put another 10-15. Cool melted butter slightly by shaking it with a fork. Add to the dough. Mix everything well. 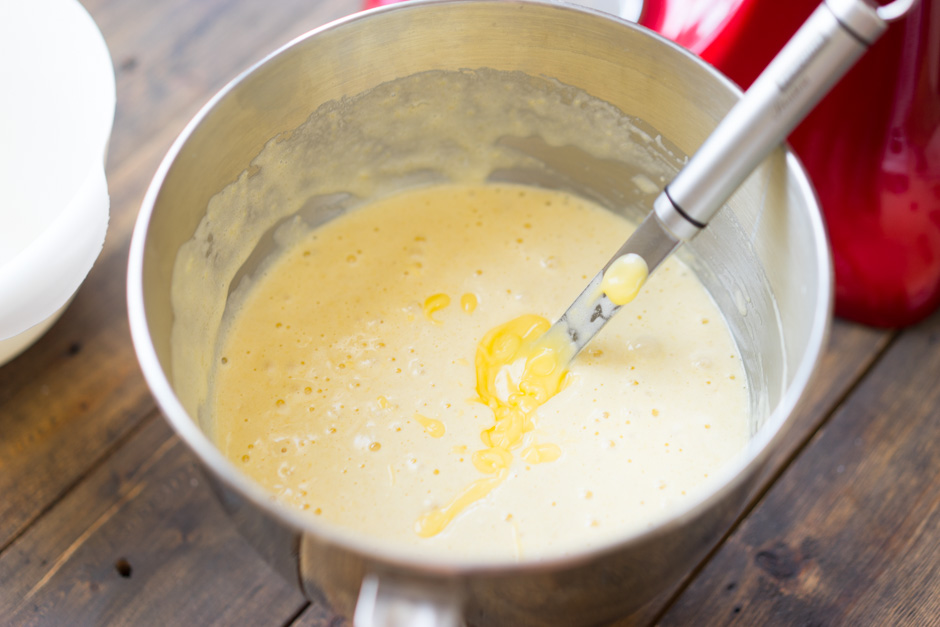
Divide the dough into two parts, pouring into forms. I have a diameter of 16 cm and it turned out two decent cake. On cakes at 20-24 cm, it is necessary to double the proportions and make 3-4 cakes. 
We bake 20-25 minutes at 180 degrees (top-bottom mode, middle shelf). Check with a skewer, it goes dry. ![]()
Putting a beautiful cake
And now the most interesting and important. I'll tell you how I make cakes, decorating and collecting. If you read everything carefully and practice a couple of times, you can make amazing cakes at home. I took 3 shortcakes for this cake (1.5 servings of the basic recipe for the dough) and one portion of the cream, this.
Test preparation
If the recipe does not provide otherwise, always use the ingredients of one (room) temperature. This means that when you are going to make a cake, take eggs from the refrigerator for an hour from the refrigerator, butter, milk and other cold ingredients. The fact is that on the one hand the ingredients are better mixed when they have one temperature (now we are talking about the dough), on the other hand, the finished dough will be at room temperature and will quickly start to bake in the oven.
Next is the porosity of the dough. To make the cake airy, we need air bubbles. For this we use soda and baking powder. read a separate note about them and never repeat the mistakes of many. Sometimes you can do without them, but only if the recipe offers something of their own. In the recipe above, we took a lot of eggs that are well whipped into a foam with sugar. Proteins hold the structure (those bubbles) and the dough does without additional help.
It is clear that bubbles are formed during the evolution of gas, during the reaction of alkali and acid (recall the chemistry lessons at school). To make it clear how this works, you can take a spoonful of soda and drop a few drops of vinegar. The mixture will begin to actively foam. These are the bubbles that form in our test. If baking powder is added to the dough, then it is in itself self-sufficient (it contains both acid and alkali), and it will begin to work when the temperature rises, that is, in the oven. Such dough tolerates waiting, for example, if you bake four cakes one by one. Another option is when vinegar, sour-milk products, etc. are added to the dough. Then in the course goes soda, which will connect with the acid and bubbles will appear. This is how Red Velvet is made. These cakes are best baked as soon as possible, and do not leave the dough for a long time.
Working with forms
How many housewives, so many opinions about which form is better. Not for nothing in my blog there is a post about what types of baking molds are. For myself, I made a choice - this is definitely solid aluminum forms and, for rare tasks, detachable. They are convenient in that they ideally keep their shape (unlike silicone, which have the properties of "walking"), durable, easy to wash and behave predictably. The only restriction - you can not work with a knife. But this stuff, I never cut the cakes inside the forms. 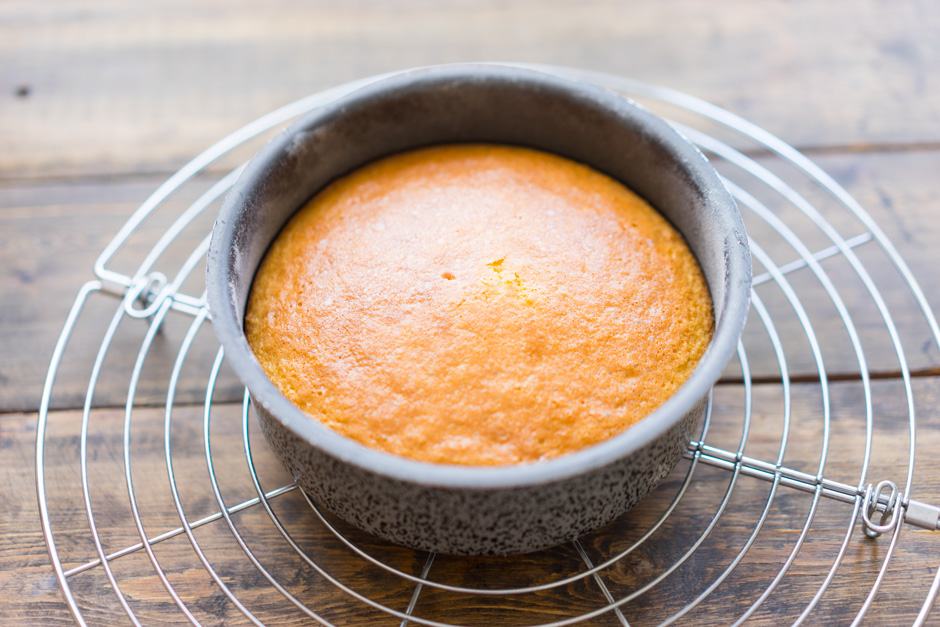
For my taste, the cake looks more beautiful when it has the same height and diameter, that is, square, when viewed from the side. I don’t like big low cakes at 24 cm or more. Someone thinks that it turns out MORE cake, but more often you make as much dough as I do, only my cakes look more interesting. Yes, and pastry trends say that flat cakes are a thing of the past, and compact cakes, on the contrary, are gaining popularity. In addition, the cakes are obtained thicker, and the cakes themselves from a single dough mix are obtained more. At least three cakes should be in the cake. Aesthetic, beautiful, and tasty.
French shirt
I will not say where this name came from, but this is the best way to prepare a form for the future of the cake. The principle is very simple. The walls are lubricated with cold butter (the layer will be thinner), and from above they are washed with flour. Excess flour pour. We have a form in our hands, with a thin layer of flour on the walls. I went further, and use circles of parchment, which I put on the bottom of the form. So in general there are no problems with dredging of cake layers, and it is not necessary to wash a form. Usually it looks like this: I make a French shirt, pour a portion of dough and bake the cake. I take it out of the mold, cool it a little, make my shirt again and bake the next cake again. Wash nothing. I even use parchment from the first cake - take it off and put it on the bottom of the form.
See how easy the cake comes out. I take it out of the oven, and after a minute it shrinks a little, perfectly moving away from the walls. Pay attention to the dark strip, this cake has moved away from the form. 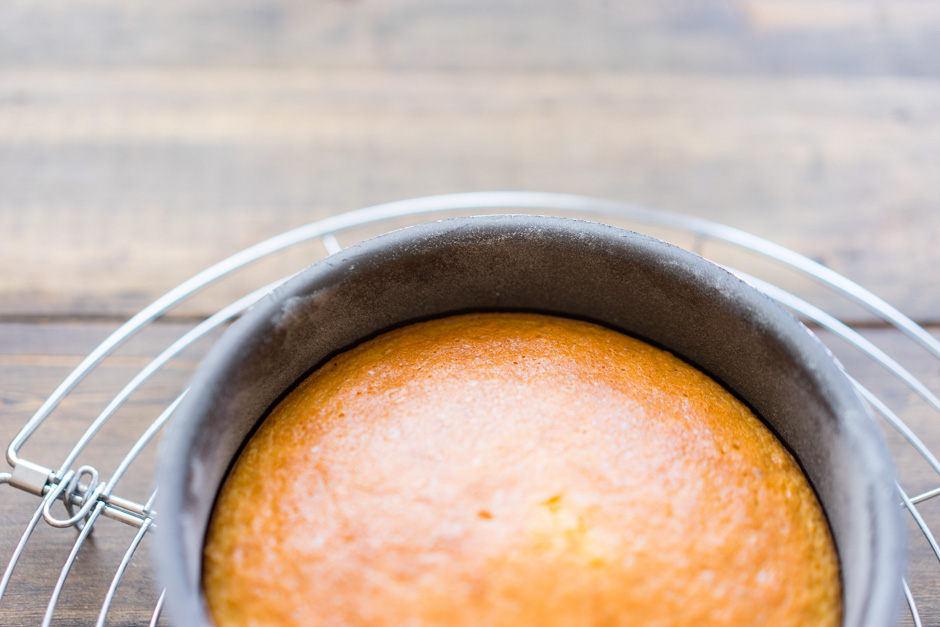
Dosage test
I highly recommend having scales in the arsenal. They greatly save time and effort. And still allow you to dose very accurately the dough. On the scales, find out the mass of your cup, in which you will beat the dough. Suppose it is 188 grams. Then we measure the weight of the bowl with the finished dough. We get 1088 grams. So the dough weighs 900 grams and is well divided into three Korzh 300 grams of dough. Put a baking dish on the scale, nullify and pour 300 grams of dough. Bake, repeat. In this case, the cakes will be the same thickness, and this will help in the assembly.
Oven
Let's agree that the ovens are different for everyone (gas, electric, combi ovens), the sensors are also different. Different ovens heat differently and the temperature can vary. You need to understand what kind of oven you have. Perhaps the cakes in it are not baked for 20 minutes, as indicated in the recipe, but all 35. So remember that time will always be more. Or the top quickly burns in the cake, most likely in the oven is not 180 degrees, but all 190. You need to get used to any oven, remember the adjustments and enjoy cooking.
In recipes, I always mean oven mode "Top-bottom", and put the form on the middle shelf in the oven. If you have a gas oven, giving a gift from below, or convection is not turned off - adjust the parameters. And the best way to experiment on one type of test. Just make three cakes with different combinations (temperature is higher, lower, shelf is lower or higher). The oven is ALWAYS heated up to the temperature indicated in the recipe, no need to put the dough in the cold oven.
I have Hansa. which does not lie completely and honestly heats the entire volume of the oven, so you always see in the photo of the recipe, what temperature I put, what heating mode and the position of the pan. ![]()
We bake
So, you put the form in the oven and wait. Many baking recipes prohibit opening the oven until dessert is fully prepared. This applies to cakes on the choux pastry and others. When you open the oven, the temperature drops sharply by 5-15 degrees in the first few seconds. If the crust of the cakes has not yet had time to form, the air inside will shrink and the cakes will settle. Try to wait patiently without opening the oven. With the usual dough for the cake, the situation is simpler, but even there it makes no sense to look in often, the cake won't bake faster.
Willingness is ALWAYS checked by one and only one method: with a wooden skewer or a match we pierce the cake vertically in the very center. If it comes out dry (or with dry crumb), then the cake is ready. If it was wet, bake further. There is no more reliable way to check than this. Cookies and choux pastries are cooked until golden brown.
It may happen that the cake begins to redden so much in the oven, but the center is still wet, what to do? Very simple. Cover the cake with a sheet of foil on top, the mirror side up - it will reflect the heat and save the cake from burning.
And now the most frequent question is the bump. There is nothing terrible if the cake in the oven begins to look like a volcano, the middle rises upwards, forming a big hill. Its appearance is influenced by factors such as the dough itself, the material and size of the mold, the oven and the temperature. I will explain his appearance. You poured the dough into a mold and put it in the oven. The walls of the mold quickly warmed up and began to bake the dough, forming a crust. The upper crust also reddens from the edges of the form to the center. Therefore, it turns out that at some point the batter is sealed in a crust. What remains for the dough that expands with temperature and bubbles? Right, grow up. I heard about such ways of dealing with this, like wrapping the sides of the mold with a wet towel to slow down the formation of a crust. But it seems to me more trouble.
Cool the cakes
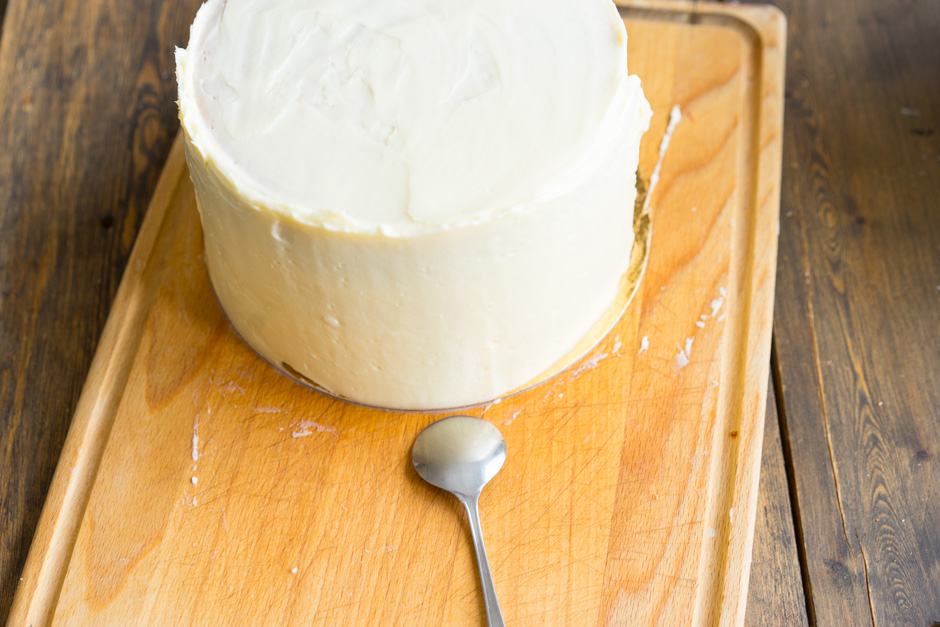
When our shortbread is ready, take it out of the oven and let it stand for a minute or two. It will shrink slightly, moving away from the walls of the form (you have already seen the photo above). Turn it over the grill. And remove the parchment. It can be used again on the next cake plate. ![]()
What is cooling on a grid for? If you put a hot cake on a plate or on a board, it will simply begin to sweat, become wet on one side, fall apart, and so on. So we need a lattice - to create an opportunity for cold air to circulate around the cake. We turned over to the bottom of it because there is one facet of the cake will remain even. If we leave the cake on a lattice tubercle down, he will sag, bending and the opposite side.
Finished and completely cooled cakes are wrapped in foil and refrigerated for at least two hours. The secret is that in the refrigerator the cakes become juicier. Moisture from the center (there drive it pressure in the oven) is distributed back over the entire volume of the cake. Thanks to this, by the way, it will crumble less.
A cake that lays the night in the fridge (on film) will generally be a hundred times more tasty than if you make a cake from freshly cooled cake layers. It is suitable for ANY cakes and even cupcakes / muffins: carrot, chocolate, red velvet - everything will be tastier.
Cutting cakes
Remember I said that I measured an equal amount of dough per form? Therefore, all three cakes turned out to be the same height, even the hillock was of a similar size. The photo is clearly visible side. 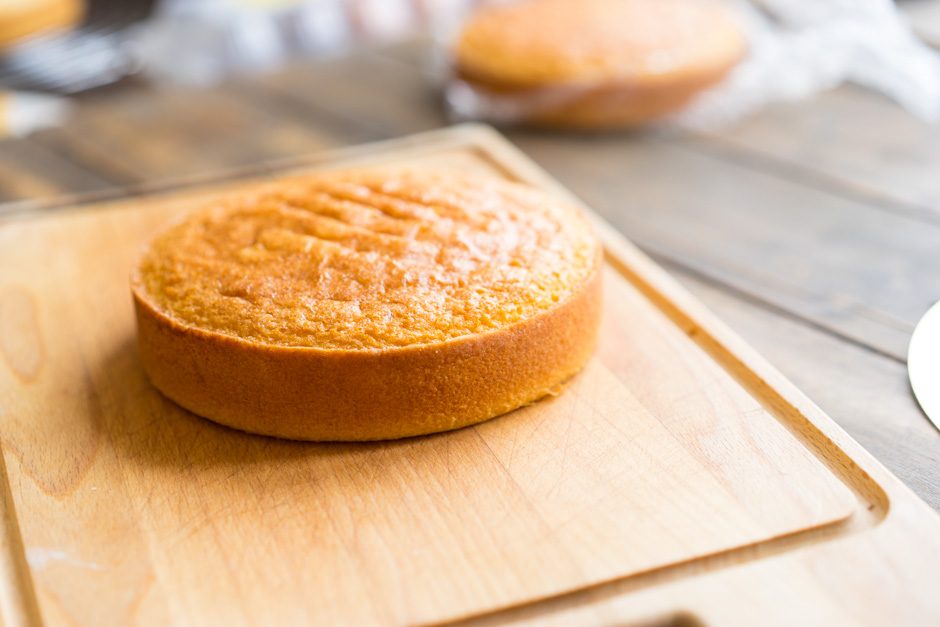
I will cut the tubercle along the upper border. For this you need a knife-saw. Simple here will not cope. Cake strings can be used, but I don’t like them. Put your hand on the cake, hold the knife horizontally with the second one and cut the cake just a couple of centimeters deep. With the hand that holds the cake on top, turn the cake, and continue making a cut with a knife. When you cut through the entire circumference, drown the knife even deeper and turning it again, make an incision. 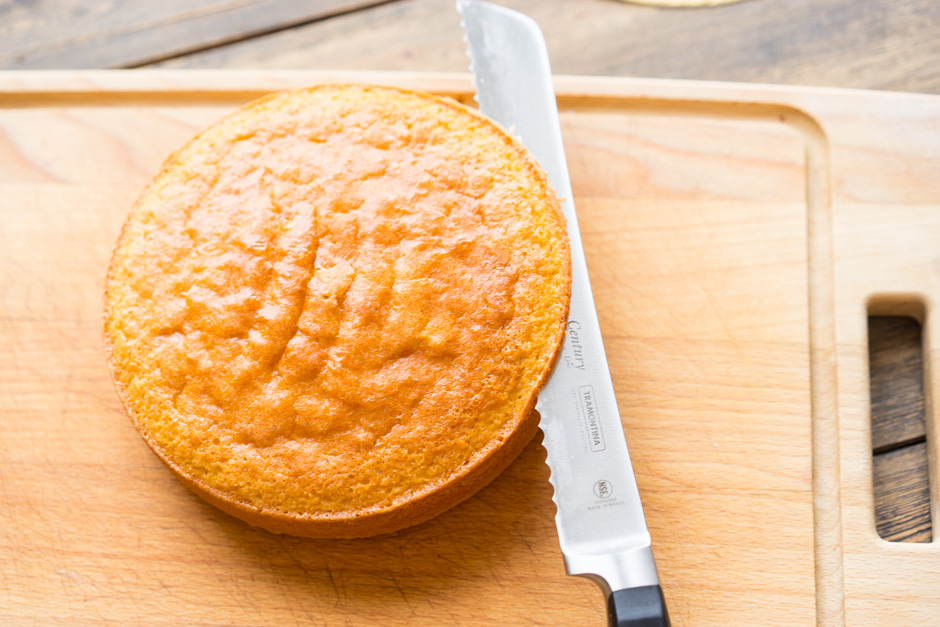
If you cut just left-to-right, there is a danger of cutting the cake obliquely. And with such small cuts, we will make the move smooth. That's what happens. 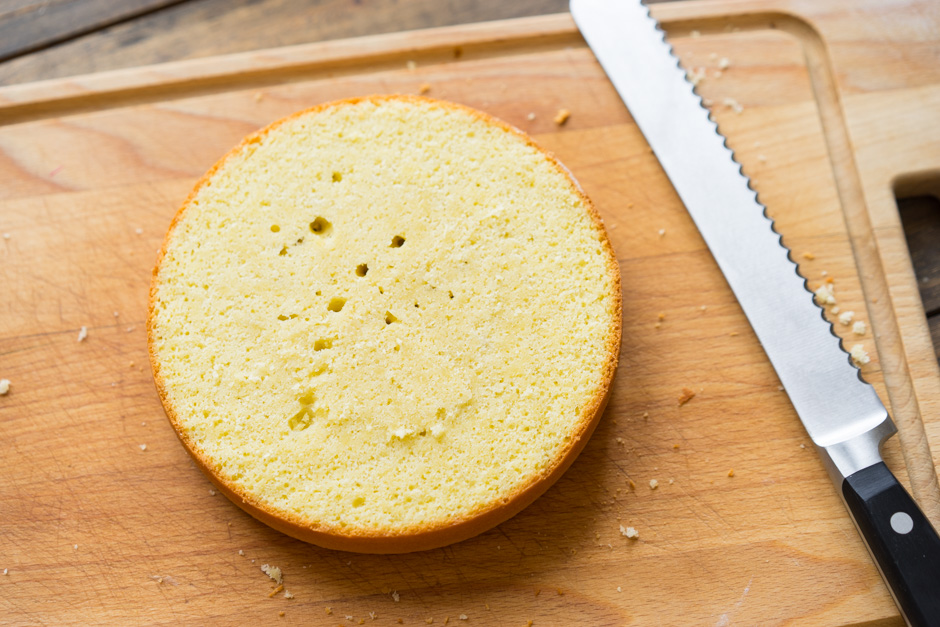
Perhaps you didn’t have such flat cakes, or you want to make two identical cakes from one cake. Then you should use the knife beacon. Use any kitchen item that has straight edges and the height you need. I take carving for cookies. Put it in focus to the cake, put a knife on it and cut, also turning the cake. Again, all the cakes will be the same height. Now you can soak cakes. I do not do this. 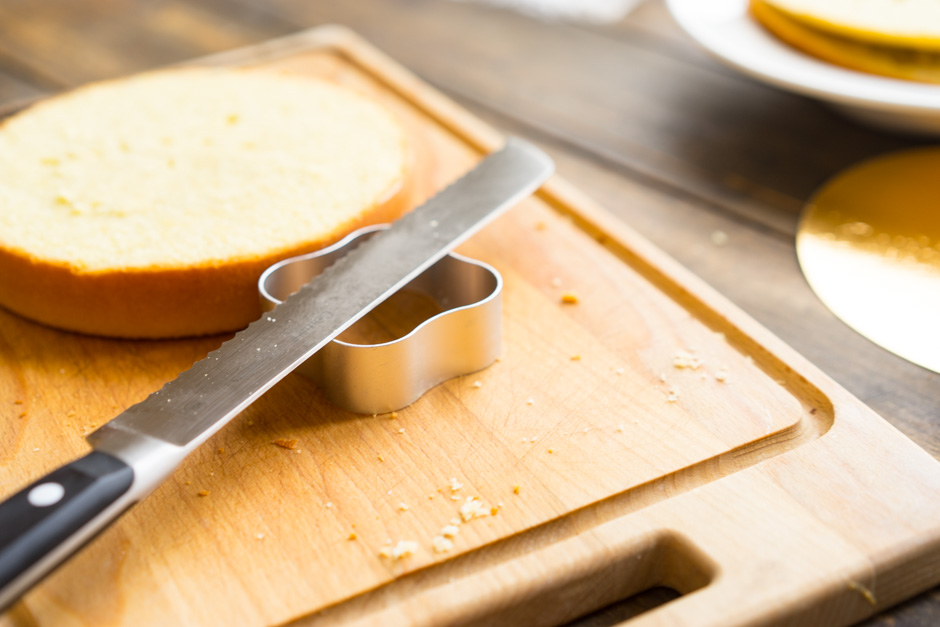
Sometimes the sides of the cakes are also cut. It is necessary in two cases: when the sides are strongly burnt and become rigid, or when you make a white sponge cake and you want the sides on the cut of the cake to be white (without a thin strip from the crust). Another side can be cut, so that they are better soaked with cream.
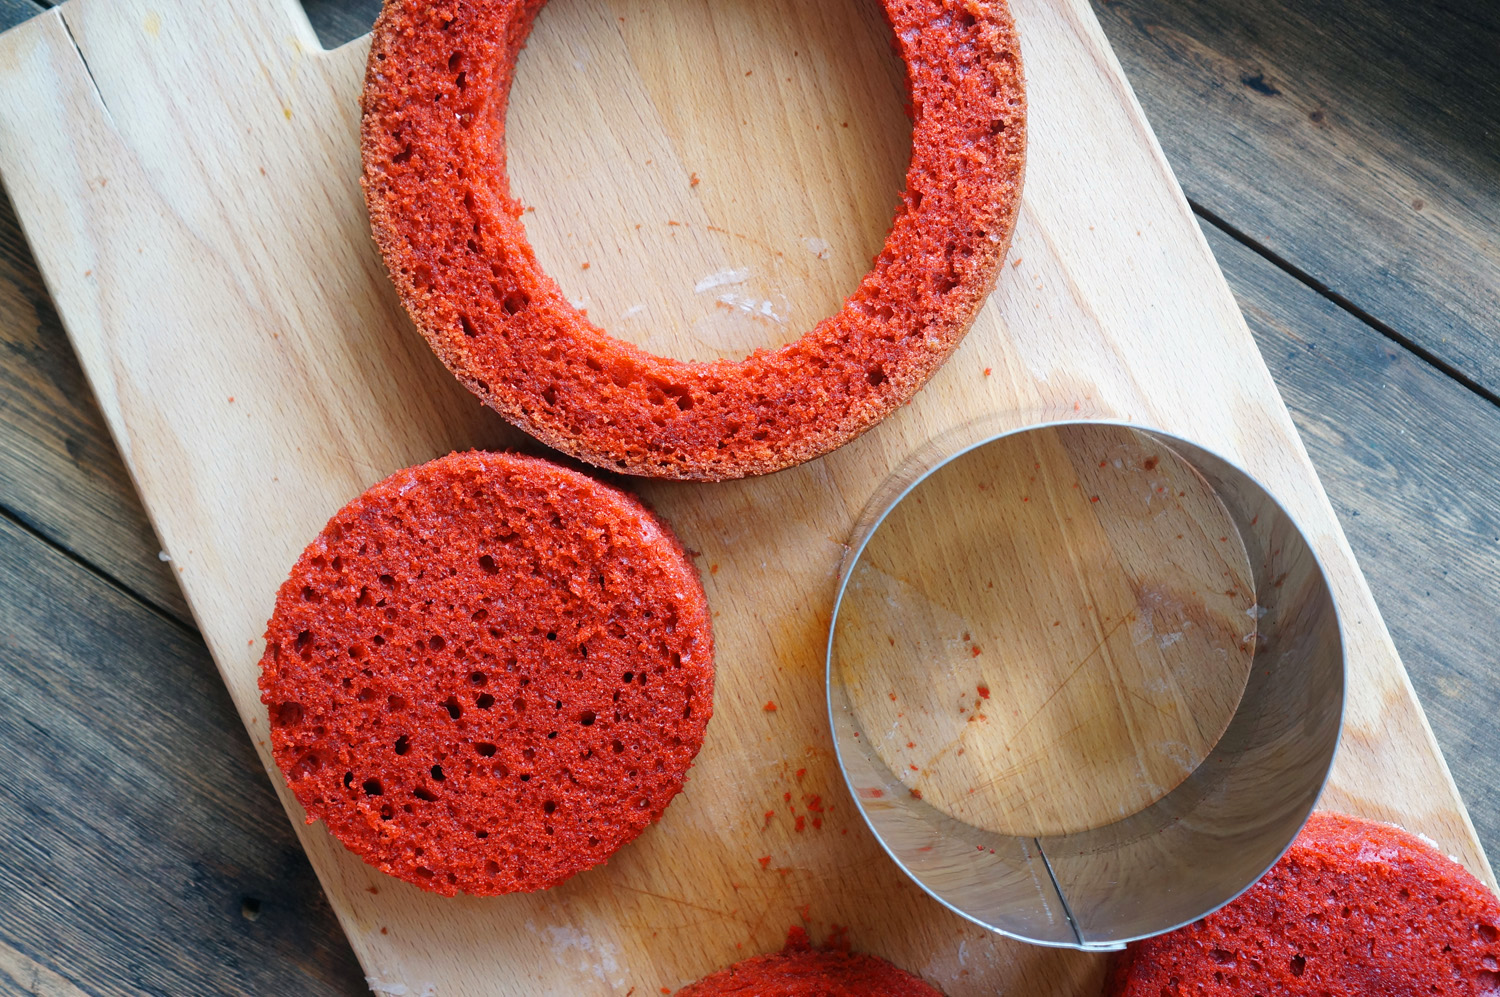
The pastry chefs manage to do this with a simple knife, cutting off thin strips of a crust a little bit. Or you can use special rings (they will soon appear in the store). There, the principle is simple - take a ring 1-2 cm smaller in diameter than the form in which the cake was baked. Suppose you have a shape of 20 cm, then carefully cut out a ring of 18 cm. A bit uneconomical, but super aesthetically pleasing. The only moment is that these biscuits are softer (the crust does not hold the geometry), so you need to collect them more carefully so that they do not walk and become the Leaning Tower.
Special aesthetes can also cut the bottom of the cake, then it turns out a solid “flesh” from the cake.
Cream
Recipes creams I give in the hostess note. recipes are gradually replenished, so check back sometimes. The most convenient way to work with disposable bags. They do not need to be washed, you can buy a lot at once, and then easily throw it away. It is good if you also have a round nozzle with a diameter of about 8 mm. If not, just cut the spout from the bag under the desired opening (only after putting the cream in it). 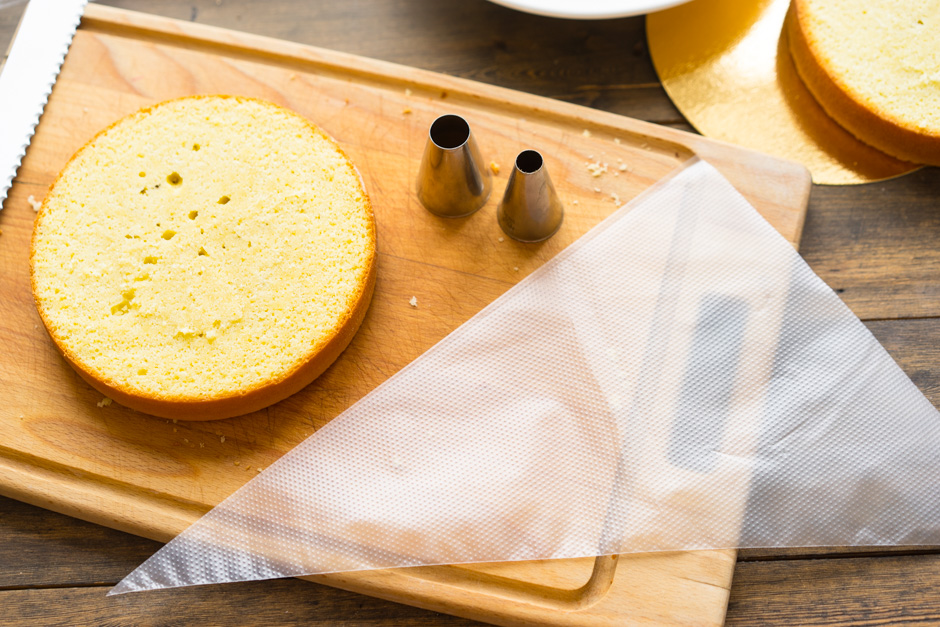
Now trim the corner of the bag. Wrap the bag on the back so that the cream does not come out. 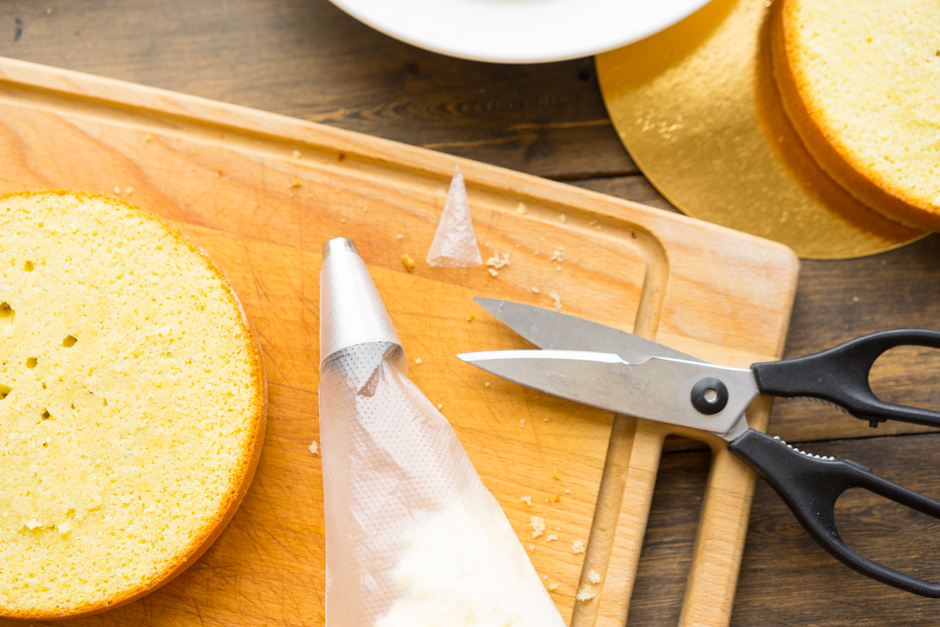
Cake assembly
I collect cakes on special cardboard substrates. If you do not have one, collect in a dish in which you will serve the cake. It is possible and on the cutting board (and then shift). In the center of the substrate / plates put the point of the cream. This is so that the cake does not go on the substrate. 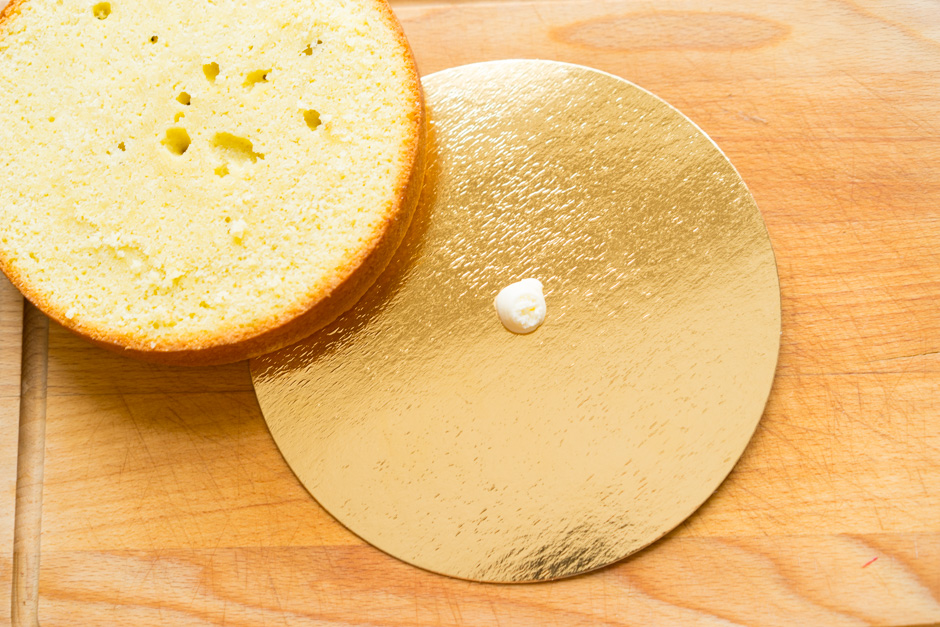
When you make cakes often, I advise you to get a turntable. On it to decorate the cake faster and easier.
If you are not a professional pastry chef, do not even try using a spatula to apply an even layer of cream between the cake layers. It is better to do this with a bag with a nozzle. Then the thickness of the layer will be the same everywhere. Apply it over the entire surface of the cake, spiraling or zigzag. 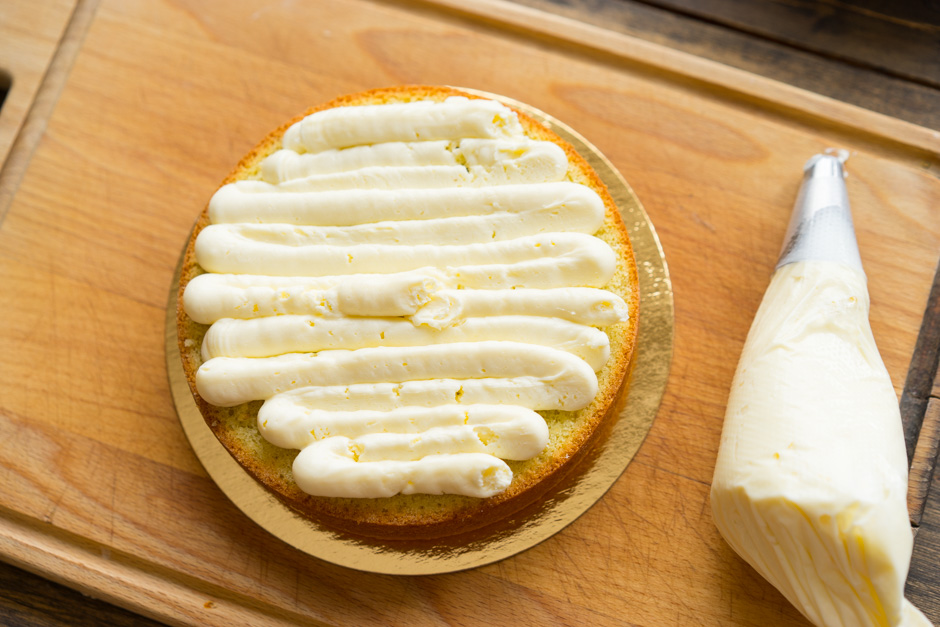
In this stage, berries, chocolate pieces, nuts, etc. are added. Just randomly insert them into the cream. Put the second cake on top. 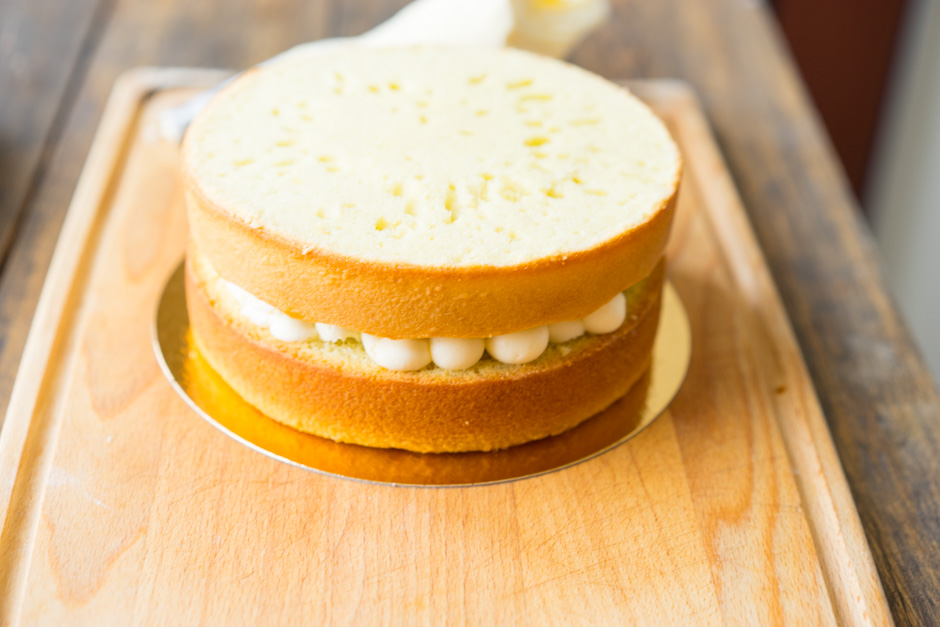
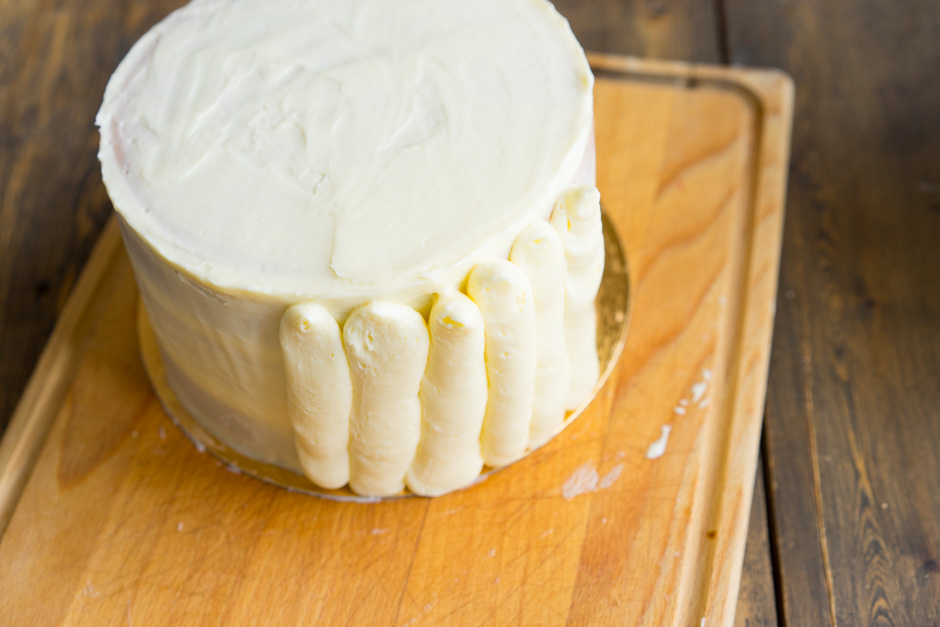
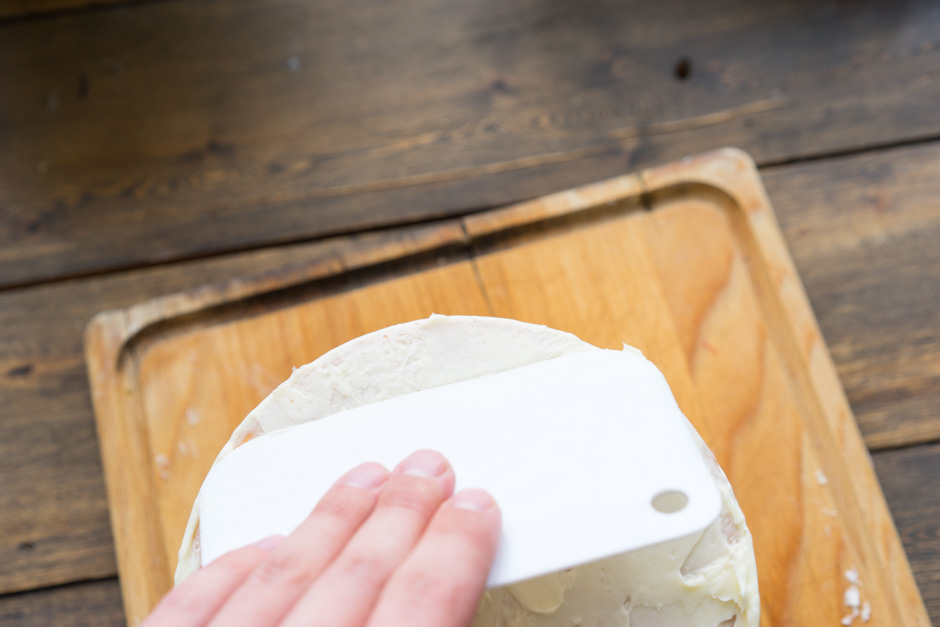
Place a large spatula vertically and line up the cakes with its line. Put in one point, trimmed cakes so that they were exactly. Put the spatula at another point and again leveled. 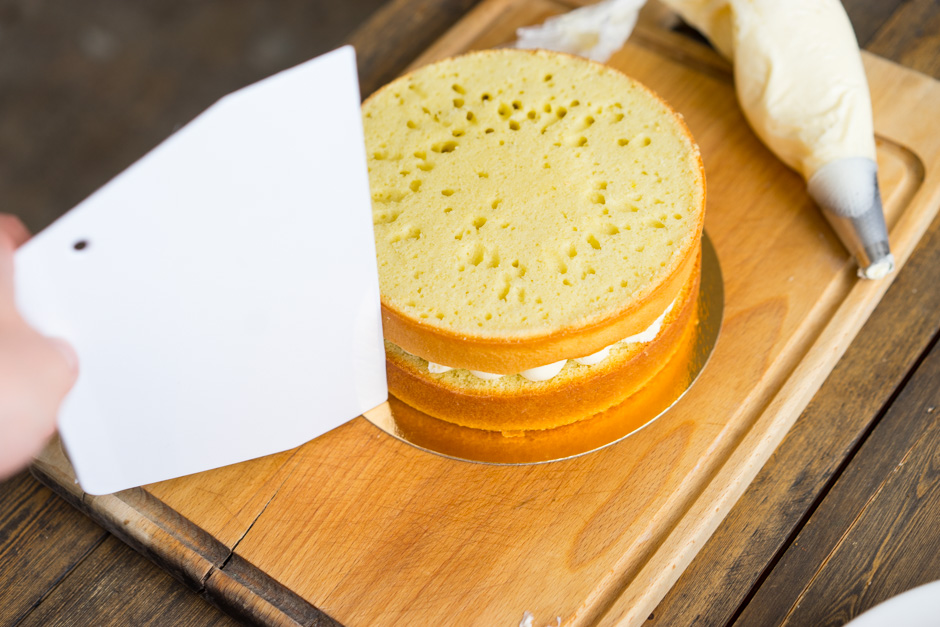
The topmost cake set bottom up. We need the top to be perfectly flat, because this is the clean side. Again, check with a spatula, whether the cakes are exactly. 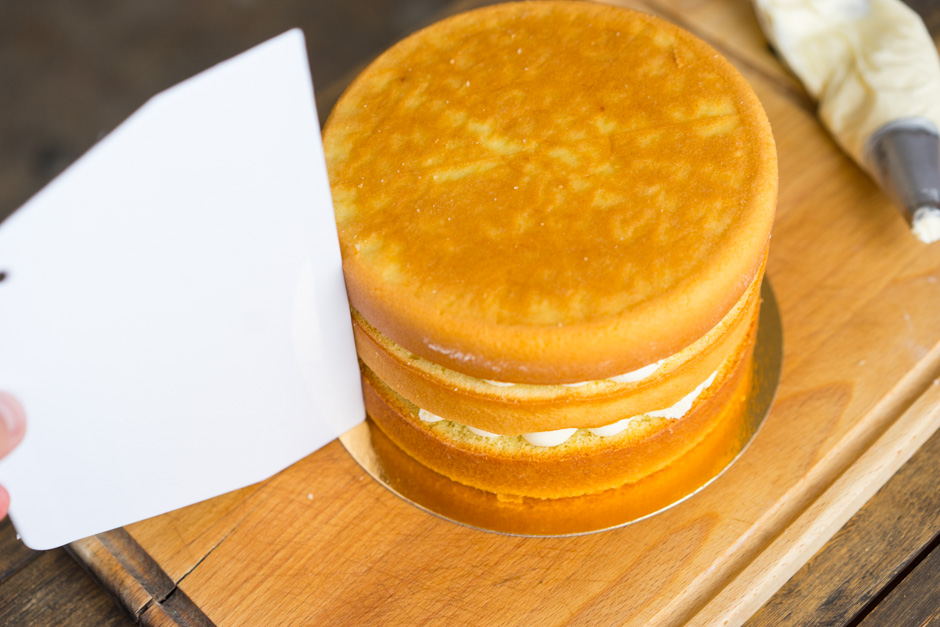
Breadcrumb coating
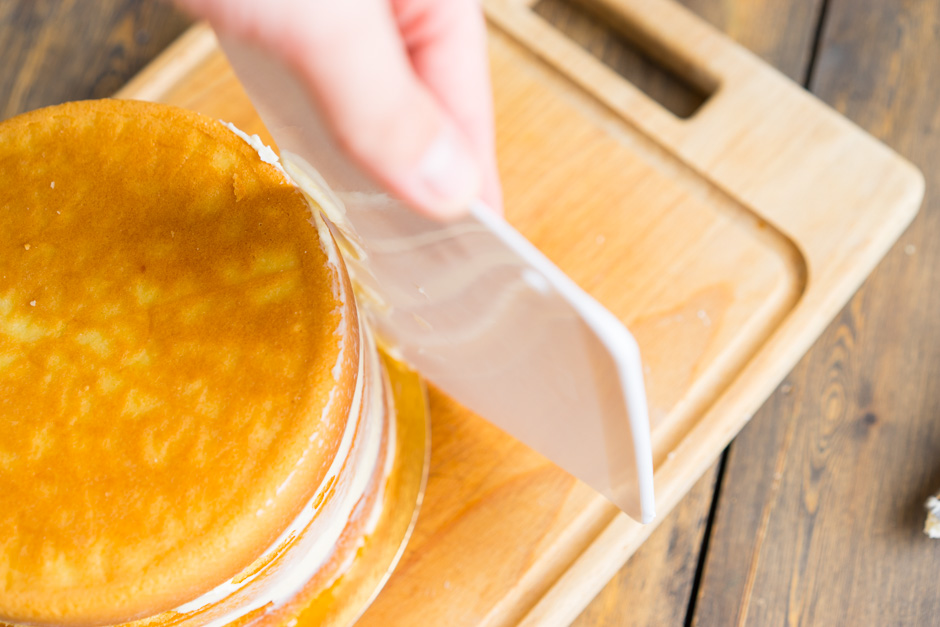
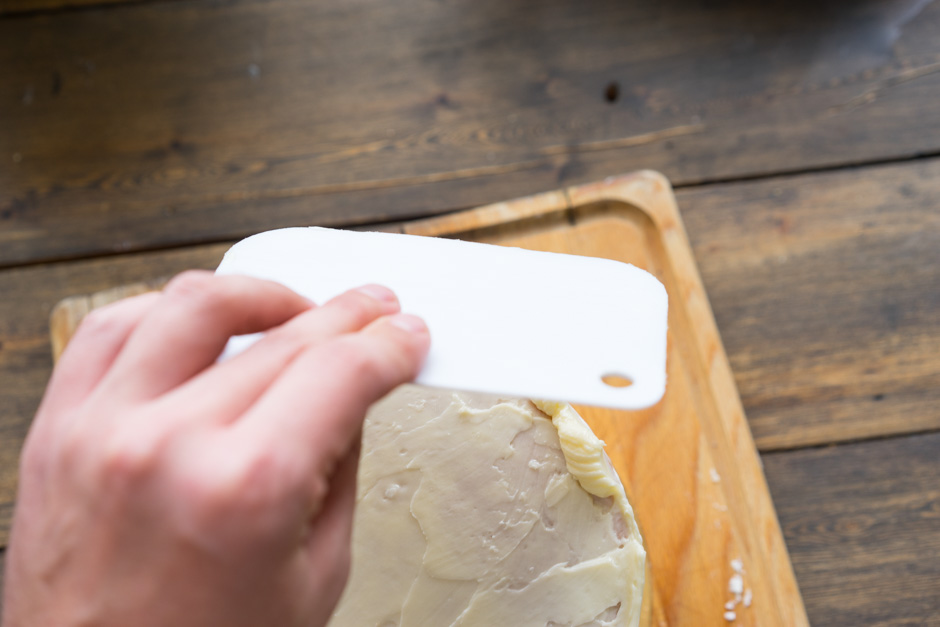
It doesn't matter if you are making a naked cake or will be completely covered with cream. It is necessary to make the first layer. In translation - crumb coating cream. This layer is thin, but it sticks together crumbs and they will not get further into the cream. On a straight spatula, apply a strip of cream equal to the height of the cake. 
You lean it against the cake and coat it with a thin layer of cream. Go with a spatula along the side wall of the cake. We hold the spatula strictly vertically.
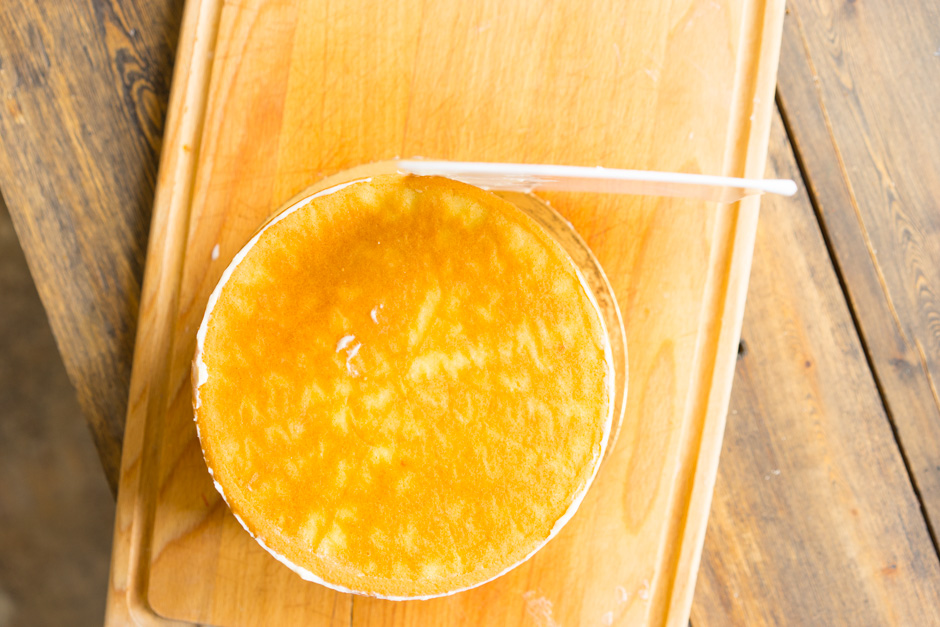
Top also covered with cream. Everything is easier here. Sowed the cream in the center and smear it in a circular motion. 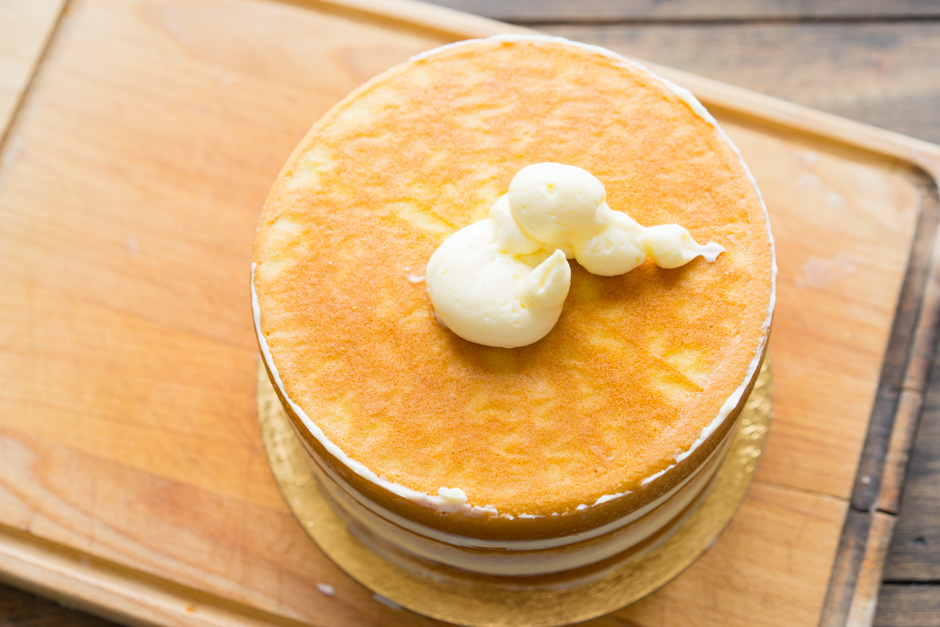
That's how it turns out naked cake. Put it in the fridge for half an hour. The cream should harden if we plan to apply more layers. 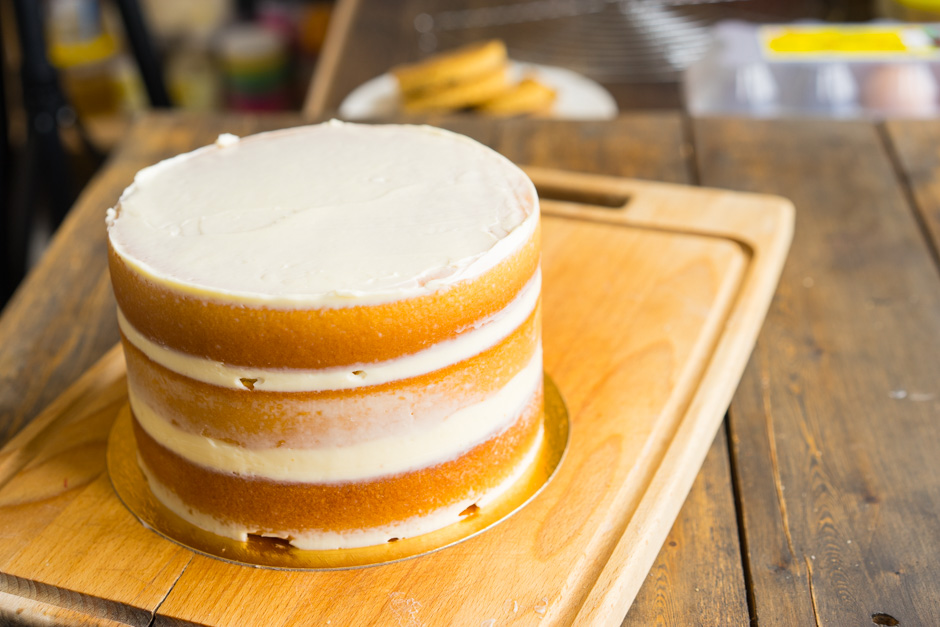
The cream in the bag becomes smaller, to use it as much as possible, each time with a spatula move it to the nozzle. 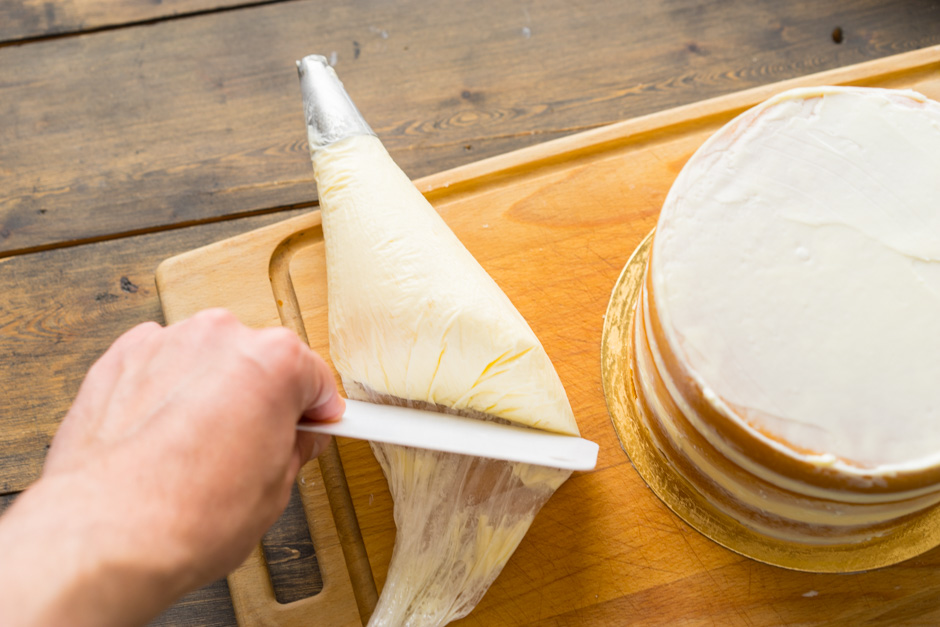
Work with cream
Remember that the cream from the fridge is quite thick, and, standing on the table, it becomes softer. Each state has its pros and cons. The softer one is softer and you need confident movements with a spatula, but a cold cream sometimes crumbles as it were. Monitor the temperature of the cream and, if necessary, refrigerate.
The most convenient and fastest way to cover the cake with cream is to make cream strips from bottom to top using a bag nozzle (or a cut-off spout). 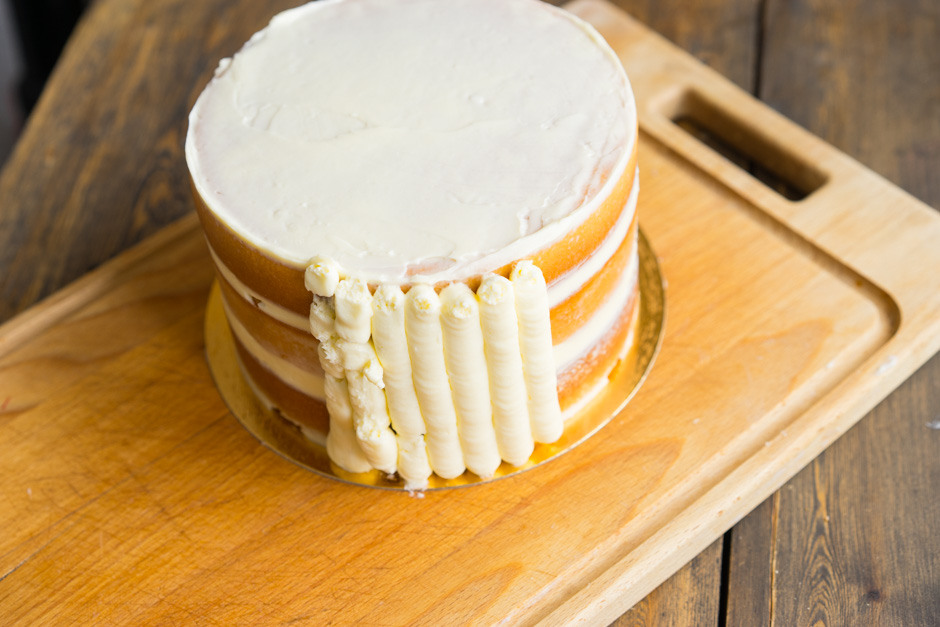
Make such paths around the perimeter. The thickness of the layer will be the same everywhere; after all, we deposited them from one hole. 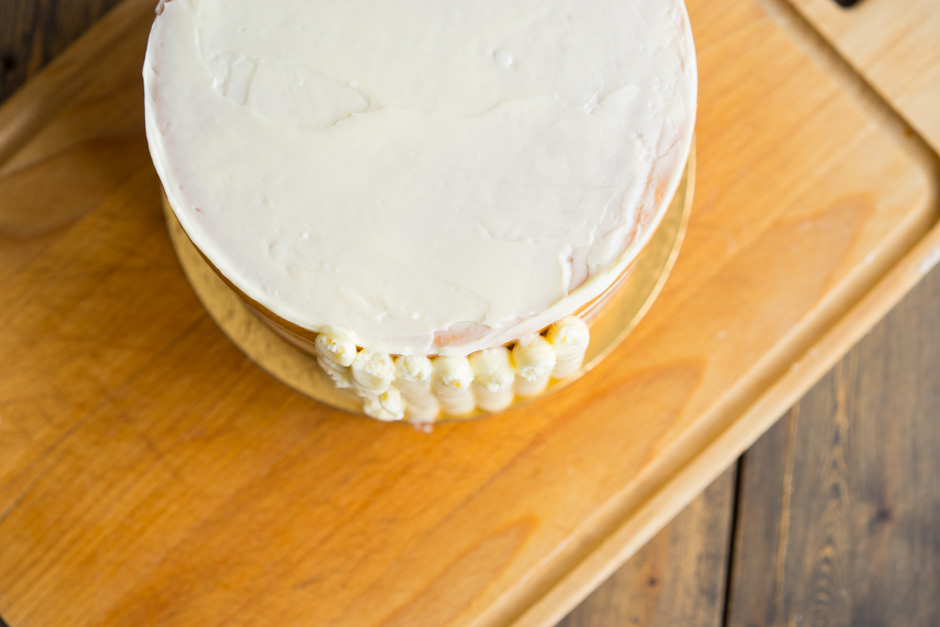
Also, as we did the first layer, we do the second one. Keep the spatula upright, covering the cream in a circle. If you want to make a gradient (ombre), divide the cream into two or three parts, paint each dye. and the tracks are applied not to the entire height of the cake, but to half or third. For example, the bottom is red, and the top is white, in half. 
If it came out well the first time, great. Sometimes a thin layer of cream turns out and the cakes are translucent (right above in the photo above). Then again we remove for half an hour in the refrigerator. And then the third layer. The more layers, the smoother the cake will eventually be. Here, of course, you need to practice. Always remove excess cream on the spatula.
That is, they held a spatula on the side edge of the cake, removed the cream from the spatula (I’ve removed it about the bowl with the cream) and move the spatula on. If suddenly you had a local accident - touched a cream with a spatula or strongly pressed. Do not worry, you can fix it. In the photo the damaged area. 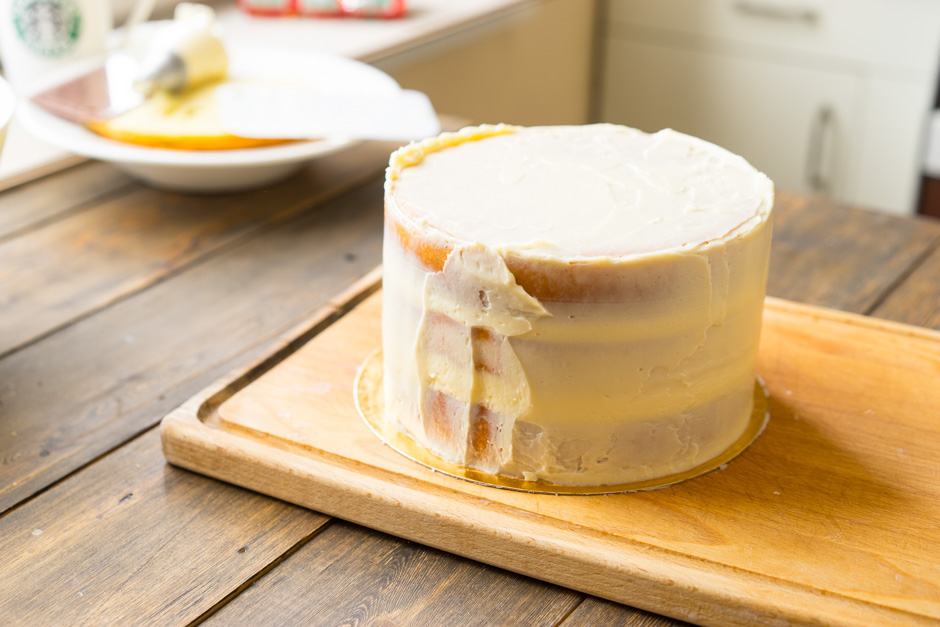
You can make the side of the relief. In this case, apply a cream thicker. And use cloves. 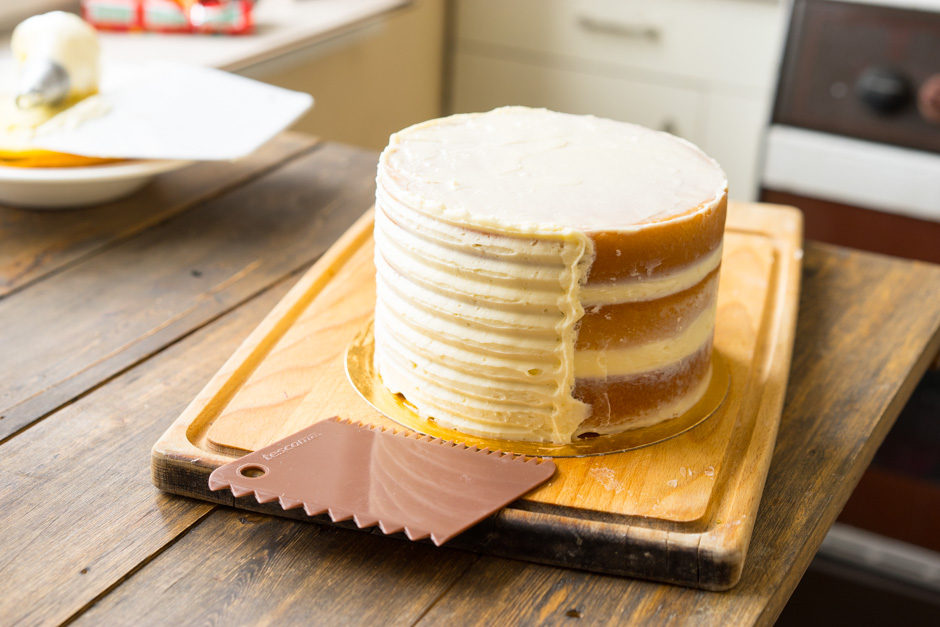
If there is no spatula, it doesn't matter. Take a teaspoon or a thin rounded shovel. Apply more cream. Align it.
Make vertical grooves. Cut the spoons from the bottom up with confident movements, one groove - one movement. 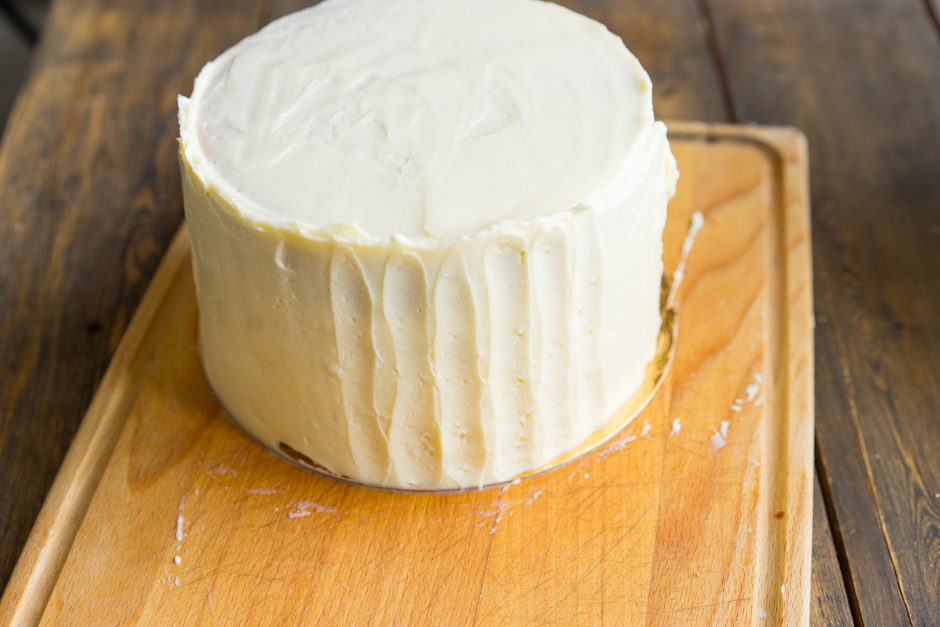
And you want to make vertical. Here the difficulty with the fact that the cake needs to be rotated. In my case, I would have turned the whole board. You see bubbles appeared (small dimples in the grooves)? This cream has already become very soft. A cooler cream would not give such traces. Therefore, it is necessary to freeze it in the refrigerator. 
You can make “feathers” with a rounded trowel. They always look interesting and mask inexperience. As confectioners say, a lazy way to decorate a cake. Here, simply hold the spatula nose upwards along the diagonal. First the bottom row, then the top. 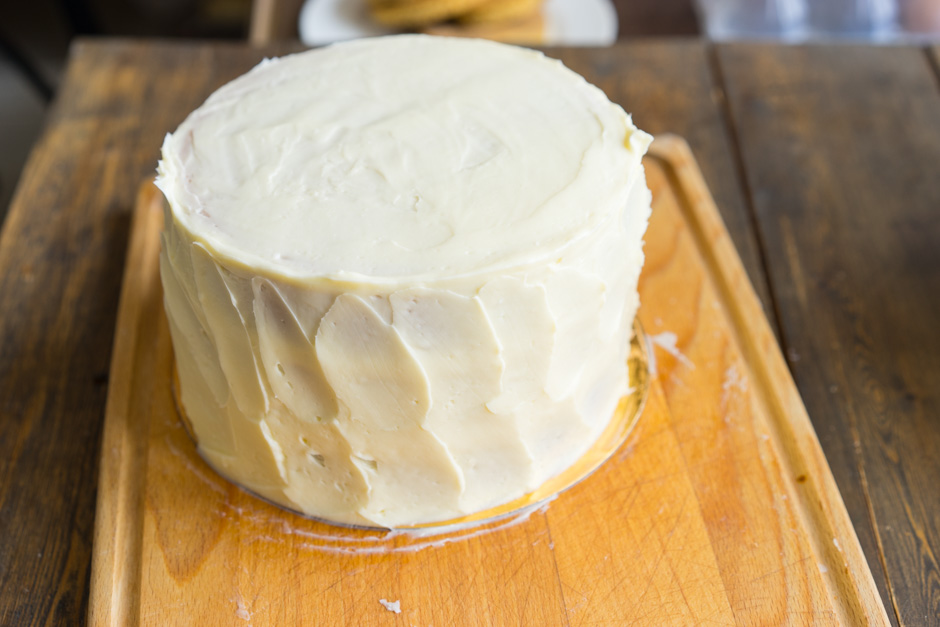
Top of the cake
Place the spatula at an angle to the top and remove this “fence” inside the cake. Make small sections by turning the cake. Thus we have a very smooth angle. And the top itself will also gradually become even.
Decoration
Cake remove again for half an hour in the fridge. And at this time we are preparing the decoration. You can cook caramel. make ganache. Remember that the sauce should not be hot, otherwise it will melt the cream and ruin everything. Allow the mass to cool so that it still flows, but very slowly. And now she can pour the cake on top.

The main advice is to experiment and train. Rarely when the first time you get a great cake. But in two or three you can get a good hand and make really high-quality cakes. In any case, outwardly they will be so beautiful that the guests will not believe when they find out who made it.
Write to me, please, in the comments, what topics were left uncovered for you, what else would you like to read as part of training in working with desserts.
- Eggs - 8 pcs
- Sugar - 220 gr
- Flour - 190 gr
- Nut flour - 50 gr
- Butter - 80 gr
IT IS IMPORTANT TO KNOW! The only way to lose weight, without harm to health ..
Today, housewives are increasingly trying to cook all kinds of sweets at home to get a tasty and safe treat. But the finished cake needs an original and interesting design, for this reason today we will tell you how to make chocolate smudges on the cake using glaze. There are a large number of recipes, which are created exactly the consistency of the glaze, which will beautifully harden on the cake in the form of smudges, below we describe a few simple recipes, as well as tell you how to arrange the cake.
Chocolate glaze recipe with sour cream
This coating will ideally hold on any dessert. Drops of sweet chocolate composition will decorate the sides of the finished cake in the form of smudges, if you apply the dessert correctly and quickly cool the finished decoration. If you need to decorate the dessert in addition, then prunes, walnuts or even homemade truffles will be perfectly combined with chocolate. It is very important to choose the right chocolate, it should not have any additives, and the percentage of cocoa in it should be at least 70%.
Ingredients:
- dark dark chocolate - 165 grams;
- sour cream is not fat - 245 grams;
- granulated sugar - 110 grams.
Cooking:
- To learn how to make chocolate smudges on the cake on the video, you must exactly follow the rules for making this glaze. To begin with, sugar is added to sour cream and slightly beat with a fork so that the crystals dissolve. Next, the composition is sent to the fire, and cook until the sugar dissolves completely.
- The composition is removed from the heat, and then stirred until the sour cream becomes thick again. Meanwhile, in a still hot mass, put chopped chocolate. All re-mixed, and get a very beautiful thick icing. With it, cover the surface of the cake so that the edges remain beautiful smudges of chocolate mixture. After that, the top of the dessert is decorated with berries, fruits, meringues or nuts. Cake is sent to the fridge.
Chocolate Milk Decoration
![]()
If you need to decorate the finished dessert with soft icing that has a delicate brown shade, you should use these recipes. The result is a fairly thick mixture, with which it is easy to correctly decorate the dessert. If it is very necessary to get a richer shade, then some cocoa is added to these ingredients, it will be added to the mass together with granulated sugar. So, if the hostess faced the question of how to make chocolate smudges on the cake according to the video recipe, you should use this icing.
Ingredients:
- milk 3.2% - 55 ml;
- milk chocolate - 105 grams;
- granulated sugar - 65 grams.
Cooking:

- As we can see, not so much is used in this recipe for sugar, the fact is that a bar of milk chocolate already contains a certain amount of sugar. If you add more sweetener, then the mass will come out too sweet.
- For a start, pieces of milk chocolate are heated on a steam bath, milk is poured in there too, and then the saucepan is transferred to ordinary fire. Milk composition is brought to a boil, it is necessary to boil down the mass to the desired thickness, after adding sugar. The finished composition is slightly cooled, and then used to create an unusual design in the form of droplets flowing down the sides of the dessert.
White Chocolate Decoration

It will be very simple to prepare such icing, it does not take much time, but it has certain advantages over the dark chocolate mass. For example, dessert decoration will be performed not in the traditional chocolate shade, but in a more interesting white color. In addition, a little dye can be added to the finished mass to make the color more interesting. Then the glaze may turn violet, blue, red or another desired shade. Apply the composition immediately after cooking, the mass should be warm when it is applied to the cake, otherwise the smudges will not work.
Ingredients:
- sugar powder - 175 grams;
- milk 3.2% - 45 ml;
- white chocolate - 210 grams.
Cooking:
- For housewives who want to learn how to make chocolate smudges on the cake, this recipe is offered. To prepare the mass, you need to take two hundred grams of white chocolate, it should not be additives, it is also better not to use the air product.
- Pieces of chocolate are placed in a bowl, and then put on a steam bath or in the microwave. From the pieces should get a liquid white mass. Meanwhile, powdered sugar is taken, in which cow's milk is added, the composition is well mixed and added to melted chocolate base.
- The glaze is stirred until it reaches a uniform consistency. The result is a fairly thick mass, with which they cover the dessert, on the sides of the glaze they let it drip slightly to get beautiful drops of white chocolate. As an additional decoration, you should use bright berries or inscriptions.
Chocolate Creamy Frosting

The structure of the finished composition is very similar to ganache, for this reason, this mass is considered to be the best for creating smudges on the sides of the cake. Immediately it should be said that for the preparation of the composition, the cream is used only the freshest, and their fat content should be at least 33%.
Ingredients:
- high-quality butter - 40 grams;
- cream fat content of 33% - 3 spoons;
- white chocolate - 110 grams.
Cooking:
- To get started is to take the white chocolate and break into small pieces. If there is no white chocolate at home, then it is replaced with milk or bitter, but then the color of the glaze will be dark. The pieces are melted using a steam bath.
- Add butter to this composition and wait for its dissolution. The last stage to the mixture pour three tablespoons of heavy cream, and mix everything. The finished mass is slightly cooled, and then applied to the cake using a pastry bag.
Above, we have described the simplest and most delicious varieties of glaze, from which it will turn out to make an unusual dessert design with smudges.
Today’s creation of confectionery products using the ombre technique is a transition of color on the surface of a cake or dessert from darker to light. Moreover, the ombre technique can be made not only with a cream, it turns out such a smooth transition on mastic, glaze, with the help of stains. The cake itself can be made absolutely by anyone, but according to tradition biscuit is used, since it is optimal for mastic and oil and other cream decorations. Biscuit layer interlayer cream, you can also choose any.
Cake with ombre effect will decorate absolutely any table. Ombre wedding cake can be made using delicate pastel colors, for example, pink, lilac. At the wedding, it is customary to cook cakes in two tiers, where you can also beat the effect of the transition of shades. Today we will prepare the ombre cake blue, it is best suited for serving to the table for the New Year or Christmas. We will decorate it with smudges on the basis of chocolate ganache, lettering and coconut chips using stencils.
Cooking cake
An ombre style cake is actually made very simply. To decorate it, you need a little patience, but baking and assembling the cake is not difficult.
According to the MK on the dough, you will need:
- 6 medium sized chicken eggs;
- 230 grams of sugar;
- 140 grams of white wheat flour;
- vanilla.
Bunk cakes will require an increase in products 2 or even 3 times. This recipe produces a high dessert with a diameter of 16 cm (or low, but wider). Ombre cakes are best done high, so that the accent is visible - a smooth transition of color.

For the cream, take:
- 250 grams of fresh soft cottage cheese;
- 150 grams of soft butter;
- 1 bag of vanilla sugar;
- 150 grams of powdered sugar.
The surface, before decorating the cake, also needs to be leveled with a cream. For this we will use the following recipe:
- 400 grams of cottage cheese;
- 100 grams of powdered sugar;
- two tablespoons of cocoa powder as desired (for a chocolate-cream filling).
In addition, you need food liquid dyes to create a real Ombre cake - purple, blue, blue, bright red or whatever.
The effect of "ombre" may be different. It can be a transition from light to dark within the same color or a combination of several shades, for example, dark purple, lilac and pink.

We present you a master class on creating beautiful glaze drips. To create smudges based on chocolate ganache with dyes you will need:
- 70 grams of cream with fat content of 33%;
- 90 grams of white chocolate;
- 40 grams of butter for gloss glaze.
In addition, you can simply melt any chocolate without fillers and neatly, with a pastry bag with a narrow nozzle, make beautiful smudges on the cake. Usually they are made only along the contour of the cake, respectively, the center must be filled with something. This can be done with fruits, chocolates, decorate the product or make a decoration of mastic and other materials.
Now we will prepare the cake for the ombre technique:
- Of the products proposed in the recipe, we bake a sponge cake. Do not forget that whites are whipped to a fluffy foam separately, then mixed with the main place. The dough can also be painted with food dyes in bright colors, contrasting or with the same color as your ombre.
- Cool the finished sponge cake and cut into 4 cakes. It is necessary to bake it in high shape or in two steps in the form of standard sizes.
- While the cake is cool, prepare the cream. We will make it out of the curd as follows: butter, soften, chop into cubes and whip with powdered sugar. Add vanilla and soft cottage cheese, beat with a mixer at the highest speed until fluffy.
- Chilled cake layers should be smoked with cottage cheese cream; this is best done in a form where a biscuit is baked, additionally putting a ring of tracing paper inside.
- Put the cake in the fridge for a few hours to freeze, then carefully remove the ring and transfer it to the dish.
It is impossible to keep a biscuit prepared for decoration for a long time in the refrigerator, it is optimal to make it in the evening, so that it can be left to soak overnight. In the morning, it is already possible to start decorating the ombre cake with mastic or smudges.
Design in the ombre technique
Using our recipe, we will make a real New Year's cake today:
- First you need to level the surface with cream cheese. To do this, beat the soft cheese with powdered sugar to a fluffy consistency. If you are going to make chocolate cream, you can add some cocoa powder. We will leave a lot of snow-white color, since it will harmoniously contrast with the blue stains. Now part of the cream must be painted in a bright blue tint. To the height of the cake, lay out the blue and white cream so that the colors blend. Thus, create a transition of shades on the side surfaces of the cake.
- Level the cake with a wide knife at the top and sides. After that, put it in the fridge, and start making ganache for smudges yourself.
- Pour the cream in a saucepan, heat, but do not let boil. Break the white chocolate into pieces, add it to the cream, stir it so that the pieces are completely dissolved. Turn off the heat and put the butter, stir it to go.
- Now wait until the mixture is only slightly suspended, but does not harden. Put it in a pastry bag, put on a narrow non-relief nozzle. Carefully, on the edge of the cake, start squeezing the ganache so that it flows down with beautiful smudges of different lengths. Walk through the entire diameter of the product.
- Remains ganache can make the inscription "Happy New Year" or "Merry Christmas". At the wedding cake fit inscription, where there will be congratulations to the newlyweds.
- Put the cake in the fridge so that the setting is completely hardened.
- Before serving, decorate the product with thematic New Year's drawings. For this you need to use special stencils. You can make them yourself, print and cut on paper, or you can take ready-made forms.
- If you used a recipe with chocolate cream, the dressing can be made with powdered sugar. Our cream is snow-white, so we can use blue coconut chips or confectionery dressing. Gently attach the stencil, fill the free hole, remove the excess and serve your masterpiece to the table.
If you tighten the cake "Ombre" mastic, the procedure is similar. You will need to paint a few pieces of mastic in different shades, put them together and roll them into a layer, which is then covered with a cake with the ombre effect. On mastic, you can also make chocolate smudges or use butter or butter cream, white or colored, for decoration.

Photo gallery of examples of design
Christmas cake "Chocolate log"
How to decorate the cake with sour cream?
Master Class | Cake "One"
MK Cake "Ladybug"
The inscription on the cake | Video
 Cake "Honey" in a slow cooker
 Children's cake "Rainbow"
Hello. Today will be the most burning topic - how to make beautiful smudges on the cake of chocolate. This is the most popular request in my direct, to everyone who was waiting - catch the article.
Chocolate smudges ... This is perhaps the most common mistake for newbies (unfortunately, not only beginners suffer from this, I often meet jobs and more experienced colleagues with ugly streaks). How to find that side so that the smudges do not run down in pools on the substrate and at the same time do not lie in thick waves at the top? Today I will reveal the secret of my chocolate streaks.
I will describe not so much a recipe as the technology itself. Here it is important to understand the very essence of the process in which the drip will sexually drain on the cake, reaching its middle.
Recipes on the Internet, how to make chocolate smudges to decorate the cake, a lot. And you will be surprised, but almost all of them are workers!
At one time I tried ganache for smudges on both butter and cream with butter. And today I will tell you the most elementary recipe of chocolate drips with cream, but not with fat 33%, but with the usual 10%. Yes Yes! Even with such cream streaks can be made beautiful. There are a lot of myths that chocolate will roll in such cream. No no and one more time no! The fatness of the cream is nothing to do with, the smudges can be made with melted milk of 4%. This is a matter of practice.
Today I will be cooking drips on a cake of dark chocolate, but, as you understand, black, milk, and even white chocolate can be used as well. Proportions, accordingly, will differ slightly. With each chocolate, the gram will be yours! I never weigh, I measure everything by sight.
In this article I will teach you to understand what needs to be done in different situations. And in the future you will be experimenting yourself and everyone will find for themselves the most comfortable proportion for themselves.
So, how to make cakes for sponge cake made from chocolate and cream 10% at home recipe with photos step by step.
Ingredients:
- dark chocolate - 50 grams
- cream 10% - 40 grams
Cooking:
To begin, I will write about the training. The cake should be as cold as possible, which means that it should stand in the refrigerator for at least 1-2 hours, and better all 4. If you have recently covered it with a finishing layer of cream, you can send the cake to the freezer for 30 minutes, to speed up the process. It is because of the difference in temperature that a cold cake is a warm chocolate ganache, and good smudges are obtained.
What cream can make chocolate smudges? Yes, almost any! For us, the main condition is an even and cooled coating. I make smudges on such creams as -, ganache, swiss butter meringue (all creams are available under the links). Drip on these creams without any problems. Even on a mousse cake, you can make smudges, as in my version with
Before you start preparing ganache, take a clean glass cup and put it in the fridge to cool, then you will understand why we need it.

Getting to the preparation of chocolate coating for the cake.
Chocolate break into pieces and fill with cream (cream from my refrigerator, the temperature is not critical).

Send our bowl in the microwave for 30 seconds. We do not have to wait for all the chocolate to melt! So it can be overheated. Chocolate should slowly disperse from the warmth of the cream.
So, we have 30 seconds. We reach and mix. At first, our mass will clump, confidently interfere.

Slowly the chocolate will disperse in the cream.

If there are pieces of not melted chocolate, then send the bowl in the microwave for 10 seconds, no more! You can only warm for the first time for a long time, then we heat only impulsively for 10−15 seconds, otherwise the chocolate will roll.
So warmed up. We get and again thoroughly knead. It should be an emulsion without lumps and bubbles! Ganache should drain tape from a spoon, if it barely drips from a spoon, then the mass is too thick, you need to add more cream, literally half a teaspoon, do not add a lot at once. We mix everything up and wait for the moment until the ganache drains from the spoon.
Runs off? Fine. We take a glass out of the fridge and check our streaks on it.

If the smudge reaches the bottom of the glass - it means the mass is liquid, you need to add more chocolate. Just a slice, added - mixed. If you need to warm up in the microwave for 10 seconds.
We try again. Sprout stopped in the middle of the glass? Fine.

We get the cake. We choose the most ugly side (of course we must try to make the cakes perfectly smooth, but anything can happen). In this cake, the top coating ganache, I experimented with a new recipe, and as you can see the experiment is not yet successful. We let the first drip, for this I choose a small spoon, you can let smudges from a disposable bag. But this is more convenient for me. Sack difficult to control the length of the leak, a spoon can also be added drop by drop exactly where you want.

We let our smudge and look. So, if the smudge reaches the substrate, it means either the temperature of the ganache itself is high (we try, the hand temperature should not be hot) 27–30 degrees, or the ganache is liquid, then add some chocolate again. Melted, mixed.

We try again.

Drip froze almost at the top? So thick icing - add a drop of cream, knead.

Let it flow again. Reached the middle? Fine! Feel free to pour the entire cake. In the picture, I specifically gave an example of 3 streaks. The first one is too long - ganache is liquid, the second one is too "fat" smudges from thick ganache, and the third one is normal.

I first make smudges, go over the edge of the cake with a spoon, and then pour the top if it requires it.

If the glaze thickens as you start leaking, set the bowl to warm up in the microwave for literally 5-10 seconds and continue.
How to smoothly fill the top of the cake with chocolate icing? Very simple. Pour the glaze into the center, take the spatula, warm it under hot water, wipe it off with water and level the surface while turning the turntable (at the moment, I work in the field and there is no table at hand, because of this, my cake is not exactly covered with cream)

That's all! The surface of the cake is completely ready to decorate.

On top of the cake you can decorate everything you want. From banal candies to mastic figures, because as you know, mastic does not flow on chocolate.

Perfect chocolate smudges on the cake are ready.

I hope now you will have a clear understanding of the process. The streaks are not difficult at all! With experience, you will measure everything by eye. Literally one trial lesson and chocolate smudges will submit to you.
What I want to add, it is not necessary to make a chaff from the streaks, it looks beautiful when the streaks of different length: one is slightly shorter, the other is slightly longer. Their length can be adjusted with a spoon, blowing somewhere a little more chocolate, somewhere on the contrary is smaller. Well, in my opinion, one or two smudges of chocolate flowing down to the substrate is still permissible, but when half flows in pools, it does not look very aesthetic.
I will post the recipe of the cake the other day - do not miss it.

Enjoy your appetite.
It is always a godsend for lazy hostesses who wish to surprise the guests, and do not want to spend much time on cooking. There are a lot of options for making cakes, as much, perhaps, as there are fillings for them. But today we will prepare a biscuit which will surely enjoy a busy lady, saving time.
Ingredients for making biscuit cakes
- 180 grams of wheat flour.
- Six eggs.
- 150 grams of granulated sugar.
- A tablespoon of cocoa powder.
Ingredients for making cream
- Butter - 200 grams.
- One egg.
- Two tablespoons of cocoa powder.
- 100 grams of condensed milk.
Bake the cake biscuit bases
The preparation of any dessert, be it a multi-layered cake with or small cream cakes, begins with baking the base. There are several cooking options. Today we have chosen the easiest and fastest for you. As promised, you will not spend a lot of time on cooking. 
So, we take eggs and break them into two different dishes so that there are proteins in one plate and yolks in the other. Add a little sugar to the yolks and start to beat them until the sugar disappears completely and is no longer felt when the dough is rubbed between fingers. Now experts recommend replacing the whisk on the mixer. If you do not have a spare corolla, then just thoroughly wash and dry the one that was used to beat the yolks. Remember that not a drop of yolks should not be on a plate with proteins.
Now move on to whipping the contents of the second bowl. Squirrels must be whipped in such a way that they become a rather thick foamy mass. We pour out the rest of the sugar in proteins and continue to beat until it disappears completely.
Sift flour. Now we need to combine the contents of three plates: flour, proteins, yolks. It is better to use a special plastic spatula for this purpose. Carefully add the yolks to the flour, then the protein mass. Now we make the dough chocolate by adding cocoa powder.
How to understand that the dough, from which you are going to make a cake with chocolate icing, is ready? Experienced housewives, of course, determine "by eye". But if you do not have enough experience in the preparation of biscuit dough, then just look carefully at the contents of the plate. It should not be similar to the pastry dough we are used to, but to a tender, airy soufflé. If it is, you can safely bake. 
Next comes the standard procedure. Exhibit 200 degrees in the oven. While it is heated, grease the cake mold with vegetable or butter, pour out the dough and set the mold in the preheated oven. Biscuit is baked for about half an hour. Everything will depend on the height of the form, the amount of dough in it and your oven.
Making cream
As you know, the better cake, which is more original filling. A “delicious” sponge cake recipe cannot do without a “delicious” cream recipe. So, for the preparation of the cream you will need in a separate bowl to mix the yolk of one egg and condensed milk. You can add a couple of tablespoons of water to make the mixture slightly thinner. Now set the dishes in the water bath and begin to evaporate, boil the cream to a thick state.
As soon as the mixture becomes thick, remove from heat and let cool. Now go to work with butter. It is recommended to get it beforehand from the refrigerator so that it becomes soft and pliable. Mix melted soft butter with two spoons of cocoa powder and cooled egg mixture.
The resulting cream and will lubricate the layers. It is better to cut it into two parts. Thin cakes are better impregnated with cream and get more fragrant and tasty.
Cooking icing for the cake
A “delicious” sponge cake recipe is not complete without the secrets of making the right chocolate icing. There are several cooking options: icing from cocoa powder and flour, from cocoa and sour cream, from chocolate and butter. We will share with you a couple of recipes, and choose you. 
Cocoa and Flour Frosting
To be good freezing, it is necessary to comply with the exact recipe of preparation. Take the following ingredients:
- One tablespoon sifted flour.
- Five tablespoons of milk.
- One and a half tablespoons of cocoa powder.
- 50 grams of butter.
- Some vanilla or vanilla sugar.
Due to the fact that there is flour in the recipe, you can always determine for yourself what density will be. We put the dishes in the water bath and add alternately to it: milk, sugar, cocoa and flour. Stir constantly, otherwise the mass may burn. Bring mass to a boil. As soon as it starts to thicken, you can remove it from the stove and cool it a little. We add vanillin and butter to warm glaze. 
Liquid frosting
Some hostesses prepare two types of glaze at once. One is the one that will sit tight on top of the cake and freeze quickly. The other is the one that will flow beautifully from the top and spread out with openwork lines on the sides.
This recipe will be just such a liquid glaze for smudges. To prepare you will need to take 50 grams of butter and melt it over low heat. Then add four tablespoons of sugar to the butter, and five tablespoons of warm milk. Stir sugar, bring to the moment when it is completely dissolved in milk.
Now you can add the main chocolate ingredient - cocoa. His in this case will need two tablespoons. Experienced housewives advise to sift it before adding the cocoa powder. Thus, you can avoid the appearance of unwanted lumps.
The glaze prepared in this way will not harden as much as in the first case, but it will differ in incredible brilliance. It will easily drain from the cake and forms a nice brown hem.
How to water the cake with icing
So, you decided to make a delicious chocolate iced cake. Recipes biscuit base and the glaze itself, we have provided. Products are accessible to everyone and do not differ in high cost, and the course of operations is quite simple. 
To glaze evenly distributed over the surface of the dessert should be resorted to a little trick. Place the cake on a small rack. Under it you can substitute a plate, so that excess glaze is not in vain. Water the cake without mixing it, while smoothing the surface with a confectionary spatula. Let the first layer of glaze froze a little.
Now we take a darker glaze (second recipe) and gently start using a large spoon to water. If you want to make a cake with chocolate icing in the form of monograms and patterns, then put the icing in the pastry syringe. With it, you can display any pictures.